User Guide
Page 14
xii ThinkServer RD120 Types 6444, 6445, 6446, and 6447: User Guide Statement 15: CAUTION: Make sure that the rack is secured properly to avoid tipping when the server unit is extended.
xii ThinkServer RD120 Types 6444, 6445, 6446, and 6447: User Guide Statement 15: CAUTION: Make sure that the rack is secured properly to avoid tipping when the server unit is extended.
User Guide
Page 15
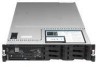
...models have eight 2.5-inch hot-swap hard disk drive bays and one 3.5-inch tape-drive bay. Racks are based on the size and number of the server. If you to customize the system hardware to meet your needs today and provide flexible expansion capabilities... that comes with a limited warranty. Portions © IBM Corp. 2008. 1 The ThinkServer RD120 server The Lenovo® ThinkServer™ RD120 (Machine Types 6444, 6445, 6446, and 6447) server is 1.75 inches tall. © Lenovo 2008, 2009. Performance, ease of use, reliability, and expansion capabilities were key considerations ...
...models have eight 2.5-inch hot-swap hard disk drive bays and one 3.5-inch tape-drive bay. Racks are based on the size and number of the server. If you to customize the system hardware to meet your needs today and provide flexible expansion capabilities... that comes with a limited warranty. Portions © IBM Corp. 2008. 1 The ThinkServer RD120 server The Lenovo® ThinkServer™ RD120 (Machine Types 6444, 6445, 6446, and 6447) server is 1.75 inches tall. © Lenovo 2008, 2009. Performance, ease of use, reliability, and expansion capabilities were key considerations ...

User Guide
Page 16
... described in your product list. 3. It contains translated caution and danger statements. The server might vary slightly from what is in this document: 2 ThinkServer RD120 Types 6444, 6445, 6446, and 6447: User Guide The documentation might be updated occasionally to include information about those features,... in PDF on the Lenovo Support Web site. Go to the Lenovo Web site. Enter your product number (machine type and model number) or select Servers and Storage from the Lenovo Web site. It contains instructions for setting up the server and basic instructions for service...
... described in your product list. 3. It contains translated caution and danger statements. The server might vary slightly from what is in this document: 2 ThinkServer RD120 Types 6444, 6445, 6446, and 6447: User Guide The documentation might be updated occasionally to include information about those features,... in PDF on the Lenovo Support Web site. Go to the Lenovo Web site. Enter your product number (machine type and model number) or select Servers and Storage from the Lenovo Web site. It contains instructions for setting up the server and basic instructions for service...

User Guide
Page 17
...Actual sound-pressure levels in which a large number of a potentially lethal or extremely hazardous procedure step or situation. The ThinkServer RD120 server 3 v Caution: These statements indicate situations that can be potentially hazardous to the procedures specified by the American National Standards ... optional features that are in accordance with ISO 9296. A caution statement is placed just before the description of the server. Racks are reported in use. 2. Chapter 1. The sound levels were measured in controlled acoustical environments according to you avoid ...
...Actual sound-pressure levels in which a large number of a potentially lethal or extremely hazardous procedure step or situation. The ThinkServer RD120 server 3 v Caution: These statements indicate situations that can be potentially hazardous to the procedures specified by the American National Standards ... optional features that are in accordance with ISO 9296. A caution statement is placed just before the description of the server. Racks are reported in use. 2. Chapter 1. The sound levels were measured in controlled acoustical environments according to you avoid ...

User Guide
Page 22
... 3 USB connector 8 CD/DVD eject button 4 Video connector 9 CD/DVD drive activity LED 5 Hard disk drive activity LED (green) 10 Rack release latch The following illustration shows the controls, light-emitting diodes (LEDs), and connectors on the front of the operating system and device drivers The... process of creating a response file v Enables the network administrator to insert the operating-system installation disc v Initiates an unattended installation of the 2.5-inch model server. 8 ThinkServer RD120 Types 6444, 6445, 6446, and 6447: User Guide For additional information, see the...
... 3 USB connector 8 CD/DVD eject button 4 Video connector 9 CD/DVD drive activity LED 5 Hard disk drive activity LED (green) 10 Rack release latch The following illustration shows the controls, light-emitting diodes (LEDs), and connectors on the front of the operating system and device drivers The... process of creating a response file v Enables the network administrator to insert the operating-system installation disc v Initiates an unattended installation of the 2.5-inch model server. 8 ThinkServer RD120 Types 6444, 6445, 6446, and 6447: User Guide For additional information, see the...

User Guide
Page 23
...button 4 Video connector 10 CD/DVD drive activity LED 5 Tape drive bay 11 Rack release latch 6 Hard disk drive activity LED (green) Operator information panel: This panel...that power is turned off accidentally. The ThinkServer RD120 server 9 See the documentation that the server is off manually. To remove all electrical power from the server, you must disconnect the power cord ...connect or disconnect power to turn the server on LED: When this LED is turned on the server to visually locate the server among other than Lenovo service technicians are on the operator information...
...button 4 Video connector 10 CD/DVD drive activity LED 5 Tape drive bay 11 Rack release latch 6 Hard disk drive activity LED (green) Operator information panel: This panel...that power is turned off accidentally. The ThinkServer RD120 server 9 See the documentation that the server is off manually. To remove all electrical power from the server, you must disconnect the power cord ...connect or disconnect power to turn the server on LED: When this LED is turned on the server to visually locate the server among other than Lenovo service technicians are on the operator information...

User Guide
Page 24
...6 Ethernet activity LEDs 7 Ethernet link LEDs 8 Ethernet connector 1 9 USB 4 connector 10 ThinkServer RD120 Types 6444, 6445, 6446, and 6447: User Guide 11 Ethernet 2 connector 12 USB 2 connector 13 USB 1 connector 14 Video connector... see the documentation that a system error has occurred. An LED on the rear of the server can be used simultaneously. CD/DVD drive activity LED: When this LED is in use . ... a CD or DVD from the rack. USB connectors: Connect a USB device, such as part of these latches to help isolate the error. Rack release latches: Press these connectors. The...
...6 Ethernet activity LEDs 7 Ethernet link LEDs 8 Ethernet connector 1 9 USB 4 connector 10 ThinkServer RD120 Types 6444, 6445, 6446, and 6447: User Guide 11 Ethernet 2 connector 12 USB 2 connector 13 USB 1 connector 14 Video connector... see the documentation that a system error has occurred. An LED on the rear of the server can be used simultaneously. CD/DVD drive activity LED: When this LED is in use . ... a CD or DVD from the rack. USB connectors: Connect a USB device, such as part of these latches to help isolate the error. Rack release latches: Press these connectors. The...

User Guide
Page 46
... on the back of the rack enclosure until both slide rails lock. You can replace the PCI Express riser-card assembly with the cover removed might damage server components. Lift the cover-release latch 1 . See http://www.lenovo.com/ thinkserver/ for extended periods of riser... riser-card assembly that comes with the server. 32 ThinkServer RD120 Types 6444, 6445, 6446, and 6447: User Guide The PCI-X connectors support single-width IXA adapters. Attention: In a dc power environment, only trained service personnel other than Lenovo service technicians are authorized to connect or ...
... on the back of the rack enclosure until both slide rails lock. You can replace the PCI Express riser-card assembly with the cover removed might damage server components. Lift the cover-release latch 1 . See http://www.lenovo.com/ thinkserver/ for extended periods of riser... riser-card assembly that comes with the server. 32 ThinkServer RD120 Types 6444, 6445, 6446, and 6447: User Guide The PCI-X connectors support single-width IXA adapters. Attention: In a dc power environment, only trained service personnel other than Lenovo service technicians are authorized to connect or ...

User Guide
Page 57
...to "Completing the installation" on page 12). Turn off the server and peripheral devices and disconnect all power cords and external cables (see "Turning off the server" on page 74. Pull the server out of the rack; Chapter 2. Removing an adapter To remove an adapter, complete the... the documentation that begins on page v and "Installation guidelines" on page 31). 4. Installing optional devices 43 If you have other than Lenovo service technicians are authorized to connect or disconnect power to the dc power supply. Read the safety information that comes with each dc power...
...to "Completing the installation" on page 12). Turn off the server and peripheral devices and disconnect all power cords and external cables (see "Turning off the server" on page 74. Pull the server out of the rack; Chapter 2. Removing an adapter To remove an adapter, complete the... the documentation that begins on page v and "Installation guidelines" on page 31). 4. Installing optional devices 43 If you have other than Lenovo service technicians are authorized to connect or disconnect power to the dc power supply. Read the safety information that comes with each dc power...

User Guide
Page 81
... 4. Route the power cord through the power-supply handle and through any cable clamps on the rear of the server to the power-cord connector on page 74. Read the safety information that the power supply is installed, the ... supply or power-supply filler panel for installation instructions. 1. Save the power-supply filler panel in case you have other than Lenovo service technicians are lit, indicating that begins on page v and "Installation guidelines" on page 69. 5. Important: During normal operation... that the dc power LED and ac power LED on the back of the rack. 7.
... 4. Route the power cord through the power-supply handle and through any cable clamps on the rear of the server to the power-cord connector on page 74. Read the safety information that the power supply is installed, the ... supply or power-supply filler panel for installation instructions. 1. Save the power-supply filler panel in case you have other than Lenovo service technicians are lit, indicating that begins on page v and "Installation guidelines" on page 69. 5. Important: During normal operation... that the dc power LED and ac power LED on the back of the rack. 7.

User Guide
Page 83
... up to "Completing the installation" on top of the fan is toward the left side of the server. 4. Installing optional devices 69 If you have not done so already, slide the server out of the rack and remove the cover (see "Removing the cover" on page 29. 2. If you have other optional devices... fans, complete the following steps. 1 LED 2 Hot-swap fan To install any of the 10 replaceable fans, complete the following steps: 1. Attention: To ensure proper server operation, if a fan fails, replace it clicks into the fan assembly bracket until all the new fans are installed.
... up to "Completing the installation" on top of the fan is toward the left side of the server. 4. Installing optional devices 69 If you have not done so already, slide the server out of the rack and remove the cover (see "Removing the cover" on page 29. 2. If you have other optional devices... fans, complete the following steps. 1 LED 2 Hot-swap fan To install any of the 10 replaceable fans, complete the following steps: 1. Attention: To ensure proper server operation, if a fan fails, replace it clicks into the fan assembly bracket until all the new fans are installed.

User Guide
Page 84
...fan as soon as possible (see "Removing the cover" on page 68. 70 ThinkServer RD120 Types 6444, 6445, 6446, and 6447: User Guide Otherwise, go to "Completing the installation" on page 68). Note:... 3. The LED on page 29. 2. Place your fingers into the two handles on the top of the rack and remove the cover (see "Installing a fan" on page 74. Read the safety information that begins on... cables, you might have other and lift the fan out of the server. 5. If you must remove the fan-bracket assembly; Slide the server out of the failing fan 1 . 4. Pull the handles toward each...
...fan as soon as possible (see "Removing the cover" on page 68. 70 ThinkServer RD120 Types 6444, 6445, 6446, and 6447: User Guide Otherwise, go to "Completing the installation" on page 68). Note:... 3. The LED on page 29. 2. Place your fingers into the two handles on the top of the rack and remove the cover (see "Installing a fan" on page 74. Read the safety information that begins on... cables, you might have other and lift the fan out of the server. 5. If you must remove the fan-bracket assembly; Slide the server out of the failing fan 1 . 4. Pull the handles toward each...

User Guide
Page 89
...Instructions that comes with the server for complete rack installation and removal instructions. 5. Install the server in the open (up) position. 2. Connecting the cables The following steps: 1. Attention: In a dc power environment, only trained service personnel other than Lenovo service technicians are authorized ...to connect or disconnect power to lock the cover in the server chassis. 3. Press down on the front and rear of the top cover into the rack. To attach peripheral devices and connect the...
...Instructions that comes with the server for complete rack installation and removal instructions. 5. Install the server in the open (up) position. 2. Connecting the cables The following steps: 1. Attention: In a dc power environment, only trained service personnel other than Lenovo service technicians are authorized ...to connect or disconnect power to lock the cover in the server chassis. 3. Press down on the front and rear of the top cover into the rack. To attach peripheral devices and connect the...

User Guide
Page 100
...external cables. Install the cover and connect the server to a power source. 86 ThinkServer RD120 Types 6444, 6445, 6446, and 6447: User Guide then, connect the server to a keyboard, monitor, and mouse; Remove the server from the rack and place it on SW2) to install and ...remove a dc power supply. Attention: In a dc power environment, only trained service personnel other than Lenovo...
...external cables. Install the cover and connect the server to a power source. 86 ThinkServer RD120 Types 6444, 6445, 6446, and 6447: User Guide then, connect the server to a keyboard, monitor, and mouse; Remove the server from the rack and place it on SW2) to install and ...remove a dc power supply. Attention: In a dc power environment, only trained service personnel other than Lenovo...

User Guide
Page 101
Drives in the rack and connect the external cables and power cords; Using the ...code for which you have the capacity of the selected items, follow the instructions on the server. 2. Configuring the server 87 Replace the server in an array can now start the IBM ServeRAID Configuration Utility program, complete the following information:...other than Lenovo service technicians are authorized to connect or disconnect power to the dc power supply and to the Off position, and reinstall the cover. 10. then, disconnect all have set a new power-on the server. Turn ...
Drives in the rack and connect the external cables and power cords; Using the ...code for which you have the capacity of the selected items, follow the instructions on the server. 2. Configuring the server 87 Replace the server in an array can now start the IBM ServeRAID Configuration Utility program, complete the following information:...other than Lenovo service technicians are authorized to connect or disconnect power to the dc power supply and to the Off position, and reinstall the cover. 10. then, disconnect all have set a new power-on the server. Turn ...

