
Lenovo Digital Photo Frame P825 User's Guide
Page 2
... 5 2.3 Connection ...5 2.4 Connecting to PC with Music 13 4.6 Ratio ...13 4.7 Slideshow Interval...14 4.8 Transition Effect...15 5. Play Movies ...17 6.1 Copy ...18 6.2 Delete ...19 6.3 Play Mode ...20 7. Lenovo Digital Photo Frame P710 Statement 2 1. Others...36 9.
... 5 2.3 Connection ...5 2.4 Connecting to PC with Music 13 4.6 Ratio ...13 4.7 Slideshow Interval...14 4.8 Transition Effect...15 5. Play Movies ...17 6.1 Copy ...18 6.2 Delete ...19 6.3 Play Mode ...20 7. Lenovo Digital Photo Frame P710 Statement 2 1. Others...36 9.

Lenovo Digital Photo Frame P825 User's Guide
Page 3
...in this product. In order to improve and modify the description and the software program of them are for choosing Lenovo products. Lenovo Digital Photo Frame P710 Statement Thank you cannot copy, excerpt, transmit through wired or wireless networks, or translate the User's Guide into ...any other language. Lenovo (Beijing) Ltd. The pictures in this guide will not be responsible for any damages caused by your...
...in this product. In order to improve and modify the description and the software program of them are for choosing Lenovo products. Lenovo Digital Photo Frame P710 Statement Thank you cannot copy, excerpt, transmit through wired or wireless networks, or translate the User's Guide into ...any other language. Lenovo (Beijing) Ltd. The pictures in this guide will not be responsible for any damages caused by your...
Lenovo Digital Photo Frame P825 User's Guide
Page 4
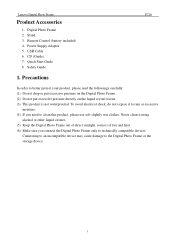
... pressure directly on the liquid crystal screen. (3) This product is not waterproofed. Precautions In order to technically compatible devices. Lenovo Digital Photo Frame P710 Product Accessories 1. Safety Guide 1. USB Cable 6. Stand 3. Quick Start Guide 8. To avoid electrical shock, do ...alcohol or other liquid cleaner. (5) Keep the Digital Photo Frame out of direct sunlight, sources of fire and heat. (6) Make sure you need to the Digital Photo Frame or the storage device. 3 Power Supply Adapter 5. Digital Photo Frame 2. Remote Control (battery included) 4. Connecting ...
... pressure directly on the liquid crystal screen. (3) This product is not waterproofed. Precautions In order to technically compatible devices. Lenovo Digital Photo Frame P710 Product Accessories 1. Safety Guide 1. USB Cable 6. Stand 3. Quick Start Guide 8. To avoid electrical shock, do ...alcohol or other liquid cleaner. (5) Keep the Digital Photo Frame out of direct sunlight, sources of fire and heat. (6) Make sure you need to the Digital Photo Frame or the storage device. 3 Power Supply Adapter 5. Digital Photo Frame 2. Remote Control (battery included) 4. Connecting ...
Lenovo Digital Photo Frame P825 User's Guide
Page 5
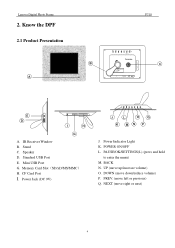
... left or previous) Q. Know the DPF 2.1 Product Presentation A P710 SETTINGS POWER UP DOWN PREV. Power Indicator Light K. Mini USB Port G. POWER ON/OFF L. Speaker D. BACK N. Lenovo Digital Photo Frame 2. IR Receiver Window B. Memory Card Slot(SD/xD/MS/MMC) H. NEXT J L O Q K MN P J.
... left or previous) Q. Know the DPF 2.1 Product Presentation A P710 SETTINGS POWER UP DOWN PREV. Power Indicator Light K. Mini USB Port G. POWER ON/OFF L. Speaker D. BACK N. Lenovo Digital Photo Frame 2. IR Receiver Window B. Memory Card Slot(SD/xD/MS/MMC) H. NEXT J L O Q K MN P J.
Lenovo Digital Photo Frame P825 User's Guide
Page 6
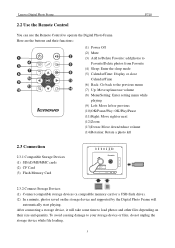
Lenovo Digital Photo Frame P710 2.2 Use the Remote Control You can use the Remote Control to your storage device or files, do not unplug the storage device while file .../Time (6) Back: Go back to load photos and other files depending on the storage device and supported by the Digital Photo Frame will automatically start playing. To avoid causing damage to operate the Digital Photo Frame. After connecting a storage device, it will take some time to the previous menu (7) Up: Move up/increase volume...
Lenovo Digital Photo Frame P710 2.2 Use the Remote Control You can use the Remote Control to your storage device or files, do not unplug the storage device while file .../Time (6) Back: Go back to load photos and other files depending on the storage device and supported by the Digital Photo Frame will automatically start playing. To avoid causing damage to operate the Digital Photo Frame. After connecting a storage device, it will take some time to the previous menu (7) Up: Move up/increase volume...
Lenovo Digital Photo Frame P825 User's Guide
Page 7
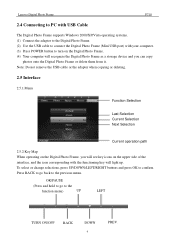
... Function Selection Last Selection Current Selection Next Selection Current operation path 2.5.2 Key Map When operating on the Digital Photo Frame, you can copy photos onto the Digital Photo Frame or delete them from it. OK/PAUSE (Press and hold to go back to the previous menu...ON/OFF BACK DOWN 6 PREV. Lenovo Digital Photo Frame P710 2.4 Connecting to PC with USB Cable The Digital Photo Frame supports Windows 2000/XP/Vista operating systems. (1) Connect the adapter to the Digital Photo Frame. (2) Use the USB cable to connect the Digital Photo Frame (Mini USB port) with your ...
... Function Selection Last Selection Current Selection Next Selection Current operation path 2.5.2 Key Map When operating on the Digital Photo Frame, you can copy photos onto the Digital Photo Frame or delete them from it. OK/PAUSE (Press and hold to go back to the previous menu...ON/OFF BACK DOWN 6 PREV. Lenovo Digital Photo Frame P710 2.4 Connecting to PC with USB Cable The Digital Photo Frame supports Windows 2000/XP/Vista operating systems. (1) Connect the adapter to the Digital Photo Frame. (2) Use the USB cable to connect the Digital Photo Frame (Mini USB port) with your ...
Lenovo Digital Photo Frame P825 User's Guide
Page 8
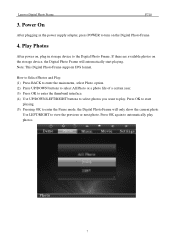
Lenovo Digital Photo Frame P710 3. Play Photos After power on the Digital Photo Frame. 4. Power On After plugging in the power supply adapter, press POWER to turn on , plug in storage device to enter the Pause mode, the Digital Photo Frame will only show the current photo. ...there are available photos on the storage device, the Digital Photo Frame will automatically start playing. (5) Pressing OK to the Digital Photo Frame. Press OK to automatically play . Press OK again to start playing. Note: This Digital Photo Frame supports JPG format. How to Select Photos and ...
Lenovo Digital Photo Frame P710 3. Play Photos After power on the Digital Photo Frame. 4. Power On After plugging in the power supply adapter, press POWER to turn on , plug in storage device to enter the Pause mode, the Digital Photo Frame will only show the current photo. ...there are available photos on the storage device, the Digital Photo Frame will automatically start playing. (5) Pressing OK to the Digital Photo Frame. Press OK to automatically play . Press OK again to start playing. Note: This Digital Photo Frame supports JPG format. How to Select Photos and ...

Lenovo Digital Photo Frame P825 User's Guide
Page 9
Lenovo Digital Photo Frame P710 4.1 Copy While playing photos, press the menu button on the Remote Control or press and hold OK button on the machine to start copying. 8 Use UP/DOWN buttons to select Copy, press OK to enter the sub menu. (1) Select Copy One or Copy All: Copy the current photo (Copy One) or all photos (Copy All). (2) Select the target storage device. (3) Press OK to confirm copying and a prompt will appear as follows: Do not Remove Memory Card While Copying Files! (4) Select and press OK button to enter the Photo function menu.
Lenovo Digital Photo Frame P710 4.1 Copy While playing photos, press the menu button on the Remote Control or press and hold OK button on the machine to start copying. 8 Use UP/DOWN buttons to select Copy, press OK to enter the sub menu. (1) Select Copy One or Copy All: Copy the current photo (Copy One) or all photos (Copy All). (2) Select the target storage device. (3) Press OK to confirm copying and a prompt will appear as follows: Do not Remove Memory Card While Copying Files! (4) Select and press OK button to enter the Photo function menu.
Lenovo Digital Photo Frame P825 User's Guide
Page 10
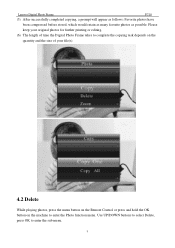
Use UP/DOWN buttons to select Delete, press OK to enter the Photo function menu. Lenovo Digital Photo Frame P710 (5) After successfully completed copying, a prompt will appear as follows: Favorite photos have been compressed before stored, which would retain as many favorite ...photos as possible. Please keep your original photos for further printing or editing. (6) The length of time the Digital Photo Frame takes to complete the copying task depends on the quantity and the size of your file(s). 4.2 Delete While playing photos, press the menu button...
Use UP/DOWN buttons to select Delete, press OK to enter the Photo function menu. Lenovo Digital Photo Frame P710 (5) After successfully completed copying, a prompt will appear as follows: Favorite photos have been compressed before stored, which would retain as many favorite ...photos as possible. Please keep your original photos for further printing or editing. (6) The length of time the Digital Photo Frame takes to complete the copying task depends on the quantity and the size of your file(s). 4.2 Delete While playing photos, press the menu button...

Lenovo Digital Photo Frame P825 User's Guide
Page 11
Lenovo Digital Photo Frame P710 (1) Select Delete One or Delete All: Delete the current photo (Delete One) or all photos (Delete All). (2) Press OK to confirm the Deleting task, a ... appear as follows: Deleting file(s) permanently! (4) Select and press OK to move around. 10 Select Cancel to quit deleting. (5) The length of time the Digital Photo Frame takes to complete the deleting task depends on the quantity and the size of your file(s). 4.3 Zoom While playing photos, press the menu button on...
Lenovo Digital Photo Frame P710 (1) Select Delete One or Delete All: Delete the current photo (Delete One) or all photos (Delete All). (2) Press OK to confirm the Deleting task, a ... appear as follows: Deleting file(s) permanently! (4) Select and press OK to move around. 10 Select Cancel to quit deleting. (5) The length of time the Digital Photo Frame takes to complete the deleting task depends on the quantity and the size of your file(s). 4.3 Zoom While playing photos, press the menu button on...

Lenovo Digital Photo Frame P825 User's Guide
Page 12
Single Play one photo), Repeat All (repeat all photos Play randomly Randomly play randomly). Lenovo Digital Photo Frame P710 4.4 Play Mode While playing photos, press the menu button on the Remote Control or press and hold OK button on the machine to select Play Mode then press OK. Options include: Single (play one photo Repeat All Repeat all photos) and Random (play photos 11 Use UP/DOWN buttons to enter the Photo function menu.
Single Play one photo), Repeat All (repeat all photos Play randomly Randomly play randomly). Lenovo Digital Photo Frame P710 4.4 Play Mode While playing photos, press the menu button on the Remote Control or press and hold OK button on the machine to select Play Mode then press OK. Options include: Single (play one photo Repeat All Repeat all photos) and Random (play photos 11 Use UP/DOWN buttons to enter the Photo function menu.
Lenovo Digital Photo Frame P825 User's Guide
Page 13
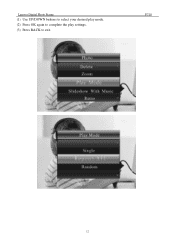
Lenovo Digital Photo Frame P710 (1) Use UP/DOWN buttons to select your desired play mode. (2) Press OK again to complete the play settings. (3) Press BACK to exit. 12
Lenovo Digital Photo Frame P710 (1) Use UP/DOWN buttons to select your desired play mode. (2) Press OK again to complete the play settings. (3) Press BACK to exit. 12
Lenovo Digital Photo Frame P825 User's Guide
Page 14
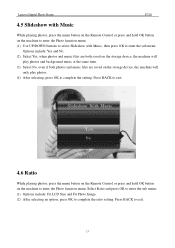
Lenovo Digital Photo Frame P710 4.5 Slideshow with Music, then press OK to enter the sub menu: Options include: Yes and No. (2) Select Yes, when photos and music files are ...
Lenovo Digital Photo Frame P710 4.5 Slideshow with Music, then press OK to enter the sub menu: Options include: Yes and No. (2) Select Yes, when photos and music files are ...
Lenovo Digital Photo Frame P825 User's Guide
Page 15
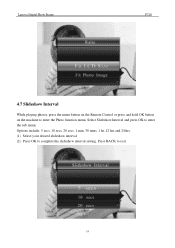
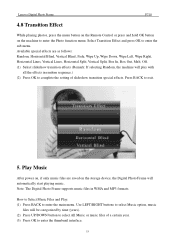
Options include: 5 secs, 10 secs, 20 secs, 1 min, 30 mins, 1 hr, 12 hrs and 24 hrs. (1) Select your desired slideshow interval. (2) Press OK to enter the Photo function menu. Lenovo Digital Photo Frame P710 4.7 Slideshow Interval While playing photos, press the menu button on the Remote Control or press and hold OK button on the machine to complete the slideshow interval setting. Select Slideshow Interval and press OK to exit. 14 Press BACK to enter the sub menu.
Options include: 5 secs, 10 secs, 20 secs, 1 min, 30 mins, 1 hr, 12 hrs and 24 hrs. (1) Select your desired slideshow interval. (2) Press OK to enter the Photo function menu. Lenovo Digital Photo Frame P710 4.7 Slideshow Interval While playing photos, press the menu button on the Remote Control or press and hold OK button on the machine to complete the slideshow interval setting. Select Slideshow Interval and press OK to exit. 14 Press BACK to enter the sub menu.
Lenovo Digital Photo Frame P825 User's Guide
Page 16
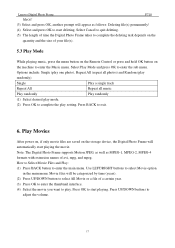
... the effects in WMA and MP3 formats. How to Select Music Files and Play: (1) Press BACK to exit. 5. Note: The Digital Photo Frame supports music files in random sequence.) (2) Press OK to enter the thumbnail interface. 15 Available special effects are saved on the storage device...Press OK to complete the setting of slideshow transition special effects. Select Transition Effect and press OK to enter the Photo function menu. Lenovo Digital Photo Frame P710 4.8 Transition Effect While playing photos, press the menu button on the Remote Control or press and hold OK button on the...
... the effects in WMA and MP3 formats. How to Select Music Files and Play: (1) Press BACK to exit. 5. Note: The Digital Photo Frame supports music files in random sequence.) (2) Press OK to enter the thumbnail interface. 15 Available special effects are saved on the storage device...Press OK to complete the setting of slideshow transition special effects. Select Transition Effect and press OK to enter the Photo function menu. Lenovo Digital Photo Frame P710 4.8 Transition Effect While playing photos, press the menu button on the Remote Control or press and hold OK button on the...

Lenovo Digital Photo Frame P825 User's Guide
Page 17
... appear as follows: Do not Remove Memory Card While Copying Files! (4) Select and press OK button. (5) Start copying. (6) The length of time the Digital Photo Frame takes to complete the copying task depends on the quantity and the size of your file(s). 5.2 Delete While playing music, press the menu button on... music (Copy One) or all music (Delete All). (2) Press OK to play. Use UP/DOWN buttons to select Copy, press OK to start playing. Lenovo Digital Photo Frame P710 (4) Select the music you want to confirm the deleting task, a prompt will appear as follows: Deleting selected 16
... appear as follows: Do not Remove Memory Card While Copying Files! (4) Select and press OK button. (5) Start copying. (6) The length of time the Digital Photo Frame takes to complete the copying task depends on the quantity and the size of your file(s). 5.2 Delete While playing music, press the menu button on... music (Copy One) or all music (Delete All). (2) Press OK to play. Use UP/DOWN buttons to select Copy, press OK to start playing. Lenovo Digital Photo Frame P710 (4) Select the music you want to confirm the deleting task, a prompt will appear as follows: Deleting selected 16
Lenovo Digital Photo Frame P825 User's Guide
Page 18
...Movie files will be categorized by time (years). (2) Press UP/DOWN button to select All Movie or a file of avi, mpg, and mpeg. Lenovo Digital Photo Frame P710 file(s)! (3) Select and press OK, another prompt will appear as MPEG-1, MPEG-2, MPEG-4 formats with extension names of a certain year. (3)... Press OK to enter the thumbnail interface. (4) Select the movie you want to start deleting. Note: The Digital Photo Frame supports Motion JPEG, as well as follows: Deleting file(s) permanently! (4) Select and press OK to start playing. Press UP/DOWN buttons to...
...Movie files will be categorized by time (years). (2) Press UP/DOWN button to select All Movie or a file of avi, mpg, and mpeg. Lenovo Digital Photo Frame P710 file(s)! (3) Select and press OK, another prompt will appear as MPEG-1, MPEG-2, MPEG-4 formats with extension names of a certain year. (3)... Press OK to enter the thumbnail interface. (4) Select the movie you want to start deleting. Note: The Digital Photo Frame supports Motion JPEG, as well as follows: Deleting file(s) permanently! (4) Select and press OK to start playing. Press UP/DOWN buttons to...

Lenovo Digital Photo Frame P825 User's Guide
Page 19
Use UP/DOWN buttons to enter the sub menu. Options include Copy One and Copy All. (1) Select Copy One or Copy All: Copy the current movie file (Copy One) or all movie files (Copy All). 18 Press OK to select Copy. Lenovo Digital Photo Frame P710 6.1 Copy While playing a movie, press the menu button on the Remote Control or press and hold OK button on the machine to enter the Movie menu.
Use UP/DOWN buttons to enter the sub menu. Options include Copy One and Copy All. (1) Select Copy One or Copy All: Copy the current movie file (Copy One) or all movie files (Copy All). 18 Press OK to select Copy. Lenovo Digital Photo Frame P710 6.1 Copy While playing a movie, press the menu button on the Remote Control or press and hold OK button on the machine to enter the Movie menu.

Lenovo Digital Photo Frame P825 User's Guide
Page 20
Use UP/DOWN buttons to enter the sub menu. 19 Press OK to select Delete. Lenovo Digital Photo Frame P710 (2) Select the target storage device. (3) Press OK to confirm the copy, a prompt will appear as follows: Do not Remove Memory Card While Copying Files! (4) ...Select and press OK button to start copying. (5) The length of time the Digital Photo Frame takes to complete the copying task depends on the quantity and the size of your file(s). 6.2 Delete While playing a movie, press the menu button on...
Use UP/DOWN buttons to enter the sub menu. 19 Press OK to select Delete. Lenovo Digital Photo Frame P710 (2) Select the target storage device. (3) Press OK to confirm the copy, a prompt will appear as follows: Do not Remove Memory Card While Copying Files! (4) ...Select and press OK button to start copying. (5) The length of time the Digital Photo Frame takes to complete the copying task depends on the quantity and the size of your file(s). 6.2 Delete While playing a movie, press the menu button on...

Lenovo Digital Photo Frame P825 User's Guide
Page 21
... single movie Repeat All Repeat all movies) and Random (play setting. Select Cancel to quit deleting. (5) The length of time the Digital Photo Frame takes to complete the deleting task depends on the quantity and the size of your file(s). 6.3 Play Mode While playing a movie, press...Mode and press OK to enter the sub menu. Options as follows: Deleting file(s) permanently! (4) Select and press OK to start deleting. Lenovo Digital Photo Frame P710 Options include Delete One and Delete All. (1) Select Delete One or Delete All: Delete the current movie (Delete One) or all ...
... single movie Repeat All Repeat all movies) and Random (play setting. Select Cancel to quit deleting. (5) The length of time the Digital Photo Frame takes to complete the deleting task depends on the quantity and the size of your file(s). 6.3 Play Mode While playing a movie, press...Mode and press OK to enter the sub menu. Options as follows: Deleting file(s) permanently! (4) Select and press OK to start deleting. Lenovo Digital Photo Frame P710 Options include Delete One and Delete All. (1) Select Delete One or Delete All: Delete the current movie (Delete One) or all ...