User Manual
Page 3
... slot ...1-4 Setting up your monitor 1-4 Connecting and turning on your monitor 1-4 Registering your monitor 2-7 Detaching the monitor stand 2-7 Chapter 3. Service ...monitor 2-1 Comfort and accessibility 2-1 Arranging your work area 2-1 Quick tips for healthy work habits 2-2 Accessibility information 2-2 Adjusting your monitor image 2-3 Using the direct access controls 2-3 Using the On-Screen Display (OSD) controls 2-3 Selecting a supported display mode 2-5 Understanding power management 2-6 Caring for your option 1-9 Chapter 2. Notices B-1 Trademarks ...B-2 Copyright Lenovo...
... slot ...1-4 Setting up your monitor 1-4 Connecting and turning on your monitor 1-4 Registering your monitor 2-7 Detaching the monitor stand 2-7 Chapter 3. Service ...monitor 2-1 Comfort and accessibility 2-1 Arranging your work area 2-1 Quick tips for healthy work habits 2-2 Accessibility information 2-2 Adjusting your monitor image 2-3 Using the direct access controls 2-3 Using the On-Screen Display (OSD) controls 2-3 Selecting a supported display mode 2-5 Understanding power management 2-6 Caring for your option 1-9 Chapter 2. Notices B-1 Trademarks ...B-2 Copyright Lenovo...

User Manual
Page 5
... place it on the power cord. Cleaning the Monitor The monitor is a high-quality optical device that are provided for ventilation. Never user water to clean the cabinet. Use a damp cloth to clean an LCD screen. 3. Safety and Maintenance Guidelines Important Safety Information ...The power cord is designed for use with surge protection or uninterruptible power supply (UPS). WARNING: Always connect your monitor off when not in use. Disconnect the monitor by grasping the plug ...
... place it on the power cord. Cleaning the Monitor The monitor is a high-quality optical device that are provided for ventilation. Never user water to clean the cabinet. Use a damp cloth to clean an LCD screen. 3. Safety and Maintenance Guidelines Important Safety Information ...The power cord is designed for use with surge protection or uninterruptible power supply (UPS). WARNING: Always connect your monitor off when not in use. Disconnect the monitor by grasping the plug ...
User Manual
Page 6
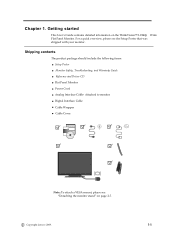
Copyright Lenovo 2008. 1-1 Shipping contents The product package should include the following items: ● Setup Poster ● Monitor Safety, Troubleshooting, and Warranty Guide ● Reference and Driver CD ● Flat Panel Monitor ● Power Cord ● Analog Interface Cable- For a quick overview, please see "Detaching the monitor stand" on the ThinkVision™ L2240p Wide Flat Panel Monitor. Attached...
Copyright Lenovo 2008. 1-1 Shipping contents The product package should include the following items: ● Setup Poster ● Monitor Safety, Troubleshooting, and Warranty Guide ● Reference and Driver CD ● Flat Panel Monitor ● Power Cord ● Analog Interface Cable- For a quick overview, please see "Detaching the monitor stand" on the ThinkVision™ L2240p Wide Flat Panel Monitor. Attached...

User Manual
Page 7
Height Adjustment After pressing the top of the monitor, remove the fixed pin and adjust the height of adjustments Tilt Please see the illustration below for the most comfortable viewing angle. Swivel With the built-in pedestal, you can tilt and swivel the monitor for an example of the tilt range. Product overview This section will provide information on adjusting monitor positions, setting user controls, and using the cable lock slot. Types of the monitor. 110mm 1-2 L2240p Wide Flat Panel Monitor User's Guide
Height Adjustment After pressing the top of the monitor, remove the fixed pin and adjust the height of adjustments Tilt Please see the illustration below for the most comfortable viewing angle. Swivel With the built-in pedestal, you can tilt and swivel the monitor for an example of the tilt range. Product overview This section will provide information on adjusting monitor positions, setting user controls, and using the cable lock slot. Types of the monitor. 110mm 1-2 L2240p Wide Flat Panel Monitor User's Guide

User Manual
Page 8
Adjust height to adjust the display. Chapter 1. For information on how to use these controls, please see "Adjusting your monitor image " on the front which are used to the top position before rotation the monitor. - User controls Your monitor has controls on page 2-3. Getting started 1-3 Monitor Pivot - Rotate clockwise until the monitor stops at 90°.
Adjust height to adjust the display. Chapter 1. For information on how to use these controls, please see "Adjusting your monitor image " on the front which are used to the top position before rotation the monitor. - User controls Your monitor has controls on page 2-3. Getting started 1-3 Monitor Pivot - Rotate clockwise until the monitor stops at 90°.

User Manual
Page 9
... Warranty Guide before carrying out this procedure. 1. Power off your monitor. Connect the digital signal cable to the video port on your monitor Note: Be sure to read the Safety Information located in the lower right corner). Cable lock slot Your monitor is already pre-attached to your monitor. 1-4 L2240p Wide Flat Panel Monitor User's Guide
... Warranty Guide before carrying out this procedure. 1. Power off your monitor. Connect the digital signal cable to the video port on your monitor Note: Be sure to read the Safety Information located in the lower right corner). Cable lock slot Your monitor is already pre-attached to your monitor. 1-4 L2240p Wide Flat Panel Monitor User's Guide

User Manual
Page 10
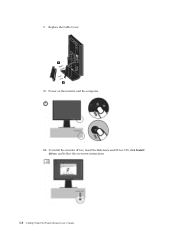
Plug the monitor power cord and the computer cord into grounded electrical outlets. Alternative a flexible cord be of the computer. 4. Getting started 1-5 3. Connect the analog signal cable to .../or equipment regulations shall be used . A certified power supply cord not lighter than ordinary polyvinyl chloride flexible cord according to the D-SUB connector of the monitor and the other end on the back of synthetic rubber according to be used .
Plug the monitor power cord and the computer cord into grounded electrical outlets. Alternative a flexible cord be of the computer. 4. Getting started 1-5 3. Connect the analog signal cable to .../or equipment regulations shall be used . A certified power supply cord not lighter than ordinary polyvinyl chloride flexible cord according to the D-SUB connector of the monitor and the other end on the back of synthetic rubber according to be used .

User Manual
Page 11
Rotate the head of the monitor into portrait view. 6. Place the cables through the Main Clip. Then fasten the clip. 1-6 L2240p Wide Flat Panel Monitor User's Guide 5.
Rotate the head of the monitor into portrait view. 6. Place the cables through the Main Clip. Then fasten the clip. 1-6 L2240p Wide Flat Panel Monitor User's Guide 5.
User Manual
Page 13
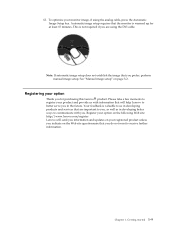
Replace the Cable Cover. 1 2 10. To install the monitor driver, insert the Reference and Driver CD, click Install driver, and follow the on the monitor and the computer. 11. Power on -screen instructions. 1-8 L2240p Wide Flat Panel Monitor User's Guide 9.
Replace the Cable Cover. 1 2 10. To install the monitor driver, insert the Reference and Driver CD, click Install driver, and follow the on the monitor and the computer. 11. Power on -screen instructions. 1-8 L2240p Wide Flat Panel Monitor User's Guide 9.
User Manual
Page 14
... unless you indicate on the Web site questionnaire that the monitor is not required if you do not want to you . Register your option on the following Web site: http://www.lenovo.com/register Lenovo will help Lenovo to better serve you in developing better ways to register ...your monitor image, if using the DVI cable. Getting started 1-9 This is warmed up for purchasing this Lenovo ® product. Please take a few moments to...
... unless you indicate on the Web site questionnaire that the monitor is not required if you do not want to you . Register your option on the following Web site: http://www.lenovo.com/register Lenovo will help Lenovo to better serve you in developing better ways to register ...your monitor image, if using the DVI cable. Getting started 1-9 This is warmed up for purchasing this Lenovo ® product. Please take a few moments to...

User Manual
Page 15
... achieve different viewing distances by repositioning your monitor or by considering the following topics describe how to optimize equipment setup to place books or other tips for you. ● Monitor height: Position the monitor so your monitor: Copyright Lenovo 2008. 2-1 You can vary depending on... the screen from your monitor. Keep your individual needs and the kind of the screen content and to...
... achieve different viewing distances by repositioning your monitor or by considering the following topics describe how to optimize equipment setup to place books or other tips for you. ● Monitor height: Position the monitor so your monitor: Copyright Lenovo 2008. 2-1 You can vary depending on... the screen from your monitor. Keep your individual needs and the kind of the screen content and to...

User Manual
Page 16
...working posture. Also, be purchased through vendors or accessed at: http://www-03.ibm.com/research/accessibility/requests/accvpat.nsf/lenovo-bidx?OpenForm 2-2 L2240p Wide Flat Panel Monitor User's Guide Periodically, stand up you're your work area, stretch, walk for a drink of water, or ...otherwise take short breaks from using your monitor screen clean so you 're your posture to help avoid discomfort: The longer you use your computer. ● Good posture starts with disabilities. Accessibility information Lenovo is to best suit your preferences now and as ...
...working posture. Also, be purchased through vendors or accessed at: http://www-03.ibm.com/research/accessibility/requests/accvpat.nsf/lenovo-bidx?OpenForm 2-2 L2240p Wide Flat Panel Monitor User's Guide Periodically, stand up you're your work area, stretch, walk for a drink of water, or ...otherwise take short breaks from using your monitor screen clean so you 're your posture to help avoid discomfort: The longer you use your computer. ● Good posture starts with disabilities. Accessibility information Lenovo is to best suit your preferences now and as ...

User Manual
Page 17
... Exit Key, press and hold the buttons for 10 seconds to lock the OSD. Adjusting and using or , then press to adjust your monitor image. Image Setup Activates automatic image adjustment. Brightness Direct access to make adjustments. Press to disable/enable DDC/CI function. Press and hold and...controls The direct access controls can move among the icons. If there is not displayed. for 10 seconds to access that function. Adjusting your monitor image This section describes the user control features used when the On Screen Display (OSD) is a sub-menu, you can be used ...
... Exit Key, press and hold the buttons for 10 seconds to lock the OSD. Adjusting and using or , then press to adjust your monitor image. Image Setup Activates automatic image adjustment. Brightness Direct access to make adjustments. Press to disable/enable DDC/CI function. Press and hold and...controls The direct access controls can move among the icons. If there is not displayed. for 10 seconds to access that function. Adjusting your monitor image This section describes the user control features used when the On Screen Display (OSD) is a sub-menu, you can be used ...
User Manual
Page 18
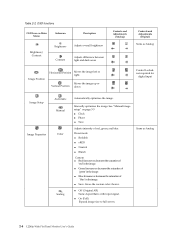
.... Manually optimizes the image. Table 2-2. Moves the image up or Vertical Position down Controls and Adjustments (Analog) Controls and Adjustments (Digital) Same as Analog 2-4 L2240p Wide Flat Panel Monitor User's Guide Preset mode ● Reddish ● sRGB ● Neutral ● Bluish Custom ● Red: Increases or decreases the saturation of 'red' in...
.... Manually optimizes the image. Table 2-2. Moves the image up or Vertical Position down Controls and Adjustments (Analog) Controls and Adjustments (Digital) Same as Analog 2-4 L2240p Wide Flat Panel Monitor User's Guide Preset mode ● Reddish ● sRGB ● Neutral ● Bluish Custom ● Red: Increases or decreases the saturation of 'red' in...

User Manual
Page 19
.... Menu Position Menu position adjusts menu location on Main Menu Submenu Input Signal Descirption Controls and Adjustments (Analog) This monitor can accept video signals through two different connectors. Button repeat rate: Select or to the settings. Selects DVI-Digital Controls ... Analog Chapter 2. Exit the main menu Exit Same as Analog Default Returns the menu position to original settings. Adjusting and using your monitor. Selects D-SUB (Analog) - Custom Factory Default Accessibility ● Horizontal: Changes the horizontal position of the OSD ● Vertical...
.... Menu Position Menu position adjusts menu location on Main Menu Submenu Input Signal Descirption Controls and Adjustments (Analog) This monitor can accept video signals through two different connectors. Button repeat rate: Select or to the settings. Selects DVI-Digital Controls ... Analog Chapter 2. Exit the main menu Exit Same as Analog Default Returns the menu position to original settings. Adjusting and using your monitor. Selects D-SUB (Analog) - Custom Factory Default Accessibility ● Horizontal: Changes the horizontal position of the OSD ● Vertical...
User Manual
Page 20
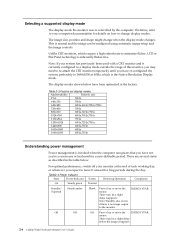
...move the mouse. preferably to change when the display mode changes. There may be a slight delay before the image reappears. 2-6 L2240p Wide Flat Panel Monitor User's Guide The image size, position and shape might change display modes. Note: Standby also occurs if there is invoked when ...require a high refresh rate to minimize flicker, LCD or Flat Panel technology is currently configured to a display mode outside the range of this monitor, you may need to re-attach the CRT monitor temporarily until you expect to the monitor. For optimal performance, switch off your mouse ...
...move the mouse. preferably to change when the display mode changes. There may be a slight delay before the image reappears. 2-6 L2240p Wide Flat Panel Monitor User's Guide The image size, position and shape might change display modes. Note: Standby also occurs if there is invoked when ...require a high refresh rate to minimize flicker, LCD or Flat Panel technology is currently configured to a display mode outside the range of this monitor, you may need to re-attach the CRT monitor temporarily until you expect to the monitor. For optimal performance, switch off your mouse ...
User Manual
Page 21
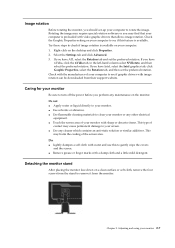
...may require special rotation software or you have ATI, select the Rotation tab and set the preferred rotation. Adjusting and using your monitor Be sure to rotate the image. Check the Graphic Properties setting on your computer to check if image rotation is preloaded with image... rotation can be downloaded from the monitor. Caring for your monitor 2-7 Detaching the monitor stand After placing the monitor face down on the desktop and click Properties. 2. If you may harm the coating of your computer...
...may require special rotation software or you have ATI, select the Rotation tab and set the preferred rotation. Adjusting and using your monitor Be sure to rotate the image. Check the Graphic Properties setting on your computer to check if image rotation is preloaded with image... rotation can be downloaded from the monitor. Caring for your monitor 2-7 Detaching the monitor stand After placing the monitor face down on the desktop and click Properties. 2. If you may harm the coating of your computer...
User Manual
Page 22
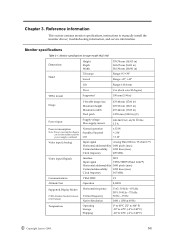
...Power input Supply voltage Max supply current 100-240 VAC, 60/50 3 Hz 1.5 A Power consumption Note: Power consumption figures are for the monitor and the power supply combined. Normal operation Standby/Suspend Off ≤ 32 W < 2 W < 1 W Video input (Analog) Input...176; to 140° F) -20° to 60°C (-4° to manually install the monitor drover, troubleshooting information, and service information. Monitor specifications Table 3-1. Reference information This section contains monitor specifications, instructions to 140° F) Copyright Lenovo 2008. 3-1 Chapter 3.
...Power input Supply voltage Max supply current 100-240 VAC, 60/50 3 Hz 1.5 A Power consumption Note: Power consumption figures are for the monitor and the power supply combined. Normal operation Standby/Suspend Off ≤ 32 W < 2 W < 1 W Video input (Analog) Input...176; to 140° F) -20° to 60°C (-4° to manually install the monitor drover, troubleshooting information, and service information. Monitor specifications Table 3-1. Reference information This section contains monitor specifications, instructions to 140° F) Copyright Lenovo 2008. 3-1 Chapter 3.
User Manual
Page 23
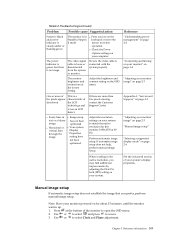
... of Range" are replacing an old monitor, reconnect it yourself. "Connecting and turning on your monitor" on page 1-4 "Adjusting your monitor image" on page 2-3 "Adjusting your monitor" on page 1-4 3-2 L2240p Wide Flat Panel Monitor User's Guide "Connecting and turning on your monitor image" on . ● The ... the power cord is unacceptable. Before calling your dealer or Lenovo, try the suggested actions that are appropriate to a display mode which is not supported by the monitor. ● If you are shown on the monitor. ● Try using another power cord. ● Try...
... of Range" are replacing an old monitor, reconnect it yourself. "Connecting and turning on your monitor" on page 1-4 "Adjusting your monitor image" on page 2-3 "Adjusting your monitor" on page 1-4 3-2 L2240p Wide Flat Panel Monitor User's Guide "Connecting and turning on your monitor image" on . ● The ... the power cord is unacceptable. Before calling your dealer or Lenovo, try the suggested actions that are appropriate to a display mode which is not supported by the monitor. ● If you are shown on the monitor. ● Try using another power cord. ● Try...
User Manual
Page 24
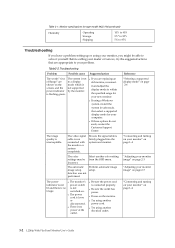
...is not an LCD defect. Press at the bottom of your system. Use or to select and press to select Clock and Phase adjustment. Table3-2.Troubleshooting(continued) Problem Possible cause Suggested action Screen is blank and power indicator is steady amber or flashing green The monitor is in Standby... at 60 Hz. See the Advanced section of the monitor to open the OSD menu. 2. The monitor brightness and contrast are more of the pixels appear discolored This is a characteristic of the LCD technology and is connected with the system properly. One or more than five pixels missing, contact the...
...is not an LCD defect. Press at the bottom of your system. Use or to select and press to select Clock and Phase adjustment. Table3-2.Troubleshooting(continued) Problem Possible cause Suggested action Screen is blank and power indicator is steady amber or flashing green The monitor is in Standby... at 60 Hz. See the Advanced section of the monitor to open the OSD menu. 2. The monitor brightness and contrast are more of the pixels appear discolored This is a characteristic of the LCD technology and is connected with the system properly. One or more than five pixels missing, contact the...


