User Manual
Page 3
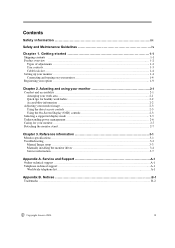
... B. Contents Safety information iii Safety and Maintenance Guidelines iv Chapter 1. Notices B-1 Trademarks ...B-2 Copyright Lenovo 2008. ii Adusting and using your monitor 2-1 Comfort and accessibility 2-1 Arranging your work area 2-1 Quick tips for healthy work habits 2-2 Accessibility information 2-2 Adjusting your monitor image 2-3 Using the direct access controls 2-3 Using the On-Screen Display (OSD) controls 2-3 Selecting...
... B. Contents Safety information iii Safety and Maintenance Guidelines iv Chapter 1. Notices B-1 Trademarks ...B-2 Copyright Lenovo 2008. ii Adusting and using your monitor 2-1 Comfort and accessibility 2-1 Arranging your work area 2-1 Quick tips for healthy work habits 2-2 Accessibility information 2-2 Adjusting your monitor image 2-3 Using the direct access controls 2-3 Using the On-Screen Display (OSD) controls 2-3 Selecting...

User Manual
Page 5
... instructions. ■ Turn your Hewlett-Packard authorized dealer, reseller, or service provider. ■ Adjust only those controls that you must lay the monitor face down on a soft area to a grounded (earthed) power outlet. Unplug your computer and its peripheral devices (such as close to IEC 60227... the power outlet by pulling the cord. ■ Do not allow anything to clean an LCD screen. 3. the power strips must not be of your monitor: ■ Do not open your monitor cabinet or attempt to determine the ampere rating (Amps or A) for each device. ■ Install your ...
... instructions. ■ Turn your Hewlett-Packard authorized dealer, reseller, or service provider. ■ Adjust only those controls that you must lay the monitor face down on a soft area to a grounded (earthed) power outlet. Unplug your computer and its peripheral devices (such as close to IEC 60227... the power outlet by pulling the cord. ■ Do not allow anything to clean an LCD screen. 3. the power strips must not be of your monitor: ■ Do not open your monitor cabinet or attempt to determine the ampere rating (Amps or A) for each device. ■ Install your ...
User Manual
Page 6
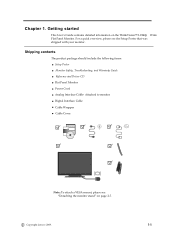
...; Analog Interface Cable- Copyright Lenovo 2008. 1-1 Attached to monitor ● Digital Interface Cable ● Cable Wrapper ● Cable Cover Note: To attach a VESA mount, please see the Setup Poster that was shipped with your monitor. For a quick overview, please see "Detaching the monitor stand" on the ThinkVision™ L2240p Wide Flat Panel Monitor. Chapter 1. Getting started This...
...; Analog Interface Cable- Copyright Lenovo 2008. 1-1 Attached to monitor ● Digital Interface Cable ● Cable Wrapper ● Cable Cover Note: To attach a VESA mount, please see the Setup Poster that was shipped with your monitor. For a quick overview, please see "Detaching the monitor stand" on the ThinkVision™ L2240p Wide Flat Panel Monitor. Chapter 1. Getting started This...

User Manual
Page 7
Types of adjustments Tilt Please see the illustration below for the most comfortable viewing angle. Height Adjustment After pressing the top of the monitor, remove the fixed pin and adjust the height of the tilt range. Product overview This section will provide information on adjusting monitor positions, setting user controls, and using the cable lock slot. Swivel With the built-in pedestal, you can tilt and swivel the monitor for an example of the monitor. 110mm 1-2 L2240p Wide Flat Panel Monitor User's Guide
Types of adjustments Tilt Please see the illustration below for the most comfortable viewing angle. Height Adjustment After pressing the top of the monitor, remove the fixed pin and adjust the height of the tilt range. Product overview This section will provide information on adjusting monitor positions, setting user controls, and using the cable lock slot. Swivel With the built-in pedestal, you can tilt and swivel the monitor for an example of the monitor. 110mm 1-2 L2240p Wide Flat Panel Monitor User's Guide

User Manual
Page 8
Rotate clockwise until the monitor stops at 90°. For information on how to use these controls, please see "Adjusting your monitor image " on the front which are used to the top position before rotation the monitor. - Getting started 1-3 User controls Your monitor has controls on page 2-3. Adjust height to adjust the display. Chapter 1. Monitor Pivot -
Rotate clockwise until the monitor stops at 90°. For information on how to use these controls, please see "Adjusting your monitor image " on the front which are used to the top position before rotation the monitor. - Getting started 1-3 User controls Your monitor has controls on page 2-3. Adjust height to adjust the display. Chapter 1. Monitor Pivot -

User Manual
Page 9
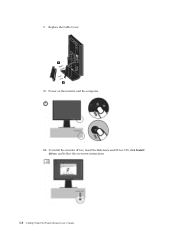
Cable lock slot Your monitor is already pre-attached to your monitor. 1-4 L2240p Wide Flat Panel Monitor User's Guide Please follow the instructions that came with a cable lock slot located on the rear of the signal cable is equipped with the cable ... back of the computer. Note: One end of your monitor Note: Be sure to attach it. Power off your monitor. Connect the digital signal cable to help you set up your monitor This section provides information to the video port on your monitor (in the Monitor Safety, Troubleshooting, and Warranty Guide before carrying out this...
Cable lock slot Your monitor is already pre-attached to your monitor. 1-4 L2240p Wide Flat Panel Monitor User's Guide Please follow the instructions that came with a cable lock slot located on the rear of the signal cable is equipped with the cable ... back of the computer. Note: One end of your monitor Note: Be sure to attach it. Power off your monitor. Connect the digital signal cable to help you set up your monitor This section provides information to the video port on your monitor (in the Monitor Safety, Troubleshooting, and Warranty Guide before carrying out this...

User Manual
Page 10
Plug the monitor power cord and the computer cord into grounded electrical outlets. Note: A certified power supply cord has to IEC 60245 (designation H05RR-F 3G 0.75mm²) shall .../or equipment regulations shall be used . A certified power supply cord not lighter than ordinary polyvinyl chloride flexible cord according to the D-SUB connector of the monitor and the other end on the back of synthetic rubber according to be used . Connect the analog signal cable to IEC 60227 (designation H05VV-F 3G...
Plug the monitor power cord and the computer cord into grounded electrical outlets. Note: A certified power supply cord has to IEC 60245 (designation H05RR-F 3G 0.75mm²) shall .../or equipment regulations shall be used . A certified power supply cord not lighter than ordinary polyvinyl chloride flexible cord according to the D-SUB connector of the monitor and the other end on the back of synthetic rubber according to be used . Connect the analog signal cable to IEC 60227 (designation H05VV-F 3G...

User Manual
Page 11
Then fasten the clip. 1-6 L2240p Wide Flat Panel Monitor User's Guide 5. Rotate the head of the monitor into portrait view. 6. Place the cables through the Main Clip.
Then fasten the clip. 1-6 L2240p Wide Flat Panel Monitor User's Guide 5. Rotate the head of the monitor into portrait view. 6. Place the cables through the Main Clip.
User Manual
Page 13
Power on -screen instructions. 1-8 L2240p Wide Flat Panel Monitor User's Guide To install the monitor driver, insert the Reference and Driver CD, click Install driver, and follow the on the monitor and the computer. 11. 9. Replace the Cable Cover. 1 2 10.
Power on -screen instructions. 1-8 L2240p Wide Flat Panel Monitor User's Guide To install the monitor driver, insert the Reference and Driver CD, click Install driver, and follow the on the monitor and the computer. 11. 9. Replace the Cable Cover. 1 2 10.
User Manual
Page 14
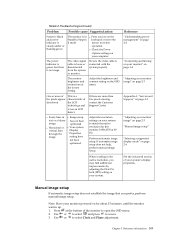
... to register your option Thank you are important to you, as well as in developing better ways to communicate with information that the monitor is valuable to us with you do not want to better serve you in developing products and services that you indicate on page 3-2....on the Web site questionnaire that you . Registering your product and provide us in the future. Your feedback is warmed up for purchasing this Lenovo ® product. To optimize your registered product unless you prefer, perform manual image setup. Chapter 1. 12. Register your option on the ...
... to register your option Thank you are important to you, as well as in developing better ways to communicate with information that the monitor is valuable to us with you do not want to better serve you in developing products and services that you indicate on page 3-2....on the Web site questionnaire that you . Registering your product and provide us in the future. Your feedback is warmed up for purchasing this Lenovo ® product. To optimize your registered product unless you prefer, perform manual image setup. Chapter 1. 12. Register your option on the ...

User Manual
Page 15
... nearby windows. A general guideline is to position the monitor such that the top of the screen is at : http://www.lenovo.com/healthycomputing Arranging your work area Use a work surface of appropriate height and available working area to allow you . ● Monitor height: Position the monitor so your head and neck are in a relaxed...-height when you are some other sturdy objects under the base of these topics, visit the Healthy Computing Web site at or slightly below your monitor: Copyright Lenovo 2008. 2-1 Arrange your workplace and the equipment you use materials and equipment.
... nearby windows. A general guideline is to position the monitor such that the top of the screen is at : http://www.lenovo.com/healthycomputing Arranging your work area Use a work surface of appropriate height and available working area to allow you . ● Monitor height: Position the monitor so your head and neck are in a relaxed...-height when you are some other sturdy objects under the base of these topics, visit the Healthy Computing Web site at or slightly below your monitor: Copyright Lenovo 2008. 2-1 Arrange your workplace and the equipment you use materials and equipment.

User Manual
Page 16
... be purchased through vendors or accessed at: http://www-03.ibm.com/research/accessibility/requests/accvpat.nsf/lenovo-bidx?OpenForm 2-2 L2240p Wide Flat Panel Monitor User's Guide Some of these technologies are performing. ● Use the monitor brightness, contrast, and image adjustment controls, if equipped, to optimize the image on your screen to meet...
... be purchased through vendors or accessed at: http://www-03.ibm.com/research/accessibility/requests/accvpat.nsf/lenovo-bidx?OpenForm 2-2 L2240p Wide Flat Panel Monitor User's Guide Some of these technologies are performing. ● Use the monitor brightness, contrast, and image adjustment controls, if equipped, to optimize the image on your screen to meet...

User Manual
Page 17
...Screen Display (OSD) controls The settings adjustable with the user controls are blue. Select an icon and press to move between options using your monitor 2-3 Press to unlock the OSD 5. for 10 seconds to save. 3. Chapter 2. Note: The direct access controls are viewed through the ...to make adjustments. Use or to the OSD. Brightness Direct access to move among the icons. Use or to Brightness adjustment. Adjusting your monitor image This section describes the user control features used when the On Screen Display (OSD) is not displayed. Table 2-1. Adjusting and using or...
...Screen Display (OSD) controls The settings adjustable with the user controls are blue. Select an icon and press to move between options using your monitor 2-3 Press to unlock the OSD 5. for 10 seconds to save. 3. Chapter 2. Note: The direct access controls are viewed through the ...to make adjustments. Use or to the OSD. Brightness Direct access to move among the icons. Use or to Brightness adjustment. Adjusting your monitor image This section describes the user control features used when the On Screen Display (OSD) is not displayed. Table 2-1. Adjusting and using or...
User Manual
Page 18
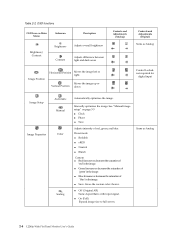
Moves the image up or Vertical Position down Controls and Adjustments (Analog) Controls and Adjustments (Digital) Same as Analog 2-4 L2240p Wide Flat Panel Monitor User's Guide See "Manual image setup" on Main Menu Submenu Descirption Brightness/ Contrast Brightness Adjusts overall brightness Contrast Adjusts difference between light and dark areas ...
Moves the image up or Vertical Position down Controls and Adjustments (Analog) Controls and Adjustments (Digital) Same as Analog 2-4 L2240p Wide Flat Panel Monitor User's Guide See "Manual image setup" on Main Menu Submenu Descirption Brightness/ Contrast Brightness Adjusts overall brightness Contrast Adjusts difference between light and dark areas ...

User Manual
Page 19
... and product details. Note: The language chosen only affects the language of the OSD. ● Save ● Cancel ● Reset Reset monitor to the default settings. Custom Factory Default Accessibility ● Horizontal: Changes the horizontal position of the OSD ● Vertical: Changes the vertical position...does not allow any software running on the computer. Exit the main menu Exit Same as Analog This section lists the languages supported by your monitor 2-5 Selects D-SUB (Analog) - It has no effect on any changes to change. ● Off ● Default ● Slow ...
... and product details. Note: The language chosen only affects the language of the OSD. ● Save ● Cancel ● Reset Reset monitor to the default settings. Custom Factory Default Accessibility ● Horizontal: Changes the horizontal position of the OSD ● Vertical: Changes the vertical position...does not allow any software running on the computer. Exit the main menu Exit Same as Analog This section lists the languages supported by your monitor 2-5 Selects D-SUB (Analog) - It has no effect on any changes to change. ● Off ● Default ● Slow ...
User Manual
Page 20
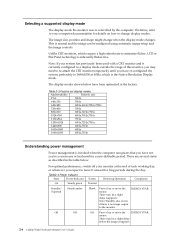
...have been optimized at the end of this monitor, you may need to leave it unused for a user-definable period. There may be a slight delay before the image reappears. 2-6 L2240p Wide Flat Panel Monitor User's Guide Unlike CRT monitors, which require a high refresh rate to ...1680x1050 at 60Hz, which is inherently flicker-free. preferably to minimize flicker, LCD or Flat Panel technology is the Native Resolution Display mode....
...have been optimized at the end of this monitor, you may need to leave it unused for a user-definable period. There may be a slight delay before the image reappears. 2-6 L2240p Wide Flat Panel Monitor User's Guide Unlike CRT monitors, which require a high refresh rate to ...1680x1050 at 60Hz, which is inherently flicker-free. preferably to minimize flicker, LCD or Flat Panel technology is the Native Resolution Display mode....
User Manual
Page 21
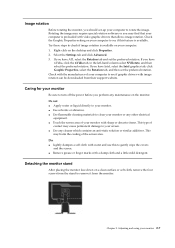
...Check with the manufacturer of your computer to remove it from their support website. Do not: ● Apply water or liquid directly to your monitor. ● Use solvents or abrasives. ● Use flammable cleaning materials to see if graphic drivers with sharp or abrasive items. This type ...your computer is preloaded with a damp cloth and a little mild detergent. Try these steps to rotate the image. Image rotation Before rotating the monitor, you should set-up your computer to check if image rotation is available on your computer. 1. Check the Graphic Properties setting on the ...
...Check with the manufacturer of your computer to remove it from their support website. Do not: ● Apply water or liquid directly to your monitor. ● Use solvents or abrasives. ● Use flammable cleaning materials to see if graphic drivers with sharp or abrasive items. This type ...your computer is preloaded with a damp cloth and a little mild detergent. Try these steps to rotate the image. Image rotation Before rotating the monitor, you should set-up your computer to check if image rotation is available on your computer. 1. Check the Graphic Properties setting on the ...
User Manual
Page 22
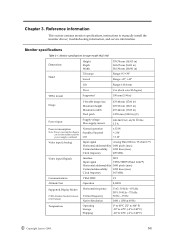
...Power input Supply voltage Max supply current 100-240 VAC, 60/50 3 Hz 1.5 A Power consumption Note: Power consumption figures are for the monitor and the power supply combined. Normal operation Standby/Suspend Off ≤ 32 W < 2 W < 1 W Video input (Analog) Input ...(-4° to 140° F) -20° to 60°C (-4° to manually install the monitor drover, troubleshooting information, and service information. Reference information This section contains monitor specifications, instructions to 140° F) Copyright Lenovo 2008. 3-1 Monitor specifications Table 3-1.
...Power input Supply voltage Max supply current 100-240 VAC, 60/50 3 Hz 1.5 A Power consumption Note: Power consumption figures are for the monitor and the power supply combined. Normal operation Standby/Suspend Off ≤ 32 W < 2 W < 1 W Video input (Analog) Input ...(-4° to 140° F) -20° to 60°C (-4° to manually install the monitor drover, troubleshooting information, and service information. Reference information This section contains monitor specifications, instructions to 140° F) Copyright Lenovo 2008. 3-1 Monitor specifications Table 3-1.
User Manual
Page 23
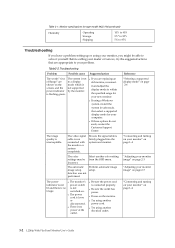
...Lenovo, try the suggested actions that are replacing an old monitor, reconnect it yourself. The video signal cable is firmly plugged into the system and monitor. "Connecting and turning on your monitor" on page 1-4 "Adjusting your monitor image" on page 2-3 "Adjusting your monitor" on page 2-3 The power ● The monitor...has power. ● Power on the monitor. ● Try using another power cord. ● Try using your problem. "Connecting and turning on your monitor image" on page 1-4 3-2 L2240p Wide Flat Panel Monitor User's Guide Select another electrical outlet....
...Lenovo, try the suggested actions that are replacing an old monitor, reconnect it yourself. The video signal cable is firmly plugged into the system and monitor. "Connecting and turning on your monitor" on page 1-4 "Adjusting your monitor image" on page 2-3 "Adjusting your monitor" on page 2-3 The power ● The monitor...has power. ● Power on the monitor. ● Try using another power cord. ● Try using your problem. "Connecting and turning on your monitor image" on page 1-4 3-2 L2240p Wide Flat Panel Monitor User's Guide Select another electrical outlet....
User Manual
Page 24
... image setup does not help, perform manual image setup. Press at the bottom of the LCD technology and is not an LCD defect. Be sure the video cable is no image. Note: Have your monitor powered on your system. Reference information 3-3 Use or to select and press to restore operation.... ● Check the Power Options settings on for this monitor: 1680x1050 at the lowest setting. ...
... image setup does not help, perform manual image setup. Press at the bottom of the LCD technology and is not an LCD defect. Be sure the video cable is no image. Note: Have your monitor powered on your system. Reference information 3-3 Use or to select and press to restore operation.... ● Check the Power Options settings on for this monitor: 1680x1050 at the lowest setting. ...


