
Lenovo L2060 Wide LCD Monitor User Guide
Page 1
L2060 Wide LCD Monitor User's Guide
L2060 Wide LCD Monitor User's Guide
Lenovo L2060 Wide LCD Monitor User Guide
Page 3
... 2-1 Positioning your monitor 2-1 Quick tips for healthy work habits 2-2 Adjusting your monitor image 2-3 Using the direct access controls 2-3 Using the On-Screen Display (OSD) controls 2-4 Selecting a supported display mode 2-7 Understanding power management 2-8 Caring for your monitor 1-3 Chapter 2. Getting started 1-1 Shipping contents 1-1 Attaching the base and handling your monitor 1-1 Product overview 1-2 Adjusting the tilt 1-2 Monitor controls 1-2 Cable lock slot 1-3 Setting up your monitor 1-3 Connecting and turning on your monitor 2-9 Detaching the monitor stand...
... 2-1 Positioning your monitor 2-1 Quick tips for healthy work habits 2-2 Adjusting your monitor image 2-3 Using the direct access controls 2-3 Using the On-Screen Display (OSD) controls 2-4 Selecting a supported display mode 2-7 Understanding power management 2-8 Caring for your monitor 1-3 Chapter 2. Getting started 1-1 Shipping contents 1-1 Attaching the base and handling your monitor 1-1 Product overview 1-2 Adjusting the tilt 1-2 Monitor controls 1-2 Cable lock slot 1-3 Setting up your monitor 1-3 Connecting and turning on your monitor 2-9 Detaching the monitor stand...

Lenovo L2060 Wide LCD Monitor User Guide
Page 4
... covers. v To isolate the monitor from the electrical supply, you must remove the plug from the power outlet. Before installing this product will be attached must also be easily accessible. The power outlet should be connected to local, state, or federal laws. dispose according to properly wired and grounded power outlets. Product Disposal (TFT Monitors): v The fluorescent lamp in the liquid crystal display...
... covers. v To isolate the monitor from the electrical supply, you must remove the plug from the power outlet. Before installing this product will be attached must also be easily accessible. The power outlet should be connected to local, state, or federal laws. dispose according to properly wired and grounded power outlets. Product Disposal (TFT Monitors): v The fluorescent lamp in the liquid crystal display...
Lenovo L2060 Wide LCD Monitor User Guide
Page 5
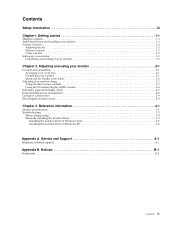
... LCD Monitor. Note: To attach a VESA mount, please see the illustrations below. Attached to monitor •D Interface Cable (exclude China mainland market) Attaching the base and handling your monitor To set up your monitor. Getting started This User's Guide contains detailed information on a flat surface. 2.Assemble the base with your monitor, please see "Detaching the monitor stand" on page 2-9. © Copyright Lenovo 2009. © 1-1 Note: Do not touch the monitor within the screen...
... LCD Monitor. Note: To attach a VESA mount, please see the illustrations below. Attached to monitor •D Interface Cable (exclude China mainland market) Attaching the base and handling your monitor To set up your monitor. Getting started This User's Guide contains detailed information on a flat surface. 2.Assemble the base with your monitor, please see "Detaching the monitor stand" on page 2-9. © Copyright Lenovo 2009. © 1-1 Note: Do not touch the monitor within the screen...

Lenovo L2060 Wide LCD Monitor User Guide
Page 6
Chapter 1. 1-2 Adjusting the tilt The illustration below shows the tilt range of the monitor. For more information, please see "Adjusting your monitor" on adjusting monitor positions, setting user controls. Monitor controls Your monitor has controls on the front which are used to use these controls, please see "Positioning your monitor image" on how to adjust the display. Product overview This section will provide information on page 2-1. For information on page 2-3.
Chapter 1. 1-2 Adjusting the tilt The illustration below shows the tilt range of the monitor. For more information, please see "Adjusting your monitor" on adjusting monitor positions, setting user controls. Monitor controls Your monitor has controls on the front which are used to use these controls, please see "Positioning your monitor image" on how to adjust the display. Product overview This section will provide information on page 2-1. For information on page 2-3.

Lenovo L2060 Wide LCD Monitor User Guide
Page 7
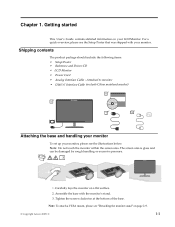
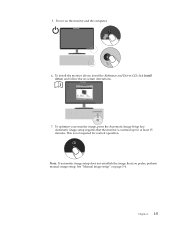
Power off your monitor. Connect the analog signal cable to the video port on the rear of your monitor (in the lower position). Chapter 1. 1-3 Cable lock slot Your monitor is already pre-attached to set up your monitor. Connecting and turning on your monitor Note: Be sure to read the Safety information located on how to your computer and all attached devices, and unplug the computer power cord. 2. Note: One end...
Power off your monitor. Connect the analog signal cable to the video port on the rear of your monitor (in the lower position). Chapter 1. 1-3 Cable lock slot Your monitor is already pre-attached to set up your monitor. Connecting and turning on your monitor Note: Be sure to read the Safety information located on how to your computer and all attached devices, and unplug the computer power cord. 2. Note: One end...
Lenovo L2060 Wide LCD Monitor User Guide
Page 9
To install the monitor driver, insert the Reference and Driver CD, click Install driver, and follow the on page 3-4 . See "Manual image setup" on -screen instructions. 7. This is warmed up for normal operation. To optimize your monitor image, press the Automatic Image Setup key. Note: If automatic image setup does not establish the image that the monitor is not required for at least 15 minutes. 5. Automatic image setup requires that you prefer, perform manual image setup. Chapter 1. 1-5 Power on the monitor and the computer. 6.
To install the monitor driver, insert the Reference and Driver CD, click Install driver, and follow the on page 3-4 . See "Manual image setup" on -screen instructions. 7. This is warmed up for normal operation. To optimize your monitor image, press the Automatic Image Setup key. Note: If automatic image setup does not establish the image that the monitor is not required for at least 15 minutes. 5. Automatic image setup requires that you prefer, perform manual image setup. Chapter 1. 1-5 Power on the monitor and the computer. 6.

Lenovo L2060 Wide LCD Monitor User Guide
Page 10
... work area clean and clear for monitors range from overhead lighting or nearby windows. In addition, use to suit your individual needs and the kind of the screen is important to achieve and maintain good working posture. The following are some other sturdy objects under the base of your monitor: • Use adequate lighting for visual distance and comfortable viewing when your posture or chair position...
... work area clean and clear for monitors range from overhead lighting or nearby windows. In addition, use to suit your individual needs and the kind of the screen is important to achieve and maintain good working posture. The following are some other sturdy objects under the base of your monitor: • Use adequate lighting for visual distance and comfortable viewing when your posture or chair position...

Lenovo L2060 Wide LCD Monitor User Guide
Page 11
... from your monitor screen and focus on the screen's contents. Quick tips for advice. A short break from your work . Make use of your computer. If you have a large effect on page 2-1 so you can maintain a comfortable and productive posture. • Use the monitor brightness, contrast, and image adjustment controls, if equipped, to optimize the image on your screen to meet your visual preferences. • Keep your monitor screen clean so you...
... from your monitor screen and focus on the screen's contents. Quick tips for advice. A short break from your work . Make use of your computer. If you have a large effect on page 2-1 so you can maintain a comfortable and productive posture. • Use the monitor brightness, contrast, and image adjustment controls, if equipped, to optimize the image on your screen to meet your visual preferences. • Keep your monitor screen clean so you...

Lenovo L2060 Wide LCD Monitor User Guide
Page 13
... icons. Use or to open the main OSD menu. 2. Enables DDC/CI by default. Chapter 2. 2-4 Press and hold the button for 10 seconds to disable / enable DDC/CI function. Using the On-Screen Display (OSD) controls To adjust the settings, the user controls can move backwards through the OSD. Select an icon and press to lock the OSD. Use or to move between options using or , then press to save. 3. Use OSD Exit Key...
... icons. Use or to open the main OSD menu. 2. Enables DDC/CI by default. Chapter 2. 2-4 Press and hold the button for 10 seconds to disable / enable DDC/CI function. Using the On-Screen Display (OSD) controls To adjust the settings, the user controls can move backwards through the OSD. Select an icon and press to lock the OSD. Use or to move between options using or , then press to save. 3. Use OSD Exit Key...
Lenovo L2060 Wide LCD Monitor User Guide
Page 14
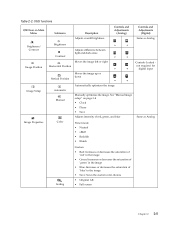
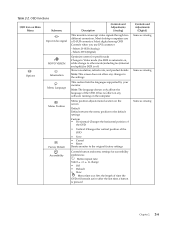
...; Green: Increases or decreases the saturation of 'green' in the image • Blue: Increases or decreases the saturation of red, green, and blue Preset mode • Neutral • sRGB • Reddish • Bluish Same as Analog Brightness/ Contrast Image Position Brightness Contrast Adjusts difference between light and dark areas Moves the image left or right Horizontal Position Vertical Position Moves the image up or down Controls Locked not required for digital input Image Setup Image Properties Automatic Manual Color Automatically optimizes the image Manually optimizes...
...; Green: Increases or decreases the saturation of 'green' in the image • Blue: Increases or decreases the saturation of red, green, and blue Preset mode • Neutral • sRGB • Reddish • Bluish Same as Analog Brightness/ Contrast Image Position Brightness Contrast Adjusts difference between light and dark areas Moves the image left or right Horizontal Position Vertical Position Moves the image up or down Controls Locked not required for digital input Image Setup Image Properties Automatic Manual Color Automatically optimizes the image Manually optimizes...
Lenovo L2060 Wide LCD Monitor User Guide
Page 15
... video signals through two different connectors. Select digital among OSD Controls when you use a D-SUB connector. Most desktop computers use DVI connector - OSD functions OSD Icon on the screen Default Default returns the menu position to the default settings Custom • Horizontal: Changes the horizontal position of the OSD • Vertical: Changes the vertical position of the OSD • Save • Cancel • Reset Resets monitor to the original factory settings Controls button and menu settings for specific tasks Change to the settings This section lists the languages...
... video signals through two different connectors. Select digital among OSD Controls when you use a D-SUB connector. Most desktop computers use DVI connector - OSD functions OSD Icon on the screen Default Default returns the menu position to the default settings Custom • Horizontal: Changes the horizontal position of the OSD • Vertical: Changes the vertical position of the OSD • Save • Cancel • Reset Resets monitor to the original factory settings Controls button and menu settings for specific tasks Change to the settings This section lists the languages...
Lenovo L2060 Wide LCD Monitor User Guide
Page 16
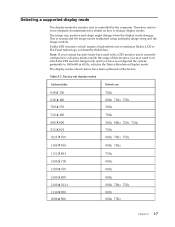
... 2. 2-7 The image size, position and shape might change display modes. This is inherently flicker-free. Unlike CRT monitors, which is controlled by the computer. Table 2-3. Selecting a supported display mode The display mode the monitor uses is the Native Resolution Display mode. preferably to 1600x900 at the factory. Note: If your computer documentation for details on how to minimize flicker, LCD or Flat Panel technology is normal and the image can be readjusted using automatic image setup and the image controls. The display modes shown below...
... 2. 2-7 The image size, position and shape might change display modes. This is inherently flicker-free. Unlike CRT monitors, which is controlled by the computer. Table 2-3. Selecting a supported display mode The display mode the monitor uses is the Native Resolution Display mode. preferably to 1600x900 at the factory. Note: If your computer documentation for details on how to minimize flicker, LCD or Flat Panel technology is normal and the image can be readjusted using automatic image setup and the image controls. The display modes shown below...

Lenovo L2060 Wide LCD Monitor User Guide
Page 18
...; Use any maintenance on a flat table with the back side up the cover and remove it. This may cause permanent damage to gently wipe the covers and the screen. • Remove grease or finger marks with a damp cloth and a little mild detergent. Detaching the monitor stand Step 1: Put the display on the monitor. VESA holes Chapter 2. 2-9 Step 2: Lift up . Step 3: Remove the four screws...
...; Use any maintenance on a flat table with the back side up the cover and remove it. This may cause permanent damage to gently wipe the covers and the screen. • Remove grease or finger marks with a damp cloth and a little mild detergent. Detaching the monitor stand Step 1: Put the display on the monitor. VESA holes Chapter 2. 2-9 Step 2: Lift up . Step 3: Remove the four screws...
Lenovo L2060 Wide LCD Monitor User Guide
Page 19
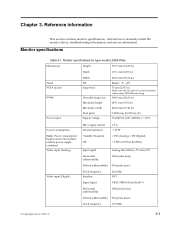
Monitor specifications Table 3-1. Chapter 3. Monitor specifications for type-model L2060 Wide Dimensions Height 370.7 mm (14.59 in) Depth 170.1 mm (6.69 in) Stand VESA mount Image Power input Width Tilt Supported Viewable image size Maximum height Maximum width Pixel pitch Supply voltage 476.0 mm (18.74 in) Range: -5°, +20° 75 mm (2.95 in) Make sure the AC jack is located downside when using VESA Mount setup 508.0 mm (20.00 in) 249.1 mm (9.81 in...
Monitor specifications Table 3-1. Chapter 3. Monitor specifications for type-model L2060 Wide Dimensions Height 370.7 mm (14.59 in) Depth 170.1 mm (6.69 in) Stand VESA mount Image Power input Width Tilt Supported Viewable image size Maximum height Maximum width Pixel pitch Supply voltage 476.0 mm (18.74 in) Range: -5°, +20° 75 mm (2.95 in) Make sure the AC jack is located downside when using VESA Mount setup 508.0 mm (20.00 in) 249.1 mm (9.81 in...

Lenovo L2060 Wide LCD Monitor User Guide
Page 20
Monitor specifications for type-model L2060 Wide Communications Supported Display Modes (VESA Standard modes between noted ranges) Temperature VESA DDC Horizontal frequency Vertical frequency Native Resolution Operating CI 30 kHz - 83 kHz(Pixel clock Table 3-1.
Monitor specifications for type-model L2060 Wide Communications Supported Display Modes (VESA Standard modes between noted ranges) Temperature VESA DDC Horizontal frequency Vertical frequency Native Resolution Operating CI 30 kHz - 83 kHz(Pixel clock Table 3-1.
Lenovo L2060 Wide LCD Monitor User Guide
Page 21
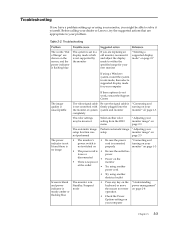
... a supported display mode for your computer If these options do not work, contact the Support Center The image quality is unacceptable The video signal cable is not connected with the monitor or system completely Be sure the signal cable is firmly plugged into the system and monitor "Connecting and turning on your monitor" on page 1-3 The color settings may be incorrect Select another color setting from the OSD menu "Adjusting your monitor image" on page 2-3 The automatic image setup...
... a supported display mode for your computer If these options do not work, contact the Support Center The image quality is unacceptable The video signal cable is not connected with the monitor or system completely Be sure the signal cable is firmly plugged into the system and monitor "Connecting and turning on your monitor" on page 1-3 The color settings may be incorrect Select another color setting from the OSD menu "Adjusting your monitor image" on page 2-3 The automatic image setup...
Lenovo L2060 Wide LCD Monitor User Guide
Page 22
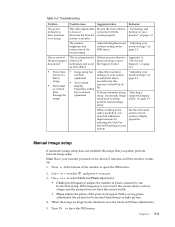
... video cable is connected with the system properly "Connecting and turning on your monitor" on page 1-3 The monitor brightness and contrast are more of the pixels appear discolored This is a characteristic of your system monitor image" on page 2-7 perform manual image setup When working in light picture. 4. Use or to select Clock and Phase adjustment. • Clock (pixel frequency) adjusts the number of the monitor to match the native page 2-3 image • Horizontal or vertical • Your system Display Properties setting resolution...
... video cable is connected with the system properly "Connecting and turning on your monitor" on page 1-3 The monitor brightness and contrast are more of the pixels appear discolored This is a characteristic of your system monitor image" on page 2-7 perform manual image setup When working in light picture. 4. Use or to select Clock and Phase adjustment. • Clock (pixel frequency) adjusts the number of the monitor to match the native page 2-3 image • Horizontal or vertical • Your system Display Properties setting resolution...
Lenovo L2060 Wide LCD Monitor User Guide
Page 23
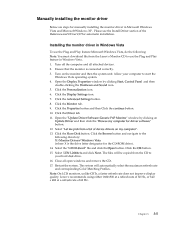
... maximum refresh rate and corresponding Color Matching Profiles. Open the "Update Driver Software-Generic PnP Monitor" window by clicking Start, Control Panel and then double-clicking the Hardware and Sound icon. 5. Restart the system. Note: On LCD monitors, unlike CRTs, a faster refresh rate does not improve display quality. Installing the monitor driver in Windows Vista To use the Plug and Play feature in Microsoft Windows Vista and Microsoft Windows XP . Click the Monitor tab. 9. Click the Advanced Settings button. 8. Manually installing the monitor driver...
... maximum refresh rate and corresponding Color Matching Profiles. Open the "Update Driver Software-Generic PnP Monitor" window by clicking Start, Control Panel and then double-clicking the Hardware and Sound icon. 5. Restart the system. Note: On LCD monitors, unlike CRTs, a faster refresh rate does not improve display quality. Installing the monitor driver in Windows Vista To use the Plug and Play feature in Microsoft Windows Vista and Microsoft Windows XP . Click the Monitor tab. 9. Click the Advanced Settings button. 8. Manually installing the monitor driver...
Lenovo L2060 Wide LCD Monitor User Guide
Page 24
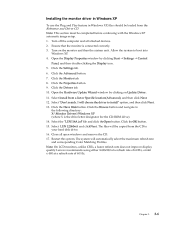
Turn on Update Driver. 11. Open the Display Properties window by clicking on the monitor and then the system unit. Click the Monitor tab. 8. Select Install from the CD to install" option, and then click Next. 13. I will automatically select the maximum refresh rate and corresponding Color Matching Profiles. Note: On LCD monitors, unlike CRTs, a faster refresh rate does not improve display quality. The system will choose the driver to your...
Turn on Update Driver. 11. Open the Display Properties window by clicking on the monitor and then the system unit. Click the Monitor tab. 8. Select Install from the CD to install" option, and then click Next. 13. I will automatically select the maximum refresh rate and corresponding Color Matching Profiles. Note: On LCD monitors, unlike CRTs, a faster refresh rate does not improve display quality. The system will choose the driver to your...

