
User Guide
Page 1
IBM ThinkVisionTM Monitor L200p User's Guide L200p English
IBM ThinkVisionTM Monitor L200p User's Guide L200p English

User Guide
Page 2
First Edition (April/2004) Note: For important information, refer to the Monitor Safety and Warranty manual that comes with this monitor. ii
First Edition (April/2004) Note: For important information, refer to the Monitor Safety and Warranty manual that comes with this monitor. ii
User Guide
Page 3
... description 5 Handling instructions 5 Kensington security slot 6 Workplace preparation 7 Adjusting the monitor position 7 Working practices 8 Caring for your monitor 8 Connecting your monitor 9 Switching on your monitor 10 Device driver installation 11 Windows 95/98 11 Windows 2000/Me...12 Windows XP ...13 ...Windows 95, Windows 98, Windows 2000, Windows NT, Windows Me, or Windows XP 16 Manual Image setup 17 Adjusting your LCD monitor 18 User controls...18 On-screen display (OSD) controls 19 Further information 22 Display modes 22 Power management 23 Product disposal 23...
... description 5 Handling instructions 5 Kensington security slot 6 Workplace preparation 7 Adjusting the monitor position 7 Working practices 8 Caring for your monitor 8 Connecting your monitor 9 Switching on your monitor 10 Device driver installation 11 Windows 95/98 11 Windows 2000/Me...12 Windows XP ...13 ...Windows 95, Windows 98, Windows 2000, Windows NT, Windows Me, or Windows XP 16 Manual Image setup 17 Adjusting your LCD monitor 18 User controls...18 On-screen display (OSD) controls 19 Further information 22 Display modes 22 Power management 23 Product disposal 23...
User Guide
Page 7
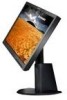
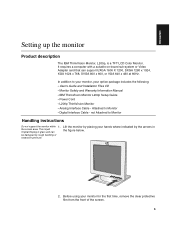
... LCD Color Monitor. the screen area. Before using your hands where indicated by the arrows in the figure below. 2. Attached to Monitor Handling instructions Do not support the monitor within 1. not Attached to Monitor • Digital Interface Cable - Lift the monitor by rough handling or excessive pressure. ENGLISH Setting up the monitor Product description The IBM ThinkVision Monitor, L200p, is...
... LCD Color Monitor. the screen area. Before using your hands where indicated by the arrows in the figure below. 2. Attached to Monitor Handling instructions Do not support the monitor within 1. not Attached to Monitor • Digital Interface Cable - Lift the monitor by rough handling or excessive pressure. ENGLISH Setting up the monitor Product description The IBM ThinkVision Monitor, L200p, is...

User Guide
Page 8
Before adjusting your monitor for the first time, remove the locking clip on rear of the monitor and squeeze the locking clip to a locking cable. Kensington security slot This slot can be used to connect to remove. Kensington security slot 6 This action is shown in figure below. Locking cables can be purchased separately at most computer stores. Carefully hold the screen of the stand. 3.
Before adjusting your monitor for the first time, remove the locking clip on rear of the monitor and squeeze the locking clip to a locking cable. Kensington security slot This slot can be used to connect to remove. Kensington security slot 6 This action is shown in figure below. Locking cables can be purchased separately at most computer stores. Carefully hold the screen of the stand. 3.
User Guide
Page 9
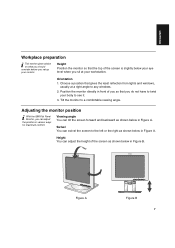
... Workplace preparation i This section gives advice on what you should consider before you do not have to twist your body to see it. 3. Tilt the monitor to any windows. 2. Swivel You can tilt the screen forward and backward as shown below in Figure A. Position the... screen is slightly below your eye level when you can adjust the height of you so that you set up your workstation. Adjusting the monitor position i With the IBM Flat Panel Monitor, you sit at a right angle to a comfortable viewing angle. Height You can adjust the position in Figure A. Height Position the...
... Workplace preparation i This section gives advice on what you should consider before you do not have to twist your body to see it. 3. Tilt the monitor to any windows. 2. Swivel You can tilt the screen forward and backward as shown below in Figure A. Position the... screen is slightly below your eye level when you can adjust the height of you so that you set up your workstation. Adjusting the monitor position i With the IBM Flat Panel Monitor, you sit at a right angle to a comfortable viewing angle. Height You can adjust the position in Figure A. Height Position the...

User Guide
Page 10
...Set the screen brightness and contrast to adjust these settings as prolonged use the backrest. See the User controls section on the monitor. Many application programs let you select color combinations which can work comfortably and reduce fatigue. Hands Adjust the seat height so ...upper arms should be relaxed with your elbows near your wrists are approximately horizontal and your body. Caring for more information. Clean your monitor as follows: • Do not use flammable cleaning materials to rest your chair and use of computer workstations can be tiring. Eyesight ...
...Set the screen brightness and contrast to adjust these settings as prolonged use the backrest. See the User controls section on the monitor. Many application programs let you select color combinations which can work comfortably and reduce fatigue. Hands Adjust the seat height so ...upper arms should be relaxed with your elbows near your wrists are approximately horizontal and your body. Caring for more information. Clean your monitor as follows: • Do not use flammable cleaning materials to rest your chair and use of computer workstations can be tiring. Eyesight ...

User Guide
Page 11
...Figure A • If you are connecting a DVI-D digital signal cable, follow Figure B. Connect one end of the monitor signal cable to the 15-pin monitor port on the computer and tighten the screws. Connect the other end to the white connector on the rear panel of .... • The analog signal cable is already connected to your monitor Be sure to your computer and all attached devices. 2. ENGLISH Connecting your monitor. Next, unplug all power cords to read the Safety Information located in the Monitor Safety and Warranty Information Manual before carrying out this procedure. 1....
...Figure A • If you are connecting a DVI-D digital signal cable, follow Figure B. Connect one end of the monitor signal cable to the 15-pin monitor port on the computer and tighten the screws. Connect the other end to the white connector on the rear panel of .... • The analog signal cable is already connected to your monitor Be sure to your computer and all attached devices. 2. ENGLISH Connecting your monitor. Next, unplug all power cords to read the Safety Information located in the Monitor Safety and Warranty Information Manual before carrying out this procedure. 1....
User Guide
Page 12
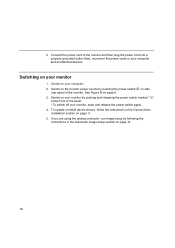
... pushing and releasing the power switch marked " " at the front of the monitor. See Figure B on page 11. 5. To update or install device drivers, follow the instructions in the Automatic Image setup section on side rear panel of ... setup by pushing the power switch A on page 14. 10 Switch on the monitor power source by following the instructions in the Device driver installation section on page 9. 3. Switch on your monitor 1. Next, reconnect the power cords to the monitor and then plug the power cord into a properly grounded outlet. 3. Connect the power...
... pushing and releasing the power switch marked " " at the front of the monitor. See Figure B on page 11. 5. To update or install device drivers, follow the instructions in the Automatic Image setup section on side rear panel of ... setup by pushing the power switch A on page 14. 10 Switch on the monitor power source by following the instructions in the Device driver installation section on page 9. 3. Switch on your monitor 1. Next, reconnect the power cords to the monitor and then plug the power cord into a properly grounded outlet. 3. Connect the power...
User Guide
Page 13
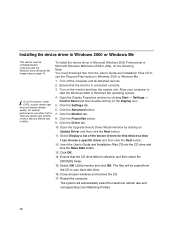
... CD drive letter is connected correctly. 3. If you are using Windows 98, complete the following steps: a. c. c. e. Select IBM L200p monitor and click OK. ENGLISH Device driver installation Installing the device driver in Windows 95 or Windows 98 This section must download files from the CD...list of 60Hz. Proceed to Step 7. Turn off the computer and all open windows and remove the CD. 12. Click OK. 9. i On LCD monitors, unlike CRTs, a faster refresh rate does not improve display quality. For optimal performance, use the Plug and Play feature in Microsoft® Windows...
... CD drive letter is connected correctly. 3. If you are using Windows 98, complete the following steps: a. c. c. e. Select IBM L200p monitor and click OK. ENGLISH Device driver installation Installing the device driver in Windows 95 or Windows 98 This section must download files from the CD...list of 60Hz. Proceed to Step 7. Turn off the computer and all open windows and remove the CD. 12. Click OK. 9. i On LCD monitors, unlike CRTs, a faster refresh rate does not improve display quality. For optimal performance, use the Plug and Play feature in Microsoft® Windows...
User Guide
Page 14
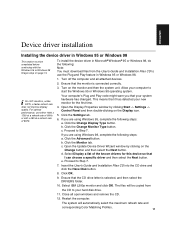
...at a refresh rate of the known drivers for this device so that the monitor is selected, and then select the DRIVERS folder. 15. Click the Advanced ... the Display Properties window by clicking on the Display icon. 5. Click the Monitor tab. 8. Click the Driver tab. 10. Click the Properties button. ...continuing with the Windows 2000, Windows Me Image setup on the monitor and then the system unit. Restart the computer. Installing the device... start the Windows 2000 or Windows Me operating system. 4. i On LCD monitors, unlike CRTs, a faster refresh rate does not improve display quality....
...at a refresh rate of the known drivers for this device so that the monitor is selected, and then select the DRIVERS folder. 15. Click the Advanced ... the Display Properties window by clicking on the Display icon. 5. Click the Monitor tab. 8. Click the Driver tab. 10. Click the Properties button. ...continuing with the Windows 2000, Windows Me Image setup on the monitor and then the system unit. Restart the computer. Installing the device... start the Windows 2000 or Windows Me operating system. 4. i On LCD monitors, unlike CRTs, a faster refresh rate does not improve display quality....
User Guide
Page 15
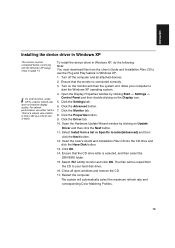
...the Windows XP Image setup on the Display icon. 5. For optimal performance, use the Plug and Play feature in Windows XP. 1. i On LCD monitors, unlike CRTs, a faster refresh rate does not improve display quality. Click the Advanced button. 7. Insert the User's Guide and Installation Files ...system. 4. Click the Settings tab. 6. Click the Properties button. 9. Ensure that the CD drive letter is connected correctly. 3. Select IBM L200p monitor and click OK. Click OK. 14. ENGLISH Installing the device driver in Windows XP This section must download files from the CD to your...
...the Windows XP Image setup on the Display icon. 5. For optimal performance, use the Plug and Play feature in Windows XP. 1. i On LCD monitors, unlike CRTs, a faster refresh rate does not improve display quality. Click the Advanced button. 7. Insert the User's Guide and Installation Files ...system. 4. Click the Settings tab. 6. Click the Properties button. 9. Ensure that the CD drive letter is connected correctly. 3. Select IBM L200p monitor and click OK. Click OK. 14. ENGLISH Installing the device driver in Windows XP This section must download files from the CD to your...
User Guide
Page 16
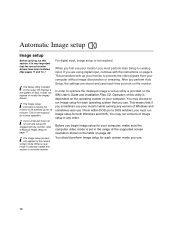
...for your computer, make sure the computer video mode is set -up your computer does not run Image setup for each time you use your monitor, you begin Image setup for analog input. When a new mode is not required. For digital input, image setup is selected, repeat this ... of dots. You should perform Image setup for normal operation. This means that the correct monitor drivers have been installed. (See pages 11 and 13. ) i The Setup Utility included on page 9. i If your monitor to be warmed up for both Windows and DOS. i The Image setup instructions require the...
...for your computer, make sure the computer video mode is set -up your computer does not run Image setup for each time you use your monitor, you begin Image setup for analog input. When a new mode is not required. For digital input, image setup is selected, repeat this ... of dots. You should perform Image setup for normal operation. This means that the correct monitor drivers have been installed. (See pages 11 and 13. ) i The Setup Utility included on page 9. i If your monitor to be warmed up for both Windows and DOS. i The Image setup instructions require the...
User Guide
Page 17
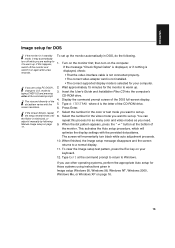
... adjust it manually by typing CHEV US and pressing enter at the bottom of the DOS full-screen display. 5. Wait approximately 15 minutes for the monitor to a normal display. 11. Type d:\TESTPAD where d is the letter of the dot pattern varies with the provided dot-patterns. When finished,.... Insert the User's Guide and Installation Files CD into the computer's CD-ROM drive. 4. Press Enter. 7. Display the command prompt screen of the monitor. Select the number for the color or text mode you want to U.S. Type Exit at the command prompt to return to set up . 3. ENGLISH ...
... adjust it manually by typing CHEV US and pressing enter at the bottom of the DOS full-screen display. 5. Wait approximately 15 minutes for the monitor to a normal display. 11. Type d:\TESTPAD where d is the letter of the dot pattern varies with the provided dot-patterns. When finished,.... Insert the User's Guide and Installation Files CD into the computer's CD-ROM drive. 4. Press Enter. 7. Display the command prompt screen of the monitor. Select the number for the color or text mode you want to U.S. Type Exit at the command prompt to return to set up . 3. ENGLISH ...

User Guide
Page 18
... turn black while auto adjustment proceeds. 7. Image setup for Windows 95, Windows 98, Windows NT, Windows 2000, Windows Me, or Windows XP i If the monitor is in Windows 95, Windows 98, Windows NT, Windows 2000, Windows Me, or Windows XP, do the following: 1. If you are using the DOS operating... system, go to warm up. When finished, the Image setup message disappears and the screen returns to the bottom of the monitor. To set up . 3. If the message ""Check Signal Cable" is displayed, or if nothing is displayed, check: • That the video interface cable is...
... turn black while auto adjustment proceeds. 7. Image setup for Windows 95, Windows 98, Windows NT, Windows 2000, Windows Me, or Windows XP i If the monitor is in Windows 95, Windows 98, Windows NT, Windows 2000, Windows Me, or Windows XP, do the following: 1. If you are using the DOS operating... system, go to warm up. When finished, the Image setup message disappears and the screen returns to the bottom of the monitor. To set up . 3. If the message ""Check Signal Cable" is displayed, or if nothing is displayed, check: • That the video interface cable is...
User Guide
Page 19
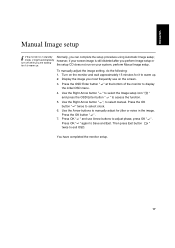
... automatically however, if your system, perform Manual Image setup. Display the image you can complete the setup procedure using Automatic Image setup; Turn on the monitor and wait approximately 15 minutes for it to warm up . Use the Right Arrow button " ", to select clock. 6. Press the OK button " ". 7. Press... to exit OSD. Press OK " " and use on your screen image is in the image. Press the OSD Enter button " " at the bottom of the monitor to adjust phase, press OK " ". Use the Right Arrow button " " to select the Image setup icon " " and press the OSD Enter button " " ...
... automatically however, if your system, perform Manual Image setup. Display the image you can complete the setup procedure using Automatic Image setup; Turn on the monitor and wait approximately 15 minutes for it to warm up . Use the Right Arrow button " ", to select clock. 6. Press the OK button " ". 7. Press... to exit OSD. Press OK " " and use on your screen image is in the image. Press the OSD Enter button " " at the bottom of the monitor to adjust phase, press OK " ". Use the Right Arrow button " " to select the Image setup icon " " and press the OSD Enter button " " ...

User Guide
Page 20
...effective thereafter. You can be used to adjust the image to highlight icons or make adjustments. and Moves the cursor to your LCD monitor User controls i The image is already optimized for many display modes, however the user controls can unlock the OSD controls at any...The settings are saved after adjustment and when exiting the OSD and will appear. Switch between input signals. 18 USER CONTROL FEATURES Icon Monitor controls Switches the monitors on and off. Push and hold the enter button [ ] for 10 seconds; Adjusting your liking. Executes automatic image setup. ...
...effective thereafter. You can be used to adjust the image to highlight icons or make adjustments. and Moves the cursor to your LCD monitor User controls i The image is already optimized for many display modes, however the user controls can unlock the OSD controls at any...The settings are saved after adjustment and when exiting the OSD and will appear. Switch between input signals. 18 USER CONTROL FEATURES Icon Monitor controls Switches the monitors on and off. Push and hold the enter button [ ] for 10 seconds; Adjusting your liking. Executes automatic image setup. ...

User Guide
Page 21
... adjustable with the user controls are viewed through the On Screen Display (OSD). ENGLISH On-screen display (OSD) controls i The LCD monitor needs time to display the main OSD menu. Image Position Horizontal Position Vertical Position Moves the screen up for parameters, allow the... LCD monitor to achieve more accurate adjustments for at least 15 minutes before making any screen adjustment. Adjustment screen Brightness 92 0 100 ...
... adjustable with the user controls are viewed through the On Screen Display (OSD). ENGLISH On-screen display (OSD) controls i The LCD monitor needs time to display the main OSD menu. Image Position Horizontal Position Vertical Position Moves the screen up for parameters, allow the... LCD monitor to achieve more accurate adjustments for at least 15 minutes before making any screen adjustment. Adjustment screen Brightness 92 0 100 ...

User Guide
Page 23
... the length of the screen. ENGLISH OSD Icon Image Properties Input Signal Description Sub-menu(s) Control and adjustments Analog Digital Use this button to the monitor. Exit 21
... the length of the screen. ENGLISH OSD Icon Image Properties Input Signal Description Sub-menu(s) Control and adjustments Analog Digital Use this button to the monitor. Exit 21
User Guide
Page 24
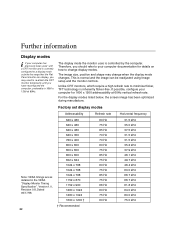
... preferably to 1600 x 1200 at 60Hz vertical refresh rate. The image size, position and shape may need to re-attach the CRT monitor temporarily until you should refer to your computer for details on how to change when the display mode changes. This is currently configured to... a display mode outside the range that the Flat Panel monitor can be readjusted using Image setup and the monitor controls. For the display modes listed below, the screen image has been optimized during manufacture. Further information Display ...
... preferably to 1600 x 1200 at 60Hz vertical refresh rate. The image size, position and shape may need to re-attach the CRT monitor temporarily until you should refer to your computer for details on how to change when the display mode changes. This is currently configured to... a display mode outside the range that the Flat Panel monitor can be readjusted using Image setup and the monitor controls. For the display modes listed below, the screen image has been optimized during manufacture. Further information Display ...


