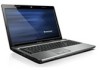
IdeaPad Z560 Battery Replacement - Lenovo
IdeaPad Z560 Battery Replacement
View Results Below
Free Lenovo IdeaPad Z560 manuals!
Problems with Lenovo IdeaPad Z560?
Ask a Question
Free Lenovo IdeaPad Z560 manuals!
Problems with Lenovo IdeaPad Z560?
Ask a Question
Related Manual Pages


Similar Questions


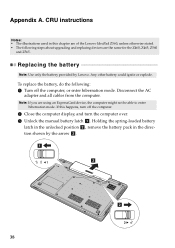
Battery Replacement
is it doable to change battery? if it is, how?
is it doable to change battery? if it is, how?
(Posted by kwonhyuktaek 11 years ago)

Lenovo Battery Problem
I have a lenovo z560. i charge the laptop but the charge only lasts for 30 minutes even though it is...
I have a lenovo z560. i charge the laptop but the charge only lasts for 30 minutes even though it is...
(Posted by Anonymous-93748 11 years ago)

My Lenovo G470 Is Not Starting
MY lenovo g470 is not starting even though the battery light shows it charging
MY lenovo g470 is not starting even though the battery light shows it charging
(Posted by deepds2k5 11 years ago)

Lenovo Ideapad U160 Dummy Media Card Replacement Help!!!!
I lost the dummy media card to my Lenovo ideapad U160 while carrying it around somewhere. Where can ...
I lost the dummy media card to my Lenovo ideapad U160 while carrying it around somewhere. Where can ...
(Posted by alisha1094 12 years ago)