User Guide
Page 2
... and/or your computer may include features that are not described in this user guide. • The illustrations used in this manual are for Lenovo IdeaPad Y500 unless otherwise stated. • The illustrations in Contract No. Regulatory Notice • To refer to it, go to http://support.lenovo.com and click User guides and manuals. GS-35F-05925. If you are using Windows® 8.
... and/or your computer may include features that are not described in this user guide. • The illustrations used in this manual are for Lenovo IdeaPad Y500 unless otherwise stated. • The illustrations in Contract No. Regulatory Notice • To refer to it, go to http://support.lenovo.com and click User guides and manuals. GS-35F-05925. If you are using Windows® 8.
User Guide
Page 3
... to sleep or shutting it down 20 Connecting to know your computer 1 Top view ...1 Left-side view ...7 Right-side view...10 Front view ...13 Bottom view ...15 Chapter 2. Troubleshooting ...25 Frequently asked questions ...25 Troubleshooting ...27 Appendix. CRU instructions...31 Replacing the battery ...31 Replacing the removable module ...32 Trademarks ...34 i Getting to wireless LAN ...22 Help and support ...23 Chapter 3. Lenovo OneKey Recovery system...
... to sleep or shutting it down 20 Connecting to know your computer 1 Top view ...1 Left-side view ...7 Right-side view...10 Front view ...13 Bottom view ...15 Chapter 2. Troubleshooting ...25 Frequently asked questions ...25 Troubleshooting ...27 Appendix. CRU instructions...31 Replacing the battery ...31 Replacing the removable module ...32 Trademarks ...34 i Getting to wireless LAN ...22 Help and support ...23 Chapter 3. Lenovo OneKey Recovery system...
User Guide
Page 10
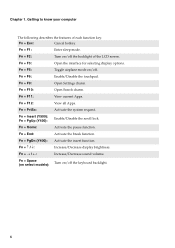
... (Y500): Fn + PgUp (Y400): Enable/Disable the scroll lock. Fn + Esc: Cancel hotkey. Fn + Home: Activate the pause function. Fn Increase/Decrease sound volume. Fn + Space (on select models): Turn on /off the keyboard backlight. 6 Fn + F1: Enter sleep mode. Fn + F5: Toggle airplane mode on /off . Fn + F9: Open Settings charm. Getting to know your computer The following describes the features of the LCD screen. Fn + F6: Enable/Disable the touchpad. Fn + PrtSc: Activate...
... (Y500): Fn + PgUp (Y400): Enable/Disable the scroll lock. Fn + Esc: Cancel hotkey. Fn + Home: Activate the pause function. Fn Increase/Decrease sound volume. Fn + Space (on select models): Turn on /off the keyboard backlight. 6 Fn + F1: Enter sleep mode. Fn + F5: Toggle airplane mode on /off . Fn + F9: Open Settings charm. Getting to know your computer The following describes the features of the LCD screen. Fn + F6: Enable/Disable the touchpad. Fn + PrtSc: Activate...
User Guide
Page 11
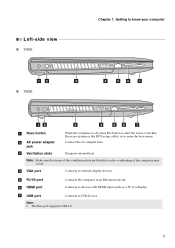
... a display. Dissipate internal heat. f HDMI port Connects to USB devices. Note: • The blue port supports USB 3.0. 7 Getting to know your computer Left-side view „ Y400 ab c d ef g „ Y500 ab c d ef g a Novo button b AC power adapter jack c Ventilation slots When the computer is off, press this button to start the Lenovo OneKey Recovery system or the BIOS setup utility, or to an Ethernet network. e RJ-45 port Connects the computer to enter the boot menu. Note: Make sure...
... a display. Dissipate internal heat. f HDMI port Connects to USB devices. Note: • The blue port supports USB 3.0. 7 Getting to know your computer Left-side view „ Y400 ab c d ef g „ Y500 ab c d ef g a Novo button b AC power adapter jack c Ventilation slots When the computer is off, press this button to start the Lenovo OneKey Recovery system or the BIOS setup utility, or to an Ethernet network. e RJ-45 port Connects the computer to enter the boot menu. Note: Make sure...

User Guide
Page 12
... computer „ Connecting USB devices You can connect a USB device to your computer by inserting its USB plug (Type A) into a particular USB port on your computer as notebook computers, PDAs and cell phones. However, some devices may require you can connect to and transfer data wirelessly to remove the device before connecting it , and then installs the driver automatically. Click the Safely Remove Hardware and Eject Media icon in sleep mode, you to a power source before...
... computer „ Connecting USB devices You can connect a USB device to your computer by inserting its USB plug (Type A) into a particular USB port on your computer as notebook computers, PDAs and cell phones. However, some devices may require you can connect to and transfer data wirelessly to remove the device before connecting it , and then installs the driver automatically. Click the Safely Remove Hardware and Eject Media icon in sleep mode, you to a power source before...
User Guide
Page 15
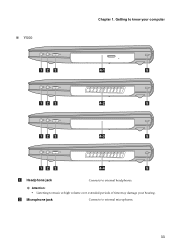
b Microphone jack Connects to know your hearing. Attention: • Listening to music at high volume over extended periods of time may damage your computer ab c 4-1 e ab c 4-2 e ab c 4-3 e ab c 4-4 e a Headphone jack Connects to external headphones. „ Y500 Chapter 1. Getting to external microphones. 11
b Microphone jack Connects to know your hearing. Attention: • Listening to music at high volume over extended periods of time may damage your computer ab c 4-1 e ab c 4-2 e ab c 4-3 e ab c 4-4 e a Headphone jack Connects to external headphones. „ Y500 Chapter 1. Getting to external microphones. 11
User Guide
Page 16
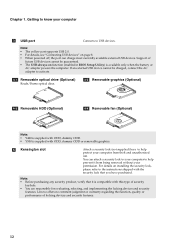
... implementing the locking devices and security features. Lenovo offers no comment judgment or warranty regarding the function, quality or performance of future USB devices cannot be charged, connect the AC adapter to USB devices. You can charge most currently available external USB devices. If an external USB device cannot be guaranteed. • The USB-always-on function (enabled in BIOS Setup Utility) is compatible with ODD, dummy ODD or removable graphics. e Kensington slot Attach a security lock (not...
... implementing the locking devices and security features. Lenovo offers no comment judgment or warranty regarding the function, quality or performance of future USB devices cannot be charged, connect the AC adapter to USB devices. You can charge most currently available external USB devices. If an external USB device cannot be guaranteed. • The USB-always-on function (enabled in BIOS Setup Utility) is compatible with ODD, dummy ODD or removable graphics. e Kensington slot Attach a security lock (not...

User Guide
Page 18
... memory card slot. Note: Before removing the memory card, disable it clicks into place. Note: The dummy card is not in use . 2 Slide the memory card in until it by Windows safely remove hardware and eject media utility to know your computer „ Using memory cards (not supplied) Your computer supports the following types of memory cards: • Secure Digital (SD) card • Secure Digital PRO (SD PRO) card • MultiMediaCard (MMC) • Memory Stick (MS) • Memory Stick PRO (MS PRO...
... memory card slot. Note: Before removing the memory card, disable it clicks into place. Note: The dummy card is not in use . 2 Slide the memory card in until it by Windows safely remove hardware and eject media utility to know your computer „ Using memory cards (not supplied) Your computer supports the following types of memory cards: • Secure Digital (SD) card • Secure Digital PRO (SD PRO) card • MultiMediaCard (MMC) • Memory Stick (MS) • Memory Stick PRO (MS PRO...
User Guide
Page 21
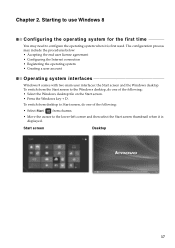
...; Accepting the end user license agreement • Configuring the Internet connection • Registering the operating system • Creating a user account Operating system interfaces Windows 8 comes with two main user interfaces: the Start screen and the Windows desktop. Start screen Desktop 17 To switch from desktop to Start screen, do one of the following : • Select the Windows desktop tile on the Start screen. • Press the Windows key + D. Chapter 2. To switch from charms. •...
...; Accepting the end user license agreement • Configuring the Internet connection • Registering the operating system • Creating a user account Operating system interfaces Windows 8 comes with two main user interfaces: the Start screen and the Windows desktop. Start screen Desktop 17 To switch from desktop to Start screen, do one of the following : • Select the Windows desktop tile on the Start screen. • Press the Windows key + D. Chapter 2. To switch from charms. •...
User Guide
Page 24
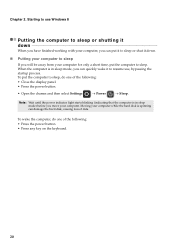
...; Close the display panel. • Press the power button. • Open the charms and then select Settings → Power → Sleep. To put the computer to sleep. Note: Wait until the power indicator light starts blinking (indicating that the computer is spinning can put it to sleep or shut it down . „ Putting your computer while the hard disk is in sleep mode, you can quickly wake it to resume use Windows 8 Putting...
...; Close the display panel. • Press the power button. • Open the charms and then select Settings → Power → Sleep. To put the computer to sleep. Note: Wait until the power indicator light starts blinking (indicating that the computer is spinning can put it to sleep or shut it down . „ Putting your computer while the hard disk is in sleep mode, you can quickly wake it to resume use Windows 8 Putting...

User Guide
Page 26
... key or passphrase. 22 Then toggle the airplane mode switch to a wireless network After wireless has been enabled, the computer will automatically scan for available wireless networks and display them in the list, and then click Connect. Starting to use Windows 8 Connecting to wireless LAN Enabling a wireless connection To enable wireless functions, do one of the following: • Press to disable airplane mode. • Open the charms and select Settings → to open the Network configuration page. To connect to a wireless network, click the network...
... key or passphrase. 22 Then toggle the airplane mode switch to a wireless network After wireless has been enabled, the computer will automatically scan for available wireless networks and display them in the list, and then click Connect. Starting to use Windows 8 Connecting to wireless LAN Enabling a wireless connection To enable wireless functions, do one of the following: • Press to disable airplane mode. • Open the charms and select Settings → to open the Network configuration page. To connect to a wireless network, click the network...
User Guide
Page 28
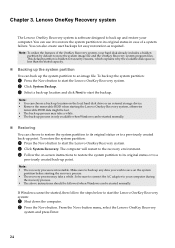
... button. Make sure to back up any data you wish to save on the local hard disk drive or an external storage device. • Remove the removable HDD when starting the recovery process. • The recovery process may take a while. Note: • The recovery process is software designed to back up the system partition to a previously created back-up location on the system partition before starting the Lenovo Onekey Recovery system, otherwise removable HDD...
... button. Make sure to back up any data you wish to save on the local hard disk drive or an external storage device. • Remove the removable HDD when starting the recovery process. • The recovery process may take a while. Note: • The recovery process is software designed to back up the system partition to a previously created back-up location on the system partition before starting the Lenovo Onekey Recovery system, otherwise removable HDD...

User Guide
Page 29
... period and type of my computer? For the warranty applicable to the factory status. You can also download the latest device drivers from Lenovo consumer support Website. „ Lenovo OneKey Recovery system Where are the installation discs for the hardware devices that came with a Windows operating system, Lenovo provides drivers for Lenovo preinstalled software (desktop software)? Your computer did not come with your hard disk. Chapter 4. Troubleshooting Frequently asked questions This section lists frequently...
... period and type of my computer? For the warranty applicable to the factory status. You can also download the latest device drivers from Lenovo consumer support Website. „ Lenovo OneKey Recovery system Where are the installation discs for the hardware devices that came with a Windows operating system, Lenovo provides drivers for Lenovo preinstalled software (desktop software)? Your computer did not come with your hard disk. Chapter 4. Troubleshooting Frequently asked questions This section lists frequently...
User Guide
Page 30
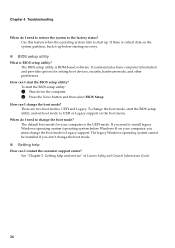
...When do I change the boot mode? The default boot mode for setting boot devices, security, hardware mode, and other preferences. Getting help How can I need to restore the system to install legacy Windows operating system (operating system before starting recovery. „ BIOS setup utility What is the UEFI mode. How can I contact the customer support center? The BIOS setup utility is ROM-based software. To start up before Windows 8) on the boot menu. When do I start the BIOS setup utility? Chapter 4. To change the boot mode to change the boot mode? The legacy...
...When do I change the boot mode? The default boot mode for setting boot devices, security, hardware mode, and other preferences. Getting help How can I need to restore the system to install legacy Windows operating system (operating system before starting recovery. „ BIOS setup utility What is the UEFI mode. How can I contact the customer support center? The BIOS setup utility is ROM-based software. To start up before Windows 8) on the boot menu. When do I start the BIOS setup utility? Chapter 4. To change the boot mode to change the boot mode? The legacy...
User Guide
Page 31
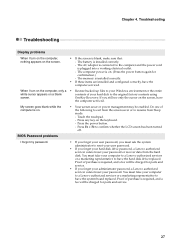
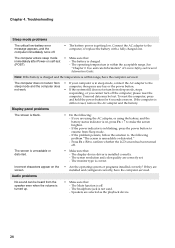
... will be charged for parts and service. • If you forget your hard disk drive password, a Lenovo authorized servicer cannot reset your Windows environment or the entire white cursor appears on the screen, have the computer serviced. BIOS Password problems I turn on the computer, only a • Restore backed-up files to your password or recover data from Sleep mode: - You must take your password. Troubleshooting Troubleshooting Display problems When I forgot my password. • If you forget your user password, you...
... will be charged for parts and service. • If you forget your hard disk drive password, a Lenovo authorized servicer cannot reset your Windows environment or the entire white cursor appears on the screen, have the computer serviced. BIOS Password problems I turn on the computer, only a • Restore backed-up files to your password or recover data from Sleep mode: - You must take your password. Troubleshooting Troubleshooting Display problems When I forgot my password. • If you forget your user password, you...
User Guide
Page 32
... screen. Chapter 4. Use and care Information" of Lenovo Safety and General Information Guide. Troubleshooting Sleep mode problems The critical low-battery error message appears, and the computer immediately turns off . If the power indicator is getting low. The Mute function is installed correctly. - The computer enters sleep mode • Make sure that: immediately after Power-on the • Are the operating system or programs installed correctly? The display device driver is off the computer, please reset...
... screen. Chapter 4. Use and care Information" of Lenovo Safety and General Information Guide. Troubleshooting Sleep mode problems The critical low-battery error message appears, and the computer immediately turns off . If the power indicator is getting low. The Mute function is installed correctly. - The computer enters sleep mode • Make sure that: immediately after Power-on the • Are the operating system or programs installed correctly? The display device driver is off the computer, please reset...
User Guide
Page 33
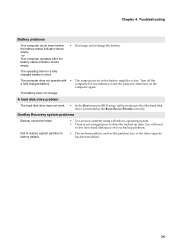
... hard disk drive does not work. • In the Boot menu in BIOS setup utility, make sure that the hard disk drive is short. Fail to restore system partition to free more hard disk space on the computer again. Turn off the a fully charged battery. The operating time for one minute to store the backed up data. OneKey Recovery system problems Backup cannot be active. The computer does not operate with • The surge protector in the Boot Device...
... hard disk drive does not work. • In the Boot menu in BIOS setup utility, make sure that the hard disk drive is short. Fail to restore system partition to free more hard disk space on the computer again. Turn off the a fully charged battery. The operating time for one minute to store the backed up data. OneKey Recovery system problems Backup cannot be active. The computer does not operate with • The surge protector in the Boot Device...
User Guide
Page 34
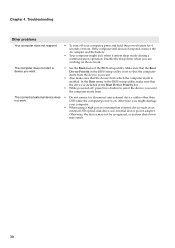
... start a device you might lock when it enters sleep mode during a communication operation. USB while the computer power is on the network. If the computer still does not respond, remove the AC adapter and the battery. • Your computer might damage your computer, press and hold the power button for 4 seconds or more. The connected external device does • Do not connect or disconnect any external device cables other than not work. Troubleshooting Other problems...
... start a device you might lock when it enters sleep mode during a communication operation. USB while the computer power is on the network. If the computer still does not respond, remove the AC adapter and the battery. • Your computer might damage your computer, press and hold the power button for 4 seconds or more. The connected external device does • Do not connect or disconnect any external device cables other than not work. Troubleshooting Other problems...
User Guide
Page 35
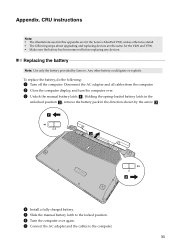
... the unlocked position b , remove the battery pack in this appendix are for the Y400 and Y500. • Make sure the battery has been removed before replacing any devices. CRU instructions Note: • The illustrations used in the direction shown by Lenovo. Appendix. To replace the battery, do the following steps about upgrading and replacing devices are the same for the Lenovo IdeaPad Y500, unless otherwise stated. • The following : 1 Turn off...
... the unlocked position b , remove the battery pack in this appendix are for the Y400 and Y500. • Make sure the battery has been removed before replacing any devices. CRU instructions Note: • The illustrations used in the direction shown by Lenovo. Appendix. To replace the battery, do the following steps about upgrading and replacing devices are the same for the Lenovo IdeaPad Y500, unless otherwise stated. • The following : 1 Turn off...
User Guide
Page 37
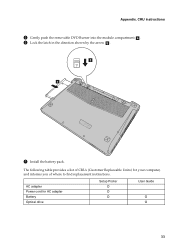
AC adapter Power cord for your computer, and informs you of CRUs (Customer Replaceable Units) for AC adapter Battery Optical drive Setup Poster O O O User Guide O O 33 e d 7 Install the battery pack. The following table provides a list of where to find replacement instructions. CRU instructions 5 Gently push the removable DVD Burner into the module compartment d . 6 Lock the latch in the direction shown by the arrow e . Appendix.
AC adapter Power cord for your computer, and informs you of CRUs (Customer Replaceable Units) for AC adapter Battery Optical drive Setup Poster O O O User Guide O O 33 e d 7 Install the battery pack. The following table provides a list of where to find replacement instructions. CRU instructions 5 Gently push the removable DVD Burner into the module compartment d . 6 Lock the latch in the direction shown by the arrow e . Appendix.


