
Hardware Maintenance Manual
Page 1
IdeaCentre Q190 Hardware Maintenance Manual ideaideaideaCentreidea Machine Types: 10115/6281
IdeaCentre Q190 Hardware Maintenance Manual ideaideaideaCentreidea Machine Types: 10115/6281

Hardware Maintenance Manual
Page 4
LIMITED AND RESTRICTED RIGHTS NOTICE: If data or software are delivered pursuant a General Services Administration "GSA" contract, use, reproduction, or disclosure is subject to restrictions set forth in Contract No. GS-35F-05925 Second Edition (December 2012)17th © Copyright Lenovo 2012.
LIMITED AND RESTRICTED RIGHTS NOTICE: If data or software are delivered pursuant a General Services Administration "GSA" contract, use, reproduction, or disclosure is subject to restrictions set forth in Contract No. GS-35F-05925 Second Edition (December 2012)17th © Copyright Lenovo 2012.

Hardware Maintenance Manual
Page 5
... Replacing the system fan 33 Replacing the motherboard 34 Replacing the keyboard and mouse 35 FRU lists 36 Chapter 9. Additional Service Information 43 © Copyright Lenovo 2012 iii General Checkout . . . . . 11 Chapter 5. Symptom-to-FRU Index . . 17 Hard disk drive boot error 17 Power Supply Problems 17 POST error codes 18...
... Replacing the system fan 33 Replacing the motherboard 34 Replacing the keyboard and mouse 35 FRU lists 36 Chapter 9. Additional Service Information 43 © Copyright Lenovo 2012 iii General Checkout . . . . . 11 Chapter 5. Symptom-to-FRU Index . . 17 Hard disk drive boot error 17 Power Supply Problems 17 POST error codes 18...

Hardware Maintenance Manual
Page 7
Before servicing a Lenovo product, be sure to read the Safety Information. It is invalid for IdeaCentre Q190 computers listed on the cover. Lesen Sie unbedingt alle Hinweise vom Typ "ACHTUNG" oder "VORSICHT" in this manual This manual contains service and reference ...DANGER et ATTENTION du présent document avant d'exécuter les instructions. It is only used for trained servicers who are familiar with Lenovo computer products. Chapter 1. Important Safety Information Be sure to read all CAUTION and DANGER sections in this manual before following any of the TV ...
Before servicing a Lenovo product, be sure to read the Safety Information. It is invalid for IdeaCentre Q190 computers listed on the cover. Lesen Sie unbedingt alle Hinweise vom Typ "ACHTUNG" oder "VORSICHT" in this manual This manual contains service and reference ...DANGER et ATTENTION du présent document avant d'exécuter les instructions. It is only used for trained servicers who are familiar with Lenovo computer products. Chapter 1. Important Safety Information Be sure to read all CAUTION and DANGER sections in this manual before following any of the TV ...

Hardware Maintenance Manual
Page 9
... familiar with before returning the machine to the customer. Electrical safety CAUTION: Electrical current from the muscles in the installation and configuration procedures. © Copyright Lenovo 2012 3 Lift by standing or by pushing up above your leg muscles; Do not attempt to your feet. 3. If your back. Ensure you open the...
... familiar with before returning the machine to the customer. Electrical safety CAUTION: Electrical current from the muscles in the installation and configuration procedures. © Copyright Lenovo 2012 3 Lift by standing or by pushing up above your leg muscles; Do not attempt to your feet. 3. If your back. Ensure you open the...

Hardware Maintenance Manual
Page 10
... machine frames. Some hand tools have , near power supplies - If you may prevent a current from electrical shock. • Find the room emergency power-off power. 4 IdeaCentre Q190Hardware Maintenance Manual Remember: There must be a complete circuit to cause electrical shock.
... machine frames. Some hand tools have , near power supplies - If you may prevent a current from electrical shock. • Find the room emergency power-off power. 4 IdeaCentre Q190Hardware Maintenance Manual Remember: There must be a complete circuit to cause electrical shock.

Hardware Maintenance Manual
Page 11
This guide addresses only those items. However, good judgment should be used to identify potential safety hazards due to attachment of features or options not covered by equalizing the charge so that the machine, the part, the work mat, and the person handling the part are inserted into the product. Check the power cord for worn, frayed, or pinched cables. 8. The power cord should be and whether you in identifying potentially unsafe conditions on these conditions and the safety hazards they present: • Electrical hazards, especially primary power (primary voltage on the frame...
This guide addresses only those items. However, good judgment should be used to identify potential safety hazards due to attachment of features or options not covered by equalizing the charge so that the machine, the part, the work mat, and the person handling the part are inserted into the product. Check the power cord for worn, frayed, or pinched cables. 8. The power cord should be and whether you in identifying potentially unsafe conditions on these conditions and the safety hazards they present: • Electrical hazards, especially primary power (primary voltage on the frame...

Hardware Maintenance Manual
Page 12
... side of the electrical outlet can use one hand only to connect or disconnect signal cables. • Never turn on this product or attached devices. 6 IdeaCentre Q190Hardware Maintenance Manual Proper grounding of a grounded work surface. Attach the ESD ground clip to provide a static-free work mat to any cables or perform...
... side of the electrical outlet can use one hand only to connect or disconnect signal cables. • Never turn on this product or attached devices. 6 IdeaCentre Q190Hardware Maintenance Manual Proper grounding of a grounded work surface. Attach the ESD ground clip to provide a static-free work mat to any cables or perform...
Hardware Maintenance Manual
Page 13
Attach power cords to devices. 3. To Disconnect 1. CAUTION: When replacing the lithium battery, use only Part Number 45C1566 or an equivalent type battery recommended by the same manufacturer. Note the following : • Do not remove the covers. To Connect 1. If your system has a module containing a lithium battery, replace it only with optical instruments, and avoid direct exposure to the beam. Do not: • Throw or immerse into the beam, do not view directly with the same module type made by the manufacturer. Safety information 7 First, remove power cords from ...
Attach power cords to devices. 3. To Disconnect 1. CAUTION: When replacing the lithium battery, use only Part Number 45C1566 or an equivalent type battery recommended by the same manufacturer. Note the following : • Do not remove the covers. To Connect 1. If your system has a module containing a lithium battery, replace it only with optical instruments, and avoid direct exposure to the beam. Do not: • Throw or immerse into the beam, do not view directly with the same module type made by the manufacturer. Safety information 7 First, remove power cords from ...

Hardware Maintenance Manual
Page 14
The device also might have more than one power cord. To remove all electrical current from the device, ensure that all power cords are disconnected from the power source. 2 1 CAUTION: Do not place any object weighing more than 82 kg (180 lbs.) on the power supply do not turn off the electrical current supplied to the device. ≥18 kg(37 lbs) CAUTION: Use safe practices when lifting. ≥32 kg(70.5 lbs) ≥55 kg(121.2 lbs) CAUTION: The power control button on the device and the power switch on top of rack-mounted devices. 8 IdeaCentre Q190Hardware Maintenance Manual
The device also might have more than one power cord. To remove all electrical current from the device, ensure that all power cords are disconnected from the power source. 2 1 CAUTION: Do not place any object weighing more than 82 kg (180 lbs.) on the power supply do not turn off the electrical current supplied to the device. ≥18 kg(37 lbs) CAUTION: Use safe practices when lifting. ≥32 kg(70.5 lbs) ≥55 kg(121.2 lbs) CAUTION: The power control button on the device and the power switch on top of rack-mounted devices. 8 IdeaCentre Q190Hardware Maintenance Manual

Hardware Maintenance Manual
Page 15
... general information that applies to 106KPa Electrical input: Input voltage: 90V-264V(AC) Input frequency: 47Hz-63Hz © Copyright Lenovo 2012 9 Specifications This section lists the physical specifications for your computer. Type IdeaCentre Q190 This section lists the physical specifications. This section lists the physical specifications for your computer. Chapter 3. Environment Air temperature...
... general information that applies to 106KPa Electrical input: Input voltage: 90V-264V(AC) Input frequency: 47Hz-63Hz © Copyright Lenovo 2012 9 Specifications This section lists the physical specifications for your computer. Type IdeaCentre Q190 This section lists the physical specifications. This section lists the physical specifications for your computer. Chapter 3. Environment Air temperature...

Hardware Maintenance Manual
Page 17
Data or programs can be overwritten if you cannot continue, replace the last device tested. © Copyright Lenovo 2012 11 For an explanation of the problem: 1. Set all external devices. 5. Power-on the display. Power-on the computer. • Look for displayed error ...
Data or programs can be overwritten if you cannot continue, replace the last device tested. © Copyright Lenovo 2012 11 For an explanation of the problem: 1. Set all external devices. 5. Power-on the display. Power-on the computer. • Look for displayed error ...

Hardware Maintenance Manual
Page 19
... right side of your computer and data. However, the operating-system settings might override any combination of up to use your user name © Copyright Lenovo 2012 13 When you must use the keyboard. If a Power-On Password or an administrator password has been set any passwords, read the following sections...
... right side of your computer and data. However, the operating-system settings might override any combination of up to use your user name © Copyright Lenovo 2012 13 When you must use the keyboard. If a Power-On Password or an administrator password has been set any passwords, read the following sections...

Hardware Maintenance Manual
Page 20
Setting, changing, and deleting a Administrator password To set Administrator password, do the following: Note: A password can be installed. 14 IdeaCentre Q190Hardware Maintenance Manual To delete a previously set , change, or delete a password, do the following : Note: When prompted for maintaining the settings of several computers, you ...
Setting, changing, and deleting a Administrator password To set Administrator password, do the following: Note: A password can be installed. 14 IdeaCentre Q190Hardware Maintenance Manual To delete a previously set , change, or delete a password, do the following : Note: When prompted for maintaining the settings of several computers, you ...

Hardware Maintenance Manual
Page 21
A setup notice will be used. Select Exit. 4. Enabling or disabling a device The Devices options is set Power-On Password, do the following devices: USB Functions Select whether to enable or disable USB (Universal Serial Bus) functions. Onboard Audio Controller Select whether to enable or disable the Onboard Audio Controller, when feature is set to Disabled all devices connected to the SATA connectors (e.g. a headphone or a microphone) are disabled and can't be used to enable or disable user access to the following : 1. Onboard Ethernet Controller or Onboard PXE Controller ...
A setup notice will be used. Select Exit. 4. Enabling or disabling a device The Devices options is set Power-On Password, do the following devices: USB Functions Select whether to enable or disable USB (Universal Serial Bus) functions. Onboard Audio Controller Select whether to enable or disable the Onboard Audio Controller, when feature is set to Disabled all devices connected to the SATA connectors (e.g. a headphone or a microphone) are disabled and can't be used to enable or disable user access to the following : 1. Onboard Ethernet Controller or Onboard PXE Controller ...

Hardware Maintenance Manual
Page 22
Turn off your changes will not be saved. 16 IdeaCentre Q190Hardware Maintenance Manual Start the Setup Utility program (see "Starting the Setup Utility program" on the computer. Press and hold the F12 key then turn ...
Turn off your changes will not be saved. 16 IdeaCentre Q190Hardware Maintenance Manual Start the Setup Utility program (see "Starting the Setup Utility program" on the computer. Press and hold the F12 key then turn ...
Hardware Maintenance Manual
Page 23
... 4, "General Checkout," on the boot drive. FRU/Action Reseat connectors Power Cord Power-on the boot drive. Install an operating system on Switch © Copyright Lenovo 2012 17
... 4, "General Checkout," on the boot drive. FRU/Action Reseat connectors Power Cord Power-on the boot drive. Install an operating system on Switch © Copyright Lenovo 2012 17

Hardware Maintenance Manual
Page 24
... drive is no keys are invalid. a. Make sure the keyboard is properly connected to find a suitable boot device. Power-off the computer. 2. Any adapters 18 IdeaCentre Q190Hardware Maintenance Manual POST error codes Each time you turn on the system. The CMOS battery is jumpered as Primary Master/Primary Slave/ Secondary Master...
... drive is no keys are invalid. a. Make sure the keyboard is properly connected to find a suitable boot device. Power-off the computer. 2. Any adapters 18 IdeaCentre Q190Hardware Maintenance Manual POST error codes Each time you turn on the system. The CMOS battery is jumpered as Primary Master/Primary Slave/ Secondary Master...

Hardware Maintenance Manual
Page 25
Diskette drive 3. Power-on the computer to -FRU Index 19 Symptom-to re-test the system. 4. External Cache f. Memory modules d. Extended video memory e. Chapter 6. c. External Cache RAM g. Hard disk drive h. Repeat steps 1 through 3 until you find the failing device or adapter. If all devices and adapters have been removed, and the problem continues, replace the system board.
Diskette drive 3. Power-on the computer to -FRU Index 19 Symptom-to re-test the system. 4. External Cache f. Memory modules d. Extended video memory e. Chapter 6. c. External Cache RAM g. Hard disk drive h. Repeat steps 1 through 3 until you find the failing device or adapter. If all devices and adapters have been removed, and the problem continues, replace the system board.
Hardware Maintenance Manual
Page 27
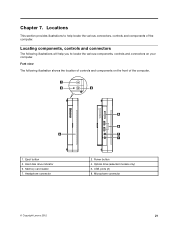
... view The following illustrations will help locate the various connectors, controls and components of the computer. 1. Optical drive (selected models only) 6. Microphone connector © Copyright Lenovo 2012 21
... view The following illustrations will help locate the various connectors, controls and components of the computer. 1. Optical drive (selected models only) 6. Microphone connector © Copyright Lenovo 2012 21
