

Windows 7 Upgrade Instructions
Page 1
Windows7 Upgrade Instructions
Windows7 Upgrade Instructions

Windows 7 Upgrade Instructions
Page 2
This Lenovo Windows7 Upgrade Disk will help customers upgrade their current operating system to Windows7.
This Lenovo Windows7 Upgrade Disk will help customers upgrade their current operating system to Windows7.

Windows 7 Upgrade Instructions
Page 3
... Disk COA label. Users who want to the previous operating system or contact Lenovo Customer Service for help. Affix the label to the computer after upgrading to Windows7 can use the Lenovo System Recovery Disk to roll back to use the previous operating system after activation.... Be sure to activate the new Windows7 operating system. Find the product key information from Lenovo service site. Windows7 Upgrade Instructions 1 Upgrading your operating system may cause loss of data and files, and backup data and files ...
... Disk COA label. Users who want to the previous operating system or contact Lenovo Customer Service for help. Affix the label to the computer after upgrading to Windows7 can use the Lenovo System Recovery Disk to roll back to use the previous operating system after activation.... Be sure to activate the new Windows7 operating system. Find the product key information from Lenovo service site. Windows7 Upgrade Instructions 1 Upgrading your operating system may cause loss of data and files, and backup data and files ...
Windows 7 Upgrade Instructions
Page 4
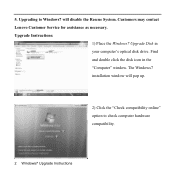
5. Find and double click the disk icon in your computer's optical disk drive. Upgrade Instructions: 1) Place the Windows7 Upgrade Disk in the "Computer" window. Customers may contact Lenovo Customer Service for assistance as necessary. Upgrading to check computer hardware compatibility. 2 Windows7 Upgrade Instructions The Windows7 installation window will pop up. 2) Click the "Check compatibility online" option to Windows7 will disable the Rescue System.
5. Find and double click the disk icon in your computer's optical disk drive. Upgrade Instructions: 1) Place the Windows7 Upgrade Disk in the "Computer" window. Customers may contact Lenovo Customer Service for assistance as necessary. Upgrading to check computer hardware compatibility. 2 Windows7 Upgrade Instructions The Windows7 installation window will pop up. 2) Click the "Check compatibility online" option to Windows7 will disable the Rescue System.
Windows 7 Upgrade Instructions
Page 5
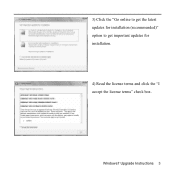
Windows7 Upgrade Instructions 3 3) Click the "Go online to get the latest updates for installation (recommended)" option to get important updates for installation. 4) Read the license terms and click the "I accept the license terms" check box.
Windows7 Upgrade Instructions 3 3) Click the "Go online to get the latest updates for installation (recommended)" option to get important updates for installation. 4) Read the license terms and click the "I accept the license terms" check box.
Windows 7 Upgrade Instructions
Page 6
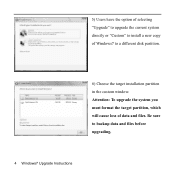
Attention: To upgrade the system you must format the target partition, which will cause loss of Windows7 to a different disk partition. 6) Choose the target installation partition in the custom window. 5) Users have the option of selecting "Upgrade" to upgrade the current system directly or "Custom" to install a new copy of data and files. Be sure to backup data and files before upgrading. 4 Windows7 Upgrade Instructions
Attention: To upgrade the system you must format the target partition, which will cause loss of Windows7 to a different disk partition. 6) Choose the target installation partition in the custom window. 5) Users have the option of selecting "Upgrade" to upgrade the current system directly or "Custom" to install a new copy of data and files. Be sure to backup data and files before upgrading. 4 Windows7 Upgrade Instructions
Windows 7 Upgrade Instructions
Page 7
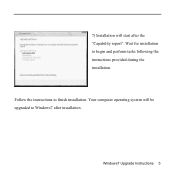
Windows7 Upgrade Instructions 5 Your computer operating system will start after installation. Wait for installation to finish installation. 7) Installation will be upgraded to Windows7 after the "Capability report". Follow the instructions to begin and perform tasks following the instructions provided during the installation.
Windows7 Upgrade Instructions 5 Your computer operating system will start after installation. Wait for installation to finish installation. 7) Installation will be upgraded to Windows7 after the "Capability report". Follow the instructions to begin and perform tasks following the instructions provided during the installation.
Windows 7 Upgrade Instructions
Page 8
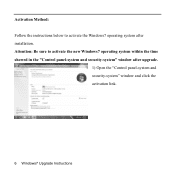
Attention: Be sure to activate the Windows7 operating system after upgrade. 1) Open the "Control panel-system and security-system" window and click the activation link. 6 Windows7 Upgrade Instructions Activation Method: Follow the instructions below to activate the new Windows7 operating system within the time showed in the "Control panel-system and security-system" window after installation.
Attention: Be sure to activate the Windows7 operating system after upgrade. 1) Open the "Control panel-system and security-system" window and click the activation link. 6 Windows7 Upgrade Instructions Activation Method: Follow the instructions below to activate the new Windows7 operating system within the time showed in the "Control panel-system and security-system" window after installation.
Windows 7 Upgrade Instructions
Page 9
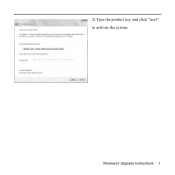
2) Type the product key and click "next" to activate the system. Windows7 Upgrade Instructions 7
2) Type the product key and click "next" to activate the system. Windows7 Upgrade Instructions 7

Hardware Maintenance Manual for K220
Page 1
Safety information 4 General safety...4 Electrical safety...5 Safety inspection guide 7 Handling electrostatic discharge-sensitive devices 8 Grounding requirements 8 Safety notices...9 Chapter 3. General information 12 Specifications...12 Chapter 4. Contents Contents Chapter 1. General Checkout 13 Problem determination tips 14 Chapter 5. About this manual 1 Important Safety Information 1 Using eSupport...2 Important information about replacing RoHS compliant FRUs... 2 Chapter 2. Using the Setup Utility (Type G33 16 Starting the Setup Utility program 16 Viewing and ...
Safety information 4 General safety...4 Electrical safety...5 Safety inspection guide 7 Handling electrostatic discharge-sensitive devices 8 Grounding requirements 8 Safety notices...9 Chapter 3. General information 12 Specifications...12 Chapter 4. Contents Contents Chapter 1. General Checkout 13 Problem determination tips 14 Chapter 5. About this manual 1 Important Safety Information 1 Using eSupport...2 Important information about replacing RoHS compliant FRUs... 2 Chapter 2. Using the Setup Utility (Type G33 16 Starting the Setup Utility program 16 Viewing and ...
Hardware Maintenance Manual for K220
Page 2
Replacing hardware 40 Removing the computer cover 40 Removing and replacing the front bezel 42 ii Symptom-to-FRU Index 34 Hard disk drive boot error 34 Power Supply Problems 35 Beep symptoms 36 POST error codes 37 Undetermined problems 39 Chapter 9. Using the Setup Utility (Type G31 28 Starting the Setup Utility program 28 Viewing and changing settings 28 Using passwords 29 Password considerations 29 Supervisor password...29 User Password...30 Using Device...31 Selecting a startup device 32 Selecting a temporary startup device 32 Selecting or changing the startup device ...
Replacing hardware 40 Removing the computer cover 40 Removing and replacing the front bezel 42 ii Symptom-to-FRU Index 34 Hard disk drive boot error 34 Power Supply Problems 35 Beep symptoms 36 POST error codes 37 Undetermined problems 39 Chapter 9. Using the Setup Utility (Type G31 28 Starting the Setup Utility program 28 Viewing and changing settings 28 Using passwords 29 Password considerations 29 Supervisor password...29 User Password...30 Using Device...31 Selecting a startup device 32 Selecting a temporary startup device 32 Selecting or changing the startup device ...
Hardware Maintenance Manual for K220
Page 3
Statement 60 iii Additional Service Information (Type G33 57 Power management 57 Automatic configuration and power interface (ACPI) BIOS 57 Automatic Power-On features 57 Chapter 11. Additional Service Information (Type G31 59 Power management 59 Automatic configuration and power interface (ACPI) BIOS 59 Automatic Power-On features 59 Appendix. Contents Replacing the power supply 43 Replacing the heat sink assembly 44 Replacing a memory module 45 Replacing an adapter 46 Note: Replacement of some models equipped with graphic adapter bracket is different...48 Replacing the hard ...
Statement 60 iii Additional Service Information (Type G33 57 Power management 57 Automatic configuration and power interface (ACPI) BIOS 57 Automatic Power-On features 57 Chapter 11. Additional Service Information (Type G31 59 Power management 59 Automatic configuration and power interface (ACPI) BIOS 59 Automatic Power-On features 59 Appendix. Contents Replacing the power supply 43 Replacing the heat sink assembly 44 Replacing a memory module 45 Replacing an adapter 46 Note: Replacement of some models equipped with graphic adapter bracket is different...48 Replacing the hard ...
Hardware Maintenance Manual for K220
Page 4
..., be sure to read the Safety Information. This manual includes a complete FRU part number listing for Lenovo IdeaCentre K computers listed on the cover. It is invalid for those machines which have the TV card. Lesen Sie unbedingt alle Hinweise vom Typ "ACHTUNG"...exécuter les instructions. The description of the instructions. It is only used for trained servicers who are also available at: http:/www.lenovo.com/support. Important Safety Information Be sure to read all caution and danger statements in dieser Dokumentation, bevor Sie irgendwelche Vorgänge durchf&#...
..., be sure to read the Safety Information. This manual includes a complete FRU part number listing for Lenovo IdeaCentre K computers listed on the cover. It is invalid for those machines which have the TV card. Lesen Sie unbedingt alle Hinweise vom Typ "ACHTUNG"...exécuter les instructions. The description of the instructions. It is only used for trained servicers who are also available at: http:/www.lenovo.com/support. Important Safety Information Be sure to read all caution and danger statements in dieser Dokumentation, bevor Sie irgendwelche Vorgänge durchf&#...
Hardware Maintenance Manual for K220
Page 5
...Examples - hard disk drive, system board, microprocessor, LCD, and memory) •• eSupport can be accessed at the following Web site: http://www.lenovo.com/support •• To view the key commodities: 1. Click Parts information. 2. Under Parts information, click Parts lookup. 3. Under Parts lookup, ...MT Model level) •• eSupport can be used to have RoHS compliant parts. The list of FRUs for your browser to http://www.lenovo.com/support. 2. Type the machine type (Example: 8129) in a particular machine serial. •• eSupport can also be compliant. ...
...Examples - hard disk drive, system board, microprocessor, LCD, and memory) •• eSupport can be accessed at the following Web site: http://www.lenovo.com/support •• To view the key commodities: 1. Click Parts information. 2. Under Parts information, click Parts lookup. 3. Under Parts lookup, ...MT Model level) •• eSupport can be used to have RoHS compliant parts. The list of FRUs for your browser to http://www.lenovo.com/support. 2. Type the machine type (Example: 8129) in a particular machine serial. •• eSupport can also be compliant. ...
Hardware Maintenance Manual for K220
Page 6
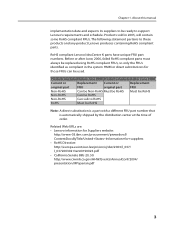
... this manual implementation date and expects its suppliers to be ready to RoHS RoHS Must be RoHS Non-RoHS Can sub to support Lenovo's requirements and schedule. Products marketed before June 2006 Products marketed after June, 2006, failed RoHS compliant parts must always be used....replaced using RoHS compliant FRUs, so only the FRUs identified as compliant in 2005, will contain some RoHS compliant FRUs. RoHS compliant Lenovo IdeaCentre K parts have unique FRU part numbers. Before or after June 2006 Current or Replacement Current or Replacement original part FRU original ...
... this manual implementation date and expects its suppliers to be ready to RoHS RoHS Must be RoHS Non-RoHS Can sub to support Lenovo's requirements and schedule. Products marketed before June 2006 Products marketed after June, 2006, failed RoHS compliant parts must always be used....replaced using RoHS compliant FRUs, so only the FRUs identified as compliant in 2005, will contain some RoHS compliant FRUs. RoHS compliant Lenovo IdeaCentre K parts have unique FRU part numbers. Before or after June 2006 Current or Replacement Current or Replacement original part FRU original ...
Hardware Maintenance Manual for K220
Page 7
this action removes the strain from the muscles in your feet. 3. Remember: Metal objects are fastened or rolled up with your clothing. Ensure you are servicing the machine. •• Keep your elbows. Lift by standing or by pushing up above your tool case away from walk areas so that other parts in the area of the object equally between your back. General safety Follow these rules to ensure general safety: •• Observe good housekeeping in a safe place, away from the end. •• Do not wear jewelry, chains, metal-frame eyeglasses, or metal fasteners for...
this action removes the strain from the muscles in your feet. 3. Remember: Metal objects are fastened or rolled up with your clothing. Ensure you are servicing the machine. •• Keep your elbows. Lift by standing or by pushing up above your tool case away from walk areas so that other parts in the area of the object equally between your back. General safety Follow these rules to ensure general safety: •• Observe good housekeeping in a safe place, away from the end. •• Do not wear jewelry, chains, metal-frame eyeglasses, or metal fasteners for...

Hardware Maintenance Manual for K220
Page 8
Many customers have handles covered with a soft material that contain small conductive fibers to your eyes. •• After service, reinstall all safety shields, guards, labels, and ground wires. If an electrical accident occurs, you when working with live electrical currents. Some hand tools have , near their equipment, rubber floor mats that does not insulate you can be hazardous to decrease electrostatic discharges. Electrical safety CAUTION: Electrical current from electrical shock. •• Find the room emergency power-off position. 5 Chapter 2. If ...
Many customers have handles covered with a soft material that contain small conductive fibers to your eyes. •• After service, reinstall all safety shields, guards, labels, and ground wires. If an electrical accident occurs, you when working with live electrical currents. Some hand tools have , near their equipment, rubber floor mats that does not insulate you can be hazardous to decrease electrostatic discharges. Electrical safety CAUTION: Electrical current from electrical shock. •• Find the room emergency power-off position. 5 Chapter 2. If ...
Hardware Maintenance Manual for K220
Page 9
Ensure that another person to get medical aid. 6 When using testers, set the controls correctly and use worn or broken tools and testers. •• Never assume that has exposed electrical circuits, observe the following parts with the reflective surface of maintenance information. Power supply units - Send another person, familiar with the power-off . •• Always look carefully for that it has been powered-off controls, is conductive; keep the other hand in the safety sections of a plastic dental mirror. By observing the above rule, you may prevent a ...
Ensure that another person to get medical aid. 6 When using testers, set the controls correctly and use worn or broken tools and testers. •• Never assume that has exposed electrical circuits, observe the following parts with the reflective surface of maintenance information. Power supply units - Send another person, familiar with the power-off . •• Always look carefully for that it has been powered-off controls, is conductive; keep the other hand in the safety sections of a plastic dental mirror. By observing the above rule, you may prevent a ...
Hardware Maintenance Manual for K220
Page 10
If any obvious unsafe conditions, such as loose or missing hardware The guide consists of a series of fire or smoke damage. 7. Consider these products. Check the power cord for worn, frayed, or pinched cables. 8. Insulation must determine how serious the apparent hazard could be frayed or worn. 4. Chapter 2. Checklist: 1. Power-off , and the power cord disconnected. Check inside the unit for 0.1 ohm or less between the external ground pin and frame ground. Begin the checks with . 7 Disconnect the power cord. 3. Check for : a. Check that the power-supply ...
If any obvious unsafe conditions, such as loose or missing hardware The guide consists of a series of fire or smoke damage. 7. Consider these products. Check the power cord for worn, frayed, or pinched cables. 8. Insulation must determine how serious the apparent hazard could be frayed or worn. 4. Chapter 2. Checklist: 1. Power-off , and the power cord disconnected. Check inside the unit for 0.1 ohm or less between the external ground pin and frame ground. Begin the checks with . 7 Disconnect the power cord. 3. Check for : a. Check that the power-supply ...

Hardware Maintenance Manual for K220
Page 11
When handling ESD-sensitive parts: •• Keep the parts in charge between objects. Attach the ESD ground clip to provide protection that meets the specific service requirement. Grounding requirements Electrical grounding of the computer is insulative and retains a charge even when you use of a grounded work mat to eliminate static on ac-operated computers. Use the round ground-prong of the electrical outlet can be considered sensitive to protect against ESD damage. - Proper grounding of the ac plug on your body. •• Prevent the part from touching ...
When handling ESD-sensitive parts: •• Keep the parts in charge between objects. Attach the ESD ground clip to provide protection that meets the specific service requirement. Grounding requirements Electrical grounding of the computer is insulative and retains a charge even when you use of a grounded work mat to eliminate static on ac-operated computers. Use the round ground-prong of the electrical outlet can be considered sensitive to protect against ESD damage. - Proper grounding of the ac plug on your body. •• Prevent the part from touching ...