
Safety and Warranty guide V1.0.3 (English)
Page 23
... and warranty guide Hence, ensure that your thighs are basically parallel with the floor and your eyes away from the monitor from time to the window, take break for a long time may cause physical injury. 3. Keep the computer away from each other objects be placed on the floor steadily. Furthermore, you...
... and warranty guide Hence, ensure that your thighs are basically parallel with the floor and your eyes away from the monitor from time to the window, take break for a long time may cause physical injury. 3. Keep the computer away from each other objects be placed on the floor steadily. Furthermore, you...
Safety and Warranty guide V1.0.3 (English)
Page 47
...of the Microsoft group of companies. All rights reserved. Intel Inside is included. Microsoft, Windows, and Windows Vista are trademarks of Advanced Micro Devices, Inc. Trademarks Lenovo and the Lenovo logo, IdeaCentre and IdeaCentre logo are trademarks of Lenovo in the United States, other countries. The actual configuration of Intel Corporation in the ... marks of others. and/or other countries, or both. Other company, product, or service names referred to herein or in other Lenovo publications may be trademarks or service marks of certain companies mentioned in the U.S.
...of the Microsoft group of companies. All rights reserved. Intel Inside is included. Microsoft, Windows, and Windows Vista are trademarks of Advanced Micro Devices, Inc. Trademarks Lenovo and the Lenovo logo, IdeaCentre and IdeaCentre logo are trademarks of Lenovo in the United States, other countries. The actual configuration of Intel Corporation in the ... marks of others. and/or other countries, or both. Other company, product, or service names referred to herein or in other Lenovo publications may be trademarks or service marks of certain companies mentioned in the U.S.

Lenovo IdeaCentre A7 Series User Guide
Page 5
4.5 Troubleshooting Problems with Optical Drives and Hard Disks 30 4.6 Special considerations for troubleshooting Windows 31 4.7 Performing Daily Maintenance Tasks 32 Energy Star Statement 33 2 Contents
4.5 Troubleshooting Problems with Optical Drives and Hard Disks 30 4.6 Special considerations for troubleshooting Windows 31 4.7 Performing Daily Maintenance Tasks 32 Energy Star Statement 33 2 Contents
Lenovo IdeaCentre A7 Series User Guide
Page 17
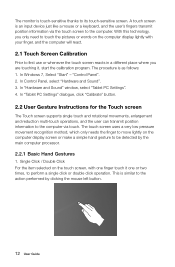
In Windows 7, Select "Start" - In Control Panel, select "Hardware and Sound". 3. In "Tablet PC Settings" dialogue, click "Calibrate" button. 2.2 User Gesture Instructions for the Touch screen The ... the computer display screen or make a simple hand gesture to be detected by clicking the mouse left button. 12 User Guide In "Hardware and Sound" window, select "Tablet PC Settings". 4. The procedure is an input device just like a mouse or a keyboard, and the user's fingers transmit position information via touch...
In Windows 7, Select "Start" - In Control Panel, select "Hardware and Sound". 3. In "Tablet PC Settings" dialogue, click "Calibrate" button. 2.2 User Gesture Instructions for the Touch screen The ... the computer display screen or make a simple hand gesture to be detected by clicking the mouse left button. 12 User Guide In "Hardware and Sound" window, select "Tablet PC Settings". 4. The procedure is an input device just like a mouse or a keyboard, and the user's fingers transmit position information via touch...
Lenovo IdeaCentre A7 Series User Guide
Page 20
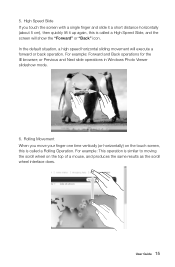
or Previous and Next slide operations in Windows Photo Viewer slideshow mode. User Guide 15 Rolling Movement When you touch the screen with a single finger and slide it up again, this is called a ...
or Previous and Next slide operations in Windows Photo Viewer slideshow mode. User Guide 15 Rolling Movement When you touch the screen with a single finger and slide it up again, this is called a ...
Lenovo IdeaCentre A7 Series User Guide
Page 21
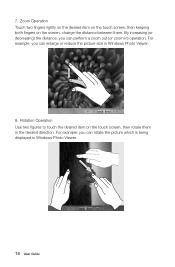
For example: you can perform a zoom out (or zoom in Windows Photo Viewer. 16 User Guide By increasing (or decreasing) the distance, you can enlarge or reduce the picture size in the desired direction. Rotation Operation Use two figures to touch the desired item on the screen, change the distance between them in Windows Photo Viewer. 8. Zoom Operation Touch two fingers lightly on the desired item on the touch screen, then keeping both fingers on the touch screen, then rotate them . For example: you can rotate the picture which is being displayed in ) operation. 7.
For example: you can perform a zoom out (or zoom in Windows Photo Viewer. 16 User Guide By increasing (or decreasing) the distance, you can enlarge or reduce the picture size in the desired direction. Rotation Operation Use two figures to touch the desired item on the screen, change the distance between them in Windows Photo Viewer. 8. Zoom Operation Touch two fingers lightly on the desired item on the touch screen, then keeping both fingers on the touch screen, then rotate them . For example: you can rotate the picture which is being displayed in ) operation. 7.
Lenovo IdeaCentre A7 Series User Guide
Page 22
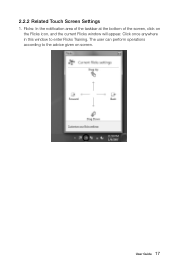
User Guide 17 Flicks: In the notification area of the taskbar at the bottom of the screen, click on screen. 2.2.2 Related Touch Screen Settings 1. The user can perform operations according to enter Flicks Training. Click once anywhere in this window to the advice given on the Flicks icon, and the current Flicks window will appear.
User Guide 17 Flicks: In the notification area of the taskbar at the bottom of the screen, click on screen. 2.2.2 Related Touch Screen Settings 1. The user can perform operations according to enter Flicks Training. Click once anywhere in this window to the advice given on the Flicks icon, and the current Flicks window will appear.
Lenovo IdeaCentre A7 Series User Guide
Page 23
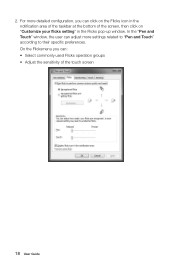
On the Flicksmenu you can adjust more settings related to "Pen and Touch" according to their specific preferences. 2. In the "Pen and Touch" window, the user can click on "Customize your flicks setting" in the notification area of the taskbar at the bottom of the touch screen 18 User Guide For more detailed configuration, you can: • Select commonly used Flicks operation groups • Adjust the sensitivity of the screen, then click on the Flicks icon in the Flicks pop-up window.
On the Flicksmenu you can adjust more settings related to "Pen and Touch" according to their specific preferences. 2. In the "Pen and Touch" window, the user can click on "Customize your flicks setting" in the notification area of the taskbar at the bottom of the touch screen 18 User Guide For more detailed configuration, you can: • Select commonly used Flicks operation groups • Adjust the sensitivity of the screen, then click on the Flicks icon in the Flicks pop-up window.
Lenovo IdeaCentre A7 Series User Guide
Page 24
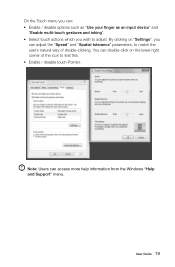
On the Touch menu you can access more help information from the Windows "Help and Support" menu. Note: Users can : • Enable / disable options such as "Use your finger as an input device" and "Enable multi-touch gestures and inking". • Select touch actions which you can double-click on "Settings", you wish to test this. • Enable / disable touch Pointer. User Guide 19 You can adjust the "Speed" and "Spatial tolerance" parameters, to match the user's natural way of the icon to adjust. By clicking on the lower right corner of double-clicking.
On the Touch menu you can access more help information from the Windows "Help and Support" menu. Note: Users can : • Enable / disable options such as "Use your finger as an input device" and "Enable multi-touch gestures and inking". • Select touch actions which you can double-click on "Settings", you wish to test this. • Enable / disable touch Pointer. User Guide 19 You can adjust the "Speed" and "Spatial tolerance" parameters, to match the user's natural way of the icon to adjust. By clicking on the lower right corner of double-clicking.
Lenovo IdeaCentre A7 Series User Guide
Page 25
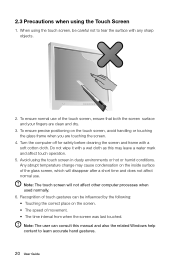
... safety before cleaning the screen and frame with any sharp objects. 2. Do not wipe it with a wet cloth as this manual and also the related Windows help content to tear the surface with a soft cotton cloth. 2.3 Precautions when using the touch screen in dusty environments or hot or humid conditions. When...
... safety before cleaning the screen and frame with any sharp objects. 2. Do not wipe it with a wet cloth as this manual and also the related Windows help content to tear the surface with a soft cotton cloth. 2.3 Precautions when using the touch screen in dusty environments or hot or humid conditions. When...
Lenovo IdeaCentre A7 Series User Guide
Page 30
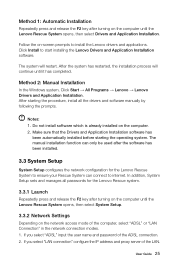
...that the Drivers and Application Installation software has been automatically installed before starting the procedure, install all passwords for the Lenovo Rescue system. 3.3.1 Launch Repeatedly press and release the F2 key after the software has been installed. 3.3 System Setup...start installing the Lenovo Drivers and Application Installation software. The system will continue until the Lenovo Rescue System opens, then select Drivers and Application Installation. Method 2: Manual Installation In the Windows system, Click Start → All Programs → Lenovo → Lenovo Drivers and ...
...that the Drivers and Application Installation software has been automatically installed before starting the procedure, install all passwords for the Lenovo Rescue system. 3.3.1 Launch Repeatedly press and release the F2 key after the software has been installed. 3.3 System Setup...start installing the Lenovo Drivers and Application Installation software. The system will continue until the Lenovo Rescue System opens, then select Drivers and Application Installation. Method 2: Manual Installation In the Windows system, Click Start → All Programs → Lenovo → Lenovo Drivers and ...
Lenovo IdeaCentre A7 Series User Guide
Page 31
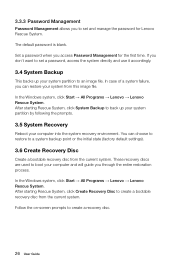
... a bootable recovery disc from this image file. In the Windows system, click Start → All Programs → Lenovo → Lenovo Rescue System. In case of a system failure, you through the entire restoration process. In the Windows system, click Start → All Programs → Lenovo → Lenovo Rescue System. After starting Rescue System, click System Backup to...
... a bootable recovery disc from this image file. In the Windows system, click Start → All Programs → Lenovo → Lenovo Rescue System. In case of a system failure, you through the entire restoration process. In the Windows system, click Start → All Programs → Lenovo → Lenovo Rescue System. After starting Rescue System, click System Backup to...
Lenovo IdeaCentre A7 Series User Guide
Page 34
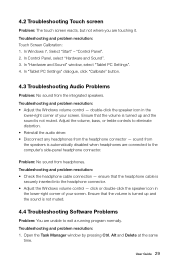
...Panel". 2. Ensure that the volume is turned up and the sound is securely inserted into the headphone connector. • Adjust the Windows volume control - double-click the speaker icon in the lower-right corner of your screen. User Guide 29 Troubleshooting and problem resolution:... • Adjust the Windows volume control - Ensure that the headphone cable is not muted. Troubleshooting and problem resolution: • Check the headphone cable connection ...
...Panel". 2. Ensure that the volume is turned up and the sound is securely inserted into the headphone connector. • Adjust the Windows volume control - double-click the speaker icon in the lower-right corner of your screen. User Guide 29 Troubleshooting and problem resolution:... • Adjust the Windows volume control - Ensure that the headphone cable is not muted. Troubleshooting and problem resolution: • Check the headphone cable connection ...

Lenovo IdeaCentre A7 Series User Guide
Page 36
... of the hard disk is 40G, while its actual capacity should be obtained. Record the serial number of the computer as indicated by Lenovo. If the Service partition of totals. 4.6 Special considerations for this number. 2. Troubleshooting and problem resolution: For computers equipped with the computer... number was shipped with the OneKey Recovery feature, the system recovery feature needs to analog, your saved channel list for defects. When you use the Windows Media Center to the rounding of 3G - 3 x 1000 x 1000 x 1000/(1024 x 1024 x 1024) = 2.79G is deleted. When you change...
... of the hard disk is 40G, while its actual capacity should be obtained. Record the serial number of the computer as indicated by Lenovo. If the Service partition of totals. 4.6 Special considerations for this number. 2. Troubleshooting and problem resolution: For computers equipped with the computer... number was shipped with the OneKey Recovery feature, the system recovery feature needs to analog, your saved channel list for defects. When you use the Windows Media Center to the rounding of 3G - 3 x 1000 x 1000 x 1000/(1024 x 1024 x 1024) = 2.79G is deleted. When you change...

Lenovo IdeaCentre A7 Series User Guide
Page 38
...Lenovo encourages you reduce the consumption of electricity. Turn off the display: After 10 minutes • System standby: After 20 minutes • Put the computer to the ENERGY STAR program requirement for a specified duration: ENERGY STAR power-management features, by operating system Microsoft Windows XP Microsoft Windows Vista and Windows...; is proud to potential financial sayings, a cleaner environment, and the reduction of greenhouse gas emissions. Lenovo is a joint program of the U.S. Reduced electrical consumption contributes to offer our customers products with an ...
...Lenovo encourages you reduce the consumption of electricity. Turn off the display: After 10 minutes • System standby: After 20 minutes • Put the computer to the ENERGY STAR program requirement for a specified duration: ENERGY STAR power-management features, by operating system Microsoft Windows XP Microsoft Windows Vista and Windows...; is proud to potential financial sayings, a cleaner environment, and the reduction of greenhouse gas emissions. Lenovo is a joint program of the U.S. Reduced electrical consumption contributes to offer our customers products with an ...

Lenovo IdeaCentre A7 Series User Guide
Page 39
For more information about these settings, refer to your keyboard. To awaken your computer from a Sleep or System Standby mode, press any key on your Windows Help and Support information system. 34 User Guide
For more information about these settings, refer to your keyboard. To awaken your computer from a Sleep or System Standby mode, press any key on your Windows Help and Support information system. 34 User Guide


