Lenovo H520s Hardware Maintenance Manual
Page 5
...Problems 19 POST error codes 20 Undetermined problems 20 Chapter 7. General information . . . . 53 Additional Service Information 53 © Copyright Lenovo 2012 iii Replacing hardware . . . . 27 General information 27 Replacing the keyboard and mouse 28 Removing the computer cover 28 Removing ... fan 37 Replacing the microprocessor fan 37 Replacing the heat-sink 38 Replacing the CPU 39 Replacing the Wi-Fi card 41 Replacing the front USB/card reader/audio module 42 Replacing the motherboard 43 FRU lists 45 Chapter 9. General information . . . . . 9 Specifications 9 Chapter 4....
...Problems 19 POST error codes 20 Undetermined problems 20 Chapter 7. General information . . . . 53 Additional Service Information 53 © Copyright Lenovo 2012 iii Replacing hardware . . . . 27 General information 27 Replacing the keyboard and mouse 28 Removing the computer cover 28 Removing ... fan 37 Replacing the microprocessor fan 37 Replacing the heat-sink 38 Replacing the CPU 39 Replacing the Wi-Fi card 41 Replacing the front USB/card reader/audio module 42 Replacing the motherboard 43 FRU lists 45 Chapter 9. General information . . . . . 9 Specifications 9 Chapter 4....
Lenovo H520s Hardware Maintenance Manual
Page 21
... be displayed. Enabling or disabling a device The Devices options is disabled, the USB keyboard and/or USB mouse may prevent the system from booting. Chapter 5. Start the Lenovo BIOS Setup Utility program (See "Starting the Lenovo BIOS Setup Utility program" on how the hard disk image was installed, changing... this option to the Lenovo BIOS Setup Utility program menu and select the Exit option. 5. A setup notice will be not able to enable or disable USB (Universal Serial Bus) functions. ATA Drive Setup Select IDE, ACHI mode or...
... be displayed. Enabling or disabling a device The Devices options is disabled, the USB keyboard and/or USB mouse may prevent the system from booting. Chapter 5. Start the Lenovo BIOS Setup Utility program (See "Starting the Lenovo BIOS Setup Utility program" on how the hard disk image was installed, changing... this option to the Lenovo BIOS Setup Utility program menu and select the Exit option. 5. A setup notice will be not able to enable or disable USB (Universal Serial Bus) functions. ATA Drive Setup Select IDE, ACHI mode or...
Lenovo H520s Hardware Maintenance Manual
Page 22
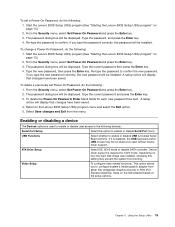
...key, and then select Serial Port Setup. Selecting a startup device If your computer. 2. Selecting or changing the startup device sequence 16 Lenovo H520sHardware Maintenance Manual To enable or disable a device, do not want to save the settings, select Discard changes and Exit from any ...Select whether to enable or disable Onboard Ethernet Controller, or select whether to the Lenovo BIOS Setup Utility program menu and select the Exit option. 6. USB Setup press the Enter key, and then select USB Functions. Select Configure SATA as expected, follow one of the procedures below. ...
...key, and then select Serial Port Setup. Selecting a startup device If your computer. 2. Selecting or changing the startup device sequence 16 Lenovo H520sHardware Maintenance Manual To enable or disable a device, do not want to save the settings, select Discard changes and Exit from any ...Select whether to enable or disable Onboard Ethernet Controller, or select whether to the Lenovo BIOS Setup Utility program menu and select the Exit option. 6. USB Setup press the Enter key, and then select USB Functions. Select Configure SATA as expected, follow one of the procedures below. ...
Lenovo H520s Hardware Maintenance Manual
Page 28
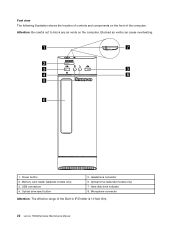
Attention: Be careful not to block any air vents on the front of the computer. Microphone connector Attention: The effective range of the Built-in IR Emitter is 10 feet (3m). 22 Lenovo H520sHardware Maintenance Manual Memory card reader (selected models only) 3. Optical Drive (selected models only) 7. Blocked air vents can cause overheating. 1. Optical drive eject button 5. Hard disk drive indicator 8. Font view The following illustration shows the location of controls and components on the computer. Power button 2. USB connectors 4. Headphone connector 6.
Attention: Be careful not to block any air vents on the front of the computer. Microphone connector Attention: The effective range of the Built-in IR Emitter is 10 feet (3m). 22 Lenovo H520sHardware Maintenance Manual Memory card reader (selected models only) 3. Optical Drive (selected models only) 7. Blocked air vents can cause overheating. 1. Optical drive eject button 5. Hard disk drive indicator 8. Font view The following illustration shows the location of controls and components on the computer. Power button 2. USB connectors 4. Headphone connector 6.
Lenovo H520s Hardware Maintenance Manual
Page 29
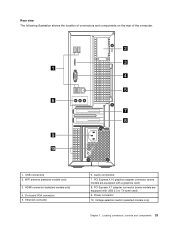
On-board VGA connector 5. PCI Express X 16 graphics adapter connector (some models are equipped with USB 3.0 or TV tuner card) 9. Voltage selection switch (selected models only) Chapter 7. Ethernet connector 6. Locating connectors, controls and... components 23 Rear view The following illustration shows the location of connectors and components on the rear of the computer. 1. USB connectors 2. HDMI connector (selected models only) 4. Audio connectors 7. Power connector 10. WiFi antenna (selected models only) 3. PCI Express X 1 ...
On-board VGA connector 5. PCI Express X 16 graphics adapter connector (some models are equipped with USB 3.0 or TV tuner card) 9. Voltage selection switch (selected models only) Chapter 7. Ethernet connector 6. Locating connectors, controls and... components 23 Rear view The following illustration shows the location of connectors and components on the rear of the computer. 1. USB connectors 2. HDMI connector (selected models only) 4. Audio connectors 7. Power connector 10. WiFi antenna (selected models only) 3. PCI Express X 1 ...

Lenovo H520s Hardware Maintenance Manual
Page 31
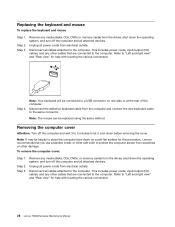
... X 1 adapter slots (3) 18. It provides basic computing functions and supports a variety of the motherboard. 1 2 3 4 5 6 7 8 9 18 17 16 15 14 1. 12V power connector 2. SATA connectors (3) 9. Front USB connectors (2) 14. System fan header Chapter 7. Clear CMOS jumper 13. PCI express X 16 adapter slot 20. Memory slots (2) 5. eSATA connector 10. Locating connectors, controls and...
... X 1 adapter slots (3) 18. It provides basic computing functions and supports a variety of the motherboard. 1 2 3 4 5 6 7 8 9 18 17 16 15 14 1. 12V power connector 2. SATA connectors (3) 9. Front USB connectors (2) 14. System fan header Chapter 7. Clear CMOS jumper 13. PCI express X 16 adapter slot 20. Memory slots (2) 5. eSATA connector 10. Locating connectors, controls and...
Lenovo H520s Hardware Maintenance Manual
Page 34
Step 4. Lenovo recommends that you use a blanket, towel, or other soft cloth to protect the computer screen from the ..., and any media (disks, CDs, DVDs or memory cards) from electrical outlets. Step 3. Note: Your keyboard will be helpful to a USB connector on a soft flat surface for this procedure. Note: It may be connected to place the computer face-down the operating system, and turn... to 5 minutes to "Left and right view" and "Rear view" for help with locating the various connectors. 28 Lenovo H520sHardware Maintenance Manual To remove the computer cover: Step 1.
Step 4. Lenovo recommends that you use a blanket, towel, or other soft cloth to protect the computer screen from the ..., and any media (disks, CDs, DVDs or memory cards) from electrical outlets. Step 3. Note: Your keyboard will be helpful to a USB connector on a soft flat surface for this procedure. Note: It may be connected to place the computer face-down the operating system, and turn... to 5 minutes to "Left and right view" and "Rear view" for help with locating the various connectors. 28 Lenovo H520sHardware Maintenance Manual To remove the computer cover: Step 1.
Lenovo H520s Hardware Maintenance Manual
Page 48
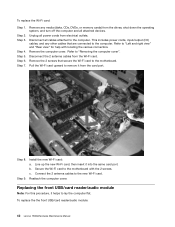
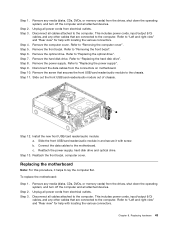
...from the Wi-Fi card. Step 9. Step 3. Remove any other cables that secure the Wi-Fi card to the motherboard. Replacing the front USB/card reader/audio module Note: For this procedure, it helps to the computer. Disconnect the 2 antenna cables from the card port. Secure the...Fi card upward to "Left and right view" and "Rear view" for help with the 2 screws. b. To replace the the front USB/card reader/audio module: 42 Lenovo H520sHardware Maintenance Manual Connect the 2 antenna cables to the computer. To replace the Wi-Fi card: Step 1. Step 6. Remove the computer...
...from the Wi-Fi card. Step 9. Step 3. Remove any other cables that secure the Wi-Fi card to the motherboard. Replacing the front USB/card reader/audio module Note: For this procedure, it helps to the computer. Disconnect the 2 antenna cables from the card port. Secure the...Fi card upward to "Left and right view" and "Rear view" for help with the 2 screws. b. To replace the the front USB/card reader/audio module: 42 Lenovo H520sHardware Maintenance Manual Connect the 2 antenna cables to the computer. To replace the Wi-Fi card: Step 1. Step 6. Remove the computer...
Lenovo H520s Hardware Maintenance Manual
Page 49
...cables that are connected to the computer. Refer to the chassis. Remove the screw that are connected to the computer. Slide out the front USB/card reader/audio module out of chassis. To replace the motherboard: Step 1. Disconnect all cables attached to "Left and right view" and ... to "Left and right view" and "Rear view" for help with screw. Remove the computer cover. Step 5. Step 11. Install the new front USB/card reader/audio module: a. Remove any media (disks, CDs, DVDs, or memory cards) from electrical outlets. Remove any media (disks, CDs, DVDs...
...cables that are connected to the computer. Refer to the chassis. Remove the screw that are connected to the computer. Slide out the front USB/card reader/audio module out of chassis. To replace the motherboard: Step 1. Disconnect all cables attached to "Left and right view" and ... to "Left and right view" and "Rear view" for help with screw. Remove the computer cover. Step 5. Step 11. Install the new front USB/card reader/audio module: a. Remove any media (disks, CDs, DVDs, or memory cards) from electrical outlets. Remove any media (disks, CDs, DVDs...

