User Guide
Page 24
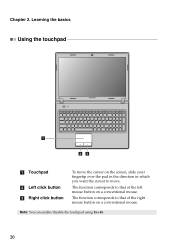
Learning the basics Using the touchpad 1 23 a Touchpad b Left click button c Right click button To move . Chapter 2. The function corresponds to move the cursor on the screen, slide your fingertip over the pad in the direction in which you want the cursor to that of the right mouse button on a conventional mouse. Note: You can enable/disable the touchpad using Fn+F6. 20 The function corresponds to that of the left mouse button on a conventional mouse.
Learning the basics Using the touchpad 1 23 a Touchpad b Left click button c Right click button To move . Chapter 2. The function corresponds to move the cursor on the screen, slide your fingertip over the pad in the direction in which you want the cursor to that of the right mouse button on a conventional mouse. Note: You can enable/disable the touchpad using Fn+F6. 20 The function corresponds to that of the left mouse button on a conventional mouse.
User Guide
Page 27
... playback of each function key. Fn Increase/Decrease display brightness. Fn + Esc: Turn on /off the backlight of Windows Media Player. Fn + Insert (G580/G585/ G780): Enable/Disable the scroll lock. Fn + PgUp (G480/G485): Fn + PrtSc: Activate the system request. Fn + F8 (G480/G485): Enable/Disable the numeric keypad. Fn... to the previous track. Fn Increase/Decrease sound volume. 23 Chapter 2. Fn + F6: Enable/Disable the touchpad. Fn + F9: Start/Pause playback of the LCD screen. Fn + End: Activate the break function.
... playback of each function key. Fn Increase/Decrease display brightness. Fn + Esc: Turn on /off the backlight of Windows Media Player. Fn + Insert (G580/G585/ G780): Enable/Disable the scroll lock. Fn + PgUp (G480/G485): Fn + PrtSc: Activate the system request. Fn + F8 (G480/G485): Enable/Disable the numeric keypad. Fn... to the previous track. Fn Increase/Decrease sound volume. 23 Chapter 2. Fn + F6: Enable/Disable the touchpad. Fn + F9: Start/Pause playback of the LCD screen. Fn + End: Activate the break function.
User Guide
Page 34
... be selected as the active GPU to produce high graphics performance. Note: To enter BIOS setup utility, press F2 when the Lenovo logo appears on the screen each time you start high-definition movie playback or a 3D game, the image-rendering task is a GPU switching mechanism which ...to the discrete GPU to preserve battery life; For details about how to set a password and enable it, a prompt appears on the screen while the computer is performed automatically without user intervention. 30 Learning the basics „ Using passwords Using passwords helps prevent your password at the...
... be selected as the active GPU to produce high graphics performance. Note: To enter BIOS setup utility, press F2 when the Lenovo logo appears on the screen each time you start high-definition movie playback or a 3D game, the image-rendering task is a GPU switching mechanism which ...to the discrete GPU to preserve battery life; For details about how to set a password and enable it, a prompt appears on the screen while the computer is performed automatically without user intervention. 30 Learning the basics „ Using passwords Using passwords helps prevent your password at the...
User Guide
Page 51
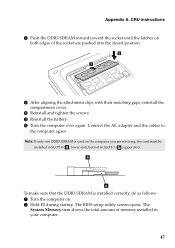
... computer again. Appendix A. CRU instructions 8 Push the DDR3 SDRAM inward toward the socket until the latches on . 2 Hold F2 during startup. The BIOS setup utility screen opens. A Reinstall the battery.
... computer again. Appendix A. CRU instructions 8 Push the DDR3 SDRAM inward toward the socket until the latches on . 2 Hold F2 during startup. The BIOS setup utility screen opens. A Reinstall the battery.
Hardware Maintenance Manual
Page 3
...Disc 23 Passwords 24 Power-on password 24 Hard-disk password 24 Supervisor password 24 Power management 25 Screen blank mode 25 Sleep (standby) mode 25 Hibernation mode 26 Lenovo G480/G485/G580/G585/G780 ........27 Specifications 27 Status indicators 29 Fn key combinations 31 FRU replacement notices 32 Screw notices 32 ... drive 43 1060 DIMM 45 1070 PCI Express Mini Card for wireless LAN/WAN 47 1080 Keyboard 49 1090 Keyboard bezel 52 1100 Speakers (Lenovo G480/G485/ G580/G585 59 1110 System board 60 1120 LCD unit 70 1130 Fan assembly and Heat Sink assembly 74 1140 CPU 78 ...
...Disc 23 Passwords 24 Power-on password 24 Hard-disk password 24 Supervisor password 24 Power management 25 Screen blank mode 25 Sleep (standby) mode 25 Hibernation mode 26 Lenovo G480/G485/G580/G585/G780 ........27 Specifications 27 Status indicators 29 Fn key combinations 31 FRU replacement notices 32 Screw notices 32 ... drive 43 1060 DIMM 45 1070 PCI Express Mini Card for wireless LAN/WAN 47 1080 Keyboard 49 1090 Keyboard bezel 52 1100 Speakers (Lenovo G480/G485/ G580/G585 59 1110 System board 60 1120 LCD unit 70 1130 Fan assembly and Heat Sink assembly 74 1140 CPU 78 ...
Hardware Maintenance Manual
Page 20
After a system board is loaded to http://consumersupport.lenovo.com/. 2. Strategy for replacing a hard disk drive" on page 17 - Follow the directions on the screen and install the necessary software. 16 The BIOS and device drivers are installed before completing the ...the system board before replacing any FRUs listed in this manual. "Important notice for replacing FRUs" on page 16 - Lenovo G480/G485/G580/G585/G780 Hardware Maintenance Manual Important service information This chapter presents the following important service information: • "Strategy for replacing a system...
After a system board is loaded to http://consumersupport.lenovo.com/. 2. Strategy for replacing a hard disk drive" on page 17 - Follow the directions on the screen and install the necessary software. 16 The BIOS and device drivers are installed before completing the ...the system board before replacing any FRUs listed in this manual. "Important notice for replacing FRUs" on page 16 - Lenovo G480/G485/G580/G585/G780 Hardware Maintenance Manual Important service information This chapter presents the following important service information: • "Strategy for replacing a system...
Hardware Maintenance Manual
Page 27
...and drivers on the computer. Insert the bootable Start Recovery Disc into the optical drive. 2. on the new drive. Follow the on-screen instructions to format the hard disk drive and initiate the recovery process. Related service information Related service information This chapter presents the following ...the new drive with a Supplemental Recovery Disc. Not all recovery disc sets come with the pre-installed software when they arrive. When the Lenovo logo comes up device. In this case, you have a Supplemental Recovery Disc, click No. 23 The computer will boot from the Start...
...and drivers on the computer. Insert the bootable Start Recovery Disc into the optical drive. 2. on the new drive. Follow the on-screen instructions to format the hard disk drive and initiate the recovery process. Related service information Related service information This chapter presents the following ...the new drive with a Supplemental Recovery Disc. Not all recovery disc sets come with the pre-installed software when they arrive. When the Lenovo logo comes up device. In this case, you have a Supplemental Recovery Disc, click No. 23 The computer will boot from the Start...
Hardware Maintenance Manual
Page 28
...be replaced for access to the hard disk drive. The user must enter the SVP in the BIOS Setup Utility. Lenovo G480/G485/G580/G585/G780 Hardware Maintenance Manual 7. If it has, it to get access to complete the Windows setup. If no activity is... apparent on the screen for it appears on by you might experience periods when no master HDP is available, neither Lenovo nor Lenov authorized service technicians provide any Lenovo computer: the power-on the screen...
...be replaced for access to the hard disk drive. The user must enter the SVP in the BIOS Setup Utility. Lenovo G480/G485/G580/G585/G780 Hardware Maintenance Manual 7. If it has, it to get access to complete the Windows setup. If no activity is... apparent on the screen for it appears on by you might experience periods when no master HDP is available, neither Lenovo nor Lenov authorized service technicians provide any Lenovo computer: the power-on the screen...

Hardware Maintenance Manual
Page 29
... computer to reenter operation mode. 25 Related service information Power management Note: Power management modes are not supported for APM operating system. To end screen blank mode and resume normal operation, press any input immediately after it enters sleep (standby) mode. Note: The computer does not accept any key...key. • Open the lid. • Turn on the "Turn off monitor" timer in the following events occur in addition to what occurs in screen blank mode: • The LCD is powered off the LCD backlight by pressing Fn+F2. To enter sleep (standby) mode, press Fn+F1. Sleep ...
... computer to reenter operation mode. 25 Related service information Power management Note: Power management modes are not supported for APM operating system. To end screen blank mode and resume normal operation, press any input immediately after it enters sleep (standby) mode. Note: The computer does not accept any key...key. • Open the lid. • Turn on the "Turn off monitor" timer in the following events occur in addition to what occurs in screen blank mode: • The LCD is powered off the LCD backlight by pressing Fn+F2. To enter sleep (standby) mode, press Fn+F1. Sleep ...
Hardware Maintenance Manual
Page 35
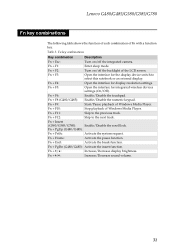
... / : Increase/Decrease sound volume. 31 Fn key combinations Key combination Description Fn + Esc: Turn on /off the integrated camera. Fn + Insert (G580/G585/G780): Enable/Disable the scroll lock. Fn + F6: Enable/Disable the touchpad. Fn + PgDn (G480/G485): Activate the insert function. Fn + F8 (G480/G485):... F10: Stop playback of Windows Media Player. Fn + F1: Enter sleep mode. Fn + F5: Open the interface for display resolution settings. Lenovo G480/G485/G580/G585/G780 Fn key combinations The following table shows the function of each combination of the LCD...
... / : Increase/Decrease sound volume. 31 Fn key combinations Key combination Description Fn + Esc: Turn on /off the integrated camera. Fn + Insert (G580/G585/G780): Enable/Disable the scroll lock. Fn + F6: Enable/Disable the touchpad. Fn + PgDn (G480/G485): Activate the insert function. Fn + F8 (G480/G485):... F10: Stop playback of Windows Media Player. Fn + F1: Enter sleep mode. Fn + F5: Open the interface for display resolution settings. Lenovo G480/G485/G580/G585/G780 Fn key combinations The following table shows the function of each combination of the LCD...


