Lenovo G470/G475/G570/G575 User Guide V1.0
Page 18
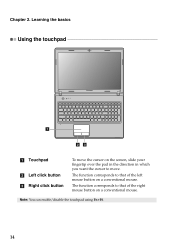
Learning the basics Using the touchpad 1 23 a Touchpad b Left click button c Right click button To move . Note: You can enable/disable the touchpad using Fn+F6. 14 The function corresponds to move the cursor on the screen, slide your fingertip over the pad in the direction in which you want the cursor to that of the left mouse button on a conventional mouse. The function corresponds to that of the right mouse button on a conventional mouse. Chapter 2.
Learning the basics Using the touchpad 1 23 a Touchpad b Left click button c Right click button To move . Note: You can enable/disable the touchpad using Fn+F6. 14 The function corresponds to move the cursor on the screen, slide your fingertip over the pad in the direction in which you want the cursor to that of the left mouse button on a conventional mouse. The function corresponds to that of the right mouse button on a conventional mouse. Chapter 2.
Lenovo G470/G475/G570/G575 User Guide V1.0
Page 21
... + F3: Open the interface for display resolution settings. Fn + F11: Skip to the next track. Fn + Home: Activate the pause function. Fn + PgDn (G470/G475): Activate the insert function. Fn Increase/Decrease display brightness. Fn + F5: Open the interface for integrated wireless devices settings (on /off the backlight of each... of Windows Media Player. Fn + F10: Stop playback of Windows Media Player. Learning the basics The following describes the features of the LCD screen. Fn + PrtSc: Activate the system request. Fn + Insert (G570/G575): Fn + PgUp (G470...
... + F3: Open the interface for display resolution settings. Fn + F11: Skip to the next track. Fn + Home: Activate the pause function. Fn + PgDn (G470/G475): Activate the insert function. Fn Increase/Decrease display brightness. Fn + F5: Open the interface for integrated wireless devices settings (on /off the backlight of each... of Windows Media Player. Fn + F10: Stop playback of Windows Media Player. Learning the basics The following describes the features of the LCD screen. Fn + PrtSc: Activate the system request. Fn + Insert (G570/G575): Fn + PgUp (G470...
Lenovo G470/G475/G570/G575 User Guide V1.0
Page 27
...up. 23 Enter your computer from one to the right of the screen in any combination. The computer cannot be from being used unless you enter the correct password. Note: To enter BIOS setup utility, press F2 when the Lenovo logo appears on the computer. Note: This password can be used ...by others. Chapter 2. For details about how to set a password and enable it, a prompt appears on the screen each time you set the password, see the Help to seven...
...up. 23 Enter your computer from one to the right of the screen in any combination. The computer cannot be from being used unless you enter the correct password. Note: To enter BIOS setup utility, press F2 when the Lenovo logo appears on the computer. Note: This password can be used ...by others. Chapter 2. For details about how to set a password and enable it, a prompt appears on the screen each time you set the password, see the Help to seven...
Lenovo G470/G475/G570/G575 User Guide V1.0
Page 43
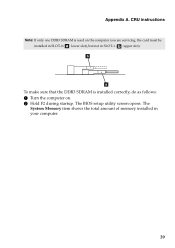
The System Memory item shows the total amount of memory installed in SLOT-1 ( : upper slot). b a To make sure that the DDR3 SDRAM is used on . 2 Hold F2 during startup. The BIOS setup utility screen opens. CRU instructions Note: If only one DDR3 SDRAM is installed correctly, do as follows: 1 Turn the computer on the computer you are servicing, the card must be installed in SLOT-0 ( : lower slot), but not in your computer. 39 Appendix A.
The System Memory item shows the total amount of memory installed in SLOT-1 ( : upper slot). b a To make sure that the DDR3 SDRAM is used on . 2 Hold F2 during startup. The BIOS setup utility screen opens. CRU instructions Note: If only one DDR3 SDRAM is installed correctly, do as follows: 1 Turn the computer on the computer you are servicing, the card must be installed in SLOT-0 ( : lower slot), but not in your computer. 39 Appendix A.


