Safety and General Information Guide - Notebook
Page 19
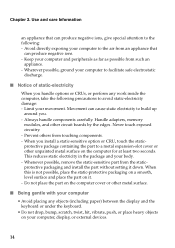
... and care Information an appliance that can produce negative ions, give special attention to avoid static-electricity damage: - Always handle components carefully. Chapter 2. Handle adapters, memory modules, and other metal surface. ■ Being gentle with your computer • Avoid placing any work inside the computer, take the following precautions to the...
... and care Information an appliance that can produce negative ions, give special attention to avoid static-electricity damage: - Always handle components carefully. Chapter 2. Handle adapters, memory modules, and other metal surface. ■ Being gentle with your computer • Avoid placing any work inside the computer, take the following precautions to the...
Safety and General Information Guide - Notebook
Page 23
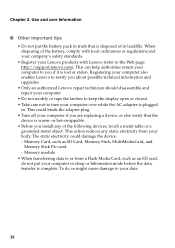
...local ordinances or regulations and your company's safety standards. • Register your Lenovo products with Lenovo (refer to or from your body. Memory module • When transferring data to the Web page: http://support.lenovo.com). Memory Card, such as an SD card, do so might cause damage to your...adapter plug. • Turn off your computer if you install any static electricity from a Flash Media Card, such as SD Card, Memory Stick, MultiMediaCard, and Memory Stick Pro card. - Chapter 2. This could damage the device. - To do not put the battery pack in trash that the ...
...local ordinances or regulations and your company's safety standards. • Register your Lenovo products with Lenovo (refer to or from your body. Memory module • When transferring data to the Web page: http://support.lenovo.com). Memory Card, such as an SD card, do so might cause damage to your...adapter plug. • Turn off your computer if you install any static electricity from a Flash Media Card, such as SD Card, Memory Stick, MultiMediaCard, and Memory Stick Pro card. - Chapter 2. This could damage the device. - To do not put the battery pack in trash that the ...

Hardware Maintenance Manual - Lenovo G40-30, G40-45, G40-70, Z40-70, Z40-75
Page 32
G40-30/G40-45/G40-70/G40-70m/Z40-70/Z40-75 Hardware Maintenance Manual Table 1. Specifications (continued) Feature Graphic memory chip Display Standard memory CMOS RAM Hard disk drive Optical drive I/O port Audio Ethernet (on the system board) Bluetooth wireless Keyboard Touchpad ...8226; 1/8" Combo audio jack • 1.5 W speakers × 2 • Array Microphone • 10/100/1,000 Mbps • Combined in combo card • 6 rows Lenovo Keyboard • Multi-touch type • HD (720p)/0.3 M • 4 cell, 2,200 mAh / 2,800 mAh • 20 V, 65 W or 45 W • Windows 8.1 28
G40-30/G40-45/G40-70/G40-70m/Z40-70/Z40-75 Hardware Maintenance Manual Table 1. Specifications (continued) Feature Graphic memory chip Display Standard memory CMOS RAM Hard disk drive Optical drive I/O port Audio Ethernet (on the system board) Bluetooth wireless Keyboard Touchpad ...8226; 1/8" Combo audio jack • 1.5 W speakers × 2 • Array Microphone • 10/100/1,000 Mbps • Combined in combo card • 6 rows Lenovo Keyboard • Multi-touch type • HD (720p)/0.3 M • 4 cell, 2,200 mAh / 2,800 mAh • 20 V, 65 W or 45 W • Windows 8.1 28

Hardware Maintenance Manual - Lenovo G40-30, G40-45, G40-70, Z40-70, Z40-75
Page 45
Make sure that it snaps into the socket. Note: When replacing the memory is difficult to restart the computer after the first reboot. 41 Lenovo G40-30/G40-45/G40-70/G40-70m/Z40-70/Z40-75 1060 DIMM For access, remove these FRUs in order: • "1010 Battery pack" on page 33 • "1020 Base cover" ...
Make sure that it snaps into the socket. Note: When replacing the memory is difficult to restart the computer after the first reboot. 41 Lenovo G40-30/G40-45/G40-70/G40-70m/Z40-70/Z40-75 1060 DIMM For access, remove these FRUs in order: • "1010 Battery pack" on page 33 • "1020 Base cover" ...

Hardware Maintenance Manual - Lenovo G40-30, G40-45, G40-70, Z40-70, Z40-75
Page 70
G40-30/G40-45/G40-70/G40-70m/Z40-70/Z40-75 Hardware Maintenance Manual Locations Front view and right-side view 1 Integrated camera 2 Built-in microphone Note: Select models may have two microphones, please refer to the actual product. 3 Wireless LAN antennas 4 Computer display 5 Power button 6 Touchpad 7 System status indicators Note: For the description of each indicator, see "Status indicators" on page 29. 8 Combo audio jack 9 Memory card slot J USB port K Optical drive L Kensington lock slot 1 2 3 4 5 6 7 3 12 11 10 9 8 66
G40-30/G40-45/G40-70/G40-70m/Z40-70/Z40-75 Hardware Maintenance Manual Locations Front view and right-side view 1 Integrated camera 2 Built-in microphone Note: Select models may have two microphones, please refer to the actual product. 3 Wireless LAN antennas 4 Computer display 5 Power button 6 Touchpad 7 System status indicators Note: For the description of each indicator, see "Status indicators" on page 29. 8 Combo audio jack 9 Memory card slot J USB port K Optical drive L Kensington lock slot 1 2 3 4 5 6 7 3 12 11 10 9 8 66
Lenovo Limited Warranty & Product Specific Notices - Lenovo G Z Series
Page 21
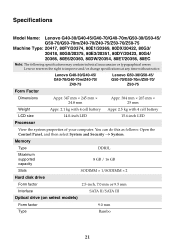
...Memory Type DDR3L Maximum supported capacity 8 GB / 16 GB Slots SODIMM × 1/SODIMM × 2 Hard disk drive Form factor 2.5-inch, 7.0 mm or 9.5 mm Interface SATA II/SATA III Optical drive (on select models) Form factor 9.0 mm Type Rambo 21 Lenovo G40-30/G40-45/ G40-70/G40-70m/Z40-70/ Z40-75 Lenovo G50-30...15.6-inch LED Processor View the system properties of your computer. Lenovo reserves the right to improve and/or change specifications at any time without notice. Specifications Model Name: Lenovo G40-30/G40-45/G40-70/G40-70m/G50-30/G50-45/ G50-70/G50-70m/Z40-70/Z40-75/...
...Memory Type DDR3L Maximum supported capacity 8 GB / 16 GB Slots SODIMM × 1/SODIMM × 2 Hard disk drive Form factor 2.5-inch, 7.0 mm or 9.5 mm Interface SATA II/SATA III Optical drive (on select models) Form factor 9.0 mm Type Rambo 21 Lenovo G40-30/G40-45/ G40-70/G40-70m/Z40-70/ Z40-75 Lenovo G50-30...15.6-inch LED Processor View the system properties of your computer. Lenovo reserves the right to improve and/or change specifications at any time without notice. Specifications Model Name: Lenovo G40-30/G40-45/G40-70/G40-70m/G50-30/G50-45/ G50-70/G50-70m/Z40-70/Z40-75/...

User Guide - Lenovo G Z Series
Page 5
... view ...9 Right-side view...12 Front view ...14 Bottom view...15 Chapter 2. CRU instructions 29 Replacing the battery pack 29 Replacing the hard disk drive 30 Replacing memory...36 Replacing the wireless LAN card 39 Removing the optical drive 42 Trademarks 44...
... view ...9 Right-side view...12 Front view ...14 Bottom view...15 Chapter 2. CRU instructions 29 Replacing the battery pack 29 Replacing the hard disk drive 30 Replacing memory...36 Replacing the wireless LAN card 39 Removing the optical drive 42 Trademarks 44...

User Guide - Lenovo G Z Series
Page 18
... theft and unauthorized use. For details on page 13. b Memory card slot Insert memory cards (not supplied) here. c USB port Connects to help prevent it is a USB 3.0 port. • For details, see "Using memory cards (not supplied)" on installing the security lock, please refer... to the instructions shipped with this type of locking devices and security features. 12 d Optical drive (on page 10. Lenovo offers no comment judgment or warranty regarding the function...
... theft and unauthorized use. For details on page 13. b Memory card slot Insert memory cards (not supplied) here. c USB port Connects to help prevent it is a USB 3.0 port. • For details, see "Using memory cards (not supplied)" on installing the security lock, please refer... to the instructions shipped with this type of locking devices and security features. 12 d Optical drive (on page 10. Lenovo offers no comment judgment or warranty regarding the function...
User Guide - Lenovo G Z Series
Page 19
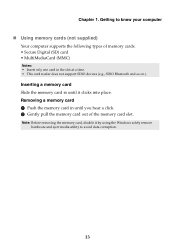
...safely remove hardware and eject media utility to know your computer Using memory cards (not supplied) Your computer supports the following types of the memory card slot. Note: Before removing the memory card, disable it clicks into place. Getting to avoid data corruption. 13 ...Removing a memory card 1 Push the memory card in the slot at a time. • This card reader does...
...safely remove hardware and eject media utility to know your computer Using memory cards (not supplied) Your computer supports the following types of the memory card slot. Note: Before removing the memory card, disable it clicks into place. Getting to avoid data corruption. 13 ...Removing a memory card 1 Push the memory card in the slot at a time. • This card reader does...
User Guide - Lenovo G Z Series
Page 31
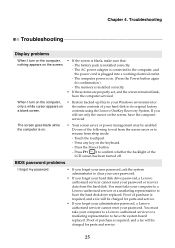
...the screen. - I turn on the computer, • only a white cursor appears on . If you forget your hard disk drive password, a Lenovo authorized servicer cannot reset your user password. • If you still see only the cursor on . (Press the Power button again for parts and... must take your password. Do one of purchase is on the screen, have the hard disk drive replaced. Press the Power button. - The memory is on a blank screen. Troubleshooting Troubleshooting Display problems When I forgot my password. • If you forget your user password, ask the system...
...the screen. - I turn on the computer, • only a white cursor appears on . If you forget your hard disk drive password, a Lenovo authorized servicer cannot reset your user password. • If you still see only the cursor on . (Press the Power button again for parts and... must take your password. Do one of purchase is on the screen, have the hard disk drive replaced. Press the Power button. - The memory is on a blank screen. Troubleshooting Troubleshooting Display problems When I forgot my password. • If you forget your user password, ask the system...

User Guide - Lenovo G Z Series
Page 37
a.Remove the screws that secure the compartment cover a. b.Remove the compartment cover b . Appendix A. Disconnect the AC power adapter and all cables from the computer. 2 Close the computer display and turn the computer over. 3 Remove the battery pack. 4 Remove the Optical drive/Hard disk drive/Memory/Central processing unit/Mini PCI Express Card slot compartment cover. Lenovo G40-30/G40-45/G40-70/G40-70m/Z40-70/Z40-75 1 1 2 2 31 CRU instructions To replace the hard disk drive, do the following: 1 Turn off the computer.
a.Remove the screws that secure the compartment cover a. b.Remove the compartment cover b . Appendix A. Disconnect the AC power adapter and all cables from the computer. 2 Close the computer display and turn the computer over. 3 Remove the battery pack. 4 Remove the Optical drive/Hard disk drive/Memory/Central processing unit/Mini PCI Express Card slot compartment cover. Lenovo G40-30/G40-45/G40-70/G40-70m/Z40-70/Z40-75 1 1 2 2 31 CRU instructions To replace the hard disk drive, do the following: 1 Turn off the computer.
User Guide - Lenovo G Z Series
Page 42
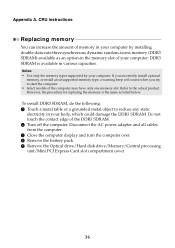
...try to the actual product. DDR3 SDRAM is the same as an option-in various capacities. However, the procedure for replacing the memory is available in the memory slot of memory in your computer by your computer. To install DDR3 SDRAM, do the following: 1 Touch a metal table or a grounded ... the computer. 3 Close the computer display and turn the computer over. 4 Remove the battery pack. 5 Remove the Optical drive/Hard disk drive/Memory/Central processing unit/Mini PCI Express Card slot compartment cover. 36 Refer to start the computer. • Select models of the DDR3 SDRAM. 2 ...
...try to the actual product. DDR3 SDRAM is the same as an option-in various capacities. However, the procedure for replacing the memory is available in the memory slot of memory in your computer by your computer. To install DDR3 SDRAM, do the following: 1 Touch a metal table or a grounded ... the computer. 3 Close the computer display and turn the computer over. 4 Remove the battery pack. 5 Remove the Optical drive/Hard disk drive/Memory/Central processing unit/Mini PCI Express Card slot compartment cover. 36 Refer to start the computer. • Select models of the DDR3 SDRAM. 2 ...
User Guide - Lenovo G Z Series
Page 44
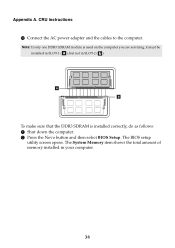
CRU instructions C Connect the AC power adapter and the cables to the computer. a b To make sure that the DDR3 SDRAM is used on the computer you are servicing, it must be installed in SLOT-1 ( ), but not in your computer. 38 The BIOS setup utility screen opens. Note: If only one DDR3 SDRAM module is installed correctly, do as follows: 1 Shut down the computer. 2 Press the Novo button and then select BIOS Setup. The System Memory item shows the total amount of memory installed in SLOT-2 ( ). Appendix A.
CRU instructions C Connect the AC power adapter and the cables to the computer. a b To make sure that the DDR3 SDRAM is used on the computer you are servicing, it must be installed in SLOT-1 ( ), but not in your computer. 38 The BIOS setup utility screen opens. Note: If only one DDR3 SDRAM module is installed correctly, do as follows: 1 Shut down the computer. 2 Press the Novo button and then select BIOS Setup. The System Memory item shows the total amount of memory installed in SLOT-2 ( ). Appendix A.
User Guide - Lenovo G Z Series
Page 45
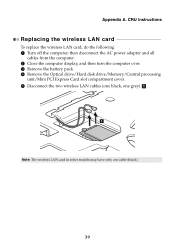
CRU instructions Replacing the wireless LAN card To replace the wireless LAN card, do the following: 1 Turn off the computer; then disconnect the AC power adapter and all cables from the computer. 2 Close the computer display, and then turn the computer over. 3 Remove the battery pack. 4 Remove the Optical drive/Hard disk drive/Memory/Central processing unit/Mini PCI Express Card slot compartment cover. 5 Disconnect the two wireless LAN cables (one black, one grey) a . 1 Note: The wireless LAN card in select models may have only one cable (black). 39 Appendix A.
CRU instructions Replacing the wireless LAN card To replace the wireless LAN card, do the following: 1 Turn off the computer; then disconnect the AC power adapter and all cables from the computer. 2 Close the computer display, and then turn the computer over. 3 Remove the battery pack. 4 Remove the Optical drive/Hard disk drive/Memory/Central processing unit/Mini PCI Express Card slot compartment cover. 5 Disconnect the two wireless LAN cables (one black, one grey) a . 1 Note: The wireless LAN card in select models may have only one cable (black). 39 Appendix A.
User Guide - Lenovo G Z Series
Page 48
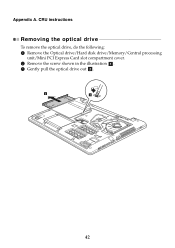
CRU instructions Removing the optical drive To remove the optical drive, do the following: 1 Remove the Optical drive/Hard disk drive/Memory/Central processing unit/Mini PCI Express Card slot compartment cover. 2 Remove the screw shown in the illustration a . 3 Gently pull the optical drive out b . 2 1 42 Appendix A.
CRU instructions Removing the optical drive To remove the optical drive, do the following: 1 Remove the Optical drive/Hard disk drive/Memory/Central processing unit/Mini PCI Express Card slot compartment cover. 2 Remove the screw shown in the illustration a . 3 Gently pull the optical drive out b . 2 1 42 Appendix A.
User Guide - Lenovo G Z Series
Page 49
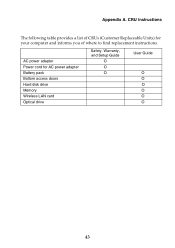
AC power adapter Power cord for your computer and informs you of CRUs (Customer Replaceable Units) for AC power adapter Battery pack Bottom access doors Hard disk drive Memory Wireless LAN card Optical drive Safety, Warranty, and Setup Guide O O O User Guide O O O O O O 43 Appendix A. CRU instructions The following table provides a list of where to find replacement instructions.
AC power adapter Power cord for your computer and informs you of CRUs (Customer Replaceable Units) for AC power adapter Battery pack Bottom access doors Hard disk drive Memory Wireless LAN card Optical drive Safety, Warranty, and Setup Guide O O O User Guide O O O O O O 43 Appendix A. CRU instructions The following table provides a list of where to find replacement instructions.


