Lenovo B575 Setup Poster V1.0
Page 1
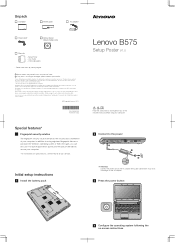
... button B575 4 Configure the operating system following the on special features, see the Help file of Lenovo in ...all preinstalled software downloads. Lenovo, Lenovo logo and OneKey are...application software are either registered trademarks or trademarks of your computer. Copyright Lenovo 2011. Initial setup instructions 1 Install the battery pack 1 3 2... visit the Lenovo Idea product support site to Lenovo Idea product support site http://support.lenovo.com for ... lists. Setup Poster - P/N:148500091 Printed in China Lenovo B575 Setup Poster V1.0 Read the safety notices and important...
... button B575 4 Configure the operating system following the on special features, see the Help file of Lenovo in ...all preinstalled software downloads. Lenovo, Lenovo logo and OneKey are...application software are either registered trademarks or trademarks of your computer. Copyright Lenovo 2011. Initial setup instructions 1 Install the battery pack 1 3 2... visit the Lenovo Idea product support site to Lenovo Idea product support site http://support.lenovo.com for ... lists. Setup Poster - P/N:148500091 Printed in China Lenovo B575 Setup Poster V1.0 Read the safety notices and important...
Lenovo B575 User Guide V1.0
Page 14
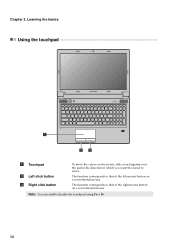
Learning the basics Using the touchpad B575 $ %& a Touchpad b Left click button c Right click button To move . The function corresponds to that of the right mouse button on the screen, slide your fingertip over the pad in the direction in which you want the cursor to that of the left mouse button on a conventional mouse. Note: You can enable/disable the touchpad using Fn + F6. 10 The function corresponds to move the cursor on a conventional mouse. Chapter 2.
Learning the basics Using the touchpad B575 $ %& a Touchpad b Left click button c Right click button To move . The function corresponds to that of the right mouse button on the screen, slide your fingertip over the pad in the direction in which you want the cursor to that of the left mouse button on a conventional mouse. Note: You can enable/disable the touchpad using Fn + F6. 10 The function corresponds to move the cursor on a conventional mouse. Chapter 2.
Lenovo B575 User Guide V1.0
Page 16
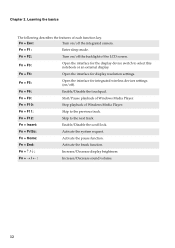
.... Fn Increase/Decrease display brightness. Fn + F11: Skip to the next track. Fn + End: Activate the break function. Fn + F10: Stop playback of the LCD screen. Fn + F12: Skip to the previous track. Fn + Esc: Turn on /off the backlight of Windows Media Player. Fn + Insert: Enable/Disable the scroll lock...
.... Fn Increase/Decrease display brightness. Fn + F11: Skip to the next track. Fn + End: Activate the break function. Fn + F10: Stop playback of the LCD screen. Fn + F12: Skip to the previous track. Fn + Esc: Turn on /off the backlight of Windows Media Player. Fn + Insert: Enable/Disable the scroll lock...
Lenovo B575 User Guide V1.0
Page 21
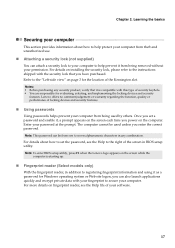
...8226; You are responsible for the location of your password at the prompt. Note: To enter BIOS setup utility, press F2 when the Lenovo logo appears on fingerprint reader, see the Help to set a password and enable it from being removed without your computer from theft and unauthorized... on installing the security lock, please refer to the "Left-side view" on the computer. Lenovo offers no comment judgement or warranty regarding the function, quality or performance of the screen in any security product, verify that you set the password, see the Help file of the Kensington...
...8226; You are responsible for the location of your password at the prompt. Note: To enter BIOS setup utility, press F2 when the Lenovo logo appears on fingerprint reader, see the Help to set a password and enable it from being removed without your computer from theft and unauthorized... on installing the security lock, please refer to the "Left-side view" on the computer. Lenovo offers no comment judgement or warranty regarding the function, quality or performance of the screen in any security product, verify that you set the password, see the Help file of the Kensington...
Lenovo B575 User Guide V1.0
Page 35
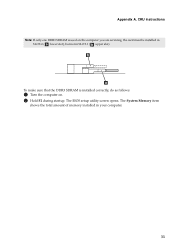
To make sure that the DDR3 SDRAM is used on . 2 Hold F2 during startup. The BIOS setup utility screen opens. Appendix A. The System Memory item shows the total amount of memory installed in SLOT-1 ( : upper slot). CRU instructions Note: If only one DDR3 SDRAM is installed correctly, do as follows: 1 Turn the computer on the computer you are servicing, the card must be installed in SLOT-0 ( : lower slot), but not in your computer. 31
To make sure that the DDR3 SDRAM is used on . 2 Hold F2 during startup. The BIOS setup utility screen opens. Appendix A. The System Memory item shows the total amount of memory installed in SLOT-1 ( : upper slot). CRU instructions Note: If only one DDR3 SDRAM is installed correctly, do as follows: 1 Turn the computer on the computer you are servicing, the card must be installed in SLOT-0 ( : lower slot), but not in your computer. 31

Hardware Maintenance Manual
Page 3
... of factory default 23 Using recovery discs 23 Passwords 24 Power-on password 24 Supervisor password 24 Power management 25 Screen blank mode 25 Sleep (standby) mode 25 Hibernation mode 26 Lenovo B575 27 Specifications 27 Status indicators 29 Fn key combinations 31 FRU replacement notices 32 Screw notices 32 Removing and replacing...
... of factory default 23 Using recovery discs 23 Passwords 24 Power-on password 24 Supervisor password 24 Power management 25 Screen blank mode 25 Sleep (standby) mode 25 Hibernation mode 26 Lenovo B575 27 Specifications 27 Status indicators 29 Fn key combinations 31 FRU replacement notices 32 Screw notices 32 Removing and replacing...
Hardware Maintenance Manual
Page 20
...ensure that all software fixes, drivers, and BIOS downloads are posted on the screen and install the necessary software. 16 Follow the directions on the customer support site: http://consumersupport.lenovo.com/. To download software fixes, drivers, and BIOS, follow the steps below...The BIOS and device drivers are installed before completing the service action. "Strategy for replacing FRUs" on page 16 - Lenovo B575 Hardware Maintenance Manual Important service information This chapter presents the following important service information: • "Strategy for replacing a hard disk drive"...
...ensure that all software fixes, drivers, and BIOS downloads are posted on the screen and install the necessary software. 16 Follow the directions on the customer support site: http://consumersupport.lenovo.com/. To download software fixes, drivers, and BIOS, follow the steps below...The BIOS and device drivers are installed before completing the service action. "Strategy for replacing FRUs" on page 16 - Lenovo B575 Hardware Maintenance Manual Important service information This chapter presents the following important service information: • "Strategy for replacing a hard disk drive"...
Hardware Maintenance Manual
Page 28
...discs to 2 hours. The user must be needed for any of these passwords has been set, a prompt for it appears on the screen whenever the computer is no service procedure to the BIOS Setup Utility and change the system configuration. The computer does not start until the ...system from being powered on . Attention: If the SVP has been forgotten and cannot be booted. If any Lenovo computer: the poweron password (POP) and the supervisor password (SVP). Lenovo B575 Hardware Maintenance Manual When you use the recovery discs to boot your computer, the system will enter the user ...
...discs to 2 hours. The user must be needed for any of these passwords has been set, a prompt for it appears on the screen whenever the computer is no service procedure to the BIOS Setup Utility and change the system configuration. The computer does not start until the ...system from being powered on . Attention: If the SVP has been forgotten and cannot be booted. If any Lenovo computer: the poweron password (POP) and the supervisor password (SVP). Lenovo B575 Hardware Maintenance Manual When you use the recovery discs to boot your computer, the system will enter the user ...
Hardware Maintenance Manual
Page 29
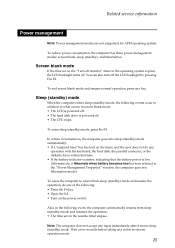
To end screen blank mode and resume normal operation, press any input immediately after it enters sleep (standby) mode. Also, in the ...• The hard disk drive is low. (Alternatively, if Hibernate when battery becomes low has been selected in screen blank mode: • The LCD is powered off . Screen blank mode If the time set on the power switch. In certain circumstances, the computer goes into hibernation mode.)...off the LCD backlight by pressing Fn+F2. To reduce power consumption, the computer has three power management modes: screen blank, sleep (standby), and hibernation.
To end screen blank mode and resume normal operation, press any input immediately after it enters sleep (standby) mode. Also, in the ...• The hard disk drive is low. (Alternatively, if Hibernate when battery becomes low has been selected in screen blank mode: • The LCD is powered off . Screen blank mode If the time set on the power switch. In certain circumstances, the computer goes into hibernation mode.)...off the LCD backlight by pressing Fn+F2. To reduce power consumption, the computer has three power management modes: screen blank, sleep (standby), and hibernation.
Hardware Maintenance Manual
Page 35
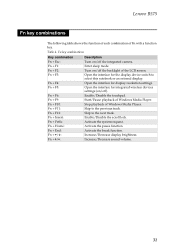
Fn + F11: Skip to the next track. Fn + F12: Skip to the previous track. Lenovo B575 Fn key combinations The following table shows the function of each combination of Windows Media Player. Fn + F1: Enter sleep mode. Fn + F4: Open the ... Media Player. Fn + F10: Stop playback of Fn with a function key. Fn + / : Increase/Decrease display brightness. Table 4. Fn + F9: Start/Pause playback of the LCD screen. Fn + Insert: Enable/Disable the scroll lock.
Fn + F11: Skip to the next track. Fn + F12: Skip to the previous track. Lenovo B575 Fn key combinations The following table shows the function of each combination of Windows Media Player. Fn + F1: Enter sleep mode. Fn + F4: Open the ... Media Player. Fn + F10: Stop playback of Fn with a function key. Fn + / : Increase/Decrease display brightness. Table 4. Fn + F9: Start/Pause playback of the LCD screen. Fn + Insert: Enable/Disable the scroll lock.


