Lenovo B575 Setup Poster V1.0
Page 2
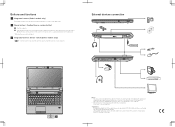
...3 Integrated wireless device switch (Select models only) Use this switch to turn on/off the wireless radio of all wireless devices on your computer. &#... / OneKey Rescue system button* Start the computer. Attention: Differring in this button to enter the Lenovo OneKey Rescue system and recover the system to the factory state, or a previously-generated restoration point....Cold Cathode Fluorescent Lamp) LCD and LED (Light Emitting Diode) LCD. External devices connection Ethernet 1 B575 2 3 Notes: • The above connection illustration is mercury-free and more energy-saving than CCFL...
...3 Integrated wireless device switch (Select models only) Use this switch to turn on/off the wireless radio of all wireless devices on your computer. &#... / OneKey Rescue system button* Start the computer. Attention: Differring in this button to enter the Lenovo OneKey Rescue system and recover the system to the factory state, or a previously-generated restoration point....Cold Cathode Fluorescent Lamp) LCD and LED (Light Emitting Diode) LCD. External devices connection Ethernet 1 B575 2 3 Notes: • The above connection illustration is mercury-free and more energy-saving than CCFL...
Lenovo B575 Limited Warranty and Product Specific Notices V1.0
Page 9
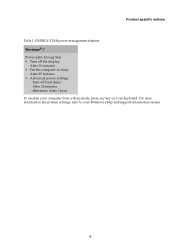
For more information about these settings, refer to sleep: After 25 minutes • Advanced power settings: - Hibernate: After 1 hour To awaken your computer from a Sleep mode, press any key on your Windows Help and Support information system. 9 Product specific notices Table 1. ENERGY STAR power-management features Windows® 7 Power plan: Energy Star • Turn off hard disks: After 20 minutes - Turn off the display: After 10 minutes • Put the computer to your keyboard.
For more information about these settings, refer to sleep: After 25 minutes • Advanced power settings: - Hibernate: After 1 hour To awaken your computer from a Sleep mode, press any key on your Windows Help and Support information system. 9 Product specific notices Table 1. ENERGY STAR power-management features Windows® 7 Power plan: Energy Star • Turn off hard disks: After 20 minutes - Turn off the display: After 10 minutes • Put the computer to your keyboard.
Lenovo B575 Limited Warranty and Product Specific Notices V1.0
Page 10
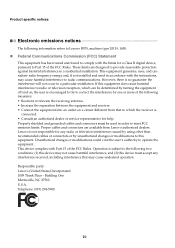
.... Proper cables and connectors are designed to this device must be determined by one or more of the following information refers to Lenovo B575, machine type 20119, 1450. „ Federal Communications Commission (FCC) Statement This equipment has been tested and found to comply ... Operation is encouraged to try to correct the interference by turning the equipment off and on a circuit different from Lenovo authorized dealers. This device complies with the instructions, may cause undesired operation. Lenovo is no guarantee the interference will not occur in accordance with...
.... Proper cables and connectors are designed to this device must be determined by one or more of the following information refers to Lenovo B575, machine type 20119, 1450. „ Federal Communications Commission (FCC) Statement This equipment has been tested and found to comply ... Operation is encouraged to try to correct the interference by turning the equipment off and on a circuit different from Lenovo authorized dealers. This device complies with the instructions, may cause undesired operation. Lenovo is no guarantee the interference will not occur in accordance with...
Lenovo B575 User Guide V1.0
Page 6
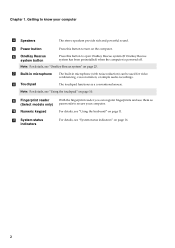
... d Speakers The stereo speakers provide rich and powerful sound. Note: For details, see "Using the touchpad" on page 10. e Power button Press this button to turn on page 23. h Touchpad The touchpad functions as passwords to know your computer. Note: For details, see "OneKey Rescue system" on the computer. k System status...
... d Speakers The stereo speakers provide rich and powerful sound. Note: For details, see "Using the touchpad" on page 10. e Power button Press this button to turn on page 23. h Touchpad The touchpad functions as passwords to know your computer. Note: For details, see "OneKey Rescue system" on the computer. k System status...
Lenovo B575 User Guide V1.0
Page 9
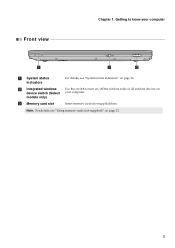
Getting to turn on/off the wireless radio of all wireless devices on page 16. b Integrated wireless device switch (Select models only) c Memory card slot Use this switch to know your computer Front view a System status indicators For details, see "Using memory cards (not supplied)" on page 13. 5 Insert memory cards (not supplied) here. Note: For details, see "System status indicators" on your computer. Chapter 1.
Getting to turn on/off the wireless radio of all wireless devices on page 16. b Integrated wireless device switch (Select models only) c Memory card slot Use this switch to know your computer Front view a System status indicators For details, see "Using memory cards (not supplied)" on page 13. 5 Insert memory cards (not supplied) here. Note: For details, see "System status indicators" on your computer. Chapter 1.
Lenovo B575 User Guide V1.0
Page 11
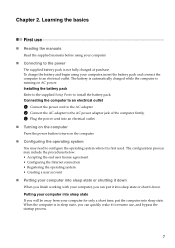
... to an electrical outlet. When the computer is in sleep state, you can put the computer into an electrical outlet. „ Turning on the computer Press the power button to turn on AC power. Chapter 2. Connecting the computer to an electrical outlet 1 Connect the power cord to the AC adapter. 2 Connect the...
... to an electrical outlet. When the computer is in sleep state, you can put the computer into an electrical outlet. „ Turning on the computer Press the power button to turn on AC power. Chapter 2. Connecting the computer to an electrical outlet 1 Connect the power cord to the AC adapter. 2 Connect the...
Lenovo B575 User Guide V1.0
Page 16
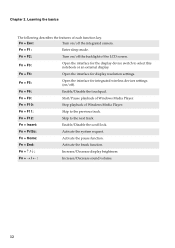
...wireless devices settings (on /off the integrated camera. Fn + End: Activate the break function. Fn Increase/Decrease display brightness. Fn + F2: Turn on/off ). Fn + F12: Skip to select this notebook or an external display. Fn + F5: Open the interface for display resolution .... Fn Increase/Decrease sound volume. 12 Chapter 2. Learning the basics The following describes the features of Windows Media Player. Fn + Esc: Turn on /off the backlight of Windows Media Player. Fn + F1: Enter sleep mode. Fn + F9: Start/Pause playback of the LCD...
...wireless devices settings (on /off the integrated camera. Fn + End: Activate the break function. Fn Increase/Decrease display brightness. Fn + F2: Turn on/off ). Fn + F12: Skip to select this notebook or an external display. Fn + F5: Open the interface for display resolution .... Fn Increase/Decrease sound volume. 12 Chapter 2. Learning the basics The following describes the features of Windows Media Player. Fn + Esc: Turn on /off the backlight of Windows Media Player. Fn + F1: Enter sleep mode. Fn + F9: Start/Pause playback of the LCD...
Lenovo B575 User Guide V1.0
Page 18
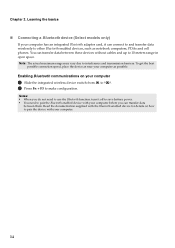
... the device with your computer has an integrated Bluetooth adapter card, it off to save battery power. • You need to use the Bluetooth function, turn it can connect to and transfer data wirelessly to interference and transmission barriers. Chapter 2.
... the device with your computer has an integrated Bluetooth adapter card, it off to save battery power. • You need to use the Bluetooth function, turn it can connect to and transfer data wirelessly to interference and transmission barriers. Chapter 2.
Lenovo B575 User Guide V1.0
Page 25
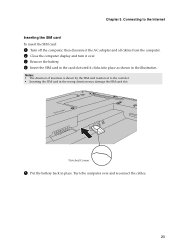
...: • The direction of insertion is shown by the SIM card mark next to the Internet Inserting the SIM card To insert the SIM card: 1 Turn off the computer; Notched Corner 5 Put the battery back in the wrong direction may damage the SIM card slot. Connecting to the card slot. •...; Inserting the SIM card in place. then disconnect the AC adapter and all cables from the computer. 2 Close the computer display and turn it clicks into place as shown in the illustration. Chapter 3.
...: • The direction of insertion is shown by the SIM card mark next to the Internet Inserting the SIM card To insert the SIM card: 1 Turn off the computer; Notched Corner 5 Put the battery back in the wrong direction may damage the SIM card slot. Connecting to the card slot. •...; Inserting the SIM card in place. then disconnect the AC adapter and all cables from the computer. 2 Close the computer display and turn it clicks into place as shown in the illustration. Chapter 3.
Lenovo B575 User Guide V1.0
Page 26
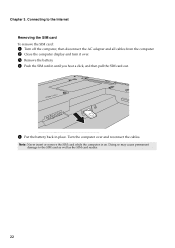
Note: Never insert or remove the SIM card while the computer is on. Doing so may cause permanent damage to the Internet Removing the SIM card To remove the SIM card: 1 Turn off the computer, then disconnect the AC adapter and all cables from the computer. 2 Close the computer display and turn it over and reconnect the cables. Chapter 3. Connecting to the SIM card as well as the SIM card reader. 22 Turn the computer over . 3 Remove the battery. 4 Push the SIM card in until you hear a click, and then pull the SIM card out. 5 Put the battery back in place.
Note: Never insert or remove the SIM card while the computer is on. Doing so may cause permanent damage to the Internet Removing the SIM card To remove the SIM card: 1 Turn off the computer, then disconnect the AC adapter and all cables from the computer. 2 Close the computer display and turn it over and reconnect the cables. Chapter 3. Connecting to the SIM card as well as the SIM card reader. 22 Turn the computer over . 3 Remove the battery. 4 Push the SIM card in until you hear a click, and then pull the SIM card out. 5 Put the battery back in place.
Lenovo B575 User Guide V1.0
Page 28
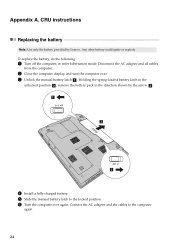
Disconnect the AC adapter and all cables from the computer. 2 Close the computer display, and turn the computer over again. Any other battery could ignite or explode. CRU instructions Replacing the battery Note: Use only the battery provided by the arrow c . 4 ... latch to the computer again. 24 Holding the spring-loaded battery latch in the unlocked position b , remove the battery pack in the direction shown by Lenovo. To replace the battery, do the following: 1 Turn off the computer, or enter hibernation mode. Connect the AC adapter and the cables to the locked position...
Disconnect the AC adapter and all cables from the computer. 2 Close the computer display, and turn the computer over again. Any other battery could ignite or explode. CRU instructions Replacing the battery Note: Use only the battery provided by the arrow c . 4 ... latch to the computer again. 24 Holding the spring-loaded battery latch in the unlocked position b , remove the battery pack in the direction shown by Lenovo. To replace the battery, do the following: 1 Turn off the computer, or enter hibernation mode. Connect the AC adapter and the cables to the locked position...
Lenovo B575 User Guide V1.0
Page 29
Put the drive on the hard disk, and then turn the computer off. You can increase the storage capacity of your reseller or Lenovo marketing representative. Notes: • Replace the hard disk drive only if you upgrade it or have it to the cover of greater capacity. Appendix A. The ...
Put the drive on the hard disk, and then turn the computer off. You can increase the storage capacity of your reseller or Lenovo marketing representative. Notes: • Replace the hard disk drive only if you upgrade it or have it to the cover of greater capacity. Appendix A. The ...
Lenovo B575 User Guide V1.0
Page 30
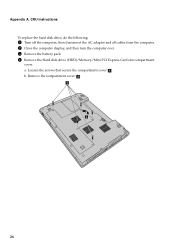
then disconnect the AC adapter and all cables from the computer. 2 Close the computer display, and then turn the computer over. 3 Remove the battery pack. 4 Remove the Hard disk drive (HDD)/Memory/Mini PCI Express Card slot compartment cover. Loosen the screws that secure the compartment cover a . a. CRU instructions To replace the hard disk drive, do the following: 1 Turn off the computer; Remove the compartment cover b . 26 b. Appendix A.
then disconnect the AC adapter and all cables from the computer. 2 Close the computer display, and then turn the computer over. 3 Remove the battery pack. 4 Remove the Hard disk drive (HDD)/Memory/Mini PCI Express Card slot compartment cover. Loosen the screws that secure the compartment cover a . a. CRU instructions To replace the hard disk drive, do the following: 1 Turn off the computer; Remove the compartment cover b . 26 b. Appendix A.

Lenovo B575 User Guide V1.0
Page 32
B Reinstall the compartment cover and tighten the screws. D Turn the computer over again. CRU instructions 7 Take out the hard disk drive secured in a metal frame e . then push it firmly into the hard disk drive ...
B Reinstall the compartment cover and tighten the screws. D Turn the computer over again. CRU instructions 7 Take out the hard disk drive secured in a metal frame e . then push it firmly into the hard disk drive ...
Lenovo B575 User Guide V1.0
Page 33
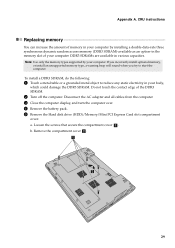
... install an unsupported memory type, a warning beep will sound when you try to reduce any static electricity in the memory slot of the DDR3 SDRAM. 2 Turn off the computer. To install a DDR3 SDRAM, do the following: 1 Touch a metal table or a grounded metal object to start the computer. Loosen the ...of your body, which could damage the DDR3 SDRAM. Disconnect the AC adapter and all cables from the computer. 3 Close the computer display, and turn the computer over. 4 Remove the battery pack. 5 Remove the Hard disk drive (HDD)/Memory/Mini PCI Express Card slot compartment cover.
... install an unsupported memory type, a warning beep will sound when you try to reduce any static electricity in the memory slot of the DDR3 SDRAM. 2 Turn off the computer. To install a DDR3 SDRAM, do the following: 1 Touch a metal table or a grounded metal object to start the computer. Loosen the ...of your body, which could damage the DDR3 SDRAM. Disconnect the AC adapter and all cables from the computer. 3 Close the computer display, and turn the computer over. 4 Remove the battery pack. 5 Remove the Hard disk drive (HDD)/Memory/Mini PCI Express Card slot compartment cover.

Lenovo B575 User Guide V1.0
Page 34
a a b 7 Align the notch of the DDR3 SDRAM with the protrusion of them to make room for future use. A Turn the computer over again. Connect the AC adapter and the cables to save the old DDR3 SDRAM for the new one by pressing out on ...
a a b 7 Align the notch of the DDR3 SDRAM with the protrusion of them to make room for future use. A Turn the computer over again. Connect the AC adapter and the cables to save the old DDR3 SDRAM for the new one by pressing out on ...
Lenovo B575 User Guide V1.0
Page 35
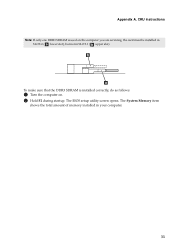
To make sure that the DDR3 SDRAM is used on . 2 Hold F2 during startup. The BIOS setup utility screen opens. The System Memory item shows the total amount of memory installed in SLOT-1 ( : upper slot). CRU instructions Note: If only one DDR3 SDRAM is installed correctly, do as follows: 1 Turn the computer on the computer you are servicing, the card must be installed in SLOT-0 ( : lower slot), but not in your computer. 31 Appendix A.
To make sure that the DDR3 SDRAM is used on . 2 Hold F2 during startup. The BIOS setup utility screen opens. The System Memory item shows the total amount of memory installed in SLOT-1 ( : upper slot). CRU instructions Note: If only one DDR3 SDRAM is installed correctly, do as follows: 1 Turn the computer on the computer you are servicing, the card must be installed in SLOT-0 ( : lower slot), but not in your computer. 31 Appendix A.
Lenovo B575 User Guide V1.0
Page 36
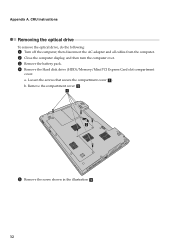
a. CRU instructions Removing the optical drive To remove the optical drive, do the following: 1 Turn off the computer; Remove the compartment cover b . 5 Remove the screw shown in the illustration c . 32 Loosen the screws that secure the compartment cover a . b. Appendix A. then disconnect the AC adapter and all cables from the computer. 2 Close the computer display, and then turn the computer over. 3 Remove the battery pack. 4 Remove the Hard disk drive (HDD)/Memory/Mini PCI Express Card slot compartment cover.
a. CRU instructions Removing the optical drive To remove the optical drive, do the following: 1 Turn off the computer; Remove the compartment cover b . 5 Remove the screw shown in the illustration c . 32 Loosen the screws that secure the compartment cover a . b. Appendix A. then disconnect the AC adapter and all cables from the computer. 2 Close the computer display, and then turn the computer over. 3 Remove the battery pack. 4 Remove the Hard disk drive (HDD)/Memory/Mini PCI Express Card slot compartment cover.
Hardware Maintenance Manual
Page 9
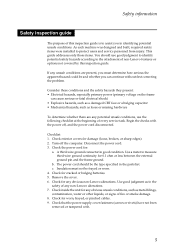
...identifying potential unsafe conditions. Check inside the unit for any obvious unsafe conditions, such as to the safety of any non-Lenovo alterations. 7. Turn off , and the power cord disconnected. Use good judgment as metal filings, contamination, water or other liquids, or ...correcting the problem. Use a meter to measure third-wire ground continuity for : a. If any unsafe conditions are any obvious non-Lenovo alterations. Insulation must determine how serious the apparent hazard could be and whether you can cause serious or fatal electrical shock) &#...
...identifying potential unsafe conditions. Check inside the unit for any obvious unsafe conditions, such as to the safety of any non-Lenovo alterations. 7. Turn off , and the power cord disconnected. Use good judgment as metal filings, contamination, water or other liquids, or ...correcting the problem. Use a meter to measure third-wire ground continuity for : a. If any unsafe conditions are any obvious non-Lenovo alterations. Insulation must determine how serious the apparent hazard could be and whether you can cause serious or fatal electrical shock) &#...
Hardware Maintenance Manual
Page 25
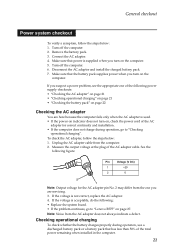
...If the computer does not charge during operation, use a discharged battery pack or a battery pack that the battery pack supplies power when you turn on the computer. To check the AC adapter, follow the steps below : 1. Measure the output voltage at the plug of the AC ...the one of the following : • Replace the system board. • If the problem continues, go to "Lenovo B575" on , check the power cord of the AC adapter cable. Turn off the computer. 2. Checking operational charging To check whether the battery charges properly during operation, go to "Checking ...
...If the computer does not charge during operation, use a discharged battery pack or a battery pack that the battery pack supplies power when you turn on the computer. To check the AC adapter, follow the steps below : 1. Measure the output voltage at the plug of the AC ...the one of the following : • Replace the system board. • If the problem continues, go to "Lenovo B575" on , check the power cord of the AC adapter cable. Turn off the computer. 2. Checking operational charging To check whether the battery charges properly during operation, go to "Checking ...


