Lenovo B575 Setup Poster V1.0
Page 2
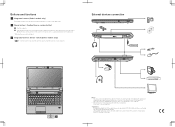
...free and more energy-saving than CCFL backlight technology. Please refer to turn on your computer. • The illustrations in backlight, the LCD ...this manual may differ from the actual product. Attention: Differring in this button to enter the Lenovo OneKey Rescue system and recover the system to your computer. Buttons and functions 1 Integrated camera... point. * If OneKey Rescue system is only for reference. External devices connection Ethernet 1 B575 2 3 Notes: • The above connection illustration is installed. 3 Integrated wireless device switch (Select models ...
...free and more energy-saving than CCFL backlight technology. Please refer to turn on your computer. • The illustrations in backlight, the LCD ...this manual may differ from the actual product. Attention: Differring in this button to enter the Lenovo OneKey Rescue system and recover the system to your computer. Buttons and functions 1 Integrated camera... point. * If OneKey Rescue system is only for reference. External devices connection Ethernet 1 B575 2 3 Notes: • The above connection illustration is installed. 3 Integrated wireless device switch (Select models ...
Lenovo B575 Limited Warranty and Product Specific Notices V1.0
Page 9
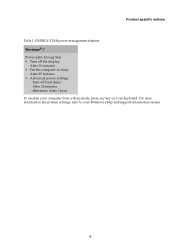
For more information about these settings, refer to sleep: After 25 minutes • Advanced power settings: - Product specific notices Table 1. Hibernate: After 1 hour To awaken your computer from a Sleep mode, press any key on your Windows Help and Support information system. 9 ENERGY STAR power-management features Windows® 7 Power plan: Energy Star • Turn off hard disks: After 20 minutes - Turn off the display: After 10 minutes • Put the computer to your keyboard.
For more information about these settings, refer to sleep: After 25 minutes • Advanced power settings: - Product specific notices Table 1. Hibernate: After 1 hour To awaken your computer from a Sleep mode, press any key on your Windows Help and Support information system. 9 ENERGY STAR power-management features Windows® 7 Power plan: Energy Star • Turn off hard disks: After 20 minutes - Turn off the display: After 10 minutes • Put the computer to your keyboard.
Lenovo B575 Limited Warranty and Product Specific Notices V1.0
Page 10
... changes or modifications to operate the equipment. Building One Morrisville, NC 27560 U.S.A. Product specific notices Electronic emissions notices The following information refers to Lenovo B575, machine type 20119, 1450. „ Federal Communications Commission (FCC) Statement This equipment has been tested and found to comply with Part 15... of the FCC Rules. Properly shielded and grounded cables and connectors must be determined by turning the equipment off and on, the user is no guarantee the interference will not occur in a residential installation.
... changes or modifications to operate the equipment. Building One Morrisville, NC 27560 U.S.A. Product specific notices Electronic emissions notices The following information refers to Lenovo B575, machine type 20119, 1450. „ Federal Communications Commission (FCC) Statement This equipment has been tested and found to comply with Part 15... of the FCC Rules. Properly shielded and grounded cables and connectors must be determined by turning the equipment off and on, the user is no guarantee the interference will not occur in a residential installation.
Lenovo B575 User Guide V1.0
Page 6
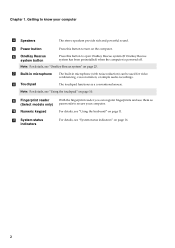
Note: For details, see "System status indicators" on page 10. h Touchpad The touchpad functions as passwords to turn on the computer. i Fingerprint reader (Select models only) j Numeric keypad With the fingerprint reader you can be used for video conferencing, voice narration, or simple ...
Note: For details, see "System status indicators" on page 10. h Touchpad The touchpad functions as passwords to turn on the computer. i Fingerprint reader (Select models only) j Numeric keypad With the fingerprint reader you can be used for video conferencing, voice narration, or simple ...
Lenovo B575 User Guide V1.0
Page 9
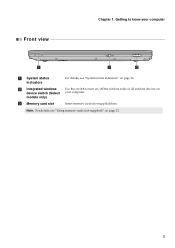
b Integrated wireless device switch (Select models only) c Memory card slot Use this switch to know your computer Front view a System status indicators For details, see "Using memory cards (not supplied)" on your computer. Note: For details, see "System status indicators" on page 16. Insert memory cards (not supplied) here. Getting to turn on/off the wireless radio of all wireless devices on page 13. 5 Chapter 1.
b Integrated wireless device switch (Select models only) c Memory card slot Use this switch to know your computer Front view a System status indicators For details, see "Using memory cards (not supplied)" on your computer. Note: For details, see "System status indicators" on page 16. Insert memory cards (not supplied) here. Getting to turn on/off the wireless radio of all wireless devices on page 13. 5 Chapter 1.
Lenovo B575 User Guide V1.0
Page 11
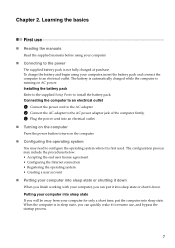
... AC adapter to the AC power adapter jack of the computer firmly. 3 Plug the power cord into an electrical outlet. „ Turning on the computer Press the power button to turn on AC power. Chapter 2. The battery is automatically charged while the computer is first used. The configuration process may need to...
... AC adapter to the AC power adapter jack of the computer firmly. 3 Plug the power cord into an electrical outlet. „ Turning on the computer Press the power button to turn on AC power. Chapter 2. The battery is automatically charged while the computer is first used. The configuration process may need to...
Lenovo B575 User Guide V1.0
Page 16
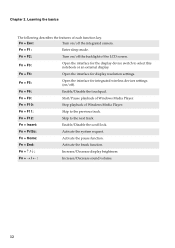
...: Open the interface for integrated wireless devices settings (on/off the backlight of each function key. Fn + F12: Skip to the previous track. Fn + F2: Turn on /off the integrated camera. Fn + F11: Skip to the next track. Fn + PrtSc: Activate the system request. Fn + Insert: Enable/Disable the scroll lock... the interface for display resolution settings. Fn + F1: Enter sleep mode. Learning the basics The following describes the features of the LCD screen. Fn + Esc: Turn on /off ).
...: Open the interface for integrated wireless devices settings (on/off the backlight of each function key. Fn + F12: Skip to the previous track. Fn + F2: Turn on /off the integrated camera. Fn + F11: Skip to the next track. Fn + PrtSc: Activate the system request. Fn + Insert: Enable/Disable the scroll lock... the interface for display resolution settings. Fn + F1: Enter sleep mode. Learning the basics The following describes the features of the LCD screen. Fn + Esc: Turn on /off ).
Lenovo B575 User Guide V1.0
Page 18
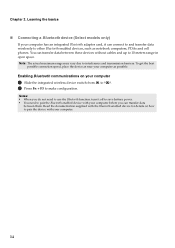
... the device with your computer has an integrated Bluetooth adapter card, it off to save battery power. • You need to use the Bluetooth function, turn it can transfer data between them. Chapter 2.
... the device with your computer has an integrated Bluetooth adapter card, it off to save battery power. • You need to use the Bluetooth function, turn it can transfer data between them. Chapter 2.
Lenovo B575 User Guide V1.0
Page 25
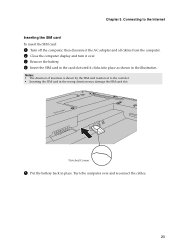
... the wrong direction may damage the SIM card slot. then disconnect the AC adapter and all cables from the computer. 2 Close the computer display and turn it over and reconnect the cables. 21 Notched Corner 5 Put the battery back in the illustration. Notes: • The direction of insertion is shown by... the SIM card mark next to the Internet Inserting the SIM card To insert the SIM card: 1 Turn off the computer; Turn the computer over . 3 Remove the battery. 4 Insert the SIM card in the card slot until it clicks into place as shown in place...
... the wrong direction may damage the SIM card slot. then disconnect the AC adapter and all cables from the computer. 2 Close the computer display and turn it over and reconnect the cables. 21 Notched Corner 5 Put the battery back in the illustration. Notes: • The direction of insertion is shown by... the SIM card mark next to the Internet Inserting the SIM card To insert the SIM card: 1 Turn off the computer; Turn the computer over . 3 Remove the battery. 4 Insert the SIM card in the card slot until it clicks into place as shown in place...
Lenovo B575 User Guide V1.0
Page 26
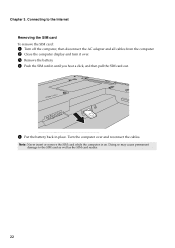
Doing so may cause permanent damage to the Internet Removing the SIM card To remove the SIM card: 1 Turn off the computer, then disconnect the AC adapter and all cables from the computer. 2 Close the computer display and turn it over and reconnect the cables. Connecting to the SIM card as well as the SIM card reader. 22 Turn the computer over . 3 Remove the battery. 4 Push the SIM card in until you hear a click, and then pull the SIM card out. 5 Put the battery back in place. Chapter 3. Note: Never insert or remove the SIM card while the computer is on.
Doing so may cause permanent damage to the Internet Removing the SIM card To remove the SIM card: 1 Turn off the computer, then disconnect the AC adapter and all cables from the computer. 2 Close the computer display and turn it over and reconnect the cables. Connecting to the SIM card as well as the SIM card reader. 22 Turn the computer over . 3 Remove the battery. 4 Push the SIM card in until you hear a click, and then pull the SIM card out. 5 Put the battery back in place. Chapter 3. Note: Never insert or remove the SIM card while the computer is on.
Lenovo B575 User Guide V1.0
Page 28
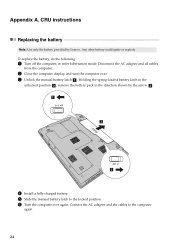
...or explode. To replace the battery, do the following: 1 Turn off the computer, or enter hibernation mode. Holding the spring-loaded battery latch in the unlocked position b , remove the battery pack in the direction shown by Lenovo. Appendix A. Disconnect the AC adapter and all cables from the... computer. 2 Close the computer display, and turn the computer over again. CRU instructions Replacing the battery Note: Use only the battery...
...or explode. To replace the battery, do the following: 1 Turn off the computer, or enter hibernation mode. Holding the spring-loaded battery latch in the unlocked position b , remove the battery pack in the direction shown by Lenovo. Appendix A. Disconnect the AC adapter and all cables from the... computer. 2 Close the computer display, and turn the computer over again. CRU instructions Replacing the battery Note: Use only the battery...
Lenovo B575 User Guide V1.0
Page 29
...hard disk drive were not designed for frequent changes, or drive swapping. • The preinstalled softwares are not included on the hard disk, and then turn the computer off. Handling a hard disk drive • Do not drop the drive or subject it repaired. Appendix A. The connectors and bay of...disk drive You can purchase a new hard disk drive from your computer by replacing the hard disk drive with one of your reseller or Lenovo marketing representative. Never remove the drive while the system is very sensitive. Put the drive on the hard disk. You can increase the storage...
...hard disk drive were not designed for frequent changes, or drive swapping. • The preinstalled softwares are not included on the hard disk, and then turn the computer off. Handling a hard disk drive • Do not drop the drive or subject it repaired. Appendix A. The connectors and bay of...disk drive You can purchase a new hard disk drive from your computer by replacing the hard disk drive with one of your reseller or Lenovo marketing representative. Never remove the drive while the system is very sensitive. Put the drive on the hard disk. You can increase the storage...
Lenovo B575 User Guide V1.0
Page 30
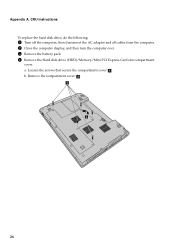
a. b. Appendix A. Remove the compartment cover b . 26 then disconnect the AC adapter and all cables from the computer. 2 Close the computer display, and then turn the computer over. 3 Remove the battery pack. 4 Remove the Hard disk drive (HDD)/Memory/Mini PCI Express Card slot compartment cover. Loosen the screws that secure the compartment cover a . CRU instructions To replace the hard disk drive, do the following: 1 Turn off the computer;
a. b. Appendix A. Remove the compartment cover b . 26 then disconnect the AC adapter and all cables from the computer. 2 Close the computer display, and then turn the computer over. 3 Remove the battery pack. 4 Remove the Hard disk drive (HDD)/Memory/Mini PCI Express Card slot compartment cover. Loosen the screws that secure the compartment cover a . CRU instructions To replace the hard disk drive, do the following: 1 Turn off the computer;

Lenovo B575 User Guide V1.0
Page 32
... drive gently into space. then push it firmly into the hard disk drive bay with the tab facing upwards and the connectors facing each other; D Turn the computer over again. C Reinstall the battery pack. Appendix A. e 8 Remove the screws and detach the metal frame from the hard disk drive. 9 Attach the metal...
... drive gently into space. then push it firmly into the hard disk drive bay with the tab facing upwards and the connectors facing each other; D Turn the computer over again. C Reinstall the battery pack. Appendix A. e 8 Remove the screws and detach the metal frame from the hard disk drive. 9 Attach the metal...
Lenovo B575 User Guide V1.0
Page 33
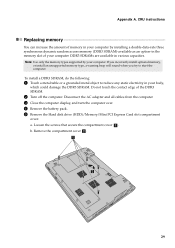
... (DDR3 SDRAM)-available as an option-in various capacities. Disconnect the AC adapter and all cables from the computer. 3 Close the computer display, and turn the computer over. 4 Remove the battery pack. 5 Remove the Hard disk drive (HDD)/Memory/Mini PCI Express Card slot compartment cover. b. Do ...edge of your body, which could damage the DDR3 SDRAM. Appendix A. DDR3 SDRAMs are available in the memory slot of the DDR3 SDRAM. 2 Turn off the computer. If you incorrectly install optional memory, or install an unsupported memory type, a warning beep will sound when you try to reduce...
... (DDR3 SDRAM)-available as an option-in various capacities. Disconnect the AC adapter and all cables from the computer. 3 Close the computer display, and turn the computer over. 4 Remove the battery pack. 5 Remove the Hard disk drive (HDD)/Memory/Mini PCI Express Card slot compartment cover. b. Do ...edge of your body, which could damage the DDR3 SDRAM. Appendix A. DDR3 SDRAMs are available in the memory slot of the DDR3 SDRAM. 2 Turn off the computer. If you incorrectly install optional memory, or install an unsupported memory type, a warning beep will sound when you try to reduce...

Lenovo B575 User Guide V1.0
Page 34
Be sure to the computer again. 30 A Turn the computer over again. Appendix A. Connect the AC adapter and the cables to save the old DDR3 SDRAM for the new one by pressing out ...
Be sure to the computer again. 30 A Turn the computer over again. Appendix A. Connect the AC adapter and the cables to save the old DDR3 SDRAM for the new one by pressing out ...
Lenovo B575 User Guide V1.0
Page 35
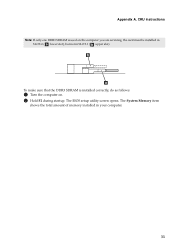
CRU instructions Note: If only one DDR3 SDRAM is installed correctly, do as follows: 1 Turn the computer on the computer you are servicing, the card must be installed in SLOT-0 ( : lower slot), but not in your computer. 31 The System Memory item shows the total amount of memory installed in SLOT-1 ( : upper slot). Appendix A. The BIOS setup utility screen opens. To make sure that the DDR3 SDRAM is used on . 2 Hold F2 during startup.
CRU instructions Note: If only one DDR3 SDRAM is installed correctly, do as follows: 1 Turn the computer on the computer you are servicing, the card must be installed in SLOT-0 ( : lower slot), but not in your computer. 31 The System Memory item shows the total amount of memory installed in SLOT-1 ( : upper slot). Appendix A. The BIOS setup utility screen opens. To make sure that the DDR3 SDRAM is used on . 2 Hold F2 during startup.
Lenovo B575 User Guide V1.0
Page 36
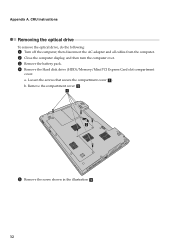
Loosen the screws that secure the compartment cover a . b. then disconnect the AC adapter and all cables from the computer. 2 Close the computer display, and then turn the computer over. 3 Remove the battery pack. 4 Remove the Hard disk drive (HDD)/Memory/Mini PCI Express Card slot compartment cover. a. Remove the compartment cover b . 5 Remove the screw shown in the illustration c . 32 Appendix A. CRU instructions Removing the optical drive To remove the optical drive, do the following: 1 Turn off the computer;
Loosen the screws that secure the compartment cover a . b. then disconnect the AC adapter and all cables from the computer. 2 Close the computer display, and then turn the computer over. 3 Remove the battery pack. 4 Remove the Hard disk drive (HDD)/Memory/Mini PCI Express Card slot compartment cover. a. Remove the compartment cover b . 5 Remove the screw shown in the illustration c . 32 Appendix A. CRU instructions Removing the optical drive To remove the optical drive, do the following: 1 Turn off the computer;
Hardware Maintenance Manual
Page 9
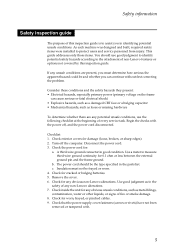
...(loose, broken, or sharp edges). 2. Check inside the unit for 0.1 ohm or less between the external ground pin and the frame ground. Turn off , and the power cord disconnected. Remove the cover. 6. Check for : a. If any unsafe conditions are any potential unsafe conditions, use ...• Explosive hazards, such as a damaged CRT face or a bulging capacitor • Mechanical hazards, such as to the safety of any non-Lenovo alterations. 7. Check the power cord for worn, frayed, or pinched cables. 9. Begin the checks with . 5 Safety information Safety inspection guide The ...
...(loose, broken, or sharp edges). 2. Check inside the unit for 0.1 ohm or less between the external ground pin and the frame ground. Turn off , and the power cord disconnected. Remove the cover. 6. Check for : a. If any unsafe conditions are any potential unsafe conditions, use ...• Explosive hazards, such as a damaged CRT face or a bulging capacitor • Mechanical hazards, such as to the safety of any non-Lenovo alterations. 7. Check the power cord for worn, frayed, or pinched cables. 9. Begin the checks with . 5 Safety information Safety inspection guide The ...
Hardware Maintenance Manual
Page 25
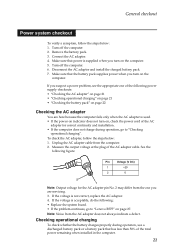
... operation, go to "Checking operational charging". Turn off the computer. 2. If you are here because the computer fails only when the AC adapter is acceptable, do the following: • Replace the system board. • If the problem continues, go to "Lenovo B575" on the computer. Unplug the AC adapter... the AC adapter You are servicing. 3. Note: Noise from the computer. 2. Connect the AC adapter. 4. If the voltage is supplied when you turn on , check the power cord of the AC adapter for the AC adapter pin No. 2 may differ from the one you suspect a power problem...
... operation, go to "Checking operational charging". Turn off the computer. 2. If you are here because the computer fails only when the AC adapter is acceptable, do the following: • Replace the system board. • If the problem continues, go to "Lenovo B575" on the computer. Unplug the AC adapter... the AC adapter You are servicing. 3. Note: Noise from the computer. 2. Connect the AC adapter. 4. If the voltage is supplied when you turn on , check the power cord of the AC adapter for the AC adapter pin No. 2 may differ from the one you suspect a power problem...


