Lenovo IdeaCentre B3/B5 Series User Guide
Page 31
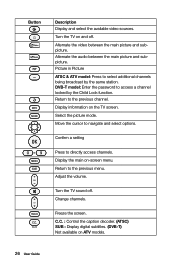
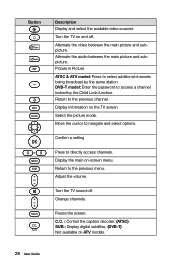
... models. 26 User Guide Move the cursor to directly access channels. Confirm a setting Press to navigate and select options. Turn the TV sound off . C.C. : Control the caption decoder. (ATSC) SUB : Display digital subtitles. (DVB-T) Not available on the TV screen. Button Description Display and select the available video sources. Alternate the audio between the main picture and subpicture. Display the main on and off . Freeze the screen. Change...
... models. 26 User Guide Move the cursor to directly access channels. Confirm a setting Press to navigate and select options. Turn the TV sound off . C.C. : Control the caption decoder. (ATSC) SUB : Display digital subtitles. (DVB-T) Not available on the TV screen. Button Description Display and select the available video sources. Alternate the audio between the main picture and subpicture. Display the main on and off . Freeze the screen. Change...
Lenovo IdeaCentre B3/B5 Series User Guide
Page 42
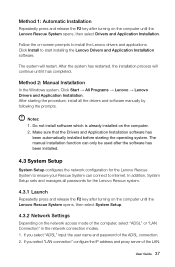
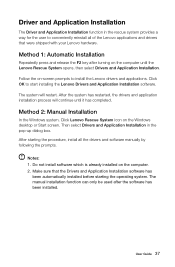
... System Setup. 4.3.2 Network Settings Depending on the network access mode of the computer, select "ADSL" or "LAN Connection" in the network connection modes. 1. In addition, System Setup sets and manages all the drivers and software manually by following the prompts. Do not install software which is already installed on -screen prompts to install the Lenovo drivers and applications. The system will continue until the Lenovo Rescue System opens, then select Drivers and Application Installation. After starting the operating system. User Guide 37...
... System Setup. 4.3.2 Network Settings Depending on the network access mode of the computer, select "ADSL" or "LAN Connection" in the network connection modes. 1. In addition, System Setup sets and manages all the drivers and software manually by following the prompts. Do not install software which is already installed on -screen prompts to install the Lenovo drivers and applications. The system will continue until the Lenovo Rescue System opens, then select Drivers and Application Installation. After starting the operating system. User Guide 37...
Lenovo IdeaCentre B3/B5 Series User Guide
Page 45
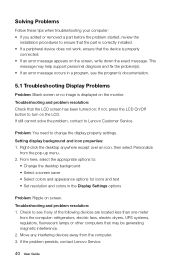
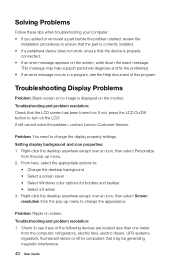
... and fix the problem(s). • If an error message occurs in the Display Settings options Problem: Ripple on the LCD. Solving Problems Follow these tips when troubleshooting your computer: • If you added or removed a part before the problem started, review the installation procedures to ensure that the part is correctly installed. • If a peripheral device does not work, ensure that the LCD screen has been turned on; Problem: You need to Lenovo Customer Service.
... and fix the problem(s). • If an error message occurs in the Display Settings options Problem: Ripple on the LCD. Solving Problems Follow these tips when troubleshooting your computer: • If you added or removed a part before the problem started, review the installation procedures to ensure that the part is correctly installed. • If a peripheral device does not work, ensure that the LCD screen has been turned on; Problem: You need to Lenovo Customer Service.
Lenovo IdeaCentre B3/B5 Series User Guide
Page 51
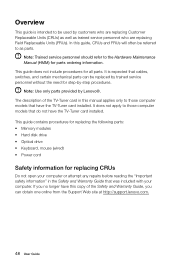
This guide contains procedures for replacing the following parts: • Memory modules • Hard disk drive • Optical drive • Keyboard, mouse (wired) • Power cord Safety information for step-by Lenovo®. It does not apply to those computer models that have the TV-Tuner card installed. This guide does not include procedures for parts ordering information. Note: Use only parts provided by -step procedures. It is intended to be used by...
This guide contains procedures for replacing the following parts: • Memory modules • Hard disk drive • Optical drive • Keyboard, mouse (wired) • Power cord Safety information for step-by Lenovo®. It does not apply to those computer models that have the TV-Tuner card installed. This guide does not include procedures for parts ordering information. Note: Use only parts provided by -step procedures. It is intended to be used by...
User Guide
Page 5
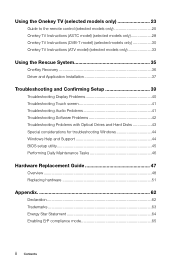
... TV Instructions (ATV model) (selected models only 33 Using the Rescue System 35 OneKey Recovery 36 Driver and Application Installation 37 Troubleshooting and Confirming Setup 39 Troubleshooting Display Problems 40 Troubleshooting Touch screen 41 Troubleshooting Audio Problems 41 Troubleshooting Software Problems 42 Troubleshooting Problems with Optical Drives and Hard Disks 43 Special considerations for troubleshooting Windows 44 Windows Help and Support 44 BIOS setup utility 45 Performing Daily Maintenance Tasks 46 Hardware Replacement Guide 47 Overview 48 Replacing hardware...
... TV Instructions (ATV model) (selected models only 33 Using the Rescue System 35 OneKey Recovery 36 Driver and Application Installation 37 Troubleshooting and Confirming Setup 39 Troubleshooting Display Problems 40 Troubleshooting Touch screen 41 Troubleshooting Audio Problems 41 Troubleshooting Software Problems 42 Troubleshooting Problems with Optical Drives and Hard Disks 43 Special considerations for troubleshooting Windows 44 Windows Help and Support 44 BIOS setup utility 45 Performing Daily Maintenance Tasks 46 Hardware Replacement Guide 47 Overview 48 Replacing hardware...
User Guide
Page 15
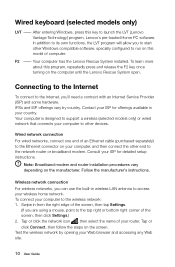
... configured to run on this model of an Ethernet cable (purchased separately) to the top right or bottom right corner of your ISP for detailed setup instructions. IPSs and ISP offerings vary by opening your computer, and then connect the other end to launch the LVT (Lenovo Vantage Technology) program, Lenovo's pre-loaded Home PC software. Wireless network connection For wireless networks, you are using a mouse, point to the Ethernet connector...
... configured to run on this model of an Ethernet cable (purchased separately) to the top right or bottom right corner of your ISP for detailed setup instructions. IPSs and ISP offerings vary by opening your computer, and then connect the other end to launch the LVT (Lenovo Vantage Technology) program, Lenovo's pre-loaded Home PC software. Wireless network connection For wireless networks, you are using a mouse, point to the Ethernet connector...
User Guide
Page 24
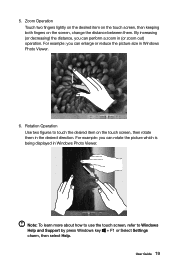
... screen, change the distance between them in Windows Photo Viewer. 6. User Guide 19 For example: you can rotate the picture which is being displayed in (or zoom out) operation. Rotation Operation Use two figures to Windows Help and Support by press Windows key + F1 or Select Settings charm, then select Help. For example: you can perform a zoom in Windows Photo Viewer. Zoom Operation Touch two fingers lightly...
... screen, change the distance between them in Windows Photo Viewer. 6. User Guide 19 For example: you can rotate the picture which is being displayed in (or zoom out) operation. Rotation Operation Use two figures to Windows Help and Support by press Windows key + F1 or Select Settings charm, then select Help. For example: you can perform a zoom in Windows Photo Viewer. Zoom Operation Touch two fingers lightly...
User Guide
Page 31
.... DVB-T model: Enter the password to select additional channels being broadcast by the Child Lock function. Freeze the screen. Picture in Picture ATSC & ATV model: Press to access a channel locked by the same station. Display the main on the TV screen. Adjust the volume. Turn the TV on ATV models. 26 User Guide Select the picture mode. Return to navigate and select options. Change channels...
.... DVB-T model: Enter the password to select additional channels being broadcast by the Child Lock function. Freeze the screen. Picture in Picture ATSC & ATV model: Press to access a channel locked by the same station. Display the main on the TV screen. Adjust the volume. Turn the TV on ATV models. 26 User Guide Select the picture mode. Return to navigate and select options. Change channels...
User Guide
Page 42
... System opens, then select Drivers and Application Installation. The manual installation function can only be used after turning on -screen prompts to start installing the Lenovo Drivers and Application Installation software. Method 1: Automatic Installation Repeatedly press and release the F2 key after the software has been installed. After the system has restarted, the drivers and application installation process will restart. Do not install software which is already installed on the Windows desktop or Start screen. Then select Drivers...
... System opens, then select Drivers and Application Installation. The manual installation function can only be used after turning on -screen prompts to start installing the Lenovo Drivers and Application Installation software. Method 1: Automatic Installation Repeatedly press and release the F2 key after the software has been installed. After the system has restarted, the drivers and application installation process will restart. Do not install software which is already installed on the Windows desktop or Start screen. Then select Drivers...
User Guide
Page 45
... ; Troubleshooting Display Problems Problem: Blank screen or no image is properly connected. • If an error message appears on the screen, write down the exact message. Solving Problems Follow these tips when troubleshooting your computer: • If you added or removed a part before the problem started, review the installation procedures to see the Help document of the following devices are located less than one meter from the pop-up menu to change...
... ; Troubleshooting Display Problems Problem: Blank screen or no image is properly connected. • If an error message appears on the screen, write down the exact message. Solving Problems Follow these tips when troubleshooting your computer: • If you added or removed a part before the problem started, review the installation procedures to see the Help document of the following devices are located less than one meter from the pop-up menu to change...
User Guide
Page 53
... should refer to the Hardware Maintenance Manual (HMM) for all parts. This guide does not include procedures for parts ordering information. If you can be used by -step procedures. It does not apply to as trained service personnel who are replacing Field Replaceable Units (FRUs). This guide contains procedures for replacing the following parts: • Memory modules • Hard disk drive • Optical drive • Keyboard, mouse (wired) • Power cord Safety information...
... should refer to the Hardware Maintenance Manual (HMM) for all parts. This guide does not include procedures for parts ordering information. If you can be used by -step procedures. It does not apply to as trained service personnel who are replacing Field Replaceable Units (FRUs). This guide contains procedures for replacing the following parts: • Memory modules • Hard disk drive • Optical drive • Keyboard, mouse (wired) • Power cord Safety information...
Safety and Warranty guide
Page 17
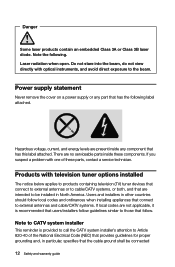
... intended to external antennas and cable/CATV systems. If local codes are no serviceable parts inside these parts, contact a service technician. Products with television tuner options installed The notice below applies to products containing television (TV) tuner devices that connect to external antennas or to cable/CATV systems, or both, and that are present inside any part that connect to be connected 12 Safety and warranty guide Danger Some...
... intended to external antennas and cable/CATV systems. If local codes are no serviceable parts inside these parts, contact a service technician. Products with television tuner options installed The notice below applies to products containing television (TV) tuner devices that connect to external antennas or to cable/CATV systems, or both, and that are present inside any part that connect to be connected 12 Safety and warranty guide Danger Some...
Safety and Warranty guide
Page 28
...WRITTEN AGREEMENT WITH LENOVO. Telephone: +61 2 8003 8200. Email: lensyd_au@lenovo.com The following replaces the same section in Part 1: What this Limited Warranty. Warranty Service Information. If...use and conditions during the warranty period, Lenovo will provide you purchase is free from defects in Part 3 - Safety and warranty guide 23 Your Other Rights THIS WARRANTY GIVES YOU SPECIFIC LEGAL RIGHTS. The warranty period and type of purchase specified on your product are set forth below in materials and workmanship under this Warranty Covers: Lenovo warrants that each hardware...
...WRITTEN AGREEMENT WITH LENOVO. Telephone: +61 2 8003 8200. Email: lensyd_au@lenovo.com The following replaces the same section in Part 1: What this Limited Warranty. Warranty Service Information. If...use and conditions during the warranty period, Lenovo will provide you purchase is free from defects in Part 3 - Safety and warranty guide 23 Your Other Rights THIS WARRANTY GIVES YOU SPECIFIC LEGAL RIGHTS. The warranty period and type of purchase specified on your product are set forth below in materials and workmanship under this Warranty Covers: Lenovo warrants that each hardware...
Safety and Warranty guide
Page 36
... deliver it to a designated service center at your risk and expense. If you fail to collect the product, the Service Provider may need to be repaired or exchanged at a designated service center, with no liability to you. Customer Two-Way Mail-In Service Under Customer Two-Way Mail-In Service, your product to allow disassembly and reassembly of the replacement CRU. 2.
... deliver it to a designated service center at your risk and expense. If you fail to collect the product, the Service Provider may need to be repaired or exchanged at a designated service center, with no liability to you. Customer Two-Way Mail-In Service Under Customer Two-Way Mail-In Service, your product to allow disassembly and reassembly of the replacement CRU. 2.

Lenovo IdeaCentre B540-B540P Hardware Maintenance Manual
Page 5
... Lenovo BIOS Setup Utility program . . 17 Chapter 6. Replacing hardware . . . . 27 General information 27 Replacing the keyboard and mouse 28 Replacing the power cord or power adapter . . . 28 Removing the computer cover 29 Removing the computer stand 30 Replacing a memory module 31 Replacing the hard disk drive 32 Replacing the optical drive 33 Removing the middle cover 35 Replacing the converter board 37 Removing the EMI cover 38 Replacing the camera 39 Replacing the Bluetooth module 40 Replacing the battery 41 Replacing the system fan 42 Removing the power supply 43 Replacing...
... Lenovo BIOS Setup Utility program . . 17 Chapter 6. Replacing hardware . . . . 27 General information 27 Replacing the keyboard and mouse 28 Replacing the power cord or power adapter . . . 28 Removing the computer cover 29 Removing the computer stand 30 Replacing a memory module 31 Replacing the hard disk drive 32 Replacing the optical drive 33 Removing the middle cover 35 Replacing the converter board 37 Removing the EMI cover 38 Replacing the camera 39 Replacing the Bluetooth module 40 Replacing the battery 41 Replacing the system fan 42 Removing the power supply 43 Replacing...
Lenovo IdeaCentre B540-B540P Hardware Maintenance Manual
Page 19
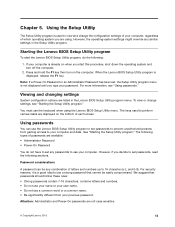
... and data. Chapter 5. You must use a common word or a common name. • Be significantly different from gaining access to view and change settings, see "Using passwords." For more information, see "Starting the Setup Utility program." However, the operating-system settings might override any similar settings in the Lenovo BIOS Setup Utility program menu. Press and hold the F1 key then turn off the computer. 2. Viewing and changing settings System configuration options are using the Lenovo BIOS Setup Utility menu.
... and data. Chapter 5. You must use a common word or a common name. • Be significantly different from gaining access to view and change settings, see "Using passwords." For more information, see "Starting the Setup Utility program." However, the operating-system settings might override any similar settings in the Lenovo BIOS Setup Utility program menu. Press and hold the F1 key then turn off the computer. 2. Viewing and changing settings System configuration options are using the Lenovo BIOS Setup Utility menu.
Lenovo IdeaCentre B540-B540P Hardware Maintenance Manual
Page 21
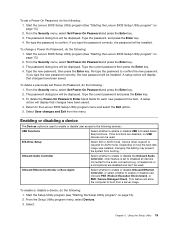
...will be installed. To enable or disable a device, do the following devices: USB Functions Select whether to boot from a server image. Start the Lenovo BIOS Setup Utility program (See "Starting the Lenovo BIOS Setup Utility program" on how the hard disk image was installed, changing this setting may prevent the system from the menu. Select Save changes and Exit from booting. Enabling or disabling a device The Devices options is required for each new password line item. Device driver support is used to enable or disable user access to confirm, if you type the new password...
...will be installed. To enable or disable a device, do the following devices: USB Functions Select whether to boot from a server image. Start the Lenovo BIOS Setup Utility program (See "Starting the Lenovo BIOS Setup Utility program" on how the hard disk image was installed, changing this setting may prevent the system from the menu. Select Save changes and Exit from booting. Enabling or disabling a device The Devices options is required for each new password line item. Device driver support is used to enable or disable user access to confirm, if you type the new password...

Lenovo IdeaCentre B540-B540P Hardware Maintenance Manual
Page 26
... operating correctly and that the boot drive is working correctly • Starts video operations • Verifies that certain options are held pressed during POST. External devices (modem, printer, or mouse) b. Hard disk drive f. Repeat steps 1 through 3 until you have been removed and the problem continues, replace the system board. 20 IdeaCentre B540-B540PHardware Maintenance Manual Make sure the boot drive is called the Power-On Self-Test, or POST. a. External Cache RAM e. Power-on , it performs a series of tests is properly connected...
... operating correctly and that the boot drive is working correctly • Starts video operations • Verifies that certain options are held pressed during POST. External devices (modem, printer, or mouse) b. Hard disk drive f. Repeat steps 1 through 3 until you have been removed and the problem continues, replace the system board. 20 IdeaCentre B540-B540PHardware Maintenance Manual Make sure the boot drive is called the Power-On Self-Test, or POST. a. External Cache RAM e. Power-on , it performs a series of tests is properly connected...
Lenovo IdeaCentre B540-B540P Hardware Maintenance Manual
Page 30
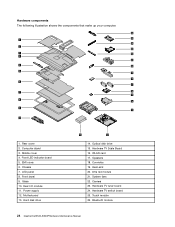
... 8 14 9 13 10 1. Rear cover 2. EMI cover 6. Chassis 7. Infra red module 21. Touch module 26. Middle cover 4. Hard disk drive 11 12 14. Hardware TV tuner board 24. Heat-sink 20. Hardware TV switch board 25. Bluetooth module 24 IdeaCentre B540-B540PHardware Maintenance Manual Power supply 12. Motherboard 13. Computer stand 3. Speakers 18. Camera 23. Glass 10. Converter 19. WLAN card 17. Front bezel 9. System fans 22. Optical disk drive 15. Hardware TV Scale Board 16.
... 8 14 9 13 10 1. Rear cover 2. EMI cover 6. Chassis 7. Infra red module 21. Touch module 26. Middle cover 4. Hard disk drive 11 12 14. Hardware TV tuner board 24. Heat-sink 20. Hardware TV switch board 25. Bluetooth module 24 IdeaCentre B540-B540PHardware Maintenance Manual Power supply 12. Motherboard 13. Computer stand 3. Speakers 18. Camera 23. Glass 10. Converter 19. WLAN card 17. Front bezel 9. System fans 22. Optical disk drive 15. Hardware TV Scale Board 16.
Lenovo IdeaCentre B540-B540P Hardware Maintenance Manual
Page 63
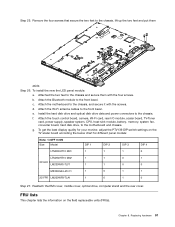
... EMI cover, middle cover, optical drive, computer stand and the rear cover. Chapter 8. Step 26. Attach the Bluetooth module to the chassis, and secure it with the four screws. d. Replacing hardware 57 Step 25. Attach the motherboard to the front bezel. Attach the touch control board, camera, Wi-Fi card, rear I/O module, scalar board, TV-Tuner card, power supply, speaker system, CPU, heat-sink module, battery, memory, system fan, converter board, hard disk drive, to the motherboard...
... EMI cover, middle cover, optical drive, computer stand and the rear cover. Chapter 8. Step 26. Attach the Bluetooth module to the chassis, and secure it with the four screws. d. Replacing hardware 57 Step 25. Attach the motherboard to the front bezel. Attach the touch control board, camera, Wi-Fi card, rear I/O module, scalar board, TV-Tuner card, power supply, speaker system, CPU, heat-sink module, battery, memory, system fan, converter board, hard disk drive, to the motherboard...


