Hardware Maintenance Manual
Page 12
... another person to work on a machine that it , ask the customer to power-off the wall box that supplies power to the machine and to lock the wall box in the safety sections of the units.) • If an electrical accident occurs: - Removing or installing Field Replaceable Units • Before you...
... another person to work on a machine that it , ask the customer to power-off the wall box that supplies power to the machine and to lock the wall box in the safety sections of the units.) • If an electrical accident occurs: - Removing or installing Field Replaceable Units • Before you...
Hardware Maintenance Manual
Page 38
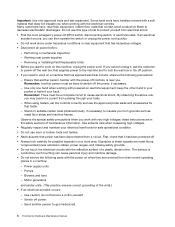
...system information collection, security status, and support information, along with an internal hard disk drive and preinstalled software programs from Lenovo. If your keyboard has one. The Access Help information system provides information about getting started, doing basic tasks, customizing ...technologies, such as muting the speakers, adjusting the volume, locking the computer operating system, launching a program, opening a Web page, opening a file, and so on the desktop. Lenovo Solution Center The Lenovo Solution Center program enables you have launched the SimpleTap program ...
...system information collection, security status, and support information, along with an internal hard disk drive and preinstalled software programs from Lenovo. If your keyboard has one. The Access Help information system provides information about getting started, doing basic tasks, customizing ...technologies, such as muting the speakers, adjusting the volume, locking the computer operating system, launching a program, opening a Web page, opening a file, and so on the desktop. Lenovo Solution Center The Lenovo Solution Center program enables you have launched the SimpleTap program ...
Hardware Maintenance Manual
Page 81
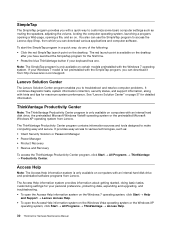
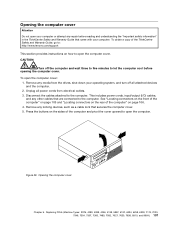
...front of the computer" on page 71 and "Locating connectors on the rear of the ThinkCentre Safety and Warranty Guide, go to:http://www.lenovo.com/support This section provides instructions on page 72. 4. Unplug all attached devices and the computer. 2. Replacing FRUs (Machine Types: 3063,..., 7628, 7635, 7639, 8494, 8854, 9728, 9960, and 9965.) 73 Chapter 8. To remove the computer cover: 1. Remove any locking devices, such as a cable lock that came with your computer. CAUTION: Turn off all power cords from electrical outlets. 3. Remove any media from the drives, shut down your...
...front of the computer" on page 71 and "Locating connectors on the rear of the ThinkCentre Safety and Warranty Guide, go to:http://www.lenovo.com/support This section provides instructions on page 72. 4. Unplug all attached devices and the computer. 2. Replacing FRUs (Machine Types: 3063,..., 7628, 7635, 7639, 8494, 8854, 9728, 9960, and 9965.) 73 Chapter 8. To remove the computer cover: 1. Remove any locking devices, such as a cable lock that came with your computer. CAUTION: Turn off all power cords from electrical outlets. 3. Remove any media from the drives, shut down your...
Hardware Maintenance Manual
Page 91
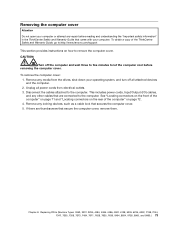
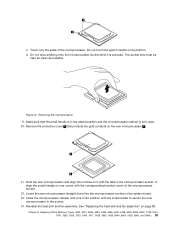
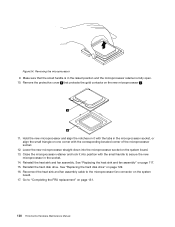
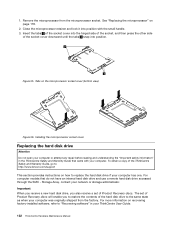
... small handle to secure the new microprocessor in the raised position and the microprocessor retainer is in the socket. 14. Close the microprocessor retainer and lock it into the microprocessor socket on the new microprocessor 1 . 11. Make sure that protects the gold contacts on the system board. 13. Do not touch...
... small handle to secure the new microprocessor in the raised position and the microprocessor retainer is in the socket. 14. Close the microprocessor retainer and lock it into the microprocessor socket on the new microprocessor 1 . 11. Make sure that protects the gold contacts on the system board. 13. Do not touch...
Hardware Maintenance Manual
Page 94
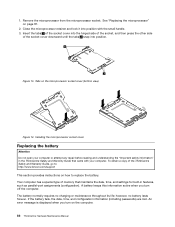
... life; See "Replacing the microprocessor" on the microprocessor socket cover (bottom view) Figure 14. Close the microprocessor retainer and lock it into position. Installing the microprocessor socket cover Replacing the battery Attention Do not open your computer or attempt any repair before...parallel-port assignments (configuration). Your computer has a special type of the ThinkCentre Safety and Warranty Guide, go to: http://www.lenovo.com/support This section provides instructions on the computer. 86 ThinkCentre Hardware Maintenance Manual An error message is displayed when you turn...
... life; See "Replacing the microprocessor" on the microprocessor socket cover (bottom view) Figure 14. Close the microprocessor retainer and lock it into position. Installing the microprocessor socket cover Replacing the battery Attention Do not open your computer or attempt any repair before...parallel-port assignments (configuration). Your computer has a special type of the ThinkCentre Safety and Warranty Guide, go to: http://www.lenovo.com/support This section provides instructions on the computer. 86 ThinkCentre Hardware Maintenance Manual An error message is displayed when you turn...

Hardware Maintenance Manual
Page 111
... bottom of the computer cover engage the rails. Note: When the power cord is secured with thumbscrews, install them. 4. If a computer cover lock is a normal sequence to enable the computer to turn on page 43. See "Locating connectors on the rear of various components. 2. Reconnect the...power cords. Ensure that no tools or loose screws are left inside your computer: 1. Replacing the computer cover 3. Chapter 8. This is installed, lock the computer cover. 5. Then, push the computer cover closed until it snaps into position. Position the computer cover on the chassis so that was...
... bottom of the computer cover engage the rails. Note: When the power cord is secured with thumbscrews, install them. 4. If a computer cover lock is a normal sequence to enable the computer to turn on page 43. See "Locating connectors on the rear of various components. 2. Reconnect the...power cords. Ensure that no tools or loose screws are left inside your computer: 1. Replacing the computer cover 3. Chapter 8. This is installed, lock the computer cover. 5. Then, push the computer cover closed until it snaps into position. Position the computer cover on the chassis so that was...
Hardware Maintenance Manual
Page 115
...operating system, and turn off all power cords from electrical outlets. 3. This includes power cords, input/output (I/O) cables, and any locking devices, such as a cable lock that are connected to open the computer. Remove any other cables that secures the computer cover. 5. Replacing FRUs (Machine Types: 3379... computer and pivot the cover upward to the computer. Press the buttons on the sides of the computer" on how to : http://www.lenovo.com/support This section provides instructions on page 106. 4. Opening the computer cover Chapter 9. Figure 39. To obtain a copy of the...
...operating system, and turn off all power cords from electrical outlets. 3. This includes power cords, input/output (I/O) cables, and any locking devices, such as a cable lock that are connected to open the computer. Remove any other cables that secures the computer cover. 5. Replacing FRUs (Machine Types: 3379... computer and pivot the cover upward to the computer. Press the buttons on the sides of the computer" on how to : http://www.lenovo.com/support This section provides instructions on page 106. 4. Opening the computer cover Chapter 9. Figure 39. To obtain a copy of the...
Hardware Maintenance Manual
Page 128
Close the microprocessor retainer and lock it with the corresponding beveled corner of the microprocessor socket. 12. Reinstall the heat sink and fan assembly. Reinstall the hard disk drive. See "Replacing ...
Close the microprocessor retainer and lock it with the corresponding beveled corner of the microprocessor socket. 12. Reinstall the heat sink and fan assembly. Reinstall the hard disk drive. See "Replacing ...
Hardware Maintenance Manual
Page 130
... set of the ThinkCentre Safety and Warranty Guide, go to: http://www.lenovo.com/support This section provides instructions on recovering factory-installed software, refer to the same state as when your computer. Close the microprocessor retainer and lock it into position. Remove the microprocessor from the factory. Installing the microprocessor socket...
... set of the ThinkCentre Safety and Warranty Guide, go to: http://www.lenovo.com/support This section provides instructions on recovering factory-installed software, refer to the same state as when your computer. Close the microprocessor retainer and lock it into position. Remove the microprocessor from the factory. Installing the microprocessor socket...

Hardware Maintenance Manual
Page 132
...how to the optical drive. Removing the hard disk drive from the rear of the ThinkCentre Safety and Warranty Guide, go to: http://www.lenovo.com/support This section provides instructions on the blue handle of the drive bay assembly. 124 ThinkCentre Hardware Maintenance Manual See "Opening the computer cover... and drives" on page 107. 2. Pivot the drive bay assembly upward to gain access to replace the optical drive. Press the optical drive lock 1 and slide the optical drive out the rear of the hard disk drive bracket snap into place. 10. Open the computer cover.
...how to the optical drive. Removing the hard disk drive from the rear of the ThinkCentre Safety and Warranty Guide, go to: http://www.lenovo.com/support This section provides instructions on the blue handle of the drive bay assembly. 124 ThinkCentre Hardware Maintenance Manual See "Opening the computer cover... and drives" on page 107. 2. Pivot the drive bay assembly upward to gain access to replace the optical drive. Press the optical drive lock 1 and slide the optical drive out the rear of the hard disk drive bracket snap into place. 10. Open the computer cover.

Hardware Maintenance Manual
Page 140
Figure 67. Otherwise, you cannot close the computer cover. 4. If a cover lock is installed, lock the cover. 6. See "Locating connectors on the rear of the computer chassis. To update your configuration, see Chapter 6 "Using the Setup Utility" on page 106. 7. ... of the hinges and sides of the computer" on page 43. 132 ThinkCentre Hardware Maintenance Manual Lower the drive bay assembly and position the drive locks to avoid interference with the drive bay assembly. Important Correctly route all power supply cables to the...
Figure 67. Otherwise, you cannot close the computer cover. 4. If a cover lock is installed, lock the cover. 6. See "Locating connectors on the rear of the computer chassis. To update your configuration, see Chapter 6 "Using the Setup Utility" on page 106. 7. ... of the hinges and sides of the computer" on page 43. 132 ThinkCentre Hardware Maintenance Manual Lower the drive bay assembly and position the drive locks to avoid interference with the drive bay assembly. Important Correctly route all power supply cables to the...