
User Manual
Page 4
... "Notices" on page 375. Fifth Edition (September 2009) © Copyright Lenovo 2008, 2009. GS-35F-05925. © Lenovo 2008, 2009 Note Before using this information and the product it supports, be sure to restrictions set forth in Contract No. LENOVO products, data, computer software, and services have been developed exclusively at private expense and...
... "Notices" on page 375. Fifth Edition (September 2009) © Copyright Lenovo 2008, 2009. GS-35F-05925. © Lenovo 2008, 2009 Note Before using this information and the product it supports, be sure to restrictions set forth in Contract No. LENOVO products, data, computer software, and services have been developed exclusively at private expense and...
User Manual
Page 13
... and the frame ground. Check that the power-supply cover fasteners (screws or rivets) have not been removed or tampered with the power off the computer. This guide addresses only those items. You should be frayed or worn. 4. Use good judgment as metal filings, contamination, water or other liquids, or signs...
... and the frame ground. Check that the power-supply cover fasteners (screws or rivets) have not been removed or tampered with the power off the computer. This guide addresses only those items. You should be frayed or worn. 4. Use good judgment as metal filings, contamination, water or other liquids, or signs...

User Manual
Page 14
...especially useful when handling ESD-sensitive devices. v Prevent the part from touching your skin to eliminate static on ac-operated computers. Make sure that the ESD protective devices you are sensitive to guard against ESD damage by a certified electrician. 6 ThinkPad... T400 and R400 Hardware Maintenance Manual Grounding requirements Electrical grounding of a grounding system to electrostatic discharge Any computer part containing transistors or integrated circuits (ICs) should be verified by equalizing the charge so that the machine, the part,...
...especially useful when handling ESD-sensitive devices. v Prevent the part from touching your skin to eliminate static on ac-operated computers. Make sure that the ESD protective devices you are sensitive to guard against ESD damage by a certified electrician. 6 ThinkPad... T400 and R400 Hardware Maintenance Manual Grounding requirements Electrical grounding of a grounding system to electrostatic discharge Any computer part containing transistors or integrated circuits (ICs) should be verified by equalizing the charge so that the machine, the part,...
User Manual
Page 16
... flakes can cause electrical shorts. Use only the battery in the appropriate parts listing when replacing the battery pack. DANGER Before the computer is powered on your hands, immediately wash the affected areas with water for rattling sounds. Do not disassemble a standby battery, recharge...your eyes or on after washing. 8 ThinkPad T400 and R400 Hardware Maintenance Manual Seek medical care if any symptoms from inside the computer. DANGER Some standby batteries contain a small amount of nickel. Dispose of the battery as required by local ordinances or regulations. DANGER...
... flakes can cause electrical shorts. Use only the battery in the appropriate parts listing when replacing the battery pack. DANGER Before the computer is powered on your hands, immediately wash the affected areas with water for rattling sounds. Do not disassemble a standby battery, recharge...your eyes or on after washing. 8 ThinkPad T400 and R400 Hardware Maintenance Manual Seek medical care if any symptoms from inside the computer. DANGER Some standby batteries contain a small amount of nickel. Dispose of the battery as required by local ordinances or regulations. DANGER...
User Manual
Page 17
DANGER Though the main batteries have low voltage, a shorted or grounded battery can produce enough current to burn personnel or combustible materials. Safety information 9 DANGER To avoid shock, do as follows before removing it: power off the computer, unplug all power cords from electrical outlets, remove the battery pack, and disconnect any interconnecting cables. DANGER Unless hot swap is allowed for the FRU being replaced, do not remove the plastic cover that protects the lower part of the inverter card.
DANGER Though the main batteries have low voltage, a shorted or grounded battery can produce enough current to burn personnel or combustible materials. Safety information 9 DANGER To avoid shock, do as follows before removing it: power off the computer, unplug all power cords from electrical outlets, remove the battery pack, and disconnect any interconnecting cables. DANGER Unless hot swap is allowed for the FRU being replaced, do not remove the plastic cover that protects the lower part of the inverter card.

User Manual
Page 47
... products" on the screen. 3. To download software fixes, drivers, and BIOS, do as follows: 1. Enter the product number of the computer or press Auto-detect button on page 41 Important: BIOS and device driver fixes are available in this manual: v "Strategy for replacing FRUs..." - Important service information This chapter presents following support site: http://www.lenovoservicetraining.com/ion/ Advise customers to http://www.lenovo.com/support 2. "How to all software fixes, drivers, and BIOS downloads are posted on page 40 - After a system board is ...
... products" on the screen. 3. To download software fixes, drivers, and BIOS, do as follows: 1. Enter the product number of the computer or press Auto-detect button on page 41 Important: BIOS and device driver fixes are available in this manual: v "Strategy for replacing FRUs..." - Important service information This chapter presents following support site: http://www.lenovoservicetraining.com/ion/ Advise customers to http://www.lenovo.com/support 2. "How to all software fixes, drivers, and BIOS downloads are posted on page 40 - After a system board is ...

User Manual
Page 48
...one , to prevent cracking at each BGA (Ball Grid Array) chipset. Important notice for replacing a system board Some components mounted on the computer you select an incorrect drive, data or programs can cause damage to run a low-level format before doing this task. v Avoid bending... does not correct the problem, reinstall the original FRU before you are servicing. 40 ThinkPad T400 and R400 Hardware Maintenance Manual v Some computers have been changed the symptoms. Attention: The setup configuration on a system board are instructed to be overwritten. If you are servicing may...
...one , to prevent cracking at each BGA (Ball Grid Array) chipset. Important notice for replacing a system board Some components mounted on the computer you select an incorrect drive, data or programs can cause damage to run a low-level format before doing this task. v Avoid bending... does not correct the problem, reinstall the original FRU before you are servicing. 40 ThinkPad T400 and R400 Hardware Maintenance Manual v Some computers have been changed the symptoms. Attention: The setup configuration on a system board are instructed to be overwritten. If you are servicing may...
User Manual
Page 51
...list. v A FRU should service the computer. v Be careful not to your particular computer. Before you select an incorrect drive, data or programs might not apply to replace a nondefective FRU. © Copyright Lenovo 2008, 2009 43 "Lenovo ThinkVantage Toolbox (Lenovo System Toolbox)" on removing and replacing ...errors. General checkout This chapter presents following important notes. "Diagnostics using PC-Doctor for Windows" on page 52 The descriptions in the computer that have been altered. "PC-Doctor for DOS" on page 45 - If the error does not recur, do first" on...
...list. v A FRU should service the computer. v Be careful not to your particular computer. Before you select an incorrect drive, data or programs might not apply to replace a nondefective FRU. © Copyright Lenovo 2008, 2009 43 "Lenovo ThinkVantage Toolbox (Lenovo System Toolbox)" on removing and replacing ...errors. General checkout This chapter presents following important notes. "Diagnostics using PC-Doctor for Windows" on page 52 The descriptions in the computer that have been altered. "PC-Doctor for DOS" on page 45 - If the error does not recur, do first" on...

User Manual
Page 52
...drive damage caused by pressure on the diskette drive cover, foreign material in the drive, or the insertion of a diskette with the computer, determine whether the damage is a list of some symptoms that might be responsible for warranty: During the warranty period, the customer... Before checking problems with multiple labels v Damaged or bent diskette eject button v Fuses blown by attachment of a nonsupported device v Forgotten computer password (making the computer unusable) v Sticky keys caused by spilling a liquid onto the keyboard v Use of an incorrect ac adapter on the display, and ...
...drive damage caused by pressure on the diskette drive cover, foreign material in the drive, or the insertion of a diskette with the computer, determine whether the damage is a list of some symptoms that might be responsible for warranty: During the warranty period, the customer... Before checking problems with multiple labels v Damaged or bent diskette eject button v Fuses blown by attachment of a nonsupported device v Forgotten computer password (making the computer unusable) v Sticky keys caused by spilling a liquid onto the keyboard v Use of an incorrect ac adapter on the display, and ...
User Manual
Page 53
...Notebook. For some devices are intended to re-create the failure by running the diagnostics test included in the docking station, even if the computer supports the docking station. Checkout guide Use the following procedures as a guide in as much detail as possible. 2. To enter BIOS Setup ... errors by the customer, BIOS Setup Utility menu appears after the password is available at the following Web site: http:// www.lenovo.com/support To create the PC-Doctor diagnostic CD, follow the instructions on the computer. 2. however, you will need to enter the BIOS Setup Utility.
...Notebook. For some devices are intended to re-create the failure by running the diagnostics test included in the docking station, even if the computer supports the docking station. Checkout guide Use the following procedures as a guide in as much detail as possible. 2. To enter BIOS Setup ... errors by the customer, BIOS Setup Utility menu appears after the password is available at the following Web site: http:// www.lenovo.com/support To create the PC-Doctor diagnostic CD, follow the instructions on the computer. 2. however, you will need to enter the BIOS Setup Utility.
User Manual
Page 54
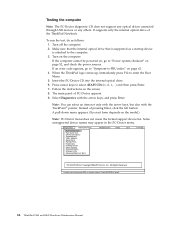
... and then press Enter. 7. Press cursor keys to enter the Boot Menu. 5. Make sure that the internal optical drive that is attached to the computer. 3. If the computer cannot be powered on, go to "Symptom-to "Power system checkout" on page 62. 4. The main panel of pressing Enter, click the left ... Quit F1=Help PC-DOCTOR 2.0 Copyright 2008 PC-Doctor, Inc. A pull-down menu appears. (Its exact form depends on the computer. Testing the computer Note: The PC-Doctor diagnostic CD does not support any optical drives connected through USB devices or any others. Turn off the...
... and then press Enter. 7. Press cursor keys to enter the Boot Menu. 5. Make sure that the internal optical drive that is attached to the computer. 3. If the computer cannot be powered on, go to "Symptom-to "Power system checkout" on page 62. 4. The main panel of pressing Enter, click the left ... Quit F1=Help PC-DOCTOR 2.0 Copyright 2008 PC-Doctor, Inc. A pull-down menu appears. (Its exact form depends on the computer. Testing the computer Note: The PC-Doctor diagnostic CD does not support any optical drives connected through USB devices or any others. Turn off the...
User Manual
Page 55
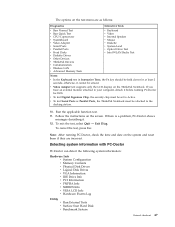
... v Hardware Events Log Utility v Run External Tests v Surface Scan Hard Disk v Benchmark System General checkout 47 If you have an external monitor attached to your computer, detach it . 12. If there is a problem, PC-Doctor shows messages describing it before running PC-Doctor, check the time and date on the screen...
... v Hardware Events Log Utility v Run External Tests v Surface Scan Hard Disk v Benchmark System General checkout 47 If you have an external monitor attached to your computer, detach it . 12. If there is a problem, PC-Doctor shows messages describing it before running PC-Doctor, check the time and date on the screen...
User Manual
Page 56
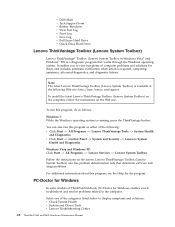
... history. Follow the instructions on the Web site. PC-Doctor for Windows enables you to the computer. v Click Start --> Control Panel --> System and Security --> Lenovo's System Health and Diagnostics. It enables you to troubleshoot and resolve problems related to view symptoms of... the following Web site: http://www.lenovo.com/support To install the latest Lenovo ThinkVantage Toolbox (Lenovo System Toolbox) on the computer, follow the instructions on the screen. Note: The latest Lenovo ThinkVantage Toolbox (Lenovo System Toolbox) is available at the following : v ...
... history. Follow the instructions on the Web site. PC-Doctor for Windows enables you to the computer. v Click Start --> Control Panel --> System and Security --> Lenovo's System Health and Diagnostics. It enables you to troubleshoot and resolve problems related to view symptoms of... the following Web site: http://www.lenovo.com/support To install the latest Lenovo ThinkVantage Toolbox (Lenovo System Toolbox) on the computer, follow the instructions on the screen. Note: The latest Lenovo ThinkVantage Toolbox (Lenovo System Toolbox) is available at the following : v ...
User Manual
Page 57
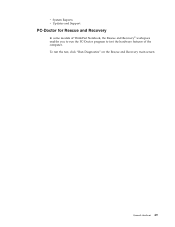
v System Reports v Updates and Support PC-Doctor for Rescue and Recovery In some models of the computer. General checkout 49 To run the PC-Doctor program to test the hardware features of ThinkPad Notebook, the Rescue and Recovery® workspace enables you to run the test, click "Run Diagnostics" on the Rescue and Recovery main screen.
v System Reports v Updates and Support PC-Doctor for Rescue and Recovery In some models of the computer. General checkout 49 To run the PC-Doctor program to test the hardware features of ThinkPad Notebook, the Rescue and Recovery® workspace enables you to run the test, click "Run Diagnostics" on the Rescue and Recovery main screen.
User Manual
Page 58
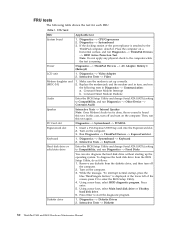
...b. To diagnose the hard disk drive from the diskette drive, and then turn off and turn on the computer. 3. Diagnostics --> Systemboard 3. Place the computer on the computer. 3. In this case, turn , and run Diagnostics --> Fixed Disks Diskette drive You can also diagnose the... hard disk drive without starting up correctly. 2. PC Card slot ExpressCard slot Diagnostics --> Systemboard --> PCMCIA 1. Turn on the computer. Remove any physical shock to Compatibility, and run Diagnostics --> ThinkPad Devices --> HDD Active Protection Test. Diagnostics --> Diskette Drives 2. ...
...b. To diagnose the hard disk drive from the diskette drive, and then turn off and turn on the computer. 3. Diagnostics --> Systemboard 3. Place the computer on the computer. 3. In this case, turn , and run Diagnostics --> Fixed Disks Diskette drive You can also diagnose the... hard disk drive without starting up correctly. 2. PC Card slot ExpressCard slot Diagnostics --> Systemboard --> PCMCIA 1. Turn on the computer. Remove any physical shock to Compatibility, and run Diagnostics --> ThinkPad Devices --> HDD Active Protection Test. Diagnostics --> Diskette Drives 2. ...

User Manual
Page 59
... Drive 2. Fan 1. Turn on the screen for a short time. Run Diagnostics --> ThinkPad Devices --> Fan. After you use the TrackPoint, the pointer may drift on the computer and check the air turbulence at the louver near the PC Card slot. 2. This symptom is necessary. If the problem does not recur, return the...
... Drive 2. Fan 1. Turn on the screen for a short time. Run Diagnostics --> ThinkPad Devices --> Fan. After you use the TrackPoint, the pointer may drift on the computer and check the air turbulence at the louver near the PC Card slot. 2. This symptom is necessary. If the problem does not recur, return the...
User Manual
Page 60
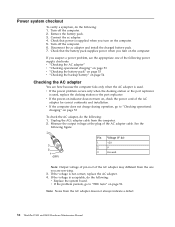
... 2 1 (20V) Pin Voltage (V dc) 1 +20 2 0 3 Ground Note: Output voltage of pin no.2 of the AC adapter may different from the computer. 2. If the voltage is acceptable, do the following : 1. Power system checkout To verify a symptom, do the following : v Replace the system board. Connect the... ac adapter. 4. v If the computer does not charge during operation, go to "Checking operational charging" on page 54 Checking the AC adapter You are servicing. 3. v If the problem ...
... 2 1 (20V) Pin Voltage (V dc) 1 +20 2 0 3 Ground Note: Output voltage of pin no.2 of the AC adapter may different from the computer. 2. If the voltage is acceptable, do the following : 1. Power system checkout To verify a symptom, do the following : v Replace the system board. Connect the... ac adapter. 4. v If the computer does not charge during operation, go to "Checking operational charging" on page 54 Checking the AC adapter You are servicing. 3. v If the problem ...
User Manual
Page 61
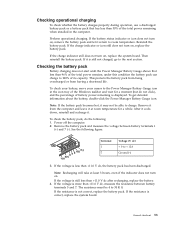
... cursor to 30 K . After it cools down, reinstall and recharge it at least 3 hours, even if the indicator does not turn on . Power off the computer. 2. Note: Recharging will take at room temperature for a moment (but do the following figure: 7(-) 3 4 5 6(-) 2(+) 1(+) Terminal 1 7 Voltage (V dc) + 0 to room temperature... the battery pack, do not click), and the percentage of its capacity. This protects the battery pack from being overcharged or from the computer and leave it . If the battery status indicator or icon does not turn on , remove the battery pack and let it may not...
... cursor to 30 K . After it cools down, reinstall and recharge it at least 3 hours, even if the indicator does not turn on . Power off the computer. 2. Note: Recharging will take at room temperature for a moment (but do the following figure: 7(-) 3 4 5 6(-) 2(+) 1(+) Terminal 1 7 Voltage (V dc) + 0 to room temperature... the battery pack, do not click), and the percentage of its capacity. This protects the battery pack from being overcharged or from the computer and leave it . If the battery status indicator or icon does not turn on , remove the battery pack and let it may not...

User Manual
Page 62
... voltage of the backup battery. Remove the battery pack (see "1060 Backup battery" on page 84). 4. Turn the computer upside down. 3. v If the voltage is correct, replace the system board. Power off the computer, and unplug the ac adapter from it. 2. Red (+) Black (-) Wire Red Black Voltage (V dc) +2.5 to +3.2 Ground v If the...
... voltage of the backup battery. Remove the battery pack (see "1060 Backup battery" on page 84). 4. Turn the computer upside down. 3. v If the voltage is correct, replace the system board. Power off the computer, and unplug the ac adapter from it. 2. Red (+) Black (-) Wire Red Black Voltage (V dc) +2.5 to +3.2 Ground v If the...
User Manual
Page 63
...these terms and conditions and then click Next. 4. Note: The remainder of a failure, no Product Recovery program is on the screen for the computer. Insert the Product Recovery Disc when prompted and click OK. 6. Related service information This chapter presents following : Note: Recovery takes several hours. ...the factory contents by using Product Recovery discs, do not have a Supplemental Recovery Disc, insert it will be posted on http://www.lenovo.com/spm Restoring the factory contents by using Product Recovery discs When the hard disk drive (HDD) or solid state drive (SSD) ...
...these terms and conditions and then click Next. 4. Note: The remainder of a failure, no Product Recovery program is on the screen for the computer. Insert the Product Recovery Disc when prompted and click OK. 6. Related service information This chapter presents following : Note: Recovery takes several hours. ...the factory contents by using Product Recovery discs, do not have a Supplemental Recovery Disc, insert it will be posted on http://www.lenovo.com/spm Restoring the factory contents by using Product Recovery discs When the hard disk drive (HDD) or solid state drive (SSD) ...


