User Guide
Page 3
... information 3-1 Monitor specifications ...3-1 Troubleshooting ...3-2 Manual Image setup ...3-3 Manually installing the monitor driver 3-4 Service information ...3-9 Appendix A. Adjusting and using your monitor 2-1 Comfort and accessibility 2-1 Arranging your work area 2-1 Quick tips for healthy work habits 2-2 Accessibility information 2-2 Adjusting your monitor image 2-3 Using the direct access controls 2-3 Using the On-Screen Display (OSD) controls 2-3 Using the ThinkVision Duo (TVD) software control 2-4 Selecting a supported display mode 2-10 Understanding power management...
... information 3-1 Monitor specifications ...3-1 Troubleshooting ...3-2 Manual Image setup ...3-3 Manually installing the monitor driver 3-4 Service information ...3-9 Appendix A. Adjusting and using your monitor 2-1 Comfort and accessibility 2-1 Arranging your work area 2-1 Quick tips for healthy work habits 2-2 Accessibility information 2-2 Adjusting your monitor image 2-3 Using the direct access controls 2-3 Using the On-Screen Display (OSD) controls 2-3 Using the ThinkVision Duo (TVD) software control 2-4 Selecting a supported display mode 2-10 Understanding power management...
User Guide
Page 5
... Cable ● USB Cable ● Cable Cover Note: To attach a VESA mount, please see the Setup Poster that was shipped with your monitor. For a quick overview, please see "Detaching the monitor stand" on the ThinkVision® L2321x Wide Flat Panel Monitor. Shipping contents The product package should include the following items: ● Setup Poster ● Monitor Safety, Troubleshooting, and Warranty Guide ● Reference and Driver CD ● Flat Panel Monitor ● Power Cord ● Analog Interface Cable- Copyright Lenovo...
... Cable ● USB Cable ● Cable Cover Note: To attach a VESA mount, please see the Setup Poster that was shipped with your monitor. For a quick overview, please see "Detaching the monitor stand" on the ThinkVision® L2321x Wide Flat Panel Monitor. Shipping contents The product package should include the following items: ● Setup Poster ● Monitor Safety, Troubleshooting, and Warranty Guide ● Reference and Driver CD ● Flat Panel Monitor ● Power Cord ● Analog Interface Cable- Copyright Lenovo...

User Guide
Page 6
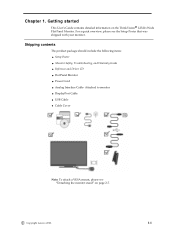
Types of adjustments Tilt Please see the illustration below for the most comfortable viewing angle. Height Adjustment After pressing the top of the monitor, remove the fixed pin and adjust the height of the tilt range. Product overview This section will provide information on adjusting monitor positions, setting user controls, and using the cable lock slot. Swivel With the built-in pedestal, you can tilt and swivel the monitor for an example of the monitor. 1-2 L2321x Wide Flat Panel Monitor User's Guide
Types of adjustments Tilt Please see the illustration below for the most comfortable viewing angle. Height Adjustment After pressing the top of the monitor, remove the fixed pin and adjust the height of the tilt range. Product overview This section will provide information on adjusting monitor positions, setting user controls, and using the cable lock slot. Swivel With the built-in pedestal, you can tilt and swivel the monitor for an example of the monitor. 1-2 L2321x Wide Flat Panel Monitor User's Guide
User Guide
Page 7
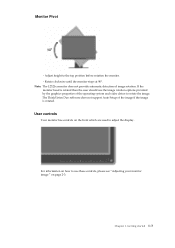
... and video driver to rotate the image. Monitor Pivot - User controls Your monitor has controls on page 2-3. The ThinkVision Duo software does not support Auto Setup of image rotation. Adjust height to adjust the display. Rotate clockwise until the monitor stops at 90°. Chapter 1. Getting started 1-3 Note: The L2321x monitor does not provide automatic detection of the image if the image is rotated then the user should use these controls, please see "Adjusting your monitor image " on...
... and video driver to rotate the image. Monitor Pivot - User controls Your monitor has controls on page 2-3. The ThinkVision Duo software does not support Auto Setup of image rotation. Adjust height to adjust the display. Rotate clockwise until the monitor stops at 90°. Chapter 1. Getting started 1-3 Note: The L2321x monitor does not provide automatic detection of the image if the image is rotated then the user should use these controls, please see "Adjusting your monitor image " on...

User Guide
Page 8
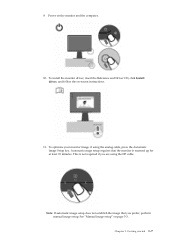
... monitor (in the Monitor Safety, troubleshooting and Warranty Guide before carrying out this User Guide. Connect the analog signal cable to the D-SUB connector of the monitor and the other end on page 2-4 of the signal cable is already pre-attached to your computer and all attached devices, and unplug the computer power cord. 2. For best dual mode performance, Lenovo recommends use of your monitor. Please follow the instructions that came with a cable lock...
... monitor (in the Monitor Safety, troubleshooting and Warranty Guide before carrying out this User Guide. Connect the analog signal cable to the D-SUB connector of the monitor and the other end on page 2-4 of the signal cable is already pre-attached to your computer and all attached devices, and unplug the computer power cord. 2. For best dual mode performance, Lenovo recommends use of your monitor. Please follow the instructions that came with a cable lock...
User Guide
Page 11
... and Driver CD, click Install driver, and follow the on page 3-3. Note: If automatic image setup does not establish the image that the monitor is not required if you prefer, perform manual image setup. See "Manual image setup" on -screen instructions. 11. 9. Getting started 1-7 Automatic image setup requires that you are using the analog cable, press the Automatic Image Setup key. This is warmed up for at least 15 minutes. Chapter 1. Power on the monitor...
... and Driver CD, click Install driver, and follow the on page 3-3. Note: If automatic image setup does not establish the image that the monitor is not required if you prefer, perform manual image setup. See "Manual image setup" on -screen instructions. 11. 9. Getting started 1-7 Automatic image setup requires that you are using the analog cable, press the Automatic Image Setup key. This is warmed up for at least 15 minutes. Chapter 1. Power on the monitor...

User Guide
Page 13
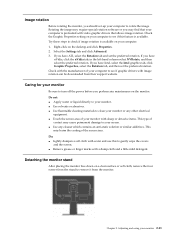
... center the monitor suits your preferences for monitors range from overhead lighting or nearby windows. Use a viewing distance that is important to avoid discomfort. Organize you work area to match the way you to maximize your performance and comfort while using your working posture. Equipment layout and setup play a large role in a relaxed stated. ● Tilt : Adjust the tilt of your monitor to optimize the appearance...
... center the monitor suits your preferences for monitors range from overhead lighting or nearby windows. Use a viewing distance that is important to avoid discomfort. Organize you work area to match the way you to maximize your performance and comfort while using your working posture. Equipment layout and setup play a large role in a relaxed stated. ● Tilt : Adjust the tilt of your monitor to optimize the appearance...

User Guide
Page 15
... Control Description Image Select Menu Switches the Signal or dual screen mode Image Setup Activates automatic image adjustment. Press and hold and allow adjustments to Brightness adjustment. The words " DDC/CI Disable/DDC/ CI/Enable" shows on the screen. 6. Brightness Direct access to the OSD. To use the controls: 1. Press to move among the icons. Use or to open the main OSD menu.(picture 1) 2. This will prevent accidental adjustments to save. 3. Using the On-Screen Display (OSD) controls The settings adjustable with the user controls are colored...
... Control Description Image Select Menu Switches the Signal or dual screen mode Image Setup Activates automatic image adjustment. Press and hold and allow adjustments to Brightness adjustment. The words " DDC/CI Disable/DDC/ CI/Enable" shows on the screen. 6. Brightness Direct access to the OSD. To use the controls: 1. Press to move among the icons. Use or to open the main OSD menu.(picture 1) 2. This will prevent accidental adjustments to save. 3. Using the On-Screen Display (OSD) controls The settings adjustable with the user controls are colored...

User Guide
Page 16
... startup Right click the icon on the task bar. is displayed on the right side of the dual screen with convenience and efficiency under PC operating systems. Startup Startup When the user with the language specified through Control Panel -> Regional and Language Options. Lenovo recommends the use and switch of the taskbar, click Settings, and then select Auto-run to view the Settings 2-4 L2321x Wide Flat Panel Monitor User's Guide
... startup Right click the icon on the task bar. is displayed on the right side of the dual screen with convenience and efficiency under PC operating systems. Startup Startup When the user with the language specified through Control Panel -> Regional and Language Options. Lenovo recommends the use and switch of the taskbar, click Settings, and then select Auto-run to view the Settings 2-4 L2321x Wide Flat Panel Monitor User's Guide

User Guide
Page 19
... Blue: Increases or decreases the saturation of red, green, and blue. Selects D-SUB (Analog) - See "Manual image setup" on Main Menu Submenu Description Brightness/ Contrast Brightness Adjusts overall brightness Contrast Adjusts difference between light and dark areas Image Position Horizontal Position Moves the image left or right. This monitor can accept video signals through two different connectors. Most desktop computers use DP connector. - Select digital among OSD Controls when you use a D-SUB connector. Manually optimizes the image. Adjusting and using your monitor...
... Blue: Increases or decreases the saturation of red, green, and blue. Selects D-SUB (Analog) - See "Manual image setup" on Main Menu Submenu Description Brightness/ Contrast Brightness Adjusts overall brightness Contrast Adjusts difference between light and dark areas Image Position Horizontal Position Moves the image left or right. This monitor can accept video signals through two different connectors. Most desktop computers use DP connector. - Select digital among OSD Controls when you use a D-SUB connector. Manually optimizes the image. Adjusting and using your monitor...

User Guide
Page 20
... menu settings for accessibility preferences. Button repeat rate: Select or to the original factory settings. Menu Position Default Custom Menu position adjusts menu location on any changes to full screen Options Exit Information Shows resolution, refresh rate, and product details. Note: This screen does not allow any software running on Main Menu Submenu Scaling Description ● Original AR Same Aspect Ratio with input signal ● Full screen Expand image to the settings. Exit the main menu 2-8 L2321x Wide Flat Panel Monitor User's Guide OSD...
... menu settings for accessibility preferences. Button repeat rate: Select or to the original factory settings. Menu Position Default Custom Menu position adjusts menu location on any changes to full screen Options Exit Information Shows resolution, refresh rate, and product details. Note: This screen does not allow any software running on Main Menu Submenu Scaling Description ● Original AR Same Aspect Ratio with input signal ● Full screen Expand image to the settings. Exit the main menu 2-8 L2321x Wide Flat Panel Monitor User's Guide OSD...

User Guide
Page 22
... a high refresh rate to switch ENERGY STAR on how to change when the display mode changes. ENERGY STAR Off Off Off Press power key to minimize flicker, LCD or Flat Panel technology is the Native Resolution Display mode. There are several states as described in the table below have re-configured the system; Unlike CRT monitors, which is inherently flicker-free. This is controlled by the computer. For optimal performance, switch off your...
... a high refresh rate to switch ENERGY STAR on how to change when the display mode changes. ENERGY STAR Off Off Off Press power key to minimize flicker, LCD or Flat Panel technology is the Native Resolution Display mode. There are several states as described in the table below have re-configured the system; Unlike CRT monitors, which is inherently flicker-free. This is controlled by the computer. For optimal performance, switch off your...
User Guide
Page 23
... the monitor stand After placing the monitor face down on the monitor. Chapter 2. Rotating the image may cause permanent damage to gently wipe the covers and the screen. ● Remove grease or finger marks with video graphic drivers that your computer is available on your screen. ● Use any maintenance on a clean surface or soft cloth, remove the four screws from the stand to turn off the power...
... the monitor stand After placing the monitor face down on the monitor. Chapter 2. Rotating the image may cause permanent damage to gently wipe the covers and the screen. ● Remove grease or finger marks with video graphic drivers that your computer is available on your screen. ● Use any maintenance on a clean surface or soft cloth, remove the four screws from the stand to turn off the power...

User Guide
Page 24
... in) Image Viewable image size Maximum height Maximum width Pixel pitch 584.20 mm (23.00 in) 286.74 mm (11.29 in) 509.76 mm (20.05 in) 0.265 mm (0.010 in) (V) Power input Power consumption Note: Power consumption figures are for the monitor and the power supply combined. Chapter 3. Reference information This section contains monitor specifications, instructions to manually install the monitor driver, troubleshooting information, and service information. Monitor specifications Table...
... in) Image Viewable image size Maximum height Maximum width Pixel pitch 584.20 mm (23.00 in) 286.74 mm (11.29 in) 509.76 mm (20.05 in) 0.265 mm (0.010 in) (V) Power input Power consumption Note: Power consumption figures are for the monitor and the power supply combined. Chapter 3. Reference information This section contains monitor specifications, instructions to manually install the monitor driver, troubleshooting information, and service information. Monitor specifications Table...
User Guide
Page 25
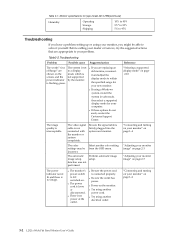
... power cord is set to 95% Troubleshooting If you have a problem setting up or using another color setting from the OSD menu. "Connecting and turning on your monitor" on page 1-4 "Adjusting your monitor image" on page 2-3 "Adjusting your monitor, you are shown on page 2-10 The image quality is flashing green. The system is connected properly. ● Be sure the outlet has power. ● Power on page 1-4 3-2 L2321x Wide Flat Panel Monitor User's Guide Be sure the signal cable is not connected with the monitor...
... power cord is set to 95% Troubleshooting If you have a problem setting up or using another color setting from the OSD menu. "Connecting and turning on your monitor" on page 1-4 "Adjusting your monitor image" on page 2-3 "Adjusting your monitor, you are shown on page 2-10 The image quality is flashing green. The system is connected properly. ● Be sure the outlet has power. ● Power on page 1-4 3-2 L2321x Wide Flat Panel Monitor User's Guide Be sure the signal cable is not connected with the monitor...

User Guide
Page 26
... "Understanding power management" on page 2-10 "Connecting and turning on your monitor" on page 1-4 "Adjusting your monitor image" on page 2-3 Appendix A, "Service and Support," on page A-1 "Adjusting your monitor image" on page 2-3 "Manual image setup" "Selecting a supported display mode" on page 2-10 When working in the native resolution, you prefer, perform manual image setup. The monitor brightness and contrast are more of This is a the pixels characteristic of your system blurry optimized to open the OSD menu. 2. Use or to access. 3. Perform automatic image setup...
... "Understanding power management" on page 2-10 "Connecting and turning on your monitor" on page 1-4 "Adjusting your monitor image" on page 2-3 Appendix A, "Service and Support," on page A-1 "Adjusting your monitor image" on page 2-3 "Manual image setup" "Selecting a supported display mode" on page 2-10 When working in the native resolution, you prefer, perform manual image setup. The monitor brightness and contrast are more of This is a the pixels characteristic of your system blurry optimized to open the OSD menu. 2. Use or to access. 3. Perform automatic image setup...
User Guide
Page 27
... must download files from the Lenovo Monitor CD to leave the OSD menu. Insert the Lenovo Monitor CD into the CD drive and click the Have Disk button. Restart the computer. Open the "Update Driver Software-Generic PnP Monitor" window by clicking Start, Control Panel and then double-clicking the Hardware and Sound icon. 5. Note: On LCD monitors, unlike CRTs, a faster refresh rate does not improve display quality. If the frequency is connected correctly. 3. Turn on the monitor...
... must download files from the Lenovo Monitor CD to leave the OSD menu. Insert the Lenovo Monitor CD into the CD drive and click the Have Disk button. Restart the computer. Open the "Update Driver Software-Generic PnP Monitor" window by clicking Start, Control Panel and then double-clicking the Hardware and Sound icon. 5. Note: On LCD monitors, unlike CRTs, a faster refresh rate does not improve display quality. If the frequency is connected correctly. 3. Turn on the monitor...
User Guide
Page 28
.... Turn on the monitor and then the system unit. Open the Display Properties window by clicking on the Browse button and navigate to the following directory: X:\Monitor Drivers\ (where X is connected correctly. 3. Click the Advanced Settings button. 8. The files will automatically select the maximum refresh rate and corresponding Color Matching Profiles. Close all attached devices 2. Restart the system. Note: On LCD monitors, unlike CRTs...
.... Turn on the monitor and then the system unit. Open the Display Properties window by clicking on the Browse button and navigate to the following directory: X:\Monitor Drivers\ (where X is connected correctly. 3. Click the Advanced Settings button. 8. The files will automatically select the maximum refresh rate and corresponding Color Matching Profiles. Close all attached devices 2. Restart the system. Note: On LCD monitors, unlike CRTs...

User Guide
Page 29
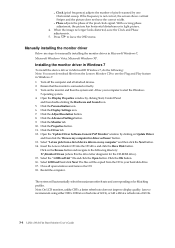
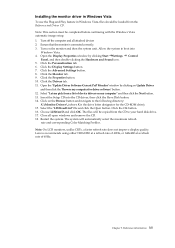
... Monitor tab. 8. Insert the Setup CD into Windows XP 4. Turn off the computer and all open windows and remove the CD. 16. Click the OK button. 14. Click the Setting tab. 6. Open the Upgrade Device Driver Wizard window by clicking Start Settings Control Panel, and then double-clicking the Display icon. 5. Note: This section must be completed before continuing with the Windows XP automatic image setup. 1. Installing the monitor driver in Windows XP To use the Plug...
... Monitor tab. 8. Insert the Setup CD into Windows XP 4. Turn off the computer and all open windows and remove the CD. 16. Click the OK button. 14. Click the Setting tab. 6. Open the Upgrade Device Driver Wizard window by clicking Start Settings Control Panel, and then double-clicking the Display icon. 5. Note: This section must be completed before continuing with the Windows XP automatic image setup. 1. Installing the monitor driver in Windows XP To use the Plug...
User Guide
Page 30
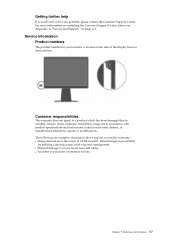
... abuse and not covered by utilizing a moving screen saver or power management. ● Physical damage to covers, bezel, base and cables. ● Scratches or punctures on the side of a CRT monitor. For more information on contacting the Customer Support Center, please see Appendix A, "Service and Support," on to accident, misuse, abuse, improper installation, usage not in accordance with product specifications and instructions, natural or...
... abuse and not covered by utilizing a moving screen saver or power management. ● Physical damage to covers, bezel, base and cables. ● Scratches or punctures on the side of a CRT monitor. For more information on contacting the Customer Support Center, please see Appendix A, "Service and Support," on to accident, misuse, abuse, improper installation, usage not in accordance with product specifications and instructions, natural or...


