
User Manual
Page 5
... and GAV products 41 General checkout 43 What to do first 44 Checkout guide 45 Diagnostics using PC-Doctor for DOS . . . . 45 Lenovo ThinkVantage Toolbox (Lenovo System Toolbox 48 PC-Doctor for Rescue and Recovery . . . . . 48 FRU tests 49 Power system checkout 51 Checking the AC adapter 51... Bluetooth daughter card (BDC-2) . . . . . 103 1150 Media Card Reader slot board and Media Card Reader cable assembly 104 1160 Keyboard 106 1170 Keyboard bezel 109 1180 LCD unit 111 1190 Top shielding assembly 116 1200 System board assembly 118 1210 USB connector board and USB cable assembly...
... and GAV products 41 General checkout 43 What to do first 44 Checkout guide 45 Diagnostics using PC-Doctor for DOS . . . . 45 Lenovo ThinkVantage Toolbox (Lenovo System Toolbox 48 PC-Doctor for Rescue and Recovery . . . . . 48 FRU tests 49 Power system checkout 51 Checking the AC adapter 51... Bluetooth daughter card (BDC-2) . . . . . 103 1150 Media Card Reader slot board and Media Card Reader cable assembly 104 1160 Keyboard 106 1170 Keyboard bezel 109 1180 LCD unit 111 1190 Top shielding assembly 116 1200 System board assembly 118 1210 USB connector board and USB cable assembly...
User Manual
Page 6
Parts list 141 Overall 142 LCD FRUs 158 Keyboard 164 Miscellaneous parts 165 AC adapters 166 Power cords 167 Recovery discs 168 Windows XP Professional (32 bit) DVDs . . . 168 Windows Vista Home Basic (32 ... (64 bit) DVDs . . 173 Windows 7 Professional (32 bit) DVDs . . . . 174 Windows 7 Professional (64 bit) DVDs . . . . 175 Common service tools 176 Notices 177 Trademarks 178 iv ThinkPad SL410, L410, SL510, and L510 Hardware Maintenance Manual
Parts list 141 Overall 142 LCD FRUs 158 Keyboard 164 Miscellaneous parts 165 AC adapters 166 Power cords 167 Recovery discs 168 Windows XP Professional (32 bit) DVDs . . . 168 Windows Vista Home Basic (32 ... (64 bit) DVDs . . 173 Windows 7 Professional (32 bit) DVDs . . . . 174 Windows 7 Professional (64 bit) DVDs . . . . 175 Common service tools 176 Notices 177 Trademarks 178 iv ThinkPad SL410, L410, SL510, and L510 Hardware Maintenance Manual
User Manual
Page 52
... diskette eject button v Fuses blown by attachment of a nonsupported device v Forgotten computer password (making the computer unusable) v Sticky keys caused by spilling a liquid onto the keyboard v Use of an incorrect ac adapter on the diskette drive cover, foreign material in the drive, or the insertion of a diskette with the computer, determine.... v If the spindle of a hard disk drive becomes noisy, it : __ 1. Following is covered under the warranty by referring to excessive force, or dropped. 44 ThinkPad SL410, L410, SL510, and L510 Hardware Maintenance Manual
... diskette eject button v Fuses blown by attachment of a nonsupported device v Forgotten computer password (making the computer unusable) v Sticky keys caused by spilling a liquid onto the keyboard v Use of an incorrect ac adapter on the diskette drive cover, foreign material in the drive, or the insertion of a diskette with the computer, determine.... v If the spindle of a hard disk drive becomes noisy, it : __ 1. Following is covered under the warranty by referring to excessive force, or dropped. 44 ThinkPad SL410, L410, SL510, and L510 Hardware Maintenance Manual
User Manual
Page 55
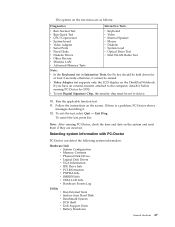
... Fixed Disks v Diskette Drives v Other Devices v Wireless LAN v Advanced Memory Tests v Keyboard v Video v Internal Speaker v Mouse v Diskette v System Load v Optical Drive Test v Intel WLAN Radio Test Note: v In the Keyboard test in Interactive Tests, the Fn key should be held down for DOS. otherwise, it ...Surface Scan Hard Disk v Benchmark System v DOS Shell v Tech Support Form v Battery Rundown General checkout 47 Follow the instructions on the ThinkPad Notebook. v Video Adapter test supports only the LCD display on the screen. To exit the test, select Quit - To cancel the test,...
... Fixed Disks v Diskette Drives v Other Devices v Wireless LAN v Advanced Memory Tests v Keyboard v Video v Internal Speaker v Mouse v Diskette v System Load v Optical Drive Test v Intel WLAN Radio Test Note: v In the Keyboard test in Interactive Tests, the Fn key should be held down for DOS. otherwise, it ...Surface Scan Hard Disk v Benchmark System v DOS Shell v Tech Support Form v Battery Rundown General checkout 47 Follow the instructions on the ThinkPad Notebook. v Video Adapter test supports only the LCD display on the screen. To exit the test, select Quit - To cancel the test,...
User Manual
Page 57
...Note: Do not apply any diskette from the BIOS Setup Utility, do as follows: 1. Then, run Diagnostics --> ThinkPad Devices --> HDD Active Protection Test. Diagnostics --> Systemboard --> Keyboard 2. Turn on a horizontal surface, and run this case, turn on the computer. If two DIMMs are installed,... Diagnostics --> Diskette Drives 2. General checkout 49 FRU tests The following table shows the test for each FRU. Interactive Tests --> Keyboard Enter the BIOS Setup Utility and change Serial ATA (SATA) setting to Compatibility, and run Diagnostics --> Advanced Memory Tests. 2....
...Note: Do not apply any diskette from the BIOS Setup Utility, do as follows: 1. Then, run Diagnostics --> ThinkPad Devices --> HDD Active Protection Test. Diagnostics --> Systemboard --> Keyboard 2. Turn on a horizontal surface, and run this case, turn on the computer. If two DIMMs are installed,... Diagnostics --> Diskette Drives 2. General checkout 49 FRU tests The following table shows the test for each FRU. Interactive Tests --> Keyboard Enter the BIOS Setup Utility and change Serial ATA (SATA) setting to Compatibility, and run Diagnostics --> Advanced Memory Tests. 2....

User Manual
Page 68
... power plan) (in addition to return from sleep (standby) mode and resume operation, do not set on the power switch. 60 ThinkPad SL410, L410, SL510, and L510 Hardware Maintenance Manual v The hard disk drive is low, and then the computer enters the power-saving mode automatically. ... press ThinkVantage button and use the ThinkVantage Productivity Center. To end screen blank mode and resume normal operation, press any operation with the keyboard, the TrackPoint, the hard disk, the parallel connector, or the diskette drive within that the battery power is a Windows 7 model,...
... power plan) (in addition to return from sleep (standby) mode and resume operation, do not set on the power switch. 60 ThinkPad SL410, L410, SL510, and L510 Hardware Maintenance Manual v The hard disk drive is low, and then the computer enters the power-saving mode automatically. ... press ThinkVantage button and use the ThinkVantage Productivity Center. To end screen blank mode and resume normal operation, press any operation with the keyboard, the TrackPoint, the hard disk, the parallel connector, or the diskette drive within that the battery power is a Windows 7 model,...
User Manual
Page 69
... action to enter hibernation mode, do any input immediately after it enters sleep (standby) mode. Note: The computer does not accept any operation with the keyboard, the TrackPoint, the hard disk drive, the parallel connector, or the diskette drive within that action. - Also, in either of the following conditions: v If a "hibernation...
... action to enter hibernation mode, do any input immediately after it enters sleep (standby) mode. Note: The computer does not accept any operation with the keyboard, the TrackPoint, the hard disk drive, the parallel connector, or the diskette drive within that action. - Also, in either of the following conditions: v If a "hibernation...
User Manual
Page 70
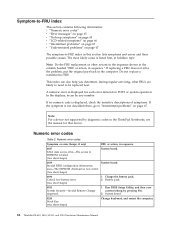
..., see the manual for each error detected in POST or system operation. System board. 0210 Stuck Key (two short beeps) Change keyboard, and restart the computer. 62 ThinkPad SL410, L410, SL510, and L510 Hardware Maintenance Manual Symptom-to-FRU index This section contains following information: v "Numeric error codes" v "Error messages" on page 65...
..., see the manual for each error detected in POST or system operation. System board. 0210 Stuck Key (two short beeps) Change keyboard, and restart the computer. 62 ThinkPad SL410, L410, SL510, and L510 Hardware Maintenance Manual Symptom-to-FRU index This section contains following information: v "Numeric error codes" v "Error messages" on page 65...

User Manual
Page 71
... connecting the ac adapter. 2. Numeric error codes (continued) Symptom or error (beeps, if any) FRU or action, in sequence 0211 Keyboard error (two short beeps) Run interactive tests of the keyboard and the auxiliary input device. 0230 Shadow RAM error-Shadow RAM fails at offset nnnn. (two short beeps) System board. 0231...
... connecting the ac adapter. 2. Numeric error codes (continued) Symptom or error (beeps, if any) FRU or action, in sequence 0211 Keyboard error (two short beeps) Run interactive tests of the keyboard and the auxiliary input device. 0230 Shadow RAM error-Shadow RAM fails at offset nnnn. (two short beeps) System board. 0231...
User Manual
Page 107
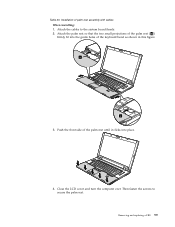
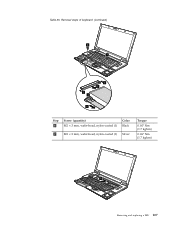
Attach the palm rest so that the two small projections of the palm rest ( a ) firmly fit into the guide holes of the palm rest until it clicks into place. 4. Push the front side of the keyboard bezel as shown in this figure. Then fasten the screws to the system board firmly. 2. Table 20. Installation of palm rest assembly with cables When installing: 1. Close the LCD cover and turn the computer over. Removing and replacing a FRU 99 Attach the cables to secure the palm rest. a a 3.
Attach the palm rest so that the two small projections of the palm rest ( a ) firmly fit into the guide holes of the palm rest until it clicks into place. 4. Push the front side of the keyboard bezel as shown in this figure. Then fasten the screws to the system board firmly. 2. Table 20. Installation of palm rest assembly with cables When installing: 1. Close the LCD cover and turn the computer over. Removing and replacing a FRU 99 Attach the cables to secure the palm rest. a a 3.

User Manual
Page 114
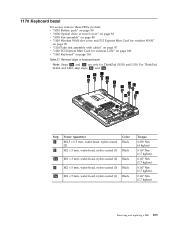
1160 Keyboard For access, remove these FRUs in order: v "1010 Battery pack" on page 80 v "1030 Optical drive or travel cover" on page 83 v "1110 Palm rest assembly with cables" on page 97 Table 25. Removal steps of keyboard 1 Step 1 Screw (quantity) M2 × 5 mm, wafer-head, nylon-coated (1) Color Black Torque 0.167 Nm (1.7 kgfcm) 106 ThinkPad SL410, L410, SL510, and L510 Hardware Maintenance Manual
1160 Keyboard For access, remove these FRUs in order: v "1010 Battery pack" on page 80 v "1030 Optical drive or travel cover" on page 83 v "1110 Palm rest assembly with cables" on page 97 Table 25. Removal steps of keyboard 1 Step 1 Screw (quantity) M2 × 5 mm, wafer-head, nylon-coated (1) Color Black Torque 0.167 Nm (1.7 kgfcm) 106 ThinkPad SL410, L410, SL510, and L510 Hardware Maintenance Manual
User Manual
Page 115
Removal steps of keyboard (continued) 6 7 2 4 2 3 5 Step 6 Screw (quantity) M2 × 3 mm, wafer-head, nylon-coated (1) Color Black 7 M2 × 2 mm, wafer-head, nylon-coated (1) Silver Torque 0.167 Nm (1.7 kgfcm) 0.167 Nm (1.7 kgfcm) 8 Removing and replacing a FRU 107 Table 25.
Removal steps of keyboard (continued) 6 7 2 4 2 3 5 Step 6 Screw (quantity) M2 × 3 mm, wafer-head, nylon-coated (1) Color Black 7 M2 × 2 mm, wafer-head, nylon-coated (1) Silver Torque 0.167 Nm (1.7 kgfcm) 0.167 Nm (1.7 kgfcm) 8 Removing and replacing a FRU 107 Table 25.
User Manual
Page 116
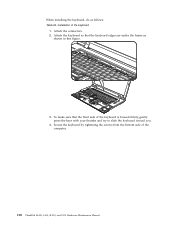
Attach the connectors. 2. Installation of the computer. 108 ThinkPad SL410, L410, SL510, and L510 Hardware Maintenance Manual Secure the keyboard by tightening the screws from the bottom side of the keyboard 1. To make sure that the keyboard edges are under the frame as follows: Table 26. When installing the keyboard, do as shown in this figure. 3. Attach the keyboard so that the front side of the keyboard is housed firmly, gently press the keys with your thumbs and try to slide the keyboard toward you. 4.
Attach the connectors. 2. Installation of the computer. 108 ThinkPad SL410, L410, SL510, and L510 Hardware Maintenance Manual Secure the keyboard by tightening the screws from the bottom side of the keyboard 1. To make sure that the keyboard edges are under the frame as follows: Table 26. When installing the keyboard, do as shown in this figure. 3. Attach the keyboard so that the front side of the keyboard is housed firmly, gently press the keys with your thumbs and try to slide the keyboard toward you. 4.
User Manual
Page 117
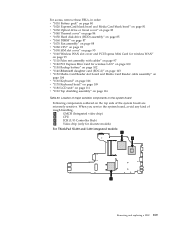
... Note: Steps 2a and 3a are only for wireless LAN" on page 100 v "1160 Keyboard" on page 106 Table 27. For ThinkPad SL410 and L410, skip steps 2a and 3a . 3 3 1 2 2 2a 2a 2 1 3a 3 Step 1 2 Screw (quantity) M2.5 × 6.5 ... 0.167 Nm (1.7 kgfcm) 0.167 Nm (1.7 kgfcm) 0.167 Nm (1.7 kgfcm) 0.167 Nm (1.7 kgfcm) Removing and replacing a FRU 109 1170 Keyboard bezel For access, remove these FRUs in order: v "1010 Battery pack" on page 80 v "1030 Optical drive or travel cover" on page 83...Palm rest assembly with cables" on page 97 v "1120 PCI Express Mini Card for ThinkPad SL510 and L510.
... Note: Steps 2a and 3a are only for wireless LAN" on page 100 v "1160 Keyboard" on page 106 Table 27. For ThinkPad SL410 and L410, skip steps 2a and 3a . 3 3 1 2 2 2a 2a 2 1 3a 3 Step 1 2 Screw (quantity) M2.5 × 6.5 ... 0.167 Nm (1.7 kgfcm) 0.167 Nm (1.7 kgfcm) 0.167 Nm (1.7 kgfcm) 0.167 Nm (1.7 kgfcm) Removing and replacing a FRU 109 1170 Keyboard bezel For access, remove these FRUs in order: v "1010 Battery pack" on page 80 v "1030 Optical drive or travel cover" on page 83...Palm rest assembly with cables" on page 97 v "1120 PCI Express Mini Card for ThinkPad SL510 and L510.

User Manual
Page 118
Table 27. Removal steps of keyboard bezel (continued) 5 6 4 7 4 5 6 Step 4 Screw (quantity) M2 × 3 mm, wafer-head, nylon-coated (2) Color Black Torque 0.167 Nm (1.7 kgfcm) When installing: Make sure that the connectors are attached firmly to the system board. 8 8 110 ThinkPad SL410, L410, SL510, and L510 Hardware Maintenance Manual
Table 27. Removal steps of keyboard bezel (continued) 5 6 4 7 4 5 6 Step 4 Screw (quantity) M2 × 3 mm, wafer-head, nylon-coated (2) Color Black Torque 0.167 Nm (1.7 kgfcm) When installing: Make sure that the connectors are attached firmly to the system board. 8 8 110 ThinkPad SL410, L410, SL510, and L510 Hardware Maintenance Manual

User Manual
Page 119
1180 LCD unit For access, remove these FRUs in order: v "1010 Battery pack" on page 80 v "1030 Optical drive or travel cover" on page 83 v "1100 Wireless WAN slot cover and PCI Express Mini Card for wireless WAN" on page 95 v "1110 Palm rest assembly with cables" on page 97 v "1120 PCI Express Mini Card for wireless LAN" on page 100 v "1160 Keyboard" on page 106 v "1170 Keyboard bezel" on page 109 Table 28. Removal steps of LCD unit 1 1 Step 1 Screw (quantity) M2.5 × 6.5 mm, wafter-head, nylon-coated (2) Color Black Torque 0.392 Nm (4 kgfcm) Removing and replacing a FRU 111
1180 LCD unit For access, remove these FRUs in order: v "1010 Battery pack" on page 80 v "1030 Optical drive or travel cover" on page 83 v "1100 Wireless WAN slot cover and PCI Express Mini Card for wireless WAN" on page 95 v "1110 Palm rest assembly with cables" on page 97 v "1120 PCI Express Mini Card for wireless LAN" on page 100 v "1160 Keyboard" on page 106 v "1170 Keyboard bezel" on page 109 Table 28. Removal steps of LCD unit 1 1 Step 1 Screw (quantity) M2.5 × 6.5 mm, wafter-head, nylon-coated (2) Color Black Torque 0.392 Nm (4 kgfcm) Removing and replacing a FRU 111

User Manual
Page 124
... × 3 mm, wafer-head, nylon-coated (3) Color Black 2 M2 × 5 mm, wafer-head, nylon-coated (4) Black Torque 0.167 Nm (1.7 kgfcm) 0.167 Nm (1.7 kgfcm) 116 ThinkPad SL410, L410, SL510, and L510 Hardware Maintenance Manual 1190 Top shielding assembly For access, remove these FRUs in order: v "1010 Battery pack" on page 80 v "1030 Optical... WAN" on page 95 v "1110 Palm rest assembly with cables" on page 97 v "1120 PCI Express Mini Card for wireless LAN" on page 100 v "1160 Keyboard" on page 106 v "1170 Keyboard bezel" on page 109 v "1180 LCD unit" on page 111 Table 29.
... × 3 mm, wafer-head, nylon-coated (3) Color Black 2 M2 × 5 mm, wafer-head, nylon-coated (4) Black Torque 0.167 Nm (1.7 kgfcm) 0.167 Nm (1.7 kgfcm) 116 ThinkPad SL410, L410, SL510, and L510 Hardware Maintenance Manual 1190 Top shielding assembly For access, remove these FRUs in order: v "1010 Battery pack" on page 80 v "1030 Optical... WAN" on page 95 v "1110 Palm rest assembly with cables" on page 97 v "1120 PCI Express Mini Card for wireless LAN" on page 100 v "1160 Keyboard" on page 106 v "1170 Keyboard bezel" on page 109 v "1180 LCD unit" on page 111 Table 29.
User Manual
Page 127
...Bluetooth daughter card (BDC-2)" on page 103 v "1150 Media Card Reader slot board and Media Card Reader cable assembly" on page 104 v "1160 Keyboard" on page 106 v "1170 Keyboard bezel" on page 109 v "1180 LCD unit" on page 111 v "1190 Top shielding assembly" on page 116 Table 30. For access, ... for wireless WAN" on page 95 v "1110 Palm rest assembly with cables" on page 97 v "1120 PCI Express Mini Card for discrete models) For ThinkPad SL410 and L410 integrated models: a b c Removing and replacing a FRU 119 When you service the system board, avoid any kind of the system board are...
...Bluetooth daughter card (BDC-2)" on page 103 v "1150 Media Card Reader slot board and Media Card Reader cable assembly" on page 104 v "1160 Keyboard" on page 106 v "1170 Keyboard bezel" on page 109 v "1180 LCD unit" on page 111 v "1190 Top shielding assembly" on page 116 Table 30. For access, ... for wireless WAN" on page 95 v "1110 Palm rest assembly with cables" on page 97 v "1120 PCI Express Mini Card for discrete models) For ThinkPad SL410 and L410 integrated models: a b c Removing and replacing a FRU 119 When you service the system board, avoid any kind of the system board are...
User Manual
Page 131
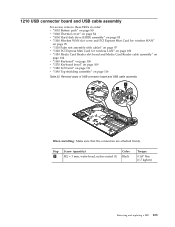
... Express Mini Card for wireless LAN" on page 100 v "1150 Media Card Reader slot board and Media Card Reader cable assembly" on page 104 v "1160 Keyboard" on page 106 v "1170 Keyboard bezel" on page 109 v "1180 LCD unit" on page 111 v "1190 Top shielding assembly" on page 116 Table 32.
... Express Mini Card for wireless LAN" on page 100 v "1150 Media Card Reader slot board and Media Card Reader cable assembly" on page 104 v "1160 Keyboard" on page 106 v "1170 Keyboard bezel" on page 109 v "1180 LCD unit" on page 111 v "1190 Top shielding assembly" on page 116 Table 32.
User Manual
Page 133
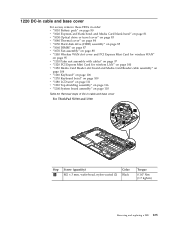
1220 DC-in cable and base cover For access, remove these FRUs in cable and base cover For ThinkPad SL510 and L510: 1 3 2 1 Step 1 Screw (quantity) M2 × 3 mm, wafer-head, nylon-coated (2) Color Black Torque 0.167 Nm (1.7 kgfcm) Removing and replacing a FRU 125 Removal steps ... Card for wireless LAN" on page 100 v "1150 Media Card Reader slot board and Media Card Reader cable assembly" on page 104 v "1160 Keyboard" on page 106 v "1170 Keyboard bezel" on page 109 v "1180 LCD unit" on page 111 v "1190 Top shielding assembly" on page 116 v "1200 System board assembly" on page...
1220 DC-in cable and base cover For access, remove these FRUs in cable and base cover For ThinkPad SL510 and L510: 1 3 2 1 Step 1 Screw (quantity) M2 × 3 mm, wafer-head, nylon-coated (2) Color Black Torque 0.167 Nm (1.7 kgfcm) Removing and replacing a FRU 125 Removal steps ... Card for wireless LAN" on page 100 v "1150 Media Card Reader slot board and Media Card Reader cable assembly" on page 104 v "1160 Keyboard" on page 106 v "1170 Keyboard bezel" on page 109 v "1180 LCD unit" on page 111 v "1190 Top shielding assembly" on page 116 v "1200 System board assembly" on page...


