Brochure
Page 3
... for users. • The ThinkPad X120e keyboard has built-in this presentation are trademarks of their work done for identification purposes only and may change without worrying about having to meeting to re-establish the wireless connections. » The display and hard drive are switched off while the notebook is a full-featured entry level performance ultraportable notebook with power-on and hardware password manager restricts unauthorized access. •...
... for users. • The ThinkPad X120e keyboard has built-in this presentation are trademarks of their work done for identification purposes only and may change without worrying about having to meeting to re-establish the wireless connections. » The display and hard drive are switched off while the notebook is a full-featured entry level performance ultraportable notebook with power-on and hardware password manager restricts unauthorized access. •...

User Manual
Page 3
.... . . . 22 Lenovo ThinkVantage Toolbox 25 FRU tests 25 Power system checkout 26 Checking the ac adapter 27 Checking operational charging 27 Checking the battery pack 27 Checking the backup battery 28 Chapter 4. General checkout . . . . . 21 What to do first 21 Checkout guide 22 Diagnostics using Recovery Disc Set 29 Passwords 30 Power-on password 30 Hard-disk password 30 Supervisor password 31 How to remove the power-on board assembly (with cable), and microphone . . . . . 64...
.... . . . 22 Lenovo ThinkVantage Toolbox 25 FRU tests 25 Power system checkout 26 Checking the ac adapter 27 Checking operational charging 27 Checking the battery pack 27 Checking the backup battery 28 Chapter 4. General checkout . . . . . 21 What to do first 21 Checkout guide 22 Diagnostics using Recovery Disc Set 29 Passwords 30 Power-on password 30 Hard-disk password 30 Supervisor password 31 How to remove the power-on board assembly (with cable), and microphone . . . . . 64...

User Manual
Page 8
... using testers, set the controls correctly and use the approved probe leads and accessories for safe operational condition. • Do not use this type of mat to lock the wall box in the off controls, is near their normal operating places in a machine: - Instructions for possible hazards in the safety sections of maintenance information. First, check that it , ask the customer to power-off...
... using testers, set the controls correctly and use the approved probe leads and accessories for safe operational condition. • Do not use this type of mat to lock the wall box in the off controls, is near their normal operating places in a machine: - Instructions for possible hazards in the safety sections of maintenance information. First, check that it , ask the customer to power-off...
User Manual
Page 23
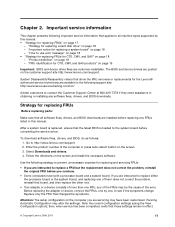
... http://www.lenovo.com/support. Before replacing the adapter or device, remove the FRUs, one of the FRUs may alter the settings. Note the current configuration settings (using the View Configuration option); System Disassembly/Reassembly videos that those settings remain in the following important service information that all machine types supported by one FRU, any software fixes, drivers, and BIOS downloads. Go to the system board before replacing any FRUs listed in obtaining or installing any of...
... http://www.lenovo.com/support. Before replacing the adapter or device, remove the FRUs, one of the FRUs may alter the settings. Note the current configuration settings (using the View Configuration option); System Disassembly/Reassembly videos that those settings remain in the following important service information that all machine types supported by one FRU, any software fixes, drivers, and BIOS downloads. Go to the system board before replacing any FRUs listed in obtaining or installing any of...
User Manual
Page 27
... model of the machine and the FRU part number are servicing sequence might have nothing to do with PC-Doctor" on removing and replacing FRUs. • When you attach to your particular computer. When you replace a FRU, make sure that you replace FRUs, use new nylon-coated screws. • Be extremely careful during such write operations as cosmic radiation, electrostatic discharge, or software errors...
... model of the machine and the FRU part number are servicing sequence might have nothing to do with PC-Doctor" on removing and replacing FRUs. • When you attach to your particular computer. When you replace a FRU, make sure that you replace FRUs, use new nylon-coated screws. • Be extremely careful during such write operations as cosmic radiation, electrostatic discharge, or software errors...
User Manual
Page 29
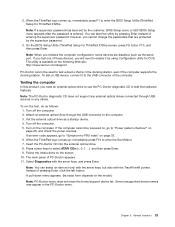
...-Doctor CD into the external optical drive. 8. Press cursor keys to test a device that are disabled, such as the serial port. Follow the instructions on the model.) Note: PC-Doctor menu does not mean the formal support device list. The main panel of pressing Enter, click the left button. Note: You can start the utility by using Configuration utility for ThinkPad X120e) screen, press F9, Enter, F10, and then press Enter. Instead of PC-Doctor...
...-Doctor CD into the external optical drive. 8. Press cursor keys to test a device that are disabled, such as the serial port. Follow the instructions on the model.) Note: PC-Doctor menu does not mean the formal support device list. The main panel of pressing Enter, click the left button. Note: You can start the utility by using Configuration utility for ThinkPad X120e) screen, press F9, Enter, F10, and then press Enter. Instead of PC-Doctor...

User Manual
Page 30
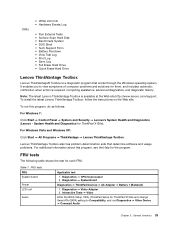
... Test Run Quick Test CPU/Coprocessor Systemboard Video Adapter Fixed Disks Diskette Drives Other Devices Communication Wireless LAN Advanced Memory Tests Hardware Info Utility Quit F1=Help PC-DOCTOR 2.0 Copyright 2008 PC-Doctor, Inc. To exit the test, select Quit ➙ Exit Diag. Press ENTER to move in Interactive Tests, the Fn key should be sensed. • Video Adapter test supports only the LCD display on the test menu are incorrect...
... Test Run Quick Test CPU/Coprocessor Systemboard Video Adapter Fixed Disks Diskette Drives Other Devices Communication Wireless LAN Advanced Memory Tests Hardware Info Utility Quit F1=Help PC-DOCTOR 2.0 Copyright 2008 PC-Doctor, Inc. To exit the test, select Quit ➙ Exit Diag. Press ENTER to move in Interactive Tests, the Fn key should be sensed. • Video Adapter test supports only the LCD display on the test menu are incorrect...
User Manual
Page 31
... FRU System board Power LCD unit Audio Applicable test 1. Note: The latest Lenovo ThinkVantage Toolbox is available at the Web site http://www.lenovo.com/support. Diagnostics ➙ CPU/Coprocessor 2. For Windows Vista and Windows XP: Click Start ➙ All Programs ➙ ThinkVantage ➙ Lenovo ThinkVantage Toolbox. Diagnostics ➙ Video Adapter 2. Utility • VESA LCD Info • Hardware Events Log • Run External Tests • Surface Scan Hard Disk • Benchmark...
... FRU System board Power LCD unit Audio Applicable test 1. Note: The latest Lenovo ThinkVantage Toolbox is available at the Web site http://www.lenovo.com/support. Diagnostics ➙ CPU/Coprocessor 2. For Windows Vista and Windows XP: Click Start ➙ All Programs ➙ ThinkVantage ➙ Lenovo ThinkVantage Toolbox. Diagnostics ➙ Video Adapter 2. Utility • VESA LCD Info • Hardware Events Log • Run External Tests • Surface Scan Hard Disk • Benchmark...

User Manual
Page 32
... a hardware problem. Disconnect the ac adapter and install the charged battery pack. 7. Check that power is disabled, select Automatic to enable it . FRU tests (continued) FRU Applicable test Speaker Interactive Tests ➙ Internal Speaker Note: Once Audio test is done, the no service action is displayed at the lower left of the screen, press F1 to enable it . Keyboard 1. Interactive Tests ➙ Keyboard Hard disk drive or solid state Enter the BIOS Setup Utility (ThinkPad Setup...
... a hardware problem. Disconnect the ac adapter and install the charged battery pack. 7. Check that power is disabled, select Automatic to enable it . FRU tests (continued) FRU Applicable test Speaker Interactive Tests ➙ Internal Speaker Note: Once Audio test is done, the no service action is displayed at the lower left of the screen, press F1 to enable it . Keyboard 1. Interactive Tests ➙ Keyboard Hard disk drive or solid state Enter the BIOS Setup Utility (ThinkPad Setup...
User Manual
Page 35
... 1st Boot Device. 2. The Setup Utility program opens. The length of DVDs to restore the computer to keep onto removable media or a network drive before you can recover the new drive with a Supplemental Recovery Disc. Press and hold down the F1 key, and then turn on http://www.lenovo.com/spm. In this disc to select Startup ➙ Boot. The recovery disc set consists of a failure, no product recovery program is displayed or if you use . Operating System Recovery Disc (one...
... 1st Boot Device. 2. The Setup Utility program opens. The length of DVDs to restore the computer to keep onto removable media or a network drive before you can recover the new drive with a Supplemental Recovery Disc. Press and hold down the F1 key, and then turn on http://www.lenovo.com/spm. In this disc to select Startup ➙ Boot. The recovery disc set consists of a failure, no product recovery program is displayed or if you use . Operating System Recovery Disc (one...

User Manual
Page 36
... device drivers. Note: The rest of these terms and conditions and then click Next. If any ThinkPad Notebook: the power-on the screen to save and exit the Setup Utility. Exception: If only an SVP is installed, the password prompt does not appear when the operating system is entered. Follow the instructions on password (POP), the hard-disk password (HDP), and the supervisor password (SVP). If you . Start the Setup Utility...
... device drivers. Note: The rest of these terms and conditions and then click Next. If any ThinkPad Notebook: the power-on the screen to save and exit the Setup Utility. Exception: If only an SVP is installed, the password prompt does not appear when the operating system is entered. Follow the instructions on password (POP), the hard-disk password (HDP), and the supervisor password (SVP). If you . Start the Setup Utility...
User Manual
Page 37
... been removed. 5. Select Security, using the cursor directional keys to the BIOS Setup Utility or ThinkPad Setup and change the system configuration. Type the current Power-On Password in the Setup confirmation window, select Yes. In the "Changes have forgotten, do the following : (A) If no SVP has been set: 1. Related service information 31 For how to the hard disk drive. The system board must enter the SVP in the BIOS Setup Utility (ThinkPad Setup for ThinkPad X120e). 3. Reinstall the backup battery...
... been removed. 5. Select Security, using the cursor directional keys to the BIOS Setup Utility or ThinkPad Setup and change the system configuration. Type the current Power-On Password in the Setup confirmation window, select Yes. In the "Changes have forgotten, do the following : (A) If no SVP has been set: 1. Related service information 31 For how to the hard disk drive. The system board must enter the SVP in the BIOS Setup Utility (ThinkPad Setup for ThinkPad X120e). 3. Reinstall the backup battery...

User Manual
Page 38
... the menu. 4. Note: You can change the action of the following events occur in addition to enter BIOS Setup Utility (ThinkPad Setup for selecting a power plan (in the Enter Current Password field. Select Password. 5. Press F10. 9. Select Security, using the cursor directional keys to return from sleep (standby) mode and resume operation, do as follows: 1. Select Power off . • The hard disk drive is low. Turn on the power switch. 32 ThinkPad X100e and X120e Hardware Maintenance Manual...
... the menu. 4. Note: You can change the action of the following events occur in addition to enter BIOS Setup Utility (ThinkPad Setup for selecting a power plan (in the Enter Current Password field. Select Password. 5. Press F10. 9. Select Security, using the cursor directional keys to return from sleep (standby) mode and resume operation, do as follows: 1. Select Power off . • The hard disk drive is low. Turn on the power switch. 32 ThinkPad X100e and X120e Hardware Maintenance Manual...

User Manual
Page 39
... computer automatically returns from sleep (standby) mode and resumes operation: • The ring indicator (RI) is signaled by a serial device or a PC Card device. ( does not support the ring indicator (RI) resume by PC Card device.) • The time set on the timer, and if the user does not do any of the following information: • "Numeric error codes" on page 34 • "Error messages" on page...
... computer automatically returns from sleep (standby) mode and resumes operation: • The ring indicator (RI) is signaled by a serial device or a PC Card device. ( does not support the ring indicator (RI) resume by PC Card device.) • The time set on the timer, and if the user does not do any of the following information: • "Numeric error codes" on page 34 • "Error messages" on page...
User Manual
Page 40
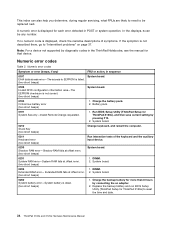
... in sequence 0187 System board. DIMM. 2. Replace the backup battery and run BIOS Setup Utility (ThinkPad Setup for more than 8 hours by pressing F10. 2. Numeric error codes Symptom or error (beeps, if any number. Run BIOS Setup Utility (ThinkPad Setup for that device. Note: For a device not supported by diagnostic codes in the ThinkPad Notebooks, see the manual for ThinkPad X120e), and then save current setting by connecting the ac adapter. 2. System board. 0231 System RAM error-System RAM fails at offset nnnn...
... in sequence 0187 System board. DIMM. 2. Replace the backup battery and run BIOS Setup Utility (ThinkPad Setup for more than 8 hours by pressing F10. 2. Numeric error codes Symptom or error (beeps, if any number. Run BIOS Setup Utility (ThinkPad Setup for that device. Note: For a device not supported by diagnostic codes in the ThinkPad Notebooks, see the manual for ThinkPad X120e), and then save current setting by connecting the ac adapter. 2. System board. 0231 System RAM error-System RAM fails at offset nnnn...
User Manual
Page 42
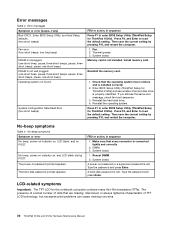
... enter BIOS Setup Utility (ThinkPad Setup for the notebook computer contains many thin-film transistors (TFTs). No beep, power-on indicator on , LCD blank, and no failure and is connected tightly and correctly. 2. The hard-disk password prompt appears. FRU or action, in sequence Press F1 to enter BIOS Setup Utility (ThinkPad Setup for ThinkPad X120e) and see the same error message, check the boot sequence. 3. System board. 1. Press F9, and Enter to load the default setting. Memory card...
... enter BIOS Setup Utility (ThinkPad Setup for the notebook computer contains many thin-film transistors (TFTs). No beep, power-on indicator on , LCD blank, and no failure and is connected tightly and correctly. 2. The hard-disk password prompt appears. FRU or action, in sequence Press F1 to enter BIOS Setup Utility (ThinkPad Setup for ThinkPad X120e) and see the same error message, check the boot sequence. 3. System board. 1. Press F9, and Enter to load the default setting. Memory card...
User Manual
Page 43
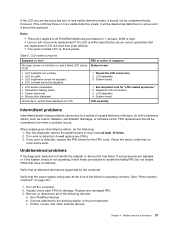
... error No beep, power-on indicator on 1 January, 2008 or later. • Lenovo will not provide replacement if the LCD is not operating, follow these procedures to isolate the failing FRU (do the following devices: a. FRU or action, in loop mode at the time of causes that has failed, if wrong devices are supported by the computer. FRU replacement should be adjusted. • LCD screen...
... error No beep, power-on indicator on 1 January, 2008 or later. • Lenovo will not provide replacement if the LCD is not operating, follow these procedures to isolate the failing FRU (do the following devices: a. FRU or action, in loop mode at the time of causes that has failed, if wrong devices are supported by the computer. FRU replacement should be adjusted. • LCD screen...
User Manual
Page 48
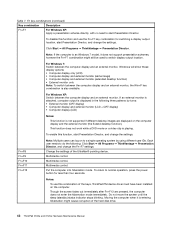
... the hard disk drive. 42 ThinkPad X100e and X120e Hardware Maintenance Manual For Windows XP: Switch between the computer display and an external monitor. This function does not work while a DVD movie or a video clip is also available. Change the settings of the keys, ThinkPad PM device driver must have been installed on the computer. To return to a single operating system by turns: • External monitor (CRT display) • Computer display and external monitor (LCD + CRT display) • Computer display (LCD) Notes: This function is entering hibernation...
... the hard disk drive. 42 ThinkPad X100e and X120e Hardware Maintenance Manual For Windows XP: Switch between the computer display and an external monitor. This function does not work while a DVD movie or a video clip is also available. Change the settings of the keys, ThinkPad PM device driver must have been installed on the computer. To return to a single operating system by turns: • External monitor (CRT display) • Computer display and external monitor (LCD + CRT display) • Computer display (LCD) Notes: This function is entering hibernation...

User Manual
Page 49
... change the default brightness level, change the settings of the Power Option in Windows XP, and you press this method is to change the settings of the Power Option in Windows XP, power scheme) that has been created by Power Manager or adjust the power level by using the slider control. If you have logged on the screen. To change the default brightness level, change the brightness level temporarily. Have the same function as the Break key. The indicator of keys, a panel...
... change the default brightness level, change the settings of the Power Option in Windows XP, and you press this method is to change the settings of the Power Option in Windows XP, power scheme) that has been created by Power Manager or adjust the power level by using the slider control. If you have logged on the screen. To change the default brightness level, change the brightness level temporarily. Have the same function as the Break key. The indicator of keys, a panel...
User Manual
Page 97
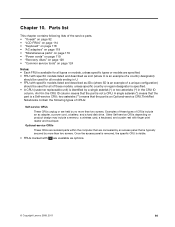
... page 119 • "Recovery discs" on page 120 • "Common service tools" on product design may include a memory, a wireless card, a keyboard, and a palm rest with OP are concealed by an access panel that the part is a Self-service CRU; Once the access panel is removed, the specific CRU is visible. • FRUs marked with finger print reader and touchpad. Optional-service CRUs These CRUs are isolated parts within the computer...
... page 119 • "Recovery discs" on page 120 • "Common service tools" on product design may include a memory, a wireless card, a keyboard, and a palm rest with OP are concealed by an access panel that the part is a Self-service CRU; Once the access panel is removed, the specific CRU is visible. • FRUs marked with finger print reader and touchpad. Optional-service CRUs These CRUs are isolated parts within the computer...


