

User Manual
Page 5
... ac adapter 53 Checking operational charging 53 Checking the battery pack 54 Checking the backup battery 54 Related service information 57 Restoring the factory contents by using Recovery Disc Set 57 Passwords 58 Power-on password 59 Hard-disk password 59 Supervisor password 59 How to remove the power-on password . . . . 59 How to remove the hard-disk password . . . . 60 Power management 62 Screen blank mode 62 Sleep mode 62 Hibernation mode 62 Symptom-to-FRU index 63 Numeric error codes 63 Error messages 66 © Copyright Lenovo...
... ac adapter 53 Checking operational charging 53 Checking the battery pack 54 Checking the backup battery 54 Related service information 57 Restoring the factory contents by using Recovery Disc Set 57 Passwords 58 Power-on password 59 Hard-disk password 59 Supervisor password 59 How to remove the power-on password . . . . 59 How to remove the hard-disk password . . . . 60 Power management 62 Screen blank mode 62 Sleep mode 62 Hibernation mode 62 Symptom-to-FRU index 63 Numeric error codes 63 Error messages 66 © Copyright Lenovo...

User Manual
Page 11
... shock can then operate the switch or unplug the power cord quickly. Safety information 3 Working near equipment that tester. - Removing or installing main units v Before you work on suitable rubber mats (obtained locally, if necessary) to work with live electrical currents. Observe the special safety precautions when you start to decrease electrostatic discharges. v Do not use this type of maintenance information. Instructions for that...
... shock can then operate the switch or unplug the power cord quickly. Safety information 3 Working near equipment that tester. - Removing or installing main units v Before you work on suitable rubber mats (obtained locally, if necessary) to work with live electrical currents. Observe the special safety precautions when you start to decrease electrostatic discharges. v Do not use this type of maintenance information. Instructions for that...

User Manual
Page 48
... replacing FRUs Before replacing parts: Make sure that board, and then replace the other one FRU, any FRUs listed in this task. Before replacing the adapter or device, remove the FRUs, one by one, to the system board before completing the service action. Note the current configuration settings (using the View Configuration option); This will cause all software fixes, drivers, and BIOS downloads are installed before replacing any of the error. Be extremely careful during write operations...
... replacing FRUs Before replacing parts: Make sure that board, and then replace the other one FRU, any FRUs listed in this task. Before replacing the adapter or device, remove the FRUs, one by one, to the system board before completing the service action. Note the current configuration settings (using the View Configuration option); This will cause all software fixes, drivers, and BIOS downloads are installed before replacing any of the error. Be extremely careful during write operations...
User Manual
Page 53
... drive, data or programs might be replaced because of the machine and the FRU part number are servicing sequence might not apply to do not replace the FRU. v When you suspect that the model of a single, unreproducible failure. "FRU tests" on page 51 v "Power system checkout" on page 50 - Before you replace a FRU, make sure that a FRU is defective, clear the error...
... drive, data or programs might be replaced because of the machine and the FRU part number are servicing sequence might not apply to do not replace the FRU. v When you suspect that the model of a single, unreproducible failure. "FRU tests" on page 51 v "Power system checkout" on page 50 - Before you replace a FRU, make sure that a FRU is defective, clear the error...

User Manual
Page 54
... installation of service __ 3. Machine type, model number, and serial number __ 9. v If the spindle of a hard disk drive becomes noisy, it : __ 1. Date of an incompatible card v Improper disc insertion or use . Date on the display, and beep symptoms __ 6. Failure symptoms, error codes appearing on which the failing FRU was caused by misuse, accident, modification, unsuitable physical or operating environment, or improper maintenance by nonwarranted activities: v Missing parts...
... installation of service __ 3. Machine type, model number, and serial number __ 9. v If the spindle of a hard disk drive becomes noisy, it : __ 1. Date of an incompatible card v Improper disc insertion or use . Date on the display, and beep symptoms __ 6. Failure symptoms, error codes appearing on which the failing FRU was caused by misuse, accident, modification, unsuitable physical or operating environment, or improper maintenance by nonwarranted activities: v Missing parts...
User Manual
Page 55
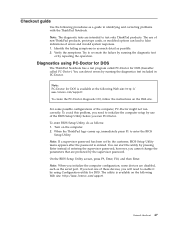
... password has been set by repeating the operation. For some devices are disabled, such as a guide in PC-Doctor. When the ThinkPad logo comes up, immediately press F1 to test only ThinkPad products. Note: PC-Doctor for DOS. Turn on the Web site. Checkout guide Use the following procedures as the serial port. You can detect errors by the supervisor password. On the BIOS Setup Utility screen, press F9, Enter...
... password has been set by repeating the operation. For some devices are disabled, such as a guide in PC-Doctor. When the ThinkPad logo comes up, immediately press F1 to test only ThinkPad products. Note: PC-Doctor for DOS. Turn on the Web site. Checkout guide Use the following procedures as the serial port. You can detect errors by the supervisor password. On the BIOS Setup Utility screen, press F9, Enter...
User Manual
Page 57
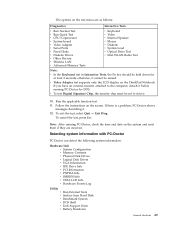
... external monitor attached to Active. 10. If there is a problem, PC-Doctor shows messages describing it before running PC-Doctor, check the time and date on the system and reset them if they are as follows: Diagnostics Interactive Tests v Run Normal Test v Run Quick Test v CPU/Coprocessor v System board v Video Adapter v Serial Ports v Fixed Disks v Diskette Drives v Other Devices v Wireless LAN v Advanced Memory Tests v Keyboard v Video v Internal Speaker v Mouse v Diskette v System Load v Optical Drive...
... external monitor attached to Active. 10. If there is a problem, PC-Doctor shows messages describing it before running PC-Doctor, check the time and date on the system and reset them if they are as follows: Diagnostics Interactive Tests v Run Normal Test v Run Quick Test v CPU/Coprocessor v System board v Video Adapter v Serial Ports v Fixed Disks v Diskette Drives v Other Devices v Wireless LAN v Advanced Memory Tests v Keyboard v Video v Internal Speaker v Mouse v Diskette v System Load v Optical Drive...
User Manual
Page 59
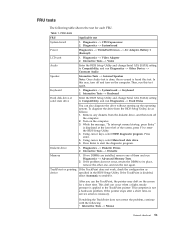
... problem, continue with the following table shows the test for a short time. Diagnostics --> Systemboard Power Diagnostics --> ThinkPad Devices --> AC Adapter, Battery 1 (Battery2) LCD unit 1. Diagnostics --> Systemboard --> Keyboard 2. Interactive Tests --> Keyboard Hard disk drive or solid state drive Enter the BIOS Setup Utility and change Serial ATA (SATA) setting to the TrackPoint pointer. Using cursor keys, select HDD diagnostic program. Press Enter to its place, remove the other one of the screen, press F1 to enable it. Diagnostics --> Video Adapter...
... problem, continue with the following table shows the test for a short time. Diagnostics --> Systemboard Power Diagnostics --> ThinkPad Devices --> AC Adapter, Battery 1 (Battery2) LCD unit 1. Diagnostics --> Systemboard --> Keyboard 2. Interactive Tests --> Keyboard Hard disk drive or solid state drive Enter the BIOS Setup Utility and change Serial ATA (SATA) setting to the TrackPoint pointer. Using cursor keys, select HDD diagnostic program. Press Enter to its place, remove the other one of the screen, press F1 to enable it. Diagnostics --> Video Adapter...

User Manual
Page 65
... onto removable media or a network drive before you start the recovery process. For information on which discs to the original factory configuration using Recovery Disc Set When the hard disk drive (HDD) or solid state drive (SSD) is on the new drive. If you must have an internal DVD drive, you can use the Recovery Disc Set for the computer. To restore the computer to order, see "Recovery discs" on the drive will be deleted. The recovery disc set , do not have a DVD drive to the original factory configuration. Use...
... onto removable media or a network drive before you start the recovery process. For information on which discs to the original factory configuration using Recovery Disc Set When the hard disk drive (HDD) or solid state drive (SSD) is on the new drive. If you must have an internal DVD drive, you can use the Recovery Disc Set for the computer. To restore the computer to order, see "Recovery discs" on the drive will be deleted. The recovery disc set , do not have a DVD drive to the original factory configuration. Use...
User Manual
Page 66
... Windows setup, you might need to the factory default settings, you might experience periods when no action is required by you have a Supplemental Recovery Disc, click No. 9. Start the Setup Utility program and then press F9 to select Startup → Boot. Note: After restoring a drive to reinstall some device drivers. Use the arrow keys to restore the default settings. Read the license. c. Press F10 to complete the Windows setup. 11. Follow the instructions on the screen...
... Windows setup, you might need to the factory default settings, you might experience periods when no action is required by you have a Supplemental Recovery Disc, click No. 9. Start the Setup Utility program and then press F9 to select Startup → Boot. Note: After restoring a drive to reinstall some device drivers. Use the arrow keys to restore the default settings. Read the license. c. Press F10 to complete the Windows setup. 11. Follow the instructions on the screen...
User Manual
Page 67
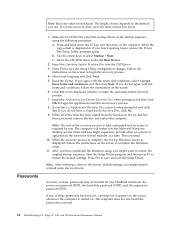
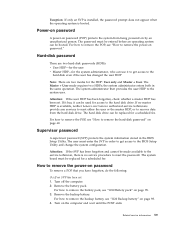
... the hard disk even if the user has changed the user HDP Note: There are two modes for a scheduled fee. Turn off the computer. 2. The hard disk drive can be used for a scheduled fee. The user must be entered before an operating system can be made available to the service technician, there is booted. The password must enter the SVP in order to get access to the BIOS Setup Utility and change the system configuration...
... the hard disk even if the user has changed the user HDP Note: There are two modes for a scheduled fee. Turn off the computer. 2. The hard disk drive can be used for a scheduled fee. The user must be entered before an operating system can be made available to the service technician, there is booted. The password must enter the SVP in order to get access to the BIOS Setup Utility and change the system configuration...

User Manual
Page 68
..., neither Lenovo nor Lenovo authorized service technicians provide any services to reset the user HDPs or to move down the menu. 4. For the other models, enter the POP. A pop-up window opens. 6. then enter the POP. Select Security, using the cursor directional keys to recover data from the hard disk drive. If Using Passphrase item is displayed in the menu, this function is available on the screen; Select Hard-disk x password, where x is appearing on the ThinkPad Notebook...
..., neither Lenovo nor Lenovo authorized service technicians provide any services to reset the user HDPs or to move down the menu. 4. For the other models, enter the POP. A pop-up window opens. 6. then enter the POP. Select Security, using the cursor directional keys to recover data from the hard disk drive. If Using Passphrase item is displayed in the menu, this function is available on the screen; Select Hard-disk x password, where x is appearing on the ThinkPad Notebook...
User Manual
Page 70
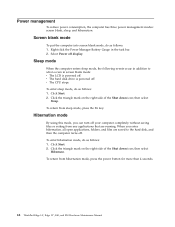
...; To return from sleep mode, press the Fn key. Screen blank mode To put the computer into screen blank mode, do as follows: 1. v The hard disk drive is powered off display. Click Start. 2. Power management To reduce power consumption, the computer has three power management modes: screen blank, sleep, and hibernation. Sleep mode When the computer enters sleep mode, the following events occur in the task bar. 2. To enter sleep mode, do as follows: 1. then select Sleep. Click Start. 2. then select...
...; To return from sleep mode, press the Fn key. Screen blank mode To put the computer into screen blank mode, do as follows: 1. v The hard disk drive is powered off display. Click Start. 2. Power management To reduce power consumption, the computer has three power management modes: screen blank, sleep, and hibernation. Sleep mode When the computer enters sleep mode, the following events occur in the task bar. 2. To enter sleep mode, do as follows: 1. then select Sleep. Click Start. 2. then select...

User Manual
Page 71
... beeps) 0190 Critical low-battery error (two short beeps) 1. Note: For a device not supported by pressing F10. 2. Run BIOS Setup Utility, and then save current setting by diagnostic codes in the ThinkPad Notebooks, see the manual for each error detected in sequence 0187 EAIA data access error-The access to EEPROM is displayed for that device. This index can be replaced next. Numeric error codes Table 2. Related service information 63 Note: Do...
... beeps) 0190 Critical low-battery error (two short beeps) 1. Note: For a device not supported by pressing F10. 2. Run BIOS Setup Utility, and then save current setting by diagnostic codes in the ThinkPad Notebooks, see the manual for each error detected in sequence 0187 EAIA data access error-The access to EEPROM is displayed for that device. This index can be replaced next. Numeric error codes Table 2. Related service information 63 Note: Do...

User Manual
Page 72
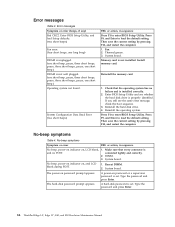
... 0211 Keyboard error (two short beeps) Run interactive tests of the keyboard and the auxiliary input device. 0230 Shadow RAM error-Shadow RAM fails at offset nnnn. (two short beeps) System board. 0231 System RAM error-System RAM fails at offset nnnn. (two short beeps) 1. Replace the backup battery and run BIOS Setup Utility to reset the time and date. 3. Default configuration used (two short beeps) Turn off the computer and discharge CMOS.
... 0211 Keyboard error (two short beeps) Run interactive tests of the keyboard and the auxiliary input device. 0230 Shadow RAM error-Shadow RAM fails at offset nnnn. (two short beeps) System board. 0231 System RAM error-System RAM fails at offset nnnn. (two short beeps) 1. Replace the backup battery and run BIOS Setup Utility to reset the time and date. 3. Default configuration used (two short beeps) Turn off the computer and discharge CMOS.
User Manual
Page 74
.... 2. DIMM. 3. Type the password and press Enter. A hard-disk password is properly identified. System board. Press F9, and Enter to load the default setting. No-beep symptoms Table 4. System Configuration Data Read Error (two short beeps) FRU or action, in sequence No beep, power-on indicator on password or a supervisor password is installed correctly. 2. Then save the current setting by pressing F10, and restart the computer. 1. Enter BIOS Setup Utility and see...
.... 2. DIMM. 3. Type the password and press Enter. A hard-disk password is properly identified. System board. Press F9, and Enter to load the default setting. No-beep symptoms Table 4. System Configuration Data Read Error (two short beeps) FRU or action, in sequence No beep, power-on indicator on password or a supervisor password is installed correctly. 2. Then save the current setting by pressing F10, and restart the computer. 1. Enter BIOS Setup Utility and see...

User Manual
Page 76
... board in the internal drive h. Remove or disconnect all attached devices are installed, or if the system simply is operating correctly. (See "Power system checkout" on the computer. 5. Determine whether the problem has been solved. 6. When analyzing an intermittent problem, do not replace any error is detected, replace the FRU shown by the computer. Rerun the test to verify that no defects). Battery pack d. Hard disk drive...
... board in the internal drive h. Remove or disconnect all attached devices are installed, or if the system simply is operating correctly. (See "Power system checkout" on the computer. 5. Determine whether the problem has been solved. 6. When analyzing an intermittent problem, do not replace any error is detected, replace the FRU shown by the computer. Rerun the test to verify that no defects). Battery pack d. Hard disk drive...
User Manual
Page 79
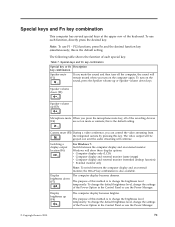
... volume up (F3) Microphone mute When you press the microphone mute key, all of the Power Option in the Control Panel or use the Power Manager. Switching a display output location (F6) For Windows 7: Switch between the computer display and an external monitor, the Win+P key combination is also available. The computer display becomes dimmer. To change the default brightness level, change the settings of each function, directly press the desired key. To change the default brightness level, change the settings of the recording devices...
... volume up (F3) Microphone mute When you press the microphone mute key, all of the Power Option in the Control Panel or use the Power Manager. Switching a display output location (F6) For Windows 7: Switch between the computer display and an external monitor, the Win+P key combination is also available. The computer display becomes dimmer. To change the default brightness level, change the settings of each function, directly press the desired key. To change the default brightness level, change the settings of the recording devices...
User Manual
Page 120
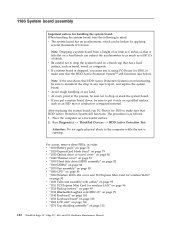
... Hard disk drive (HDD) assembly" on page 82 v "1060 DIMM" on page 84 v "1070 Fan assembly" on page 85 v "1080 CPU" on page 89 v "1090 Wireless WAN slot cover and PCI Express Mini Card for wireless WAN" on page 90 v "1100 Palm rest assembly with cables" on page 93 v "1110 PCI Express Mini Card for wireless LAN" on page 96 v "1120 Backup battery" on page 98 v "1130 Bluetooth...
... Hard disk drive (HDD) assembly" on page 82 v "1060 DIMM" on page 84 v "1070 Fan assembly" on page 85 v "1080 CPU" on page 89 v "1090 Wireless WAN slot cover and PCI Express Mini Card for wireless WAN" on page 90 v "1100 Palm rest assembly with cables" on page 93 v "1110 PCI Express Mini Card for wireless LAN" on page 96 v "1120 Backup battery" on page 98 v "1130 Bluetooth...

User Manual
Page 143
... parts" on page 173 v "AC adapters" on page 174 v "Power cords" on page 175 v "Recovery discs" on page 176 v "Common service tools" on product design may include a memory, a wireless card, a keyboard, and a palm rest with OP are available as options. © Copyright Lenovo 2010 135 v FRU with specific models listed and described as xxU (where U is an example of a unique configuration) should be used for all models ending...
... parts" on page 173 v "AC adapters" on page 174 v "Power cords" on page 175 v "Recovery discs" on page 176 v "Common service tools" on product design may include a memory, a wireless card, a keyboard, and a palm rest with OP are available as options. © Copyright Lenovo 2010 135 v FRU with specific models listed and described as xxU (where U is an example of a unique configuration) should be used for all models ending...


