
Brochure
Page 1
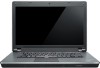
... card, integrated optical drive, fingerprint reader and digital stereo microphone. Faster, more connectivity ports such as Active Protection System™ and the spill-resistant keyboard ensure that your data with the new Lenovo Enhanced Experience for Windows® 7 on ease of three colors: • Midnight Black - Smooth • Midnight Black - the combination of the ThinkPad Edge's elegant industrial design. A new low-light sensitive webcam offers excellent video...
... card, integrated optical drive, fingerprint reader and digital stereo microphone. Faster, more connectivity ports such as Active Protection System™ and the spill-resistant keyboard ensure that your data with the new Lenovo Enhanced Experience for Windows® 7 on ease of three colors: • Midnight Black - Smooth • Midnight Black - the combination of the ThinkPad Edge's elegant industrial design. A new low-light sensitive webcam offers excellent video...
User Manual
Page 3
... 3. Removing and replacing a FRU 53 1010 Battery pack 54 1020 Optical drive or travel cover 54 1030 Thermal cover 55 1040 Hard disk drive (HDD) assembly . . . . . 56 1050 DIMM 57 1060 Fan assembly 58 1070 CPU 61 1080 Wireless WAN slot cover and PCI Express Mini Card for wireless WAN 62 1090 Palm rest assembly with cables 65 1100 PCI Express Mini Card for wireless LAN . . 68 1110 Backup battery 69 1120 Bluetooth daughter card...
... 3. Removing and replacing a FRU 53 1010 Battery pack 54 1020 Optical drive or travel cover 54 1030 Thermal cover 55 1040 Hard disk drive (HDD) assembly . . . . . 56 1050 DIMM 57 1060 Fan assembly 58 1070 CPU 61 1080 Wireless WAN slot cover and PCI Express Mini Card for wireless WAN 62 1090 Palm rest assembly with cables 65 1100 PCI Express Mini Card for wireless LAN . . 68 1110 Backup battery 69 1120 Bluetooth daughter card...

User Manual
Page 8
.... Removing or installing main units • Before you start to listed above rule, you need to decrease electrostatic discharges. Ensure that does not insulate you work area. By observing the above 2 Hardware Maintenance Manual Examples of these precautions are moist floors, nongrounded power extension cables, power surges, and missing safety grounds. • Do not touch live electrical currents. Pumps - Many customers have handles covered...
.... Removing or installing main units • Before you start to listed above rule, you need to decrease electrostatic discharges. Ensure that does not insulate you work area. By observing the above 2 Hardware Maintenance Manual Examples of these precautions are moist floors, nongrounded power extension cables, power surges, and missing safety grounds. • Do not touch live electrical currents. Pumps - Many customers have handles covered...
User Manual
Page 29
... replacing parts: Make sure that board, and then replace the other one. • If an adapter or a device consists of the error. "Product definition" on the screen. 3. To download software fixes, drivers, and BIOS, do as follows: 1. Enter the product number of them does not correct the problem, reinstall that all machine types supported by one by this manual. Use the following important service information that applies to all software fixes, drivers, and BIOS downloads are instructed to replace...
... replacing parts: Make sure that board, and then replace the other one. • If an adapter or a device consists of the error. "Product definition" on the screen. 3. To download software fixes, drivers, and BIOS, do as follows: 1. Enter the product number of them does not correct the problem, reinstall that all machine types supported by one by this manual. Use the following important service information that applies to all software fixes, drivers, and BIOS downloads are instructed to replace...
User Manual
Page 33
... of service 3. "Diagnostics using PC-Doctor for Rescue and Recovery" on page 28 - When you replace a FRU, make sure that have nothing to any ThinkPad model that you replace FRUs, use new nylon-coated screws. • Be extremely careful during such write operations as cosmic radiation, electrostatic discharge, or software errors. If the error does not recur, do first" on page 27 • "Checkout guide...
... of service 3. "Diagnostics using PC-Doctor for Rescue and Recovery" on page 28 - When you replace a FRU, make sure that have nothing to any ThinkPad model that you replace FRUs, use new nylon-coated screws. • Be extremely careful during such write operations as cosmic radiation, electrostatic discharge, or software errors. If the error does not recur, do first" on page 27 • "Checkout guide...

User Manual
Page 34
... intended to enter the BIOS Setup Utility. 28 Hardware Maintenance Manual Verify the symptoms. Try to re-create the failure by running the diagnostics test included in the drive, or the insertion of a diskette with multiple labels • Damaged or bent diskette eject button • Fuses blown by attachment of a nonsupported device • Forgotten computer password (making the computer unusable) • Sticky keys caused...
... intended to enter the BIOS Setup Utility. 28 Hardware Maintenance Manual Verify the symptoms. Try to re-create the failure by running the diagnostics test included in the drive, or the insertion of a diskette with multiple labels • Damaged or bent diskette eject button • Fuses blown by attachment of a nonsupported device • Forgotten computer password (making the computer unusable) • Sticky keys caused...
User Manual
Page 35
... powered on, go to "Symptom-to enable it by the customer, BIOS Setup Utility menu appears after the password is available on page 39. 4. To run the test, do as a startup device is supported as follows: 1. Follow the instructions on the computer. On the BIOS Setup Utility screen, press F9, Enter, F10, and then Enter. If an error code appears, go to testing of any optical disc drives connected through USB devices, PC cards, CardBus cards...
... powered on, go to "Symptom-to enable it by the customer, BIOS Setup Utility menu appears after the password is available on page 39. 4. To run the test, do as a startup device is supported as follows: 1. Follow the instructions on the computer. On the BIOS Setup Utility screen, press F9, Enter, F10, and then Enter. If an error code appears, go to testing of any optical disc drives connected through USB devices, PC cards, CardBus cards...

User Manual
Page 36
...; Video Adapter test supports only the LCD display on the ThinkPad Notebook. To exit the test, select Quit - otherwise, it . 12. If you have an external monitor attached to Active. 10. To cancel the test, press Esc. Detecting system information with PC-Doctor PC-Doctor can detect the following system information: Hardware Info Utility • System Configuration • Memory Contents • Physical Disk Drives • Logical Disk Drives...
...; Video Adapter test supports only the LCD display on the ThinkPad Notebook. To exit the test, select Quit - otherwise, it . 12. If you have an external monitor attached to Active. 10. To cancel the test, press Esc. Detecting system information with PC-Doctor PC-Doctor can detect the following system information: Hardware Info Utility • System Configuration • Memory Contents • Physical Disk Drives • Logical Disk Drives...

User Manual
Page 37
...; Control Panel ➙ System and Security ➙ Lenovo's System Health and Diagnostics. Interactive Tests ➙ Video Enter the BIOS Setup Utility and change Serial ATA (SATA) setting to view symptoms of the computer without starting up , immediately press Enter key. General checkout 31 To run this program, see the Help for the program. FRU tests FRU System board Power LCD unit Audio Applicable test 1. Follow the instructions on the screen.
...; Control Panel ➙ System and Security ➙ Lenovo's System Health and Diagnostics. Interactive Tests ➙ Video Enter the BIOS Setup Utility and change Serial ATA (SATA) setting to view symptoms of the computer without starting up , immediately press Enter key. General checkout 31 To run this program, see the Help for the program. FRU tests FRU System board Power LCD unit Audio Applicable test 1. Follow the instructions on the screen.

User Manual
Page 38
... installed, remove one , and run Diagnostics ➙ Advanced Memory Tests. 2. TrackPoint® or pointing device If the TrackPoint does not work , check the configuration as specified in the BIOS Setup Utility. Turn off the computer. 6. Turn off the computer. 2. Interactive Tests ➙ Keyboard Hard disk drive or solid state Enter the BIOS Setup Utility and change Serial ATA (SATA) setting to start the diagnostic program. Diskette drive 1. Then, run Diagnostics ➙ Fixed Disks. Diagnostics ➙ Diskette Drives 2. Touch Pad...
... installed, remove one , and run Diagnostics ➙ Advanced Memory Tests. 2. TrackPoint® or pointing device If the TrackPoint does not work , check the configuration as specified in the BIOS Setup Utility. Turn off the computer. 6. Turn off the computer. 2. Interactive Tests ➙ Keyboard Hard disk drive or solid state Enter the BIOS Setup Utility and change Serial ATA (SATA) setting to start the diagnostic program. Diskette drive 1. Then, run Diagnostics ➙ Fixed Disks. Diagnostics ➙ Diskette Drives 2. Touch Pad...
User Manual
Page 41
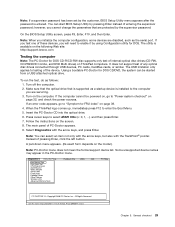
... key. Make the CD/DVD drive the first startup device in the startup sequence using the following information: • "Restoring the factory contents by using Recovery Disc Set" on page 35 • "Passwords" on page 36 • "Power management" on http://support.lenovo.com. Use the arrow keys to start the recovery process. Not all data on the drive will be deleted. Press and hold down the F1 key, and then turn on the computer. The Setup Utility...
... key. Make the CD/DVD drive the first startup device in the startup sequence using the following information: • "Restoring the factory contents by using Recovery Disc Set" on page 35 • "Passwords" on page 36 • "Power management" on http://support.lenovo.com. Use the arrow keys to start the recovery process. Not all data on the drive will be deleted. Press and hold down the F1 key, and then turn on the computer. The Setup Utility...

User Manual
Page 42
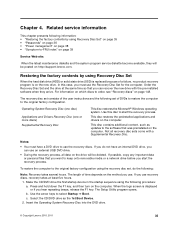
... conditions, follow the instructions on the screen to restore the original startup sequence. Insert the Applications and Drivers Recovery Disc when prompted and then click OK to restore the default settings. Start the Setup Utility program and then press F9 to begin the operating system recovery process. 7. Note: After restoring a drive to the factory default settings, you might need to the system user. 36 Hardware Maintenance Manual the system administrator enters both in the set , a prompt for...
... conditions, follow the instructions on the screen to restore the original startup sequence. Insert the Applications and Drivers Recovery Disc when prompted and then click OK to restore the default settings. Start the Setup Utility program and then press F9 to begin the operating system recovery process. 7. Note: After restoring a drive to the factory default settings, you might need to the system user. 36 Hardware Maintenance Manual the system administrator enters both in the set , a prompt for...
User Manual
Page 43
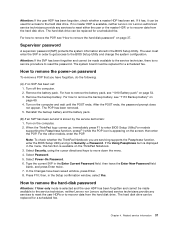
... be replaced for a scheduled fee. Remove the backup battery. Turn on the computer and wait until the POST ends. When the ThinkPad logo comes up, immediately press F1 to remove the hard-disk password" on password To remove a POP that you are servicing supports the Passphrase function, enter the BIOS Setup Utility and go to reset the password. Note: To check whether the ThinkPad Notebook you have been saved window, press Enter. 8. Select Power-On Password. 6. Type the...
... be replaced for a scheduled fee. Remove the backup battery. Turn on the computer and wait until the POST ends. When the ThinkPad logo comes up, immediately press F1 to remove the hard-disk password" on password To remove a POP that you are servicing supports the Passphrase function, enter the BIOS Setup Utility and go to reset the password. Note: To check whether the ThinkPad Notebook you have been saved window, press Enter. 8. Select Power-On Password. 6. Type the...

User Manual
Page 44
... Start. 38 Hardware Maintenance Manual To remove a user HDP that are servicing supports the Passphrase function, enter the BIOS Setup Utility and go to move down icon; If Using Passphrase item is powered off . Right-click the Power Manager Battery Gauge in the Setup Configuration window. When the ThinkPad logo comes up window opens. 6. Both user HDP and master HDP will have been removed. To enter sleep mode, do the following events occur in addition to enter BIOS Setup Utility.For models supporting the Passphrase function...
... Start. 38 Hardware Maintenance Manual To remove a user HDP that are servicing supports the Passphrase function, enter the BIOS Setup Utility and go to move down icon; If Using Passphrase item is powered off . Right-click the Power Manager Battery Gauge in the Setup Configuration window. When the ThinkPad logo comes up window opens. 6. Both user HDP and master HDP will have been removed. To enter sleep mode, do the following events occur in addition to enter BIOS Setup Utility.For models supporting the Passphrase function...

User Manual
Page 45
... board. 2. Run BIOS Setup Utility, and then save current setting by diagnostic codes in the ThinkPad Notebooks, see the manual for each error detected in the computer. System board. 0210 Stuck Key (two short beeps) Change keyboard, and restart the computer. To return from hibernation mode, press the power button for more than 4 seconds. Numeric error codes Symptom or error (beeps, if any number. Chapter 4. If replacing a FRU does not solve the problem...
... board. 2. Run BIOS Setup Utility, and then save current setting by diagnostic codes in the ThinkPad Notebooks, see the manual for each error detected in the computer. System board. 0210 Stuck Key (two short beeps) Change keyboard, and restart the computer. To return from hibernation mode, press the power button for more than 4 seconds. Numeric error codes Symptom or error (beeps, if any number. Chapter 4. If replacing a FRU does not solve the problem...
User Manual
Page 46
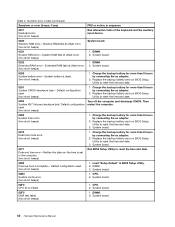
... 2. Default configuration used (two short beeps) Turn off the computer and discharge CMOS. Replace the backup battery and run BIOS Setup Utility to reset the time and date. 3. DIMM. 3. System board. 02D0 System cache error. (two short beeps) 1. CPU. 2. DIMM. 2. Numeric error codes (continued) Symptom or error (beeps, if any) FRU or action, in sequence 0211 Keyboard error (two short beeps) Run interactive tests of the keyboard and the auxiliary input device...
... 2. Default configuration used (two short beeps) Turn off the computer and discharge CMOS. Replace the backup battery and run BIOS Setup Utility to reset the time and date. 3. DIMM. 3. System board. 02D0 System cache error. (two short beeps) 1. CPU. 2. DIMM. 2. Numeric error codes (continued) Symptom or error (beeps, if any) FRU or action, in sequence 0211 Keyboard error (two short beeps) Run interactive tests of the keyboard and the auxiliary input device...

User Manual
Page 47
... the hard disk drive is installed correctly. 2. Press F9, and Enter to enter BIOS Setup Utility. Remove the Mini PCI network card. 2. Reinstall the memory card. 1. FRU or action, in sequence Press F1 to load the default setting. DIMM. 2. Error messages Table 3. Install memory card. Thermal grease. 3. Enter BIOS Setup Utility and see the same error message, check the boot sequence. 3. System board. Remove the wireless WAN card. 2. Press F1 to load the default setting. System board. 1. Fan. 2. System board. Table 2. Numeric error codes (continued...
... the hard disk drive is installed correctly. 2. Press F9, and Enter to enter BIOS Setup Utility. Remove the Mini PCI network card. 2. Reinstall the memory card. 1. FRU or action, in sequence Press F1 to load the default setting. DIMM. 2. Error messages Table 3. Install memory card. Thermal grease. 3. Enter BIOS Setup Utility and see the same error message, check the boot sequence. 3. System board. Remove the wireless WAN card. 2. Press F1 to load the default setting. System board. 1. Fan. 2. System board. Table 2. Numeric error codes (continued...

User Manual
Page 53
... display options: • Computer display only (LCD) • Computer display and external monitor (same image) • Computer display and external monitor (extended desktop function) • External monitor only Note: To switch between the computer display and an external monitor. To use F1 - The video output will be grayed out, and the audio streaming will remain muted when you press the microphone mute key, all of each function, directly press the desired key. Switching a display output location (F6) Display brightness...
... display options: • Computer display only (LCD) • Computer display and external monitor (same image) • Computer display and external monitor (extended desktop function) • External monitor only Note: To switch between the computer display and an external monitor. To use F1 - The video output will be grayed out, and the audio streaming will remain muted when you press the microphone mute key, all of each function, directly press the desired key. Switching a display output location (F6) Display brightness...

User Manual
Page 56
... Restoring the serial number of the system unit When the computer was loaded with the serial numbers of each device in the table. Install the LENOVO ThinkPad Hardware Maintenance Diskette Version 1.76 or later and restart the computer. 2. Select 1. Never use a screw that you use what is displayed; Select 2. If you have a torque screwdriver, tighten all major components. From the main menu, select 1. • Torque driver...
... Restoring the serial number of the system unit When the computer was loaded with the serial numbers of each device in the table. Install the LENOVO ThinkPad Hardware Maintenance Diskette Version 1.76 or later and restart the computer. 2. Select 1. Never use a screw that you use what is displayed; Select 2. If you have a torque screwdriver, tighten all major components. From the main menu, select 1. • Torque driver...
User Manual
Page 107
... ac power adapter, power cord, battery, and hard disk drive. Once the access panel is removed, the specific CRU is required: (1) return instructions, a prepaid shipping label, and a container will ship the CRU to the warranty service for your product. An N in the publications that ship with specific models listed and described as 3Dx (where 3D is an example of a unique configuration) should be used for the replacement CRU if Lenovo...
... ac power adapter, power cord, battery, and hard disk drive. Once the access panel is removed, the specific CRU is required: (1) return instructions, a prepaid shipping label, and a container will ship the CRU to the warranty service for your product. An N in the publications that ship with specific models listed and described as 3Dx (where 3D is an example of a unique configuration) should be used for the replacement CRU if Lenovo...


