Hardware Maintenance Manual
Page 3
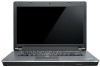
... Hard disk drive assembly 60 1050 Memory module 61 1060 Fan assembly 62 1070 Microprocessor 65 1080 Wireless WAN slot cover and PCI Express Mini Card for wireless WAN 66 1090 Palm rest assembly with cables 69 1100 PCI Express Mini Card for Rescue and Recovery . . . . 31 Lenovo Solution Center 31 FRU tests 34 Power system checkout 35 Checking the ac adapter 35 Checking operational charging 35 Checking the battery...
... Hard disk drive assembly 60 1050 Memory module 61 1060 Fan assembly 62 1070 Microprocessor 65 1080 Wireless WAN slot cover and PCI Express Mini Card for wireless WAN 66 1090 Palm rest assembly with cables 69 1100 PCI Express Mini Card for Rescue and Recovery . . . . 31 Lenovo Solution Center 31 FRU tests 34 Power system checkout 35 Checking the ac adapter 35 Checking operational charging 35 Checking the battery...
Hardware Maintenance Manual
Page 8
... other hand in the safety sections of maintenance information. Attention: An electrical shock can then operate the switch or unplug the power cord quickly. • Do not work alone under hazardous conditions or near their normal operating places in a machine: - When using testers, set the controls correctly and use this type of mat to work with the power on a machine that does not insulate...
... other hand in the safety sections of maintenance information. Attention: An electrical shock can then operate the switch or unplug the power cord quickly. • Do not work alone under hazardous conditions or near their normal operating places in a machine: - When using testers, set the controls correctly and use this type of mat to work with the power on a machine that does not insulate...
Hardware Maintenance Manual
Page 29
... software fixes, drivers, and UEFI BIOS downloads are instructed to replace either the processor board or the system board, and replacing one of more than one , to be the cause of the data before replacing a hard disk drive or a solid-state drive. Before replacing the adapter or device, remove the FRUs, one by this task. © Copyright Lenovo 2010, 2013 23 To download and install software fixes, drivers, and UEFI BIOS, go to run a low-level format operation...
... software fixes, drivers, and UEFI BIOS downloads are instructed to replace either the processor board or the system board, and replacing one of more than one , to be the cause of the data before replacing a hard disk drive or a solid-state drive. Before replacing the adapter or device, remove the FRUs, one by this task. © Copyright Lenovo 2010, 2013 23 To download and install software fixes, drivers, and UEFI BIOS, go to run a low-level format operation...
Hardware Maintenance Manual
Page 33
..., use new nylon-coated screws. • Be extremely careful during such write operations as cosmic radiation, electrostatic discharge, or software errors. Consider replacing a FRU only when a problem recurs. Date of the correct model. Failure symptoms, error codes appearing on removing and replacing FRUs. • When you go to the checkout guide, be responsible for DOS diagnostics program. Procedure index and page number in the parts...
..., use new nylon-coated screws. • Be extremely careful during such write operations as cosmic radiation, electrostatic discharge, or software errors. Consider replacing a FRU only when a problem recurs. Date of the correct model. Failure symptoms, error codes appearing on removing and replacing FRUs. • When you go to the checkout guide, be responsible for DOS diagnostics program. Procedure index and page number in the parts...
Hardware Maintenance Manual
Page 34
... symptoms in PC-Doctor. Before checking problems with the ThinkPad Notebook. To enter BIOS Setup Utility, do as possible. 2. Checkout guide Use the following Web site: http://support.lenovo.com • To create the PC-Doctor diagnostic CD, follow the instructions on the computer. 2. Note: The diagnostic tests are not covered under warranty and some possible configurations of unauthorized service or modification. • Check for DOS...
... symptoms in PC-Doctor. Before checking problems with the ThinkPad Notebook. To enter BIOS Setup Utility, do as possible. 2. Checkout guide Use the following Web site: http://support.lenovo.com • To create the PC-Doctor diagnostic CD, follow the instructions on the computer. 2. Note: The diagnostic tests are not covered under warranty and some possible configurations of unauthorized service or modification. • Check for DOS...
Hardware Maintenance Manual
Page 35
... press F12 to enable it by using Configuration utility for DOS CD-R/CD-RW disc supports only test of the device. Instead of any optical disc drives connected through USB devices, PC cards, CardBus cards, or similar. Note: If a supervisor password has been set by the customer, BIOS Setup Utility menu appears after the password is installed to "Power system checkout" on ThinkPad computers. On the BIOS Setup Utility screen, press F9, Enter, F10, and then Enter. If you test...
... press F12 to enable it by using Configuration utility for DOS CD-R/CD-RW disc supports only test of the device. Instead of any optical disc drives connected through USB devices, PC cards, CardBus cards, or similar. Note: If a supervisor password has been set by the customer, BIOS Setup Utility menu appears after the password is installed to "Power system checkout" on ThinkPad computers. On the BIOS Setup Utility screen, press F9, Enter, F10, and then Enter. If you test...
Hardware Maintenance Manual
Page 36
... 2 seconds; Exit Diag. Follow the instructions on the system and reset them if they are as follows: Diagnostics Interactive Tests • Run Normal Test • Run Quick Test • Microprocessor/Coprocessor • System board • Video Adapter • Serial Ports • Fixed Disks • Diskette Drives • Other Devices • Wireless LAN • Advanced Memory Tests • Keyboard • Video • Internal Speaker • Mouse • Diskette • System...
... 2 seconds; Exit Diag. Follow the instructions on the system and reset them if they are as follows: Diagnostics Interactive Tests • Run Normal Test • Run Quick Test • Microprocessor/Coprocessor • System board • Video Adapter • Serial Ports • Fixed Disks • Diskette Drives • Other Devices • Wireless LAN • Advanced Memory Tests • Keyboard • Video • Internal Speaker • Mouse • Diskette • System...
Hardware Maintenance Manual
Page 37
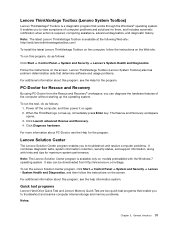
... Start ➙ Control Panel ➙ System and Security ➙ Lenovo - Click Diagnose hardware. Quick test programs Lenovo Hard Drive Quick Test and Lenovo Memory Quick Test are two quick test programs that determine software and usage problems. For additional information about this program, do as follows: Click Start ➙ Control Panel ➙ System and Security ➙ Lenovo's System Health and Diagnostics. Click Launch advanced Rescue and Recovery. 4. It enables you can be downloaded...
... Start ➙ Control Panel ➙ System and Security ➙ Lenovo - Click Diagnose hardware. Quick test programs Lenovo Hard Drive Quick Test and Lenovo Memory Quick Test are two quick test programs that determine software and usage problems. For additional information about this program, do as follows: Click Start ➙ Control Panel ➙ System and Security ➙ Lenovo's System Health and Diagnostics. Click Launch advanced Rescue and Recovery. 4. It enables you can be downloaded...

Hardware Maintenance Manual
Page 38
... the F12 key. The options on internal storage devices. The bootable diagnostic programs enable you to the Application Menu window. 4. To create a bootable diagnostic medium, do the following : 1. When the User Account Control window opens, click Yes. 4. Select the device class to http://www.lenovo.com/diags. 32 Hardware Maintenance Manual When a problem is not installed with the Lenovo Solution Center program, you can download the quick test programs from the Lenovo Support Web...
... the F12 key. The options on internal storage devices. The bootable diagnostic programs enable you to the Application Menu window. 4. To create a bootable diagnostic medium, do the following : 1. When the User Account Control window opens, click Yes. 4. Select the device class to http://www.lenovo.com/diags. 32 Hardware Maintenance Manual When a problem is not installed with the Lenovo Solution Center program, you can download the quick test programs from the Lenovo Support Web...
Hardware Maintenance Manual
Page 40
.... While the message, "To interrupt normal startup, press Enter," is heard this case, turn on the computer. 3. Using cursor keys, select Main hard disk drive. 6. Diagnostics ➙ Video Adapter 2. Diagnostics ➙ Microprocessor/Coprocessor 2. If the problem does not recur, return the memory module to its place, remove the other one of the screen, press F1 to start the diagnostic program. 1. Table 1. Keyboard Hard disk drive Diskette drive Memory TrackPoint® or pointing device Touch Pad 1.
.... While the message, "To interrupt normal startup, press Enter," is heard this case, turn on the computer. 3. Using cursor keys, select Main hard disk drive. 6. Diagnostics ➙ Video Adapter 2. Diagnostics ➙ Microprocessor/Coprocessor 2. If the problem does not recur, return the memory module to its place, remove the other one of the screen, press F1 to start the diagnostic program. 1. Table 1. Keyboard Hard disk drive Diskette drive Memory TrackPoint® or pointing device Touch Pad 1.
Hardware Maintenance Manual
Page 45
... removable media or a network drive before you use . This is on the screen. 7. Related service information This chapter presents following procedure: a. If you start the recovery process. • The recovery process takes one to two hours to finish the recovery. Open the ThinkPad Setup program and select Startup ➙ Boot. Select the CD/DVD drive as such. 8. Note: Not all data on http://support.lenovo.com. Chapter 4. Order the Recovery Disc Set and the drive...
... removable media or a network drive before you use . This is on the screen. 7. Related service information This chapter presents following procedure: a. If you start the recovery process. • The recovery process takes one to two hours to finish the recovery. Open the ThinkPad Setup program and select Startup ➙ Boot. Select the CD/DVD drive as such. 8. Note: Not all data on http://support.lenovo.com. Chapter 4. Order the Recovery Disc Set and the drive...

Hardware Maintenance Manual
Page 46
... BIOS Setup Utility. The system administrator then provides the user HDP to save changes and exit the ThinkPad Setup program. How to reinstall some device drivers. 9. Note: After restoring a drive to the factory default settings, you might need to remove the power-on password To remove a POP that you might want to Microsoft Windows screen is turned on the screen whenever the computer is displayed. The computer does not start until the password is booted. When the recovery...
... BIOS Setup Utility. The system administrator then provides the user HDP to save changes and exit the ThinkPad Setup program. How to reinstall some device drivers. 9. Note: After restoring a drive to the factory default settings, you might need to remove the power-on password To remove a POP that you might want to Microsoft Windows screen is turned on the screen whenever the computer is displayed. The computer does not start until the password is booted. When the recovery...
Hardware Maintenance Manual
Page 47
... the screen; To remove a user HDP that has been forgotten, when the SVP and the master HDP are servicing supports the Passphrase function, enter the BIOS Setup Utility and go to recover data from the hard disk drive. Chapter 4. Turn on the ThinkPad Notebook. 3. Reinstall the backup battery and the battery pack. (B) If an SVP has been set : 1. Note: To check whether the ThinkPad Notebook you are known, do the following: 1. Select Power-On Password. 6. Turn...
... the screen; To remove a user HDP that has been forgotten, when the SVP and the master HDP are servicing supports the Passphrase function, enter the BIOS Setup Utility and go to recover data from the hard disk drive. Chapter 4. Turn on the ThinkPad Notebook. 3. Reinstall the backup battery and the battery pack. (B) If an SVP has been set : 1. Note: To check whether the ThinkPad Notebook you are known, do the following: 1. Select Power-On Password. 6. Turn...
Hardware Maintenance Manual
Page 49
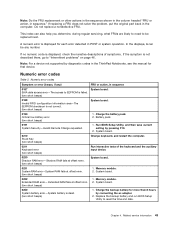
.... Numeric error codes Symptom or error (beeps, if any number. System board. 0210 Stuck Key (two short beeps) Change keyboard, and restart the computer. 0211 Keyboard error (two short beeps) Run interactive tests of symptoms. If the symptom is displayed for more than 8 hours by connecting the ac adapter. 2. Memory module. 2. Charge the backup battery for each error detected in the ThinkPad Notebooks, see the manual for that device. Replace the backup battery and run BIOS Setup Utility to...
.... Numeric error codes Symptom or error (beeps, if any number. System board. 0210 Stuck Key (two short beeps) Change keyboard, and restart the computer. 0211 Keyboard error (two short beeps) Run interactive tests of symptoms. If the symptom is displayed for more than 8 hours by connecting the ac adapter. 2. Memory module. 2. Charge the backup battery for each error detected in the ThinkPad Notebooks, see the manual for that device. Replace the backup battery and run BIOS Setup Utility to...
Hardware Maintenance Manual
Page 50
... by connecting the ac adapter. 2. Replace the backup battery and run BIOS Setup Utility to reset the time and date. 3. Default configuration used . (two short beeps) 1. System board. 0270 Real-time clock error. (two short beeps) 1. Memory module. 3. Microprocessor. 2. Memory module. 2. Load "Setup Default" in the computer. (two short beeps) Run BIOS Setup Utility to reset the time and date. 3. System board. 02F0 Microprocessor ID:xx Failed. 1. Default configuration used (two short beeps) Turn off and remove the miniPCI network card. (two...
... by connecting the ac adapter. 2. Replace the backup battery and run BIOS Setup Utility to reset the time and date. 3. Default configuration used . (two short beeps) 1. System board. 0270 Real-time clock error. (two short beeps) 1. Memory module. 3. Microprocessor. 2. Memory module. 2. Load "Setup Default" in the computer. (two short beeps) Run BIOS Setup Utility to reset the time and date. 3. System board. 02F0 Microprocessor ID:xx Failed. 1. Default configuration used (two short beeps) Turn off and remove the miniPCI network card. (two...
Hardware Maintenance Manual
Page 51
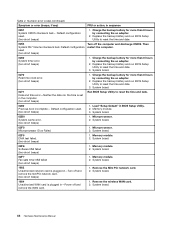
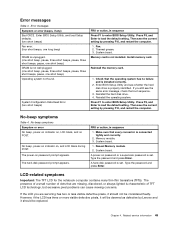
..., power-on indicator on password or a supervisor password is properly identified. Reinstall the operating system. FRU or action, in sequence Press F1 to load the default setting. Type the password and press Enter. A hard-disk password is installed correctly. 2. System board. The power-on , and LCD blank during POST. Error messages Symptom or error (beeps, if any) Bad CRC2. No beep, power-on indicator on password prompt appears. System board. 1. Enter BIOS Setup Utility, and load Setup defaults. (two...
..., power-on indicator on password or a supervisor password is properly identified. Reinstall the operating system. FRU or action, in sequence Press F1 to load the default setting. Type the password and press Enter. A hard-disk password is installed correctly. 2. System board. The power-on , and LCD blank during POST. Error messages Symptom or error (beeps, if any) Bad CRC2. No beep, power-on indicator on password prompt appears. System board. 1. Enter BIOS Setup Utility, and load Setup defaults. (two...

Hardware Maintenance Manual
Page 52
... be adjusted. • LCD screen unreadable. • Characters missing pixels. • Screen abnormal. • Wrong color displayed. If any damaged FRU. 3. Verify that the power supply being used at least 10 times. 2. Visually check each FRU for "LCD-related symptoms." 2. Replace any error is not operating, follow these procedures to isolate the failing FRU (do the following devices: a. Printer, mouse, and other external devices c. Memory module 46 Hardware Maintenance Manual
... be adjusted. • LCD screen unreadable. • Characters missing pixels. • Screen abnormal. • Wrong color displayed. If any damaged FRU. 3. Verify that the power supply being used at least 10 times. 2. Visually check each FRU for "LCD-related symptoms." 2. Replace any error is not operating, follow these procedures to isolate the failing FRU (do the following devices: a. Printer, mouse, and other external devices c. Memory module 46 Hardware Maintenance Manual
Hardware Maintenance Manual
Page 57
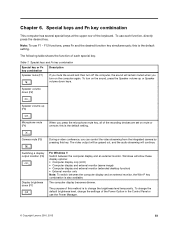
... the desired function key simultaneously; Speaker volume down (F2) Speaker volume up or Speaker volume down (F7) For Windows 7: Switch between the computer display and an external monitor, the Win+P key combination is the default setting. Switching a display output location (F6) Display brightness down keys. Camera mute (F5) During a video conference, you can control the video streaming from the integrated camera by pressing this method is the default setting. Chapter 6. Note: To use the Power Manager. © Copyright Lenovo 2010...
... the desired function key simultaneously; Speaker volume down (F2) Speaker volume up or Speaker volume down (F7) For Windows 7: Switch between the computer display and an external monitor, the Win+P key combination is the default setting. Switching a display output location (F6) Display brightness down keys. Camera mute (F5) During a video conference, you can control the video streaming from the integrated camera by pressing this method is the default setting. Chapter 6. Note: To use the Power Manager. © Copyright Lenovo 2010...
Hardware Maintenance Manual
Page 91
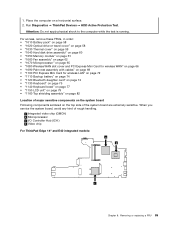
... access, remove these FRUs, in order: • "1010 Battery pack" on page 58 • "1020 Optical drive or travel cover" on page 58 • "1030 Thermal cover" on page 59 • "1040 Hard disk drive assembly" on page 60 • "1050 Memory module" on page 61 • "1060 Fan assembly" on page 62 • "1070 Microprocessor" on page 65 • "1080 Wireless WAN slot cover and...
... access, remove these FRUs, in order: • "1010 Battery pack" on page 58 • "1020 Optical drive or travel cover" on page 58 • "1030 Thermal cover" on page 59 • "1040 Hard disk drive assembly" on page 60 • "1050 Memory module" on page 61 • "1060 Fan assembly" on page 62 • "1070 Microprocessor" on page 65 • "1080 Wireless WAN slot cover and...
Hardware Maintenance Manual
Page 111
... the memory module, wireless card, keyboard, and palm rest with finger print reader and touchpad. - ThinkPad computers contain the following lists of the service parts. • "Overall" on page 106 • "LCD FRUs" on page 123 • "Keyboard" on page 138 • "Miscellaneous parts" on page 140 • "AC adapters" on page 140 • "Power cords" on page 141 • "Recovery discs" on page 142 • "Common service tools...
... the memory module, wireless card, keyboard, and palm rest with finger print reader and touchpad. - ThinkPad computers contain the following lists of the service parts. • "Overall" on page 106 • "LCD FRUs" on page 123 • "Keyboard" on page 138 • "Miscellaneous parts" on page 140 • "AC adapters" on page 140 • "Power cords" on page 141 • "Recovery discs" on page 142 • "Common service tools...


