
Owner's Manual
Page 2
...Call 1-800-243-0000 to locate the nearest ASC. • This air conditioner is not intended for service at all. READ THIS MANUAL Inside you a great deal of time and money over the life of your part can find the numbers on a label on how... tips. Dealer's Name Date Purchased s Staple your air conditioner properly. Window-Type Air Conditioner Owner's Manual TABLE OF CONTENTS Safety Precautions 3 Before Operation 7 Introduction 8 Symbols Used in this Manual ........8 Features 8 Electrical Safety 9 Temporary Use of an Adapter 10 Temporary Use of an Extension Cord ...
...Call 1-800-243-0000 to locate the nearest ASC. • This air conditioner is not intended for service at all. READ THIS MANUAL Inside you a great deal of time and money over the life of your part can find the numbers on a label on how... tips. Dealer's Name Date Purchased s Staple your air conditioner properly. Window-Type Air Conditioner Owner's Manual TABLE OF CONTENTS Safety Precautions 3 Before Operation 7 Introduction 8 Symbols Used in this Manual ........8 Features 8 Electrical Safety 9 Temporary Use of an Adapter 10 Temporary Use of an Extension Cord ...
Owner's Manual
Page 3
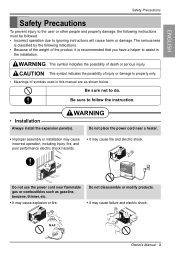
... instructions must be followed. • Incorrect operation due to property only. • Meanings of symbols used in the installation. Gasolin Owner's Manual 3 WARNING • Installation Always install the expansion panel(s). The seriousness is recommended that you have a helper to assist in this... manual are as gasoline, benzene, thinner, etc. • It may cause explosion or fire. CAUTION This symbol indicates the possibility of injury ...
... instructions must be followed. • Incorrect operation due to property only. • Meanings of symbols used in the installation. Gasolin Owner's Manual 3 WARNING • Installation Always install the expansion panel(s). The seriousness is recommended that you have a helper to assist in this... manual are as gasoline, benzene, thinner, etc. • It may cause explosion or fire. CAUTION This symbol indicates the possibility of injury ...

Owner's Manual
Page 4
... out the power plug. • It will cause electric shock or fire due to heat generation. • No grounding may cause electric shock (See Installation Manual). Do not operate with other appliances. Do not damage or use the socket if it may cause fire and electric • It will cause electric...
... out the power plug. • It will cause electric shock or fire due to heat generation. • No grounding may cause electric shock (See Installation Manual). Do not operate with other appliances. Do not damage or use the socket if it may cause fire and electric • It will cause electric...

Owner's Manual
Page 5
... to run into electric parts. Sharp edges Unplug the air conditioner if it damaged could result in the air conditioner falling out of injury. Owner's Manual 5 and burn. CAUTION Do not block the inlet or outlet. • It may cause failure of the unit when removing the filter. • They are...
... to run into electric parts. Sharp edges Unplug the air conditioner if it damaged could result in the air conditioner falling out of injury. Owner's Manual 5 and burn. CAUTION Do not block the inlet or outlet. • It may cause failure of the unit when removing the filter. • They are...
Owner's Manual
Page 7
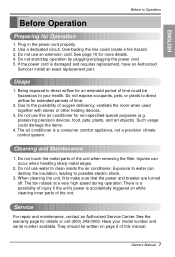
...while cleaning inner parts of the unit. Cleaning and Maintenance 1. Do not touch the metal parts of time. 2. Do not use this manual. See the warranty page for more details. 4. The fan rotates at a very high speed during operation. There is a possibility of ...conditioner is damaged and requires replacement, have an Authorized Servicer install an exact replacement part. Overloading the line could damage the items. 4. Owner's Manual 7 Do not use an extension cord. Exposure to direct airflow for Operation 1. Such usage could create a fire hazard. 3. See page 10...
...while cleaning inner parts of the unit. Cleaning and Maintenance 1. Do not touch the metal parts of time. 2. Do not use this manual. See the warranty page for more details. 4. The fan rotates at a very high speed during operation. There is a possibility of ...conditioner is damaged and requires replacement, have an Authorized Servicer install an exact replacement part. Overloading the line could damage the items. 4. Owner's Manual 7 Do not use an extension cord. Exposure to direct airflow for Operation 1. Such usage could create a fire hazard. 3. See page 10...

Owner's Manual
Page 11
As such, a standard single-hung or double-hung window is required for installation in walls, and other installations are not recommended. Owner's Manual 11 The upper and lower window sash must open sufficiently to allow a clear vertical opening widths from the bottom of 13" from 22" to 36" ...
As such, a standard single-hung or double-hung window is required for installation in walls, and other installations are not recommended. Owner's Manual 11 The upper and lower window sash must open sufficiently to allow a clear vertical opening widths from the bottom of 13" from 22" to 36" ...

Owner's Manual
Page 13
ENGLISH Preparation of the air conditioner. Attach L bracket 4-1. Inner Sill Outer Sill Type A Inside Center Line 8" 8" Outside L Bracket Owner's Manual 13 Insert the guide panels into the guides of Chassis 1. Cut the adhesive-backed seal strip (Type D) to hold unit securely in window Open the ...
ENGLISH Preparation of the air conditioner. Attach L bracket 4-1. Inner Sill Outer Sill Type A Inside Center Line 8" 8" Outside L Bracket Owner's Manual 13 Insert the guide panels into the guides of Chassis 1. Cut the adhesive-backed seal strip (Type D) to hold unit securely in window Open the ...

Owner's Manual
Page 15
See ELECTRICAL DATA for attaching power cord to the inner window sill with a screw (Type B). ENGLISH 3-4. Fasten the support bracket (Type G) using a screw removed from the air conditioner cabinet. Installation Type B Support Bracket (Type G) 4. Attach the support bracket (Type G) to electrical outlet. Window installation of room air conditioner is now completed. Owner's Manual 15
See ELECTRICAL DATA for attaching power cord to the inner window sill with a screw (Type B). ENGLISH 3-4. Fasten the support bracket (Type G) using a screw removed from the air conditioner cabinet. Installation Type B Support Bracket (Type G) 4. Attach the support bracket (Type G) to electrical outlet. Window installation of room air conditioner is now completed. Owner's Manual 15

Owner's Manual
Page 19
... rear hole of these directions. Drain Pipe Drain Cap Ring CAUTION: Be careful when inserting the drain pipe. Push away from between the windows. Owner's Manual 19 ENGLISH Operating Instructions Additional Features Air Direction Adjusting the air direction using the horizontal air deflector control. Using the control tabs, the air flow...
... rear hole of these directions. Drain Pipe Drain Cap Ring CAUTION: Be careful when inserting the drain pipe. Push away from between the windows. Owner's Manual 19 ENGLISH Operating Instructions Additional Features Air Direction Adjusting the air direction using the horizontal air deflector control. Using the control tabs, the air flow...
Owner's Manual
Page 21
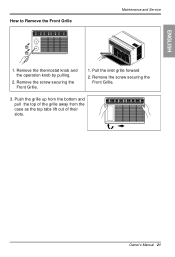
Remove the thermostat knob and the operation knob by pulling. 2. Push the grille up from the bottom and pull the top of the grille away from the case as the top tabs lift out of their slots. Pull the inlet grille forward 2. Remove the screw securing the Front Grille. 3. Remove the screw securing the Front Grille. 1. Owner's Manual 21 ENGLISH How to Remove the Front Grille Maintenance and Service 1.
Remove the thermostat knob and the operation knob by pulling. 2. Push the grille up from the bottom and pull the top of the grille away from the case as the top tabs lift out of their slots. Pull the inlet grille forward 2. Remove the screw securing the Front Grille. 3. Remove the screw securing the Front Grille. 1. Owner's Manual 21 ENGLISH How to Remove the Front Grille Maintenance and Service 1.


