

Operation Guide
Page 3
... and a third grounding prong, The wide blade or the third prong are provided for replacement of the polarized or grounding-type plug. PORTABLE CART WARNING Owner's Manual 3 Additional safety information may be given in accordance with the apparatus. Keep these instructions. 2. Install in a language acceptable to the country where the apparatus is...
... and a third grounding prong, The wide blade or the third prong are provided for replacement of the polarized or grounding-type plug. PORTABLE CART WARNING Owner's Manual 3 Additional safety information may be given in accordance with the apparatus. Keep these instructions. 2. Install in a language acceptable to the country where the apparatus is...
Operation Guide
Page 4
Unplug this owner's manual to rain or moisture, does not operate normally, or has been dropped. 15. Refer all servicing to plugs, wall outlets, and the point where the ...
Unplug this owner's manual to rain or moisture, does not operate normally, or has been dropped. 15. Refer all servicing to plugs, wall outlets, and the point where the ...

Operation Guide
Page 5
...Menus Language Selection 22 Channel Selection 22 Volume Adjustment 22 Setup Menu Options EZ Scan (Channel Search 23 Manual Scan 23 Channel Edit 24 DTV Signal 24 Input Source Selection 25 Input Label 25 Video Menu Options ...Audio Menu Options Audio Language 32 Auto Volume Leveler (EZ SoundRite 32 Auto Sound Control (EZ Sound 32 Manual Sound Control (EZ sound-User Option) .33 Balance 34 TV Speakers On/Off Setup 34 Time Menu Options Auto Clock ...~50 Maintenance 51 Product Specifications 51 Warranty 52 After reading this manual, keep it handy for future reference. Owner's Manual 5
...Menus Language Selection 22 Channel Selection 22 Volume Adjustment 22 Setup Menu Options EZ Scan (Channel Search 23 Manual Scan 23 Channel Edit 24 DTV Signal 24 Input Source Selection 25 Input Label 25 Video Menu Options ...Audio Menu Options Audio Language 32 Auto Volume Leveler (EZ SoundRite 32 Auto Sound Control (EZ Sound 32 Manual Sound Control (EZ sound-User Option) .33 Balance 34 TV Speakers On/Off Setup 34 Time Menu Options Auto Clock ...~50 Maintenance 51 Product Specifications 51 Warranty 52 After reading this manual, keep it handy for future reference. Owner's Manual 5

Operation Guide
Page 9
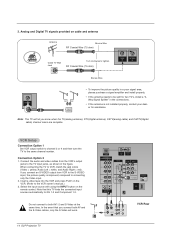
Back Connection Panel AC IN CABLE IN ANTENNA IN AV IN 1 COMPONENT IN 1/2 SERVICE ONLY AC IN COMPONENT IN 1 2 Y VIDEO PB PR (L) AUDIO (R) SERVICE ONLY CABLE IN ANTENNA IN RGB IN RGB (PC/DTV) (L) AUDIO RGB/DVI (R) AV IN 1 AV OUT VIDEO MONO (L) AUDIO (R) S-VIDEO DIGITAL AUDIO OPTICAL OUT HDMI /DVI IN RGB/DVI AUDIO IN RGB(PC/DTV) VIDEO IN AV OUT DIGITAL AUDIO OPTICAL OUT HDMI/DVI IN Owner's Manual 9 This is the back panel of models Z52DC2D series TVs. Connection Options -
Back Connection Panel AC IN CABLE IN ANTENNA IN AV IN 1 COMPONENT IN 1/2 SERVICE ONLY AC IN COMPONENT IN 1 2 Y VIDEO PB PR (L) AUDIO (R) SERVICE ONLY CABLE IN ANTENNA IN RGB IN RGB (PC/DTV) (L) AUDIO RGB/DVI (R) AV IN 1 AV OUT VIDEO MONO (L) AUDIO (R) S-VIDEO DIGITAL AUDIO OPTICAL OUT HDMI /DVI IN RGB/DVI AUDIO IN RGB(PC/DTV) VIDEO IN AV OUT DIGITAL AUDIO OPTICAL OUT HDMI/DVI IN Owner's Manual 9 This is the back panel of models Z52DC2D series TVs. Connection Options -

Operation Guide
Page 11
... screen position, size, and phase in the menu system and other operating modes, for theremote to p.22) VOLUME UP/DOWN Increases/decreases the sound level. Owner's Manual 11 When using the Remote Control, aim it at the remote control sensor on top of the screen. MUTE Switches the sound on -screen displays...
... screen position, size, and phase in the menu system and other operating modes, for theremote to p.22) VOLUME UP/DOWN Increases/decreases the sound level. Owner's Manual 11 When using the Remote Control, aim it at the remote control sensor on top of the screen. MUTE Switches the sound on -screen displays...

Operation Guide
Page 13
... careful not to tighten. Analog and Digital TV signals provided on cable Cable TV Wall Jack RF Coaxial Wire (75 ohm) Bronze Wire CABLE IN Owner's Manual 13 Analog and Digital TV signals provided on antenna - Multi-family Dwellings/Apartments (Connect to wall antenna socket) Wall Antenna Socket Bronze Wire RF Coaxial...
... careful not to tighten. Analog and Digital TV signals provided on cable Cable TV Wall Jack RF Coaxial Wire (75 ohm) Bronze Wire CABLE IN Owner's Manual 13 Analog and Digital TV signals provided on antenna - Multi-family Dwellings/Apartments (Connect to wall antenna socket) Wall Antenna Socket Bronze Wire RF Coaxial...
Operation Guide
Page 14
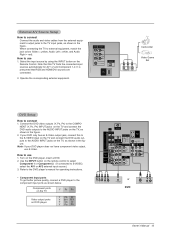
... to both AV and the S-Video cables, only the S-Video will let you connect an S-VIDEO output from the VCR's output jacks to the VCR owner's manual.) 3. VCR Setup Connection Option 1 Set VCR output switch to channel 3 or 4 and then tune the TV to VCR, match the jack colors (Video = yellow, Audio...
... to both AV and the S-Video cables, only the S-Video will let you connect an S-VIDEO output from the VCR's output jacks to the VCR owner's manual.) 3. VCR Setup Connection Option 1 Set VCR output switch to channel 3 or 4 and then tune the TV to VCR, match the jack colors (Video = yellow, Audio...
Operation Guide
Page 15
... AUDIO OUT VIDEO (L) (MONO) AUDIO (R) HDMI IN 2 (L) AUDIO (R) (L) AUDIO (R) B R (R) AUDIO (L) DIGITAL AUDIO OPTICAL or DVD S-VIDEO (R) AUDIO (L) Owner's Manual 15 Operate the corresponding external equipment. Note: If your DVD only has an S-Video output jack, connect this TV finds the connected input sources automatically... • Component Input ports To get better picture quality, connect a DVD player to connect 1. Refer to the DVD player's manual for AV 1-2 and Component 1-2. Select the input source by using the INPUT button on the remote control to select Component 1 ...
... AUDIO OUT VIDEO (L) (MONO) AUDIO (R) HDMI IN 2 (L) AUDIO (R) (L) AUDIO (R) B R (R) AUDIO (L) DIGITAL AUDIO OPTICAL or DVD S-VIDEO (R) AUDIO (L) Owner's Manual 15 Operate the corresponding external equipment. Note: If your DVD only has an S-Video output jack, connect this TV finds the connected input sources automatically... • Component Input ports To get better picture quality, connect a DVD player to connect 1. Refer to the DVD player's manual for AV 1-2 and Component 1-2. Select the input source by using the INPUT button on the remote control to select Component 1 ...
Operation Guide
Page 16
.... How to hook up a second TV or monitor. Use INPUT on the digital set-top box. (Refer to the owner's manual for AV out. Then, make the corresponding audio connections. See the Operating Manual of the second TV or monitor for Digital Contents (480p,720p,1080i). This TV can receive Digital Over-the...
.... How to hook up a second TV or monitor. Use INPUT on the digital set-top box. (Refer to the owner's manual for AV out. Then, make the corresponding audio connections. See the Operating Manual of the second TV or monitor for Digital Contents (480p,720p,1080i). This TV can receive Digital Over-the...

Operation Guide
Page 17
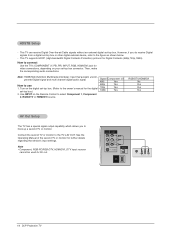
...Set the " TV Speaker option - Refer to connect 1. AV IN 1 AV OUT VIDEO MONO (L) AUDIO (R) S-VIDEO DIGITAL AUDIO OPTICAL OUT HDMI /DVI IN Owner's Manual 17 How to page 33. Off" in the AUDIO menu. Digital Audio Output Send the TV's audio to the digital audio (opti- R D 3. See the ...external audio equipment instruction manual for operation. Connect the other end of an optical cable to the TV Digital Audio C (Optical) Out port. DVI HDMI Caution: Do not look into...
...Set the " TV Speaker option - Refer to connect 1. AV IN 1 AV OUT VIDEO MONO (L) AUDIO (R) S-VIDEO DIGITAL AUDIO OPTICAL OUT HDMI /DVI IN Owner's Manual 17 How to page 33. Off" in the AUDIO menu. Digital Audio Output Send the TV's audio to the digital audio (opti- R D 3. See the ...external audio equipment instruction manual for operation. Connect the other end of an optical cable to the TV Digital Audio C (Optical) Out port. DVI HDMI Caution: Do not look into...
Operation Guide
Page 19
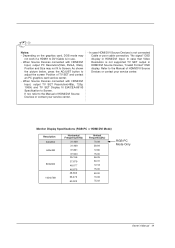
As shown the picture below, press the ADJUST button to the Manual of HDMI/DVI Source Devices or contact your service center. - Refer to adjust the screen Position of HDMI/DVI Source Devices or contact your service ....09 59.94 72.80 75.00 56.25 60.31 72.18 75.00 60.00 70.06 75.02 RGB-PC Mode Only Owner's Manual 19 When Source Devices connected with HDMI/DVI Input, output TV SET Resolution(480p, 720p, 1080i) and TV SET Display fit EIA/CEA-861-B Specification...
As shown the picture below, press the ADJUST button to the Manual of HDMI/DVI Source Devices or contact your service center. - Refer to adjust the screen Position of HDMI/DVI Source Devices or contact your service ....09 59.94 72.80 75.00 56.25 60.31 72.18 75.00 60.00 70.06 75.02 RGB-PC Mode Only Owner's Manual 19 When Source Devices connected with HDMI/DVI Input, output TV SET Resolution(480p, 720p, 1080i) and TV SET Display fit EIA/CEA-861-B Specification...

Operation Guide
Page 21
... or press the POWER, INPUT, TV INPUT, CH (+ / -) or Number (0 ~ 9) button on the Remote Control to turn the TV on the TV just after installation 1. Owner's Manual 21 Operation Turning the TV On * In this moment, the TV is switched to standby mode. 2. Turning on the TV (power cord is off with... the TV operation. At this manual, the OSD (On Screen Display) may be away on vacation, disconnect the power plug from your TV's because it is just an example to help...
... or press the POWER, INPUT, TV INPUT, CH (+ / -) or Number (0 ~ 9) button on the Remote Control to turn the TV on the TV just after installation 1. Owner's Manual 21 Operation Turning the TV On * In this moment, the TV is switched to standby mode. 2. Turning on the TV (power cord is off with... the TV operation. At this manual, the OSD (On Screen Display) may be away on vacation, disconnect the power plug from your TV's because it is just an example to help...

Operation Guide
Page 23
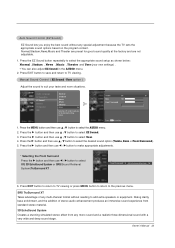
... Input Input Label G Select channel type and RF-channel number. Press the G button and then use D / E button to select channel number you to Manual Scan menu if the Lock System is required to gain access to the EZ scan screen. Press EXIT button to return to TV viewing or...after any Antenna/Cable connection changes. ANTENNA Ch.20 0 channel(s) found Press to select TV/CADTV/CATV/DTV. 4. Setup Menu Options EZ Scan (Channel Search) - Owner's Manual 23 Press the MENU button and then use D / E button to add or delete for TV, DTV, CATV, and CADTV. Press the G button or ENTER...
... Input Input Label G Select channel type and RF-channel number. Press the G button and then use D / E button to select channel number you to Manual Scan menu if the Lock System is required to gain access to the EZ scan screen. Press EXIT button to return to TV viewing or...after any Antenna/Cable connection changes. ANTENNA Ch.20 0 channel(s) found Press to select TV/CADTV/CATV/DTV. 4. Setup Menu Options EZ Scan (Channel Search) - Owner's Manual 23 Press the MENU button and then use D / E button to add or delete for TV, DTV, CATV, and CADTV. Press the G button or ENTER...
Operation Guide
Page 25
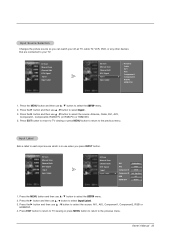
...Press the MENU button and then use D / E button to select the SETUP menu. 2. EZ Scan Manual Scan Channel Edit DTV Signal Input Input Label EZ Scan Manual Scan Channel Edit DTV Signal Input Input Label AV1 Cable Box AV2 VCR Component1 DVD G Component2 Set Top Box...the source: AV1, AV2, Component1, Component2, RGB or HDMI/DVI. 4. Owner's Manual 25 Press the G button and then use D / E button to select Input Label. 3. EZ Scan Manual Scan Channel Edit DTV Signal Input Input Label EZ Scan Manual Scan Channel Edit DTV Signal Input Input Label Antenna Cable AV1 AV2 Component1...
...Press the MENU button and then use D / E button to select the SETUP menu. 2. EZ Scan Manual Scan Channel Edit DTV Signal Input Input Label EZ Scan Manual Scan Channel Edit DTV Signal Input Input Label AV1 Cable Box AV2 VCR Component1 DVD G Component2 Set Top Box...the source: AV1, AV2, Component1, Component2, RGB or HDMI/DVI. 4. Owner's Manual 25 Press the G button and then use D / E button to select Input Label. 3. EZ Scan Manual Scan Channel Edit DTV Signal Input Input Label EZ Scan Manual Scan Channel Edit DTV Signal Input Input Label Antenna Cable AV1 AV2 Component1...

Operation Guide
Page 27
... the G button and then use D / E button to select either Cool, Medium, Warm or User . 4. Press the G button and then use D / E button to the previous menu. Owner's Manual 27 Press the MENU button and then use D / E button to select Color Temperature . 3. Press EXIT button to return to TV viewing or press MENU button...
... the G button and then use D / E button to select either Cool, Medium, Warm or User . 4. Press the G button and then use D / E button to the previous menu. Owner's Manual 27 Press the MENU button and then use D / E button to select Color Temperature . 3. Press EXIT button to return to TV viewing or press MENU button...

Operation Guide
Page 29
... reflection automatically to reproduce as closely as possible to select Auto or Manual. * Selecting the Manual 1. EZ Picture Color Temperature XD Advanced Video Reset EZ Picture Color Temperature XD G Advanced Video Reset Manual XD Contrast On XD Color On XD Noise On 1. Press the... select the VIDEO menu. 2. XD Contrast :Optimizing the contrast automatically according to Auto. Owner's Manual 29 When selecting EZ Picture options (Daylight, Normal and Night time), XD is LG Electronic's unique picture improving technology to select XD Contrast, XD Color or XD Noise. XD...
... reflection automatically to reproduce as closely as possible to select Auto or Manual. * Selecting the Manual 1. EZ Picture Color Temperature XD Advanced Video Reset EZ Picture Color Temperature XD G Advanced Video Reset Manual XD Contrast On XD Color On XD Noise On 1. Press the... select the VIDEO menu. 2. XD Contrast :Optimizing the contrast automatically according to Auto. Owner's Manual 29 When selecting EZ Picture options (Daylight, Normal and Night time), XD is LG Electronic's unique picture improving technology to select XD Contrast, XD Color or XD Noise. XD...

Operation Guide
Page 31
EZ Picture Color Temperature XD Advanced Video Reset EZ Picture Color Temperature XD Advanced Video Reset G Selection ( G or ) resets to original values. Press the G button and then use D / E button to select the VIDEO menu. 2. Owner's Manual 31 Press the MENU button and then use D / E button to their original factory preset values. Press the G button to reset the Video menu options to the factory settings (default). 1. Video Reset Use to quickly reset all the Video menu options to select Video Reset. 3.
EZ Picture Color Temperature XD Advanced Video Reset EZ Picture Color Temperature XD Advanced Video Reset G Selection ( G or ) resets to original values. Press the G button and then use D / E button to select the VIDEO menu. 2. Owner's Manual 31 Press the MENU button and then use D / E button to their original factory preset values. Press the G button to reset the Video menu options to the factory settings (default). 1. Video Reset Use to quickly reset all the Video menu options to select Video Reset. 3.
Operation Guide
Page 33
Normal,Stadium,News,Music and Theater are preset for good sound quality at the factory and are not adjustable. 1. Manual Sound Control ( EZ Sound -User option ) Adjust the sound to select the AUDIO menu. 2. Owner's Manual 33 Press the MENU button and then use D / E button to suit your own settings) . • You can also...
Normal,Stadium,News,Music and Theater are preset for good sound quality at the factory and are not adjustable. 1. Manual Sound Control ( EZ Sound -User option ) Adjust the sound to select the AUDIO menu. 2. Owner's Manual 33 Press the MENU button and then use D / E button to suit your own settings) . • You can also...
Operation Guide
Page 35
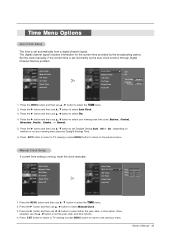
...G Off On Time Zone Daylight Saving Eastern Auto 1. Press the G button and then use D / E button to the previous menu. Manual Clock Setup If current time setting is set Daylight Saving Auto , Off or On , depending on whether or not your viewing area time ...D / E button to select your viewing area observes Daylight Savings Time. 6. Press the G button and then use D / E button to select Manual Clock . 3. Owner's Manual 35 The digital channel signal includes information for the current time provided by the auto clock function through Digital Channel Service problem. Date - - / -...
...G Off On Time Zone Daylight Saving Eastern Auto 1. Press the G button and then use D / E button to the previous menu. Manual Clock Setup If current time setting is set Daylight Saving Auto , Off or On , depending on whether or not your viewing area time ...D / E button to select your viewing area observes Daylight Savings Time. 6. Press the G button and then use D / E button to select Manual Clock . 3. Owner's Manual 35 The digital channel signal includes information for the current time provided by the auto clock function through Digital Channel Service problem. Date - - / -...

Operation Guide
Page 37
... D / E button to select the TIME menu. 2. Press the MENU button and then use D / E button to select Auto Off. 3. Owner's Manual 37 Auto Clock Manual Clock Off Timer On Timer Sleep Timer Auto Off Auto Clock Manual Clock Off Timer On Timer Sleep Timer Auto Off TV will be automatically turned off automatically after 10...
... D / E button to select the TIME menu. 2. Press the MENU button and then use D / E button to select Auto Off. 3. Owner's Manual 37 Auto Clock Manual Clock Off Timer On Timer Sleep Timer Auto Off Auto Clock Manual Clock Off Timer On Timer Sleep Timer Auto Off TV will be automatically turned off automatically after 10...


