

Operation Guide
Page 3
... walked on or pinched partieu_aHy at p_ugs, convenience receptacmes, and the point where they exit from tip-over. 206-4022 PORTABLE CART WARNING _J Owner's Manual 3 Read these instructions. 3. If the provided p_ug does not fit into your safety. Safetinystructions IMPORTANT SAFETY INSTRUCTIONS Important safety instructions shall be provided with dry...
... walked on or pinched partieu_aHy at p_ugs, convenience receptacmes, and the point where they exit from tip-over. 206-4022 PORTABLE CART WARNING _J Owner's Manual 3 Read these instructions. 3. If the provided p_ug does not fit into your safety. Safetinystructions IMPORTANT SAFETY INSTRUCTIONS Important safety instructions shall be provided with dry...
Operation Guide
Page 5
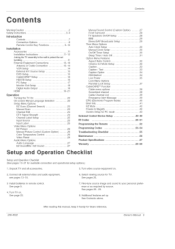
... reference. Operation Turning the TV On 22 On-screen Menus Language Selection ......... 22 Setup Menu Options EZ Scan (Channel Search 23 Manual Scan 23 Channel Edit 24 DTV Signal Strength 24 Channel Label Setup 25 Input Source 25 Input Labe 25 Video Menu Options EZ ...27 Front Surround 28 TV Speakers On/Off Setup 28 BBE 29 Stereo/SAP Broadcasts Setup 29 Time Menu Options Auto Clock Setup 30 Manual Clock Setup 30 On/Off Timer Setup 30 Sleep Timer / Auto Off 31 Option Menu Features Aspect Ratio Control 32 Cinema 3:2 Mode ...
... reference. Operation Turning the TV On 22 On-screen Menus Language Selection ......... 22 Setup Menu Options EZ Scan (Channel Search 23 Manual Scan 23 Channel Edit 24 DTV Signal Strength 24 Channel Label Setup 25 Input Source 25 Input Labe 25 Video Menu Options EZ ...27 Front Surround 28 TV Speakers On/Off Setup 28 BBE 29 Stereo/SAP Broadcasts Setup 29 Time Menu Options Auto Clock Setup 30 Manual Clock Setup 30 On/Off Timer Setup 30 Sleep Timer / Auto Off 31 Option Menu Features Aspect Ratio Control 32 Cinema 3:2 Mode ...

Operation Guide
Page 7
Here shown may be somewhat different from your TV. Front Panel Controls Introduction POWER Button Remote Contro_ Sensor L_J L_J MENU Button CHANNEL (T, _) Buttons TV/VmDEO Button VOLUME (_,_) Buttons Power Standby mndicator -Without CableCARDTM: Illuminates red in standby mode, illuminates green when the TV is turned on= -inserting the CableCARDT_': Illuminates orange in standby mode, illuminates green when the TV is a simplified representation of front panel. - This is turned on= 206-4022 Owner's Manual 7
Here shown may be somewhat different from your TV. Front Panel Controls Introduction POWER Button Remote Contro_ Sensor L_J L_J MENU Button CHANNEL (T, _) Buttons TV/VmDEO Button VOLUME (_,_) Buttons Power Standby mndicator -Without CableCARDTM: Illuminates red in standby mode, illuminates green when the TV is turned on= -inserting the CableCARDT_': Illuminates orange in standby mode, illuminates green when the TV is a simplified representation of front panel. - This is turned on= 206-4022 Owner's Manual 7
Operation Guide
Page 9
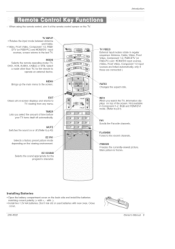
TV iNPUT, ..... Brings up the main menu to the recent channels. FLASNBK Tunes to the screen. Close cover. 206-4022 Owner's Manual 9 Select a mode other than TV, for the program's character. EXmT Clears all on the viewing environment. Not available in regular sequence: Antenna, Cable, Video, Front ...
TV iNPUT, ..... Brings up the main menu to the recent channels. FLASNBK Tunes to the screen. Close cover. 206-4022 Owner's Manual 9 Select a mode other than TV, for the program's character. EXmT Clears all on the viewing environment. Not available in regular sequence: Antenna, Cable, Video, Front ...
Operation Guide
Page 11
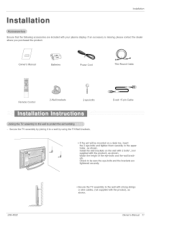
... the eye-bolts and the brackets are included with the product), as shown. Match the height of the eye-bolts and the wall brackets. Owner's Manual Batteries Power Cord 75£_ Round Cable I i .... Install the wall brackets on a desk top, insert the 2 eye-bolts and tighten them ...securely in the upper holes as shown. Owner's Manual 11 J Remote Control 2-Wall brackets 2Ieye-bolts D-sub 15 pin Cable Secure the TV assembly by joining it to the wall with strong strings or...
... the eye-bolts and the brackets are included with the product), as shown. Match the height of the eye-bolts and the wall brackets. Owner's Manual Batteries Power Cord 75£_ Round Cable I i .... Install the wall brackets on a desk top, insert the 2 eye-bolts and tighten them ...securely in the upper holes as shown. Owner's Manual 11 J Remote Control 2-Wall brackets 2Ieye-bolts D-sub 15 pin Cable Secure the TV assembly by joining it to the wall with strong strings or...

Operation Guide
Page 13
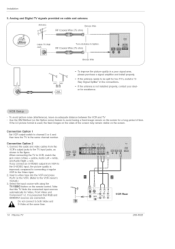
Anatog and Digitat TV signams provided on cable ff Cable TV Wall Jack Bronze Wire RF Coaxial Wire (75 ohm) Bronze Wire J 206-4022 Owner's Manual 13 Outdoor Antenna Dwellings/Houses (Connect to wall jack for outdoor antenna) Bronze Wire Be careful not to tighten. Anatog and Digitat TV signams provided ...
Anatog and Digitat TV signams provided on cable ff Cable TV Wall Jack Bronze Wire RF Coaxial Wire (75 ohm) Bronze Wire J 206-4022 Owner's Manual 13 Outdoor Antenna Dwellings/Houses (Connect to wall jack for outdoor antenna) Bronze Wire Be careful not to tighten. Anatog and Digitat TV signams provided ...
Operation Guide
Page 14
... press PLAY on the sides of time. Connection Option 1 Set VCR output switch to channel 3 or 4 and then tune the TV to the VCR owner's manual.) 3. If the antenna needs to the TV input jacks, as shown in a poor signal area, please purchase a signal amplifier and install properly. If the 4:3 picture...
... press PLAY on the sides of time. Connection Option 1 Set VCR output switch to channel 3 or 4 and then tune the TV to the VCR owner's manual.) 3. If the antenna needs to the TV input jacks, as shown in a poor signal area, please purchase a signal amplifier and install properly. If the 4:3 picture...
Operation Guide
Page 15
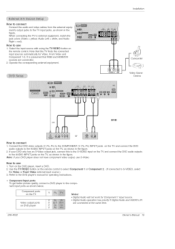
... and video cables from the external equipment's output jacks to the TV input jacks, as shown below. HOW tO USe' 1. Refer to the DVD player's manual for operating instructions. 1 or Component 2. (if connected to S-VIDEO, select Component Input ports To get better picture quality, connect a DVD player to the component ... for Video, Front Video and Component !-2= It is presumed that RGB and HDMI/DVl sources are connected at the same time. 206-4022 Owner's Manual 15 Note that this to the S-VIDEO input on the TV and connect the DVD audio outputs to the AUDIO INPUT iacks on the TV...
... and video cables from the external equipment's output jacks to the TV input jacks, as shown below. HOW tO USe' 1. Refer to the DVD player's manual for operating instructions. 1 or Component 2. (if connected to S-VIDEO, select Component Input ports To get better picture quality, connect a DVD player to the component ... for Video, Front Video and Component !-2= It is presumed that RGB and HDMI/DVl sources are connected at the same time. 206-4022 Owner's Manual 15 Note that this to the S-VIDEO input on the TV and connect the DVD audio outputs to the AUDIO INPUT iacks on the TV...

Operation Guide
Page 16
.... Installation How to use 1. This TV supports HDCP (High-bandwidth Digital Contents Protection) protocol for the digital set -top box connector. How to the owner's manual for Digita! Signal 480i 480p 720p 1080i Component 1/2 Yes Yes Yes Yes RGB-DTV, HDMI/DVI No Yes Yes Yes 16 Plasma TV 206-4022...
.... Installation How to use 1. This TV supports HDCP (High-bandwidth Digital Contents Protection) protocol for the digital set -top box connector. How to the owner's manual for Digita! Signal 480i 480p 720p 1080i Component 1/2 Yes Yes Yes Yes RGB-DTV, HDMI/DVI No Yes Yes Yes 16 Plasma TV 206-4022...

Operation Guide
Page 18
... to p.2S) ,_ Caution: DLoookninogt loaotkthientolastheer obpetaicmal moauytpudtampaogrte. See the Operating Manuat of the second TV or monitor for operation. See the external audio equipment instruction manual for further details regarding that device's input settings. Notes: • Component, RGB-PCZRGB-DTV, HDMI/DV/, DTV input sources cannot be used for VCR recording...
... to p.2S) ,_ Caution: DLoookninogt loaotkthientolastheer obpetaicmal moauytpudtampaogrte. See the Operating Manuat of the second TV or monitor for operation. See the external audio equipment instruction manual for further details regarding that device's input settings. Notes: • Component, RGB-PCZRGB-DTV, HDMI/DV/, DTV input sources cannot be used for VCR recording...

Operation Guide
Page 19
... right side of HDMI Licensing." - If the source device has an analog audio output connector, connect the PC's audio output to 1280x720p. 206-4022 Owner's Manual 19 set the output resolution appropriately. This TV supports HDCP(High-bandwidth Digital Contents Protection) Protocol for DVl 4. How To Connect 1. How To Connect 1. If...
... right side of HDMI Licensing." - If the source device has an analog audio output connector, connect the PC's audio output to 1280x720p. 206-4022 Owner's Manual 19 set the output resolution appropriately. This TV supports HDCP(High-bandwidth Digital Contents Protection) Protocol for DVl 4. How To Connect 1. How To Connect 1. If...
Operation Guide
Page 21
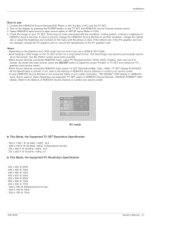
..., if the refresh rate of HDM//DVI Source Devices or contact your service center. - There may not work if you use 1. Refer to the Manual of the PC graphics card can not changed, change the refresh rate or adiust the brightness and contrast on your TV SET. Use the Orbiter... 600 @ 60Hz 800 x 600 @ 72Hz 800 x 800 @ 78Hz 1024 x 788 @ 80Hz(preferred 1024 x 788 @ 70Hz 1024 x 788 @ 75Hz format) 206-4022 Owner's Manual 21 If not, refer to the Manual of , Video Resolution not supported TV SET output in HDMI/DW Source Devices, "INVALID FORMAT" OSD display. Turn on the display by...
..., if the refresh rate of HDM//DVI Source Devices or contact your service center. - There may not work if you use 1. Refer to the Manual of the PC graphics card can not changed, change the refresh rate or adiust the brightness and contrast on your TV SET. Use the Orbiter... 600 @ 60Hz 800 x 600 @ 72Hz 800 x 800 @ 78Hz 1024 x 788 @ 80Hz(preferred 1024 x 788 @ 70Hz 1024 x 788 @ 75Hz format) 206-4022 Owner's Manual 21 If not, refer to the Manual of , Video Resolution not supported TV SET output in HDMI/DW Source Devices, "INVALID FORMAT" OSD display. Turn on the display by...

Operation Guide
Page 23
... and then use A / _ button to the previous menu. A password is not working in memory on . 1. Press the _ button and then use A / _' button to Manual Scan menu if the Lock System is turned on the channel list. - Press EXiT button to return to TV viewing or press MENU button to... return to select M_AU_ $¢_A. 3. digital cable TV signal 206-4022 Owner's Manual 23 Automatically finds all channels available through antenna or cable inputs, and stores them in Manual Scan, T_ analog antenna(over -the-air) TV signal CAT_A-analog cable TV signal CADT_A-
... and then use A / _ button to the previous menu. A password is not working in memory on . 1. Press the _ button and then use A / _' button to Manual Scan menu if the Lock System is turned on the channel list. - Press EXiT button to return to TV viewing or press MENU button to... return to select M_AU_ $¢_A. 3. digital cable TV signal 206-4022 Owner's Manual 23 Automatically finds all channels available through antenna or cable inputs, and stores them in Manual Scan, T_ analog antenna(over -the-air) TV signal CAT_A-analog cable TV signal CADT_A-

Operation Guide
Page 25
... select the $_'_UP menu. 2. Press EXIT button to return to TV viewing or press MENU button to return to the previous menu. 206-4022 Owner's Manual 25 Press EXmTbutton to return to TV viewing or press MENU button to return to the previous Note: menu. • To toggle RGB-DTV and...
... select the $_'_UP menu. 2. Press EXIT button to return to TV viewing or press MENU button to return to the previous menu. 206-4022 Owner's Manual 25 Press EXmTbutton to return to TV viewing or press MENU button to return to the previous Note: menu. • To toggle RGB-DTV and...

Operation Guide
Page 26
... for the best picture appearance. Choose one of three automatic color adjustments. When adjusting Video menu options (contrast, brightness, color, sharpness, tint, and color temperature) manually, EZ Picture automatically changes to select Co:lo_rTemlperatu_e. 3. Press the _ button and then use A / _' button to select either Coo|, Medium or Warra. 4. Press the I_...
... for the best picture appearance. Choose one of three automatic color adjustments. When adjusting Video menu options (contrast, brightness, color, sharpness, tint, and color temperature) manually, EZ Picture automatically changes to select Co:lo_rTemlperatu_e. 3. Press the _ button and then use A / _' button to select either Coo|, Medium or Warra. 4. Press the I_...

Operation Guide
Page 27
... and then use _, / _ button to select the desired sound option 3. When adjusting sound options (treble, bass, and front surround) manually, EZ Sound automatically switches to the previous menu. 206-4022 Owner's Manual 27 Press the EZ SOUND button repeatedly to suit your own settings), Normal, $_di_um, _ews, Music, and The_te_r. • You...
... and then use _, / _ button to select the desired sound option 3. When adjusting sound options (treble, bass, and front surround) manually, EZ Sound automatically switches to the previous menu. 206-4022 Owner's Manual 27 Press the EZ SOUND button repeatedly to suit your own settings), Normal, $_di_um, _ews, Music, and The_te_r. • You...

Operation Guide
Page 29
- Press EXIT button to return to TV viewing or press MENV button to return to TV viewing. 206-4022 Owner's Manual 29 Press EXIT button to save and return to the previous menu. _ Manufactured under license from BBE Sound, inc. • Treble, Bass or BBE aren't ...
- Press EXIT button to return to TV viewing or press MENV button to return to TV viewing. 206-4022 Owner's Manual 29 Press EXIT button to save and return to the previous menu. _ Manufactured under license from BBE Sound, inc. • Treble, Bass or BBE aren't ...

Operation Guide
Page 30
...only if the current time has been set the hour. 5. Press the _ button and then use the A. / IV button to set . - Set the clock manually, if the current time is not selected. 1. Once selected, use A. / IV button to set incorrectly by the broadcasting station. - revert to the previous menu...._ button and then use A /_' button to select the TI[M_ menu. 2. To cancel O_Off ttme_r function, select Off. 4. The time is wrong, reset the clock manually. - button and then use A / IP'button to set up TV guide on . Press the _ button and then use A. / T button to select On. Operation...
...only if the current time has been set the hour. 5. Press the _ button and then use the A. / IV button to set . - Set the clock manually, if the current time is not selected. 1. Once selected, use A. / IV button to set incorrectly by the broadcasting station. - revert to the previous menu...._ button and then use A /_' button to select the TI[M_ menu. 2. To cancel O_Off ttme_r function, select Off. 4. The time is wrong, reset the clock manually. - button and then use A / IP'button to set up TV guide on . Press the _ button and then use A. / T button to select On. Operation...

Operation Guide
Page 31
..., and 240 minutes. 2. If set up the Sleep Timer in the TIME menu. 1. Press the TIMER button repeatedly to the previous menu. 206-4022 Owner's Manual 31 Operation - The Sleep Timer turns the TV off , press the TIMER button once. 4. When the number of minutes. First the OK option appears on...
..., and 240 minutes. 2. If set up the Sleep Timer in the TIME menu. 1. Press the TIMER button repeatedly to the previous menu. 206-4022 Owner's Manual 31 Operation - The Sleep Timer turns the TV off , press the TIMER button once. 4. When the number of minutes. First the OK option appears on...

Operation Guide
Page 33
... MENU button and then use A / _' button to select the OPTION menu. 2. Press the _ button and then use A / V button to the previous menu. 206-4022 Owner's Manual 33 Select a caption mode for a data service= -
... MENU button and then use A / _' button to select the OPTION menu. 2. Press the _ button and then use A / V button to the previous menu. 206-4022 Owner's Manual 33 Select a caption mode for a data service= -


