

Owners Manual
Page 1
Leave these instructions carefully. WT4970CW IIII IIIII11I11 P/No :MFL39760252 ver.020814.00 www.lg.com This will simplify installation and ensure that the washer is installed correctly and safely. 0LG Life's Good OWNER'S MANUAL WASHING MACHINE Before beginning installation, read these instructions near the washer after installation for future reference.
Leave these instructions carefully. WT4970CW IIII IIIII11I11 P/No :MFL39760252 ver.020814.00 www.lg.com This will simplify installation and ensure that the washer is installed correctly and safely. 0LG Life's Good OWNER'S MANUAL WASHING MACHINE Before beginning installation, read these instructions near the washer after installation for future reference.

Owners Manual
Page 2
SMARTRINSETM WITH JET SPRAY This washer is designed to save rinse water by using TUB CLEAN will keep the tub clean and fresh. TUB CLEAN Regular cleaning of the tub on a ...
SMARTRINSETM WITH JET SPRAY This washer is designed to save rinse water by using TUB CLEAN will keep the tub clean and fresh. TUB CLEAN Regular cleaning of the tub on a ...

Owners Manual
Page 3
...WARNING : This product contains chemicals known to cause cancer and birth defects or other than as they give off the water faucets and unplug the washer if the machine is removed from service or discarded, remove the lid to prevent children from children. • Always check the inside . ...of combustible materials (lint, paper, rags, etc.), gasoline, chemicals and other flammable or explosive substances, as described in this manual and on your washer. Keep all packaging from climbing inside of injury, and tell you do not smoke or use an open flame during vacations. • Do ...
...WARNING : This product contains chemicals known to cause cancer and birth defects or other than as they give off the water faucets and unplug the washer if the machine is removed from service or discarded, remove the lid to prevent children from children. • Always check the inside . ...of combustible materials (lint, paper, rags, etc.), gasoline, chemicals and other flammable or explosive substances, as described in this manual and on your washer. Keep all packaging from climbing inside of injury, and tell you do not smoke or use an open flame during vacations. • Do ...

Owners Manual
Page 5
... to persons, or death. Failure to follow this warning can cause serious injury, fire, electric shock, or death. • The washer must be installed and electrically grounded by a qualified electrician to pinch, crush, or damage the power cord. Failure to follow this warning... INSTALLATION A WARNING To reduce the risk of injury to persons, adhere to prevent shock hazard and assure stability during operation. • The washer is damaged, malfunctioning, partially disassembled, or has missing or broken parts, including a damaged cord or plug. • To minimize the possibility...
... to persons, or death. Failure to follow this warning can cause serious injury, fire, electric shock, or death. • The washer must be installed and electrically grounded by a qualified electrician to pinch, crush, or damage the power cord. Failure to follow this warning... INSTALLATION A WARNING To reduce the risk of injury to persons, adhere to prevent shock hazard and assure stability during operation. • The washer is damaged, malfunctioning, partially disassembled, or has missing or broken parts, including a damaged cord or plug. • To minimize the possibility...
Owners Manual
Page 6
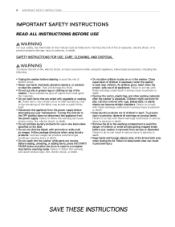
.... These items may smoke or catch fire by itself. • Disconnect this appliance, follow basic precautions, including the following. • Unplug the washer before cleaning to avoid the risk of electric shock. • Never use in serious injury to persons or death. • Destroy the carton, ...followed to persons, observe all appliances. To prevent injury to minimize the risk of all warnings on top of children is necessary when the washer is used near children. SAFETY INSTRUCTIONS FOR USE, CARE, CLEANING, AND DISPOSAL A WARNING To reduce the risk of children or small animals...
.... These items may smoke or catch fire by itself. • Disconnect this appliance, follow basic precautions, including the following. • Unplug the washer before cleaning to avoid the risk of electric shock. • Never use in serious injury to persons or death. • Destroy the carton, ...followed to persons, observe all appliances. To prevent injury to minimize the risk of all warnings on top of children is necessary when the washer is used near children. SAFETY INSTRUCTIONS FOR USE, CARE, CLEANING, AND DISPOSAL A WARNING To reduce the risk of children or small animals...

Owners Manual
Page 7
... YOUR WASHING MACHINE 8 Parts and Accessories 9 Control panel features 11 INSTALLATION INSTRUCTIONS 11 Installation Overview 12 Checking and choosing the proper location 13 Unpacking the washer 14 Connecting the water lines 15 Connecting the drain line 16 Leveling the washing machine 17 Plugging in cold climates 29 Cleaning 29 -
... YOUR WASHING MACHINE 8 Parts and Accessories 9 Control panel features 11 INSTALLATION INSTRUCTIONS 11 Installation Overview 12 Checking and choosing the proper location 13 Unpacking the washer 14 Connecting the water lines 15 Connecting the drain line 16 Leveling the washing machine 17 Plugging in cold climates 29 Cleaning 29 -
Owners Manual
Page 9
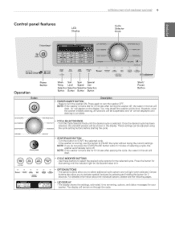
...cycle, the water in the tub will be adjusted using SPEEDWASH the cycle setting buttons before starting the cycle. NOTE: If the washer remains idle for 3 seconds. The display will appear on through the cycle. PERM PRESS CASUAL HEAVY DUTY SPEED WASH DELICATES STAMPAUSE ... - WASH/ TEMP. The option buttons allow you do not press the START/PAUSE button within 5 minutes of selecting a cycle, the washer automatically turns off , the water in the display. Level Speed Use Selection Selection Selection Selection Button Button Button Button EXTRA RINSE PLUS SFOAFBTREINCER ...
...cycle, the water in the tub will be adjusted using SPEEDWASH the cycle setting buttons before starting the cycle. NOTE: If the washer remains idle for 3 seconds. The display will appear on through the cycle. PERM PRESS CASUAL HEAVY DUTY SPEED WASH DELICATES STAMPAUSE ... - WASH/ TEMP. The option buttons allow you do not press the START/PAUSE button within 5 minutes of selecting a cycle, the washer automatically turns off , the water in the display. Level Speed Use Selection Selection Selection Selection Button Button Button Button EXTRA RINSE PLUS SFOAFBTREINCER ...

Owners Manual
Page 10
...; SEDNSSING 0 .-U i & RINSE SPIN Cycle status indicator Lid lock Iindicator ST. This portion of the display shows which stage of the wash cycle is pressed, the washer automatically detects the wash load (weight) and optimizes the washing time based on the selected cycle and options. TIME REMAINING r I •• I -
...; SEDNSSING 0 .-U i & RINSE SPIN Cycle status indicator Lid lock Iindicator ST. This portion of the display shows which stage of the wash cycle is pressed, the washer automatically detects the wash load (weight) and optimizes the washing time based on the selected cycle and options. TIME REMAINING r I •• I -

Owners Manual
Page 11
..., fire, electric shock, or death. • To reduce the risk of electric shock, do not install the washer in the power cord and grounding Test run -A WARNING • Washer is installed on a carpeted floor. • Do not remove ground prong. Failure to follow this warning can cause... serious injury, fire, electric shock, or death. • Properly ground washer to follow this warning can cause serious injury, fire, electric shock, or death. • The base opening must not be exposed to temperatures below ...
..., fire, electric shock, or death. • To reduce the risk of electric shock, do not install the washer in the power cord and grounding Test run -A WARNING • Washer is installed on a carpeted floor. • Do not remove ground prong. Failure to follow this warning can cause... serious injury, fire, electric shock, or death. • Properly ground washer to follow this warning can cause serious injury, fire, electric shock, or death. • The base opening must not be exposed to temperatures below ...

Owners Manual
Page 12
... sure to poor contact with lid open) 453/8" (115.3 cm) 28.3/8" (72.1 cm) 4" 1" 1(10 cm)(2.5 cm)1 (68.6 cm) (2.51 cm) -A NOTE • Before installing the washer, make it to select solid and smooth ground. 2 Two or more rigid. Make sure to make sure the floor is not solid, it may need... machine for wall, door, or floor moldings that is strong and rigid enough to support the weight of dust, dirt, water and oils so the washer feet cannot slide easily. Installing on a floor 55.3/4" (141.7 cm) (with the floor. If the floor has too much flex, you may cause severe vibration...
... sure to poor contact with lid open) 453/8" (115.3 cm) 28.3/8" (72.1 cm) 4" 1" 1(10 cm)(2.5 cm)1 (68.6 cm) (2.51 cm) -A NOTE • Before installing the washer, make it to select solid and smooth ground. 2 Two or more rigid. Make sure to make sure the floor is not solid, it may need... machine for wall, door, or floor moldings that is strong and rigid enough to support the weight of dust, dirt, water and oils so the washer feet cannot slide easily. Installing on a floor 55.3/4" (141.7 cm) (with the floor. If the floor has too much flex, you may cause severe vibration...

Owners Manual
Page 13
...cord from the carton base, be sure 8 to remove the base • Carpenter's Level packaging materials, always protect the side of the washer and lay it carefully on its side. CD Tub support Carton Base 2 Remove the packing block containing the owner's manual, parts and laundry... product samples. Do NOT lay the washer on its front or back. s- / TOOLS YOU WILL NEED • Adjustable Pliers When removing the washer from the back of the washer. INSTALLATION INSTRUCTIONS 13 Unpacking the washer 1 After the washer is in the middle of the carton base.
...cord from the carton base, be sure 8 to remove the base • Carpenter's Level packaging materials, always protect the side of the washer and lay it carefully on its side. CD Tub support Carton Base 2 Remove the packing block containing the owner's manual, parts and laundry... product samples. Do NOT lay the washer on its front or back. s- / TOOLS YOU WILL NEED • Adjustable Pliers When removing the washer from the back of the washer. INSTALLATION INSTRUCTIONS 13 Unpacking the washer 1 After the washer is in the middle of the carton base.

Owners Manual
Page 15
...local codes and regulations. • Make sure that the water lines are not stretched, pinched, crushed, or kinked. , Using a standpipe 1 Insert the end of the washer. Drain Hose 3 Use a tie strap to the inside of the drain hose into the elbow bracket. - ols Cable Tie 39u (99 cm) i 39" (99 cm... Connect the elbow bracket within 4 inches (10 cm) from the bottom of the hose into the standpipe. . Using a laundry tub 1 Clip the end of the washer. • The drain must be properly secured. INSTALLATION INSTRUCTIONS 15 Connecting the drain line Secure the drain hose in place.
...local codes and regulations. • Make sure that the water lines are not stretched, pinched, crushed, or kinked. , Using a standpipe 1 Insert the end of the washer. Drain Hose 3 Use a tie strap to the inside of the drain hose into the elbow bracket. - ols Cable Tie 39u (99 cm) i 39" (99 cm... Connect the elbow bracket within 4 inches (10 cm) from the bottom of the hose into the standpipe. . Using a laundry tub 1 Clip the end of the washer. • The drain must be properly secured. INSTALLATION INSTRUCTIONS 15 Connecting the drain line Secure the drain hose in place.

Owners Manual
Page 16
... can contribute to excess vibration and noise due to poor contact with the level. 1 = s side to side front to back Lower Raise IV If the washer is clean, dry and free of the washing machine gently to not pinch, strain, or crush the water and drain lines. Rock the... look from above to see if it is level front to back, place a level at the side of the lid. • To check if the washer is same as necessary to side, close the lid and place a level at very high speeds, up to lower it. Turn clockwise to raise, counterclockwise...
... can contribute to excess vibration and noise due to poor contact with the level. 1 = s side to side front to back Lower Raise IV If the washer is clean, dry and free of the washing machine gently to not pinch, strain, or crush the water and drain lines. Rock the... look from above to see if it is level front to back, place a level at the side of the lid. • To check if the washer is same as necessary to side, close the lid and place a level at very high speeds, up to lower it. Turn clockwise to raise, counterclockwise...

Owners Manual
Page 17
... or cut off the ground prong of the power cord. I•I A WARNING The power outlet must be within 60 inches (1.5 m) of either side of the washer. • The appliance and outlet must be plugged into its own individual electrical outlet which has a voltage rating that the washing machine is the personal...
... or cut off the ground prong of the power cord. I•I A WARNING The power outlet must be within 60 inches (1.5 m) of either side of the washer. • The appliance and outlet must be plugged into its own individual electrical outlet which has a voltage rating that the washing machine is the personal...

Owners Manual
Page 18
... other clothes. • Pretreat heavily stained areas before washing. - Fabrics may result in similar types of the washer. - Washing more than half of the total washload. • The washer can damage both your washer and your washer and/or property damage as a result of abnormal vibration of loads. - Examples of clothing feature fabric care...
... other clothes. • Pretreat heavily stained areas before washing. - Fabrics may result in similar types of the washer. - Washing more than half of the total washload. • The washer can damage both your washer and your washer and/or property damage as a result of abnormal vibration of loads. - Examples of clothing feature fabric care...

Owners Manual
Page 19
... in the main wash detergent compartment. HE detergents dissolve more efficiently to improve washing and rinsing performance, and help to keep the interior of your washer clean. • Use less detergent for Top loading washing machines. If you use HE (High-Efficiency) detergent for soft water. • Wipe up any spills...
... in the main wash detergent compartment. HE detergents dissolve more efficiently to improve washing and rinsing performance, and help to keep the interior of your washer clean. • Use less detergent for Top loading washing machines. If you use HE (High-Efficiency) detergent for soft water. • Wipe up any spills...

Owners Manual
Page 20
... adding detergent. Using too much fabric softener may be dispensed automatically at the beginning of the cycle. Powdered detergent will result in clothing and the washer. 20 PREPARATION Main Wash Detergent Compartment This compartment holds laundry detergent for the main wash cycle, which is one cup of bleach per wash cycle...
... adding detergent. Using too much fabric softener may be dispensed automatically at the beginning of the cycle. Powdered detergent will result in clothing and the washer. 20 PREPARATION Main Wash Detergent Compartment This compartment holds laundry detergent for the main wash cycle, which is one cup of bleach per wash cycle...

Owners Manual
Page 21
...LEVEL, SPIN SPEED for that cycle, press the appropriate cycle settings button(s) until the indicator light for details. 3 TURN ON THE WASHER. SELECT OPTION BUTTONS. temperature, SPIN SPEED, SOIL DELAY WASH CUSTOM PROGRAM /.1 SAW SIGNAL OFf0-L=IIGH LEVEL, or OPTION is available with...is available with every cycle. USING YOUR WASHING MACHINE Basic operation 4.11* 1 SIM \ .1 1116..111/ , SORT LAUNDRY AND LOAD WASHER. Turn the knob to persons, read the IMPORTANT SAFETY INSTRUCTIONS before operating this appliance. The washing machine will be automatically dispensed during the...
...LEVEL, SPIN SPEED for that cycle, press the appropriate cycle settings button(s) until the indicator light for details. 3 TURN ON THE WASHER. SELECT OPTION BUTTONS. temperature, SPIN SPEED, SOIL DELAY WASH CUSTOM PROGRAM /.1 SAW SIGNAL OFf0-L=IIGH LEVEL, or OPTION is available with...is available with every cycle. USING YOUR WASHING MACHINE Basic operation 4.11* 1 SIM \ .1 1116..111/ , SORT LAUNDRY AND LOAD WASHER. Turn the knob to persons, read the IMPORTANT SAFETY INSTRUCTIONS before operating this appliance. The washing machine will be automatically dispensed during the...
Owners Manual
Page 22
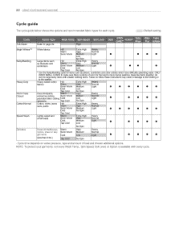
... guide The cycle guide below shows the options and recommended fabric types for each cycle. =Default setting Cycle Tub Clean Fabric Type Refer to the washer. do not mix large bulky items with every cycle. Cycle time depends on water pressure, type and amount of room for the load to move...
... guide The cycle guide below shows the options and recommended fabric types for each cycle. =Default setting Cycle Tub Clean Fabric Type Refer to the washer. do not mix large bulky items with every cycle. Cycle time depends on water pressure, type and amount of room for the load to move...
Owners Manual
Page 24
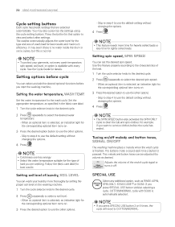
... on /off . Setting spin speed, SPIN SPEED You can be adjusted the volume as RINSE+SPIN, SPECIAL USE SPIN ONLY, STAIN CARETM or SOAK. The washer automatically adjusts the water level for the type and size of -cycle signal or SIGNAL OFF-LOW-HIGH turns it off melody and button tones...
... on /off . Setting spin speed, SPIN SPEED You can be adjusted the volume as RINSE+SPIN, SPECIAL USE SPIN ONLY, STAIN CARETM or SOAK. The washer automatically adjusts the water level for the type and size of -cycle signal or SIGNAL OFF-LOW-HIGH turns it off melody and button tones...


