
Owners Manual
Page 2
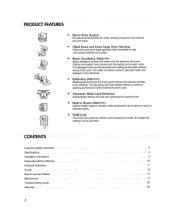
::PRODUCT FEATURES @ u Direct Drive System The advanced Brushless DC motor directty drives the drum without bett and pulley w Tilted Drum and Extra [_rge Door Opening Tilted drum and extra large opening make it possible to load and unload clothing more easily, Water Circulation (WM22T/'H,) Spray detergent solution and water onto the load ...
::PRODUCT FEATURES @ u Direct Drive System The advanced Brushless DC motor directty drives the drum without bett and pulley w Tilted Drum and Extra [_rge Door Opening Tilted drum and extra large opening make it possible to load and unload clothing more easily, Water Circulation (WM22T/'H,) Spray detergent solution and water onto the load ...
Owners Manual
Page 11
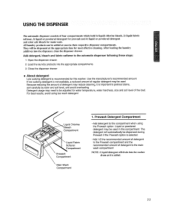
Add detergent, bleach and fabric softener to the automatic dispenser following 1 Open the dispenser drawer, 2 Load the laundry products into Ihe washer drum as it is important to pretreat stains, sort carefuffy by color and soil level, and avoid overloading Detergent usage may reduce cleaning, it is not ...
Add detergent, bleach and fabric softener to the automatic dispenser following 1 Open the dispenser drawer, 2 Load the laundry products into Ihe washer drum as it is important to pretreat stains, sort carefuffy by color and soil level, and avoid overloading Detergent usage may reduce cleaning, it is not ...
Owners Manual
Page 12
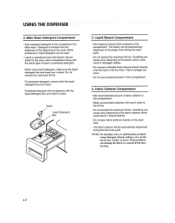
... of the fabric softener which could result in damaged clothes. • Do not pour undiluted liquid chlorine bleach directly onto the load or into the drum Fabric damage can occur • Do not use powdered bleach in this compartment The bleach will be automatically dispensed at the beginning of the bleach...
... of the fabric softener which could result in damaged clothes. • Do not pour undiluted liquid chlorine bleach directly onto the load or into the drum Fabric damage can occur • Do not use powdered bleach in this compartment The bleach will be automatically dispensed at the beginning of the bleach...
Owners Manual
Page 18
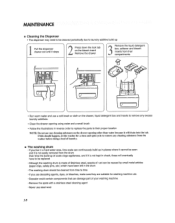
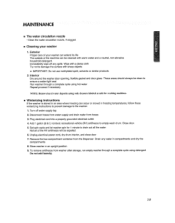
...box and inserts to remove any excess laundry additives, * Clean the drawer opening using water and a small brush * Follow the illustrations in the drum • The washing drum should happen, set the washer for washing machine use. • Descaler could contain components that can be caused by small metal articles (paper ... in a hard water area, lime scale can continuously build up in places where it cannot be seen and it is not easily removed from the drum Over time the build-up f 1] Puff the dispenser 1 drawer out until it will drain into the tub, If this should be replaced •...
...box and inserts to remove any excess laundry additives, * Clean the drawer opening using water and a small brush * Follow the illustrations in the drum • The washing drum should happen, set the washer for washing machine use. • Descaler could contain components that can be caused by small metal articles (paper ... in a hard water area, lime scale can continuously build up in places where it cannot be seen and it is not easily removed from the drum Over time the build-up f 1] Puff the dispenser 1 drawer out until it will drain into the tub, If this should be replaced •...
Owners Manual
Page 19
... container from hoses 3, Plug electrical cord into a properly grounded electrical outlet 4_ Add l gaffon (3 8 _ ) nontoxic recreational vehicle (RV) antifreeze to empty wash drum. Unplug electrical power cord, dry drum interior, and close door 7. Run washer through a complete cycle using nnly cleaners labeled as safe hw _a._hing machines, = Winterizing instructions if the...
... container from hoses 3, Plug electrical cord into a properly grounded electrical outlet 4_ Add l gaffon (3 8 _ ) nontoxic recreational vehicle (RV) antifreeze to empty wash drum. Unplug electrical power cord, dry drum interior, and close door 7. Run washer through a complete cycle using nnly cleaners labeled as safe hw _a._hing machines, = Winterizing instructions if the...
Owners Manual
Page 20
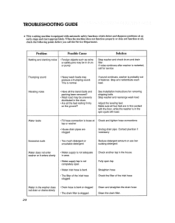
... washer does not drain or drains slowly 2O • Drain hose is bent or clogged • The drain fifter is in drum or pump Solution Stop washer and check drum and drain filter If noise continues after washer is restarted, call for removing wash load Adjust the leveling feet.. See Installation Instructions... Stop and redistribute wash toad, Vibrating noise * Have all the transit bolts and packing been removed? • Wash load may be unevenly distributed in the drum • Are all the feet resting firmly on the ground?
... washer does not drain or drains slowly 2O • Drain hose is bent or clogged • The drain fifter is in drum or pump Solution Stop washer and check drum and drain filter If noise continues after washer is restarted, call for removing wash load Adjust the leveling feet.. See Installation Instructions... Stop and redistribute wash toad, Vibrating noise * Have all the transit bolts and packing been removed? • Wash load may be unevenly distributed in the drum • Are all the feet resting firmly on the ground?
Owners Manual
Page 23
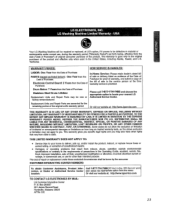
... PERIOD: HOW SERVICE IS HANDLED: LABOR: One Year from the menu, Or visit our webstta aic http://www_Igservtce.com 23 Drum Motor: 7'Years from misuse, abuse, operation outside environmental sper.3tlca'-Jonosr contrary to the requirements of precautions in the Operating Guide..., effective from state to state° THIS LIMITED WARRANTY DOES NOT APPLY TO: • Service trips to your nearest LG Authorized Service Centers ReplacemenUt nitsend RepairPartsore warrantedfor the remainingportionof the odginal unit's warrantyperiod. Or visitourwebstteat: http:llwwwJgserV!ce,com THIS ...
... PERIOD: HOW SERVICE IS HANDLED: LABOR: One Year from the menu, Or visit our webstta aic http://www_Igservtce.com 23 Drum Motor: 7'Years from misuse, abuse, operation outside environmental sper.3tlca'-Jonosr contrary to the requirements of precautions in the Operating Guide..., effective from state to state° THIS LIMITED WARRANTY DOES NOT APPLY TO: • Service trips to your nearest LG Authorized Service Centers ReplacemenUt nitsend RepairPartsore warrantedfor the remainingportionof the odginal unit's warrantyperiod. Or visitourwebstteat: http:llwwwJgserV!ce,com THIS ...

Service Manual
Page 3
...-2. FEATURES & TECHNICAL EXPLANATION 4 3. PARTS IDENTIFICATION ...7 4. QC TEST MODE...17 7-3. ERROR DIAGNOSIS AND CHECK LIST 20 8-1. FAULT DIAGNOSIS AND TROUBLESHOOTING 23 9. INSTALLATION & TEST ...8 5. ERROR DISPLAY ...18 8. DRUM & TUB ASSEMBLY 42 10-3. DISPENSER ASSEMBLY 43 2 DIAGNOSIS AND SOLUTION FOR ABNORMAL OPERATION 20 8-2. EXPLODED VIEW ...41 10-1. BEFORE PERFORMING SERVICE 17 7-2. CONTENTS 1.
...-2. FEATURES & TECHNICAL EXPLANATION 4 3. PARTS IDENTIFICATION ...7 4. QC TEST MODE...17 7-3. ERROR DIAGNOSIS AND CHECK LIST 20 8-1. FAULT DIAGNOSIS AND TROUBLESHOOTING 23 9. INSTALLATION & TEST ...8 5. ERROR DISPLAY ...18 8. DRUM & TUB ASSEMBLY 42 10-3. DISPENSER ASSEMBLY 43 2 DIAGNOSIS AND SOLUTION FOR ABNORMAL OPERATION 20 8-2. EXPLODED VIEW ...41 10-1. BEFORE PERFORMING SERVICE 17 7-2. CONTENTS 1.
Service Manual
Page 5
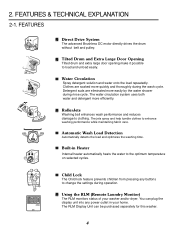
...from pressing any power outlet in Heater Internal heater automatically heats the water to load and unload easily. Tilted Drum and Extra Large Door Opening Tilted drum and extra large door opening make it possible to the optimum temperature on selected cycles. FEATURES Direct Drive ...System The advanced Brushless DC motor directly drives the drum without belt and pulley. FEATURES & TECHNICAL EXPLANATION 2-1. Clothes are eliminated more easily by the water shower during the wash cycle. ...
...from pressing any power outlet in Heater Internal heater automatically heats the water to load and unload easily. Tilted Drum and Extra Large Door Opening Tilted drum and extra large door opening make it possible to the optimum temperature on selected cycles. FEATURES Direct Drive ...System The advanced Brushless DC motor directly drives the drum without belt and pulley. FEATURES & TECHNICAL EXPLANATION 2-1. Clothes are eliminated more easily by the water shower during the wash cycle. ...

Service Manual
Page 11
... button. Check the spin and drain functions. Check the water heating function. Listen for a click to determine if the door is unlocking. Check if the drum rotates clockwise and counterclockwise. Check if water is needed during check, remove the remaining water by pulling out the hose cap. 10 Press the POWER...
... button. Check the spin and drain functions. Check the water heating function. Listen for a click to determine if the door is unlocking. Check if the drum rotates clockwise and counterclockwise. Check if water is needed during check, remove the remaining water by pulling out the hose cap. 10 Press the POWER...
Service Manual
Page 19
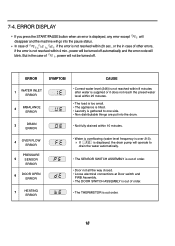
... within 4 min., power will be turned off automatically and the error code will operate to one side. • Non distributable things are put into the drum. • Not fully drained within 20 sec., or the in the case of , power will go into the pause status. ERROR SYMPTOM CAUSE 1 WATER INLET...
... within 4 min., power will be turned off automatically and the error code will operate to one side. • Non distributable things are put into the drum. • Not fully drained within 20 sec., or the in the case of , power will go into the pause status. ERROR SYMPTOM CAUSE 1 WATER INLET...

Service Manual
Page 23
... FOR SERVICE CALL Is a low-sudsing detergent used? ;-5 Is the proper amount of detergent used as drain, water input, pause will operate, without rotating the drum. Clean the compartment. SYMPTOM Suds overflow from the appliance. (In this condition, wash and spin do not flow in the correct compartment of the dispenser...
... FOR SERVICE CALL Is a low-sudsing detergent used? ;-5 Is the proper amount of detergent used as drain, water input, pause will operate, without rotating the drum. Clean the compartment. SYMPTOM Suds overflow from the appliance. (In this condition, wash and spin do not flow in the correct compartment of the dispenser...
Service Manual
Page 25
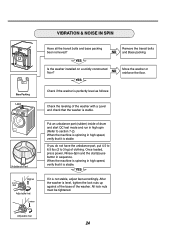
... Have all the transit bolts and base packing been removed? After the washer is level, tighten the lock nuts up against of the base of drum and start /pause button in high speed, verify that it is stable. Is the washer installed on a solidly constructed floor?
... Have all the transit bolts and base packing been removed? After the washer is level, tighten the lock nuts up against of the base of drum and start /pause button in high speed, verify that it is stable. Is the washer installed on a solidly constructed floor?
Service Manual
Page 26
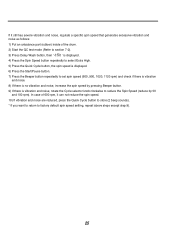
... button to store (2 beep sounds). * If you want to return to reduce the Spin Speed (reduce by 50 and 100 rpm). In case of the drum. 2) Start the QC test mode (Refer to section 7-2). 3) Press Delay Wash button, then ' ' is displayed. 4) Press the Spin Speed button repeatedly to select Extra High...
... button to store (2 beep sounds). * If you want to return to reduce the Spin Speed (reduce by 50 and 100 rpm). In case of the drum. 2) Start the QC test mode (Refer to section 7-2). 3) Press Delay Wash button, then ' ' is displayed. 4) Press the Spin Speed button repeatedly to select Extra High...

Service Manual
Page 32
... connector (1)). Check the DOOR SWITCH Is there clicking sound once or twice when the ASSEMBLY Connector and MAIN PWB ASSEMBLY START/PAUSE button is the drum spinning at low speed? Normal Is it disconnected, or disassembled? [Red: 3pin (1), NA: 4pin (2)] Check the motor connector, Is the resistance of Latch Hook actuate...
... connector (1)). Check the DOOR SWITCH Is there clicking sound once or twice when the ASSEMBLY Connector and MAIN PWB ASSEMBLY START/PAUSE button is the drum spinning at low speed? Normal Is it disconnected, or disassembled? [Red: 3pin (1), NA: 4pin (2)] Check the motor connector, Is the resistance of Latch Hook actuate...


