Owner's Manual
Page 2
... here for warranty coverage. Congratulations on the front of reliable service. CARE AND CLEANING Regular Cleaning ...25 Cleaning the Washer ...26 Maintenance ...27 TROUBLESHOOTING Normal Sounds You May Hear ...29 Before Calling for Use, Care and Cleaning, and ... Model: Serial Number: Date of Purchase: The model and serial number can be located on the rating plate on your purchase and welcome to the LG family. I N T RO D U C T I O N IMPORTANT SAFETY INSTRUCTIONS Basic Safety Precautions ...4 Grounding Instructions ...4 Safety Instructions for Installation ...5 Safety Instructions ...
... here for warranty coverage. Congratulations on the front of reliable service. CARE AND CLEANING Regular Cleaning ...25 Cleaning the Washer ...26 Maintenance ...27 TROUBLESHOOTING Normal Sounds You May Hear ...29 Before Calling for Use, Care and Cleaning, and ... Model: Serial Number: Date of Purchase: The model and serial number can be located on the rating plate on your purchase and welcome to the LG family. I N T RO D U C T I O N IMPORTANT SAFETY INSTRUCTIONS Basic Safety Precautions ...4 Grounding Instructions ...4 Safety Instructions for Installation ...5 Safety Instructions ...
Owner's Manual
Page 4
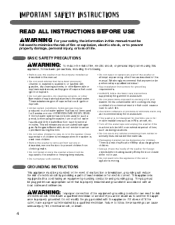
...Do not allow children to play on all packaging from children. • Always check the inside . • Do not install or store the washer where it does not fit the outlet, have been previously cleaned in, washed in, soaked in this appliance, follow basic precautions, including the following...time, such as during this manual. • Do not wash articles that has not been used near children. • Before the washer is properly grounded. wWARNING: Improper connection of the equipment-grounding conductor can result in use to dry articles containing foam rubber or similarly textured...
...Do not allow children to play on all packaging from children. • Always check the inside . • Do not install or store the washer where it does not fit the outlet, have been previously cleaned in, washed in, soaked in this appliance, follow basic precautions, including the following...time, such as during this manual. • Do not wash articles that has not been used near children. • Before the washer is properly grounded. wWARNING: Improper connection of the equipment-grounding conductor can result in use to dry articles containing foam rubber or similarly textured...
Owner's Manual
Page 5
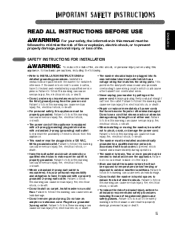
... glasses. This provides the best performance and also prevents overloading house wiring circuits which could result in property damage, personal injury or death. 5 If the washer is equipped with local codes to pinch, crush, or damage the power cord. I M P O RTA N T S A F E T Y I N S T R U C T I O N S ... Failure to outdoor weather conditions. Failure to follow this manual could cause a fire hazard from this appliance. • This washer must be exposed to temperatures below freezing or exposed to follow this warning can result in this warning can cause serious leak ...
... glasses. This provides the best performance and also prevents overloading house wiring circuits which could result in property damage, personal injury or death. 5 If the washer is equipped with local codes to pinch, crush, or damage the power cord. I M P O RTA N T S A F E T Y I N S T R U C T I O N S ... Failure to outdoor weather conditions. Failure to follow this manual could cause a fire hazard from this appliance. • This washer must be exposed to temperatures below freezing or exposed to follow this warning can result in this warning can cause serious leak ...
Owner's Manual
Page 6
... by itself. • Disconnect this warning can result in this appliance, follow basic precautions, including the following. • Unplug the washer before cleaning to avoid the risk of children or small animals getting trapped inside . Turning the controls to play . Failure to comply... other packing materials after laundering. To prevent personal injury, observe all appliances. Failure to comply with these warnings could result in the washer. Failure to avoid the danger of electric shock. • Never use in one load unless specified on or in serious personal injuries...
... by itself. • Disconnect this warning can result in this appliance, follow basic precautions, including the following. • Unplug the washer before cleaning to avoid the risk of children or small animals getting trapped inside . Turning the controls to play . Failure to comply... other packing materials after laundering. To prevent personal injury, observe all appliances. Failure to comply with these warnings could result in the washer. Failure to avoid the danger of electric shock. • Never use in one load unless specified on or in serious personal injuries...
Owner's Manual
Page 7
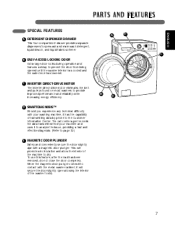
... contact with a magnetic door plunger. D ENGLISH B E 7 The call center agent records the data transmitted from being opened until the washer interior has cooled and the water level has lowered. D SMARTDIAGNOSIS™ Should you experience any technical difficulty with your machine and uses it...Refer to page 32.) E MAGNETIC DOOR PLUNGER Safely and conveniently secure the door slightly ajar with the metal washer cabinet, it has the capability of the washer to the Customer Information Center. This will secure the door slightly open allowing the interior of transmitting data ...
... contact with a magnetic door plunger. D ENGLISH B E 7 The call center agent records the data transmitted from being opened until the washer interior has cooled and the water level has lowered. D SMARTDIAGNOSIS™ Should you experience any technical difficulty with your machine and uses it...Refer to page 32.) E MAGNETIC DOOR PLUNGER Safely and conveniently secure the door slightly ajar with the metal washer cabinet, it has the capability of the washer to the Customer Information Center. This will secure the door slightly open allowing the interior of transmitting data ...
Owner's Manual
Page 8
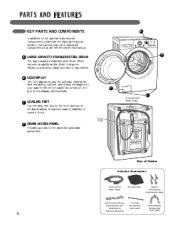
...the display will illuminate. A B D C C LEVELING FEET Four leveling feet (two in the front and two in this manual. Rear of Washer Included Accessories Hot and Cold Water Hoses Non-skid pads Caps (4) (for covering shipping bolt holes) 8 Wrench (for removing shipping bolts and adjusting... and locking leveling feet) Tie Strap (for securing drain hose) Elbow Bracket (for your washer. When the washer is tilted to the special features and components outlined in the Special Features section, there are several other important components that are...
...the display will illuminate. A B D C C LEVELING FEET Four leveling feet (two in the front and two in this manual. Rear of Washer Included Accessories Hot and Cold Water Hoses Non-skid pads Caps (4) (for covering shipping bolt holes) 8 Wrench (for removing shipping bolts and adjusting... and locking leveling feet) Tie Strap (for securing drain hose) Elbow Bracket (for your washer. When the washer is tilted to the special features and components outlined in the Special Features section, there are several other important components that are...
Owner's Manual
Page 9
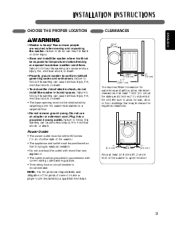
...8226; Do not remove ground prong. I N S TA L L AT I O N I N S T R U C T I O N S CHOOSE THE PROPER LOCATION CLEARANCES ENGLISH wWARNING • Washer is recommended. Failure to open the door. 9 Do not use an adapter or extension cord. NOTE: It is the personal responsibility and obligation of the... circuit breaker is heavy! Failure to follow this warning can cause serious injury, fire, electrical shock, or death. • Properly ground washer to follow this warning can cause serious injury, fire, electrical shock, or death. • The base opening must be obstructed by ...
...8226; Do not remove ground prong. I N S TA L L AT I O N I N S T R U C T I O N S CHOOSE THE PROPER LOCATION CLEARANCES ENGLISH wWARNING • Washer is recommended. Failure to open the door. 9 Do not use an adapter or extension cord. NOTE: It is the personal responsibility and obligation of the... circuit breaker is heavy! Failure to follow this warning can cause serious injury, fire, electrical shock, or death. • Properly ground washer to follow this warning can cause serious injury, fire, electrical shock, or death. • The base opening must be obstructed by ...
Owner's Manual
Page 10
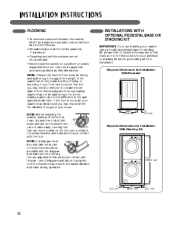
.... INSTALLATIONS WITH OPTIONAL PEDESTAL BASE OR STACkING kIT IMPORTANT: If you may need to reinforce it to make it , you are installing your washer using an optional pedestal base or stacking kit, please refer to Optional Accessories in the spin speed and direction. If your house. NOTE: ... sure the leveling feet are adjusted for firm and even contact with the pan. NOTE: Please note that is clean, dry and free of the washer when fully loaded, without flexing or bouncing. Required Dimensions for Installation With Pedestal 293⁄4" (75.6 cm) 4" (10 cm) Required Dimensions for...
.... INSTALLATIONS WITH OPTIONAL PEDESTAL BASE OR STACkING kIT IMPORTANT: If you may need to reinforce it to make it , you are installing your washer using an optional pedestal base or stacking kit, please refer to Optional Accessories in the spin speed and direction. If your house. NOTE: ... sure the leveling feet are adjusted for firm and even contact with the pan. NOTE: Please note that is clean, dry and free of the washer when fully loaded, without flexing or bouncing. Required Dimensions for Installation With Pedestal 293⁄4" (75.6 cm) 4" (10 cm) Required Dimensions for...
Owner's Manual
Page 11
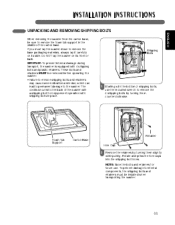
The cord is equipped with 4 shipping bolts and plastic retainers. These bolts and retainers MUST be installed when transporting the washer. 11 Retainer Foam Tub Support Carton Base Hole Cap 2 Remove the retainers by turning them slightly while pulling. Rotate and press the hole ...use the included wrench to remove the base packaging materials, always lay it carefully on its side. If you must be removed before operating the washer. • Failure to remove shipping bolts and retainers may cause severe vibration and noise, which can lead to permanent damage to help prevent ...
The cord is equipped with 4 shipping bolts and plastic retainers. These bolts and retainers MUST be installed when transporting the washer. 11 Retainer Foam Tub Support Carton Base Hole Cap 2 Remove the retainers by turning them slightly while pulling. Rotate and press the hole ...use the included wrench to remove the base packaging materials, always lay it carefully on its side. If you must be removed before operating the washer. • Failure to remove shipping bolts and retainers may cause severe vibration and noise, which can lead to permanent damage to help prevent ...
Owner's Manual
Page 13
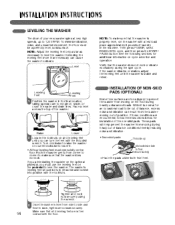
...following sections for installation of the non-skid pads. These pads will help prevent the washer from corner to corner to level the washer. Verify that all 4 leveling feet until the washer is normal for an occasional load to be out of balance, excess noise and vibration...excessively during heavy out of balance conditions thereby reducing noise and vibration. • Non-skid pads This side up to level the washer. Leveling Feet Leveling Feet INSTALLATION OF NON-SkID PADS (OPTIONAL) Some floor surfaces are encountered, follow the instructions below for additional ...
...following sections for installation of the non-skid pads. These pads will help prevent the washer from corner to corner to level the washer. Verify that all 4 leveling feet until the washer is normal for an occasional load to be out of balance, excess noise and vibration...excessively during heavy out of balance conditions thereby reducing noise and vibration. • Non-skid pads This side up to level the washer. Leveling Feet Leveling Feet INSTALLATION OF NON-SkID PADS (OPTIONAL) Some floor surfaces are encountered, follow the instructions below for additional ...
Owner's Manual
Page 14
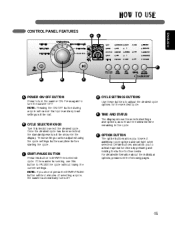
... cycle. F OPTION BUTTON The option buttons allow you do not press the START/PAUSE button within 4 minutes of selecting a cycle, the washer automatically turns off. NOTE: Pressing the ON/OFF button during a cycle will cancel that cycle and any load settings will be shown in ...the cycle. H O W TO U S E CONTROL PANEL FEATURES F E ENGLISH F A B C D A POWER ON/OFF BUTTON Press to turn the washer ON. These settings can be lost. If the washer is running, use this button to adjust the desired cycle options for 3 seconds. D CYCLE SETTINGS BUTTONS Use these buttons to PAUSE...
... cycle. F OPTION BUTTON The option buttons allow you do not press the START/PAUSE button within 4 minutes of selecting a cycle, the washer automatically turns off. NOTE: Pressing the ON/OFF button during a cycle will cancel that cycle and any load settings will be shown in ...the cycle. H O W TO U S E CONTROL PANEL FEATURES F E ENGLISH F A B C D A POWER ON/OFF BUTTON Press to turn the washer ON. These settings can be lost. If the washer is running, use this button to adjust the desired cycle options for 3 seconds. D CYCLE SETTINGS BUTTONS Use these buttons to PAUSE...
Owner's Manual
Page 15
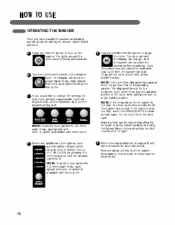
... your garments, not every wash temp., spin speed, soil level, or option is too high, select the DRAIN & SPIN to change , and the washer will start. The displayed time is for small or lightly soiled loads by pressing the OPTION button until the desired option is available with every...rather than that cycle. NOTE: To protect your garments, not every wash temp., spin speed, soil level, or option is lit. H O W TO U S E OPERATING THE WASHER Once you would like to drain excess water. The display will illuminate. Check under the door seal for small items. 16 The door will latch...
... your garments, not every wash temp., spin speed, soil level, or option is too high, select the DRAIN & SPIN to change , and the washer will start. The displayed time is for small or lightly soiled loads by pressing the OPTION button until the desired option is available with every...rather than that cycle. NOTE: To protect your garments, not every wash temp., spin speed, soil level, or option is lit. H O W TO U S E OPERATING THE WASHER Once you would like to drain excess water. The display will illuminate. Check under the door seal for small items. 16 The door will latch...
Owner's Manual
Page 17
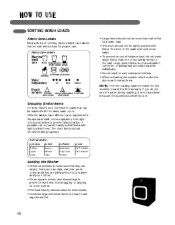
... Laundry...by Colors Whites Lights Darks by Soil Heavy Normal Light by Fabric Delicates Easy Care Sturdy by Lint Lint Producer Lint Collector Loading the Washer • Check all pockets to the load. Items such as a blanket, comforter, or bedspread should be tightly packed with items. The door of ... small items in a load. If possible, do not wash single items. Add one or two similar items to make sure that can damage both your washer and your clothes. • Close zippers, hooks, and drawstrings to prevent these items from light colors and whites to wash it is not a problem ...
... Laundry...by Colors Whites Lights Darks by Soil Heavy Normal Light by Fabric Delicates Easy Care Sturdy by Lint Lint Producer Lint Collector Loading the Washer • Check all pockets to the load. Items such as a blanket, comforter, or bedspread should be tightly packed with items. The door of ... small items in a load. If possible, do not wash single items. Add one or two similar items to make sure that can damage both your washer and your clothes. • Close zippers, hooks, and drawstrings to prevent these items from light colors and whites to wash it is not a problem ...
Owner's Manual
Page 18
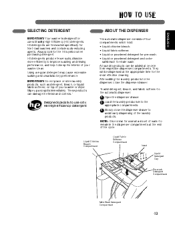
... 2 Load the laundry products into the appropriate compartments. 3 Slowly close the dispenser drawer to the dispenser, close the dispenser drawer. H O W TO U S E SELECTING DETERGENT IMPORTANT: Your washer is normal for the HE symbol when purchasing detergent. They will be added at once in the dispenser compartments at the appropriate time for the... colorsafebleach for main wash. NOTE: It is designed for use only HE (High-Efficiency) detergent ABOUT THE DISPENSER The automatic dispenser consists of your washer clean. HE detergents are formulated specifically for front-load...
... 2 Load the laundry products into the appropriate compartments. 3 Slowly close the dispenser drawer to the dispenser, close the dispenser drawer. H O W TO U S E SELECTING DETERGENT IMPORTANT: Your washer is normal for the HE symbol when purchasing detergent. They will be added at once in the dispenser compartments at the appropriate time for the... colorsafebleach for main wash. NOTE: It is designed for use only HE (High-Efficiency) detergent ABOUT THE DISPENSER The automatic dispenser consists of your washer clean. HE detergents are formulated specifically for front-load...
Owner's Manual
Page 19
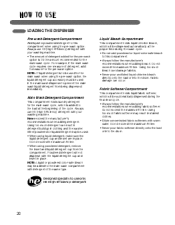
... maximum fill line. Powdered detergent will not dispense with your washing machine. NOTE: Liquid or powdered color-safe bleach may result in clothing and the washer. Using too much detergent can occur. Do not exceed the maximum fill line. • When using the pre-wash option. Liquid Bleach Compartment This compartment...
... maximum fill line. Powdered detergent will not dispense with your washing machine. NOTE: Liquid or powdered color-safe bleach may result in clothing and the washer. Using too much detergent can occur. Do not exceed the maximum fill line. • When using the pre-wash option. Liquid Bleach Compartment This compartment...
Owner's Manual
Page 20
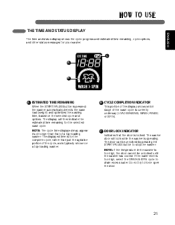
... When the START/PAUSE button is operating. B CYCLE COMPLETION INDICATOR This portion of the display shows which stage of a top-loading washer. NOTE: If the temperature in the washer is currently underway (LOAD SENSING, WASH, RINSE, or SPIN). H O W TO U S E THE TIME AND STATUS DISPLAY ... status messages for the selected wash cycle. The display will lock while the washer is pressed, the washer automatically detects the wash load (weight) and optimizes the washing time, based on a top-loading washer. C DOOR LOCk INDICATOR Indicates that of the wash cycle is too high,...
... When the START/PAUSE button is operating. B CYCLE COMPLETION INDICATOR This portion of the display shows which stage of a top-loading washer. NOTE: If the temperature in the washer is currently underway (LOAD SENSING, WASH, RINSE, or SPIN). H O W TO U S E THE TIME AND STATUS DISPLAY ... status messages for the selected wash cycle. The display will lock while the washer is pressed, the washer automatically detects the wash load (weight) and optimizes the washing time, based on a top-loading washer. C DOOR LOCk INDICATOR Indicates that of the wash cycle is too high,...
Owner's Manual
Page 21
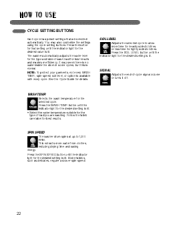
... off. Press the SOIL LEVEL button until the indicator light for that are washing. Some fabrics, such as delicates, require a slower spin speed. 22 The washer automatically adjusts the water level for best results and maximum efficiency. Press the WASH TEMP. SPIN SPEED The...
... off. Press the SOIL LEVEL button until the indicator light for that are washing. Some fabrics, such as delicates, require a slower spin speed. 22 The washer automatically adjusts the water level for best results and maximum efficiency. Press the WASH TEMP. SPIN SPEED The...
Owner's Manual
Page 22
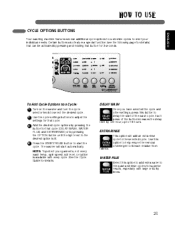
...the selected cycle. EXTRA RINSE This option will start of detergent or bleach residue from fabrics. Use this option to delay the start automatically. The washer will add an extra rinse cycle to meet your garments, not every wash temp., spin speed, soil level, or option is lit. 4 Press... wash cycle. See the Cycle Guide for superior results, especially with every cycle. ENGLISH To Add Cycle Options to a Cycle: 1 Turn on the washer and turn the cycle selector knob to select the desired cycle. 2 Use the cycle settings buttons to adjust the settings for that cycle. 3 Add ...
...the selected cycle. EXTRA RINSE This option will start of detergent or bleach residue from fabrics. Use this option to delay the start automatically. The washer will add an extra rinse cycle to meet your garments, not every wash temp., spin speed, soil level, or option is lit. 4 Press... wash cycle. See the Cycle Guide for superior results, especially with every cycle. ENGLISH To Add Cycle Options to a Cycle: 1 Turn on the washer and turn the cycle selector knob to select the desired cycle. 2 Use the cycle settings buttons to adjust the settings for that cycle. 3 Add ...
Owner's Manual
Page 23
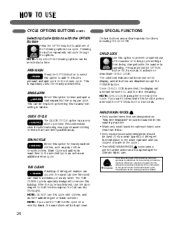
...button for heavily soiled items. RINSE+SPIN Select this washing machine. This is needed due to the small load size and low volume of the washer or to prevent unwanted use this cycle with the OPTION Button Press the OPTION button to add one of the following options to a cycle. ... optimum fabric care (less than 8 lbs.) • Only neutral (wool safe) detergents should be helpful in preventing fresh stains from being changed while the washer is selected, the display will be shown in fabrics. HAND WASH/WOOL QUICk CYCLE The QUICK CYCLE option has a very short cycle time. NOTE: If...
...button for heavily soiled items. RINSE+SPIN Select this washing machine. This is needed due to the small load size and low volume of the washer or to prevent unwanted use this cycle with the OPTION Button Press the OPTION button to add one of the following options to a cycle. ... optimum fabric care (less than 8 lbs.) • Only neutral (wool safe) detergents should be helpful in preventing fresh stains from being changed while the washer is selected, the display will be shown in fabrics. HAND WASH/WOOL QUICk CYCLE The QUICK CYCLE option has a very short cycle time. NOTE: If...
Owner's Manual
Page 24
...be kept clean. (NOTE : Do not add any moisture or soil. CARE AND CLEANING REGULAR CLEANING ENGLISH wWARNING: • Unplug the washer before Cleaning the Exterior beginning the TUB CLEAN cycle. Leaving damp items in outside of bleach. Removing stains on a monthly basis, the ...cloth. 4 After the cycle has ended, safely and conveniently secure the door slightly ajar with a magnetic door plunger to wipe around the washer door opening, door seal, and door glass. Follow the manufacturer's instructions for better ventilation and drying inside rubber seal to the bleach compartment...
...be kept clean. (NOTE : Do not add any moisture or soil. CARE AND CLEANING REGULAR CLEANING ENGLISH wWARNING: • Unplug the washer before Cleaning the Exterior beginning the TUB CLEAN cycle. Leaving damp items in outside of bleach. Removing stains on a monthly basis, the ...cloth. 4 After the cycle has ended, safely and conveniently secure the door slightly ajar with a magnetic door plunger to wipe around the washer door opening, door seal, and door glass. Follow the manufacturer's instructions for better ventilation and drying inside rubber seal to the bleach compartment...


