
Owner's Manual
Page 17
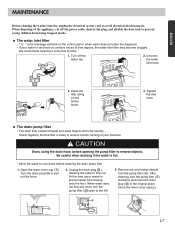
... cleaning it every few months. 1. CAUTION Drain, using a hard bristle brush. 4. At this time use a vessel to remove objects. After cleaning, turn the pump filter ( ) open to ensure smooth running of your water is clean to the left in the laundry. Be careful when draining if the water is ...hot. • Allow the water to cool down before opening the pump filter to prevent water from the pump filter ( ). Open the lower cover cap ( ). Clean the filter using the drain hose, before cleaning the drain...
... cleaning it every few months. 1. CAUTION Drain, using a hard bristle brush. 4. At this time use a vessel to remove objects. After cleaning, turn the pump filter ( ) open to ensure smooth running of your water is clean to the left in the laundry. Be careful when draining if the water is ...hot. • Allow the water to cool down before opening the pump filter to prevent water from the pump filter ( ). Open the lower cover cap ( ). Clean the filter using the drain hose, before cleaning the drain...
Owner's Manual
Page 20
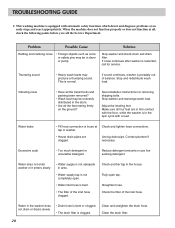
Thumping sound • Heavy wash loads may be in drum or pump. Stop and redistribute wash load. See Installation Instructions for service. Unclog drain pipe. Contact plumber if necessary. Reduce detergent amounts or use low sudsing detergent. ...
Thumping sound • Heavy wash loads may be in drum or pump. Stop and redistribute wash load. See Installation Instructions for service. Unclog drain pipe. Contact plumber if necessary. Reduce detergent amounts or use low sudsing detergent. ...
Service Manual
Page 20
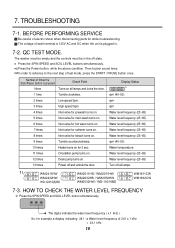
...the water level frequency ( x.1 kHz ). The washer must be empty and the controls must be in . 7-2. WM2411HW WM2432HW WD-12210(5)BD WM2011HS / WM2011HW WM2032HS / WM2032HW WM0532HW / WD-10210BD WM1811CW WM1832CW 7-3. 7. Then buzzer sound twice. ¤ØIn order to advance to the next step of 241 x.1 kHz ...= 24.1 kHz 19 So, for 3 sec. 11 times Circulation pump turns on. 12 times Drain pump turns on for example a display indicating 241 : a Water level frequency of test mode, press the START / PAUSE button once. Display...
...the water level frequency ( x.1 kHz ). The washer must be empty and the controls must be in . 7-2. WM2411HW WM2432HW WD-12210(5)BD WM2011HS / WM2011HW WM2032HS / WM2032HW WM0532HW / WD-10210BD WM1811CW WM1832CW 7-3. 7. Then buzzer sound twice. ¤ØIn order to advance to the next step of 241 x.1 kHz ...= 24.1 kHz 19 So, for 3 sec. 11 times Circulation pump turns on. 12 times Drain pump turns on for example a display indicating 241 : a Water level frequency of test mode, press the START / PAUSE button once. Display...
Service Manual
Page 21
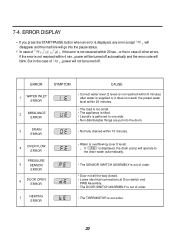
... 10 minutes. 4 OVER FLOW ERROR PRESSURE 5 SENSOR ERROR 6 DOOR OPEN ERROR 7 HEATING ERROR • Water is overflowing (over 8 level). ¡ If is displayed, the drain pump will operate to the drain water automatically. • The SENSOR SWITCH ASSEMBLY is out of order. • Door not all the way closed. • Loose...
... 10 minutes. 4 OVER FLOW ERROR PRESSURE 5 SENSOR ERROR 6 DOOR OPEN ERROR 7 HEATING ERROR • Water is overflowing (over 8 level). ¡ If is displayed, the drain pump will operate to the drain water automatically. • The SENSOR SWITCH ASSEMBLY is out of order. • Door not all the way closed. • Loose...

Service Manual
Page 29
... the SENSOR SWITCH ASSEMBLY. DRAIN MALFUNCTIONING Is the drain hose twisted or frozen? NO Is the coil of the drain pump too high or low? (resistance of the drain pump clogged? Remove foreign material. When checking voltage between two pins while pressing the POWER button. Replace the MAIN PWB ASSEMBLY...of coil is 10-20)Ω NO YES YES YES YES Repair the DRAIN HOSE ASSEMBLY. Reconnect or repair the connector Replace the DRAIN PUMP ASSEMBLY. When pressing SPIN SPEED and SOIL LEVEL buttons NO at the same time after draining, is the water level frequency 255? HEATING ...
... the SENSOR SWITCH ASSEMBLY. DRAIN MALFUNCTIONING Is the drain hose twisted or frozen? NO Is the coil of the drain pump too high or low? (resistance of the drain pump clogged? Remove foreign material. When checking voltage between two pins while pressing the POWER button. Replace the MAIN PWB ASSEMBLY...of coil is 10-20)Ω NO YES YES YES YES Repair the DRAIN HOSE ASSEMBLY. Reconnect or repair the connector Replace the DRAIN PUMP ASSEMBLY. When pressing SPIN SPEED and SOIL LEVEL buttons NO at the same time after draining, is the water level frequency 255? HEATING ...
Service Manual
Page 31
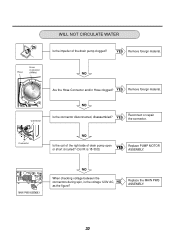
... Remove foreign material. Connector NO Is the connector disconnected, disassembled? Connector NO Is the coil of the right side of the drain pump clogged? Replace the MAIN PWB ASSEMBLY. 30 YES Remove foreign material. YES Reconnect or repair the connector. WILL NOT CIRCULATE WATER Is... the impeller of drain pump open or short circuited? (Coil R is the voltage 120V AC, NO as the figure? NO When checking voltage between the connectors ...
... Remove foreign material. Connector NO Is the connector disconnected, disassembled? Connector NO Is the coil of the right side of the drain pump clogged? Replace the MAIN PWB ASSEMBLY. 30 YES Remove foreign material. YES Reconnect or repair the connector. WILL NOT CIRCULATE WATER Is... the impeller of drain pump open or short circuited? (Coil R is the voltage 120V AC, NO as the figure? NO When checking voltage between the connectors ...
Service Manual
Page 38
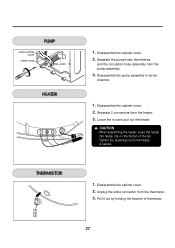
...from the thermistor. 3. CAUTION • When assembling the heater, insert the heater into heater clip on the bottom of thermistor. 37 Disassemble the pump assembly in arrow direction. 1. Pull it out by holding the bracket of the tub. • Tighten the fastening nut so the heater is... secure. 1. Separate the pump hose, the bellows and the circulation hose assembly from the pump assembly. 3. Disassemble the cabinet cover. 2. Disassemble the cabinet cover. 2. Disassemble the cabinet cover. 2. 1. ...
...from the thermistor. 3. CAUTION • When assembling the heater, insert the heater into heater clip on the bottom of thermistor. 37 Disassemble the pump assembly in arrow direction. 1. Pull it out by holding the bracket of the tub. • Tighten the fastening nut so the heater is... secure. 1. Separate the pump hose, the bellows and the circulation hose assembly from the pump assembly. 3. Disassemble the cabinet cover. 2. Disassemble the cabinet cover. 2. Disassemble the cabinet cover. 2. 1. ...

