
Owner's Manual
Page 1
It provides instructions on safe installation, use, and maintenance. Retain it for future reference. Record the model and serial numbers of your machine and report this manual carefully. Owner's Manual Washing Machine WM2432HW WM2032HS WM2032HW WM1832CW Please read this information to your dealer if your machine requires service.
It provides instructions on safe installation, use, and maintenance. Retain it for future reference. Record the model and serial numbers of your machine and report this manual carefully. Owner's Manual Washing Machine WM2432HW WM2032HS WM2032HW WM1832CW Please read this information to your dealer if your machine requires service.
Owner's Manual
Page 2
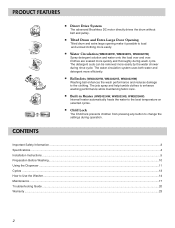
... lock prevents children from pressing any button to load and unload clothing more efficiently. ■ RollerJets (WM2432HW, WM2032HS, WM2032HW) Washing ball enhances the wash performance and reduces damage to Use the Washer...14 Maintenance ...17 Troubleshooting Guide ...20 Warranty ...23 2 Clothes are soaked more easily by the water shower during rinse cycle. The detergent suds can be removed more quickly and thoroughly during wash cycle. PRODUCT FEATURES ■ Direct Drive System The advanced Brushless DC motor directly drives the drum...
... lock prevents children from pressing any button to load and unload clothing more efficiently. ■ RollerJets (WM2432HW, WM2032HS, WM2032HW) Washing ball enhances the wash performance and reduces damage to Use the Washer...14 Maintenance ...17 Troubleshooting Guide ...20 Warranty ...23 2 Clothes are soaked more easily by the water shower during rinse cycle. The detergent suds can be removed more quickly and thoroughly during wash cycle. PRODUCT FEATURES ■ Direct Drive System The advanced Brushless DC motor directly drives the drum...
Owner's Manual
Page 3
... any servicing unless specifically recommended in the user-maintenance instructions or published user-repair instructions that you understand and have the skills to carry out. • See Installation Instructions for grounding requirements. • ALWAYS follow basic precautions, including the following: • Read all instructions before using the washer. • Do not wash articles that could cause a load to catch fire. • Do not use fabric softeners or products to...
... any servicing unless specifically recommended in the user-maintenance instructions or published user-repair instructions that you understand and have the skills to carry out. • See Installation Instructions for grounding requirements. • ALWAYS follow basic precautions, including the following: • Read all instructions before using the washer. • Do not wash articles that could cause a load to catch fire. • Do not use fabric softeners or products to...

Owner's Manual
Page 7
... the water inlet hoses to prevent water leaks. • Check for leakage of washing machine connections by turning the tap completely on. • Periodically check the condition of the electronic control unit may cause injury or serious malfunctioning. Repairs carried out by inexperienced persons may be carried out by qualified personnel. The connector for a few hours before putting it into operation. 7 ENGLISH INSTALLATION INSTRUCTIONS ■ Electrical...
... the water inlet hoses to prevent water leaks. • Check for leakage of washing machine connections by turning the tap completely on. • Periodically check the condition of the electronic control unit may cause injury or serious malfunctioning. Repairs carried out by inexperienced persons may be carried out by qualified personnel. The connector for a few hours before putting it into operation. 7 ENGLISH INSTALLATION INSTRUCTIONS ■ Electrical...
Owner's Manual
Page 9
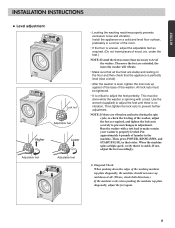
... sure that order. under the feet.) NOTE: Extend the feet no vibration. Then, press POWER, RINSE+SPIN, and START/PAUSE, in adjustment. Use the wrench (supplied) to adjust the feet until there is spinning with a test load to adjust the feet perfectly. Then tighten the lock nuts to level the washer. Run the washer with a load. ENGLISH INSTALLATION INSTRUCTIONS ■ Level adjustment Lock nut Adjustable feet Adjustable feet Adjustable feet • Leveling the washing machine properly prevents excessive noise and vibration.
... sure that order. under the feet.) NOTE: Extend the feet no vibration. Then, press POWER, RINSE+SPIN, and START/PAUSE, in adjustment. Use the wrench (supplied) to adjust the feet until there is spinning with a test load to adjust the feet perfectly. Then tighten the lock nuts to level the washer. Run the washer with a load. ENGLISH INSTALLATION INSTRUCTIONS ■ Level adjustment Lock nut Adjustable feet Adjustable feet Adjustable feet • Leveling the washing machine properly prevents excessive noise and vibration.

Owner's Manual
Page 12
... the load or into the washer drum as it is flushed from the dispenser at the proper time during the last rinse cycle. Liquid detergent will be added to the main wash compartment along with warm water to this compartment for Main wash. Fabric damage can cause early dispensing of the cycle. USING THE DISPENSER 2. Overfilling can occur. • Do not use powdered bleach in stained clothes. • Do not pour fabric softener directly...
... the load or into the washer drum as it is flushed from the dispenser at the proper time during the last rinse cycle. Liquid detergent will be added to the main wash compartment along with warm water to this compartment for Main wash. Fabric damage can cause early dispensing of the cycle. USING THE DISPENSER 2. Overfilling can occur. • Do not use powdered bleach in stained clothes. • Do not pour fabric softener directly...
Owner's Manual
Page 14
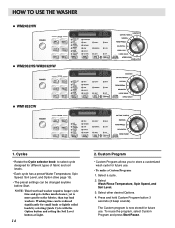
... store a customized wash cycle for different types of fabric and soil levels. • Each cycle has a preset Water Temperature, Spin Speed, Soil Level, and Option (See page 13). • The preset settings can be changed anytime before Start. HOW TO USE THE WASHER WM2432HW WM2032HS/WM2032HW WM1832CW 1. NOTE: This front load washer requires longer cycle time and gets clothes much cleaner, yet is now stored for small loads or lightly soiled loads by selecting Quick Cycle with...
... store a customized wash cycle for different types of fabric and soil levels. • Each cycle has a preset Water Temperature, Spin Speed, Soil Level, and Option (See page 13). • The preset settings can be changed anytime before Start. HOW TO USE THE WASHER WM2432HW WM2032HS/WM2032HW WM1832CW 1. NOTE: This front load washer requires longer cycle time and gets clothes much cleaner, yet is now stored for small loads or lightly soiled loads by selecting Quick Cycle with...
Owner's Manual
Page 15
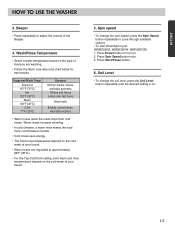
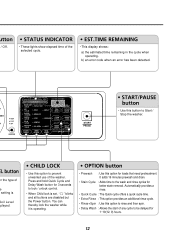
Press Power button to cycle through available options. • To start Drain/Spin cycle: (WM2032HS, WM2032HW, WM1832CW) 1. Press Start/Pause button. 6. Soil Level • To change the spin speed, press the Spin Speed button repeatedly to turn on the type of the Beeper. 4. Beeper • Press repeatedly to handle. • Cold rinses save energy. • The Cold rinse temperatures depend on the cold water at your faucet. • Warm rinses are washing. • Follow the fabric care label and chart...
Press Power button to cycle through available options. • To start Drain/Spin cycle: (WM2032HS, WM2032HW, WM1832CW) 1. Press Start/Pause button. 6. Soil Level • To change the spin speed, press the Spin Speed button repeatedly to turn on the type of the Beeper. 4. Beeper • Press repeatedly to handle. • Cold rinses save energy. • The Cold rinse temperatures depend on the cold water at your faucet. • Warm rinses are washing. • Follow the fabric care label and chart...
Owner's Manual
Page 16
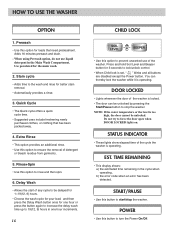
... DOOR LOCKED lights on. Quick Cycle • The Quick cycle offers a quick cycle time. • Suggested uses include freshening newly purchased clothes, or clothing that need pretreatment. Extra Rinse • This option provides an additional rinse. • Use this option to stop the washer. NOTE: If the water temperature or the level is operating. Do not try to start of the cycle the washer is set, " " blinks and all buttons are disabled except the Power button. START/PAUSE • Use this option to lock/unlock control...
... DOOR LOCKED lights on. Quick Cycle • The Quick cycle offers a quick cycle time. • Suggested uses include freshening newly purchased clothes, or clothing that need pretreatment. Extra Rinse • This option provides an additional rinse. • Use this option to stop the washer. NOTE: If the water temperature or the level is operating. Do not try to start of the cycle the washer is set, " " blinks and all buttons are disabled except the Power button. START/PAUSE • Use this option to lock/unlock control...
Owner's Manual
Page 17
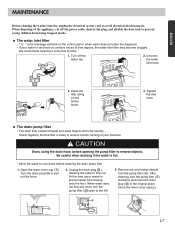
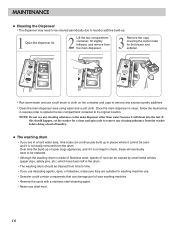
... water inlet filter • " " error message will blink on the control panel when water does not enter the dispenser. • If your machine. CAUTION Drain, using a hard bristle brush. 4. Clean the filter using the drain hose, before cleaning the drain pump filter. 1. Check regularly that the filter is clean to ensure smooth running of your water is hot. • Allow the water to cool down before opening the pump filter to prevent water from the pump filter ( ). When disposing of lime deposit, the water inlet filter may become clogged...
... water inlet filter • " " error message will blink on the control panel when water does not enter the dispenser. • If your machine. CAUTION Drain, using a hard bristle brush. 4. Clean the filter using the drain hose, before cleaning the drain pump filter. 1. Check regularly that the filter is clean to ensure smooth running of your water is hot. • Allow the water to cool down before opening the pump filter to prevent water from the pump filter ( ). When disposing of lime deposit, the water inlet filter may become clogged...
Owner's Manual
Page 18
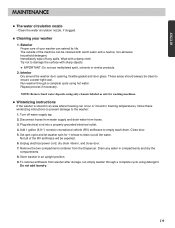
... spin cycle to remove any cleaning substance from time to time. • If you live in a hard water area, lime scale can damage part of laundry. ■ The washing drum • If you use descaling agents, dyes, or bleaches, make sure they are suitable for the bleach and softener. • Run warm water and use steel wool. 18 If this should be cleaned from the washer before doing a load of your washing machine...
... spin cycle to remove any cleaning substance from time to time. • If you live in a hard water area, lime scale can damage part of laundry. ■ The washing drum • If you use descaling agents, dyes, or bleaches, make sure they are suitable for the bleach and softener. • Run warm water and use steel wool. 18 If this should be cleaned from the washer before doing a load of your washing machine...
Owner's Manual
Page 19
... Dispenser. The outside of the machine can be clean to the washer: 1. Immediately wipe off water supply tap. 2. Plug electrical cord into a properly grounded electrical outlet. 4. Set spin cycle and let washer spin for washing machines. ■ Winterizing instructions If the washer is stored in an area where freezing can extend its life. Drain any spills. Interior Dry around the washer door opening, flexible gasket and door glass. To remove antifreeze from washer after storage, run empty washer...
... Dispenser. The outside of the machine can be clean to the washer: 1. Immediately wipe off water supply tap. 2. Plug electrical cord into a properly grounded electrical outlet. 4. Set spin cycle and let washer spin for washing machines. ■ Winterizing instructions If the washer is stored in an area where freezing can extend its life. Drain any spills. Interior Dry around the washer door opening, flexible gasket and door glass. To remove antifreeze from washer after storage, run empty washer...
Owner's Manual
Page 20
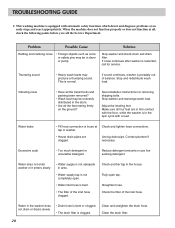
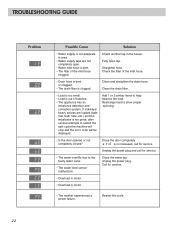
... the washer is in drum or pump. Reduce detergent amounts or use low sudsing detergent. Solution Stop washer and check drum and drain filter. Thumping sound • Heavy wash loads may be in the spin cycle with automatic safety functions which detect and diagnose problems at Check and tighten hose connections. Adjust the leveling feet. Vibrating noise • Have all the feet resting firmly on the ground? Contact plumber if necessary. Straighten hose. See Installation Instructions for service. Excessive...
... the washer is in drum or pump. Reduce detergent amounts or use low sudsing detergent. Solution Stop washer and check drum and drain filter. Thumping sound • Heavy wash loads may be in the spin cycle with automatic safety functions which detect and diagnose problems at Check and tighten hose connections. Adjust the leveling feet. Vibrating noise • Have all the feet resting firmly on the ground? Contact plumber if necessary. Straighten hose. See Installation Instructions for service. Excessive...
Owner's Manual
Page 21
... the door and press the Start/Pause button. Wash cycle time delayed • The washing time may vary by a qualified electrician. • Water supply tap is firmly shut. Washer won't spin • Check that the door is not turned on water supply tap. If the imbalance is blown, circuit breaker tripped, or a power outage has occurred. Do not increase fuse capacity. ENGLISH TROUBLESHOOTING GUIDE Problem Washer does not start Possible Cause • Electrical power cord may...
... the door and press the Start/Pause button. Wash cycle time delayed • The washing time may vary by a qualified electrician. • Water supply tap is firmly shut. Washer won't spin • Check that the door is not turned on water supply tap. If the imbalance is blown, circuit breaker tripped, or a power outage has occurred. Do not increase fuse capacity. ENGLISH TROUBLESHOOTING GUIDE Problem Washer does not start Possible Cause • Electrical power cord may...
Owner's Manual
Page 22
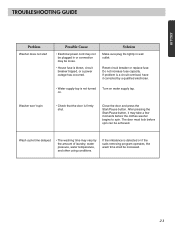
... restart the spin cycle the machine will stop and the error code will be displayed. Rearrange load to help balance the load. Add 1 or 2 similar items to allow proper spinning. • Is the door opened or not completely closed? Unplug the power plug and call for service. • The water overfills due to the faulty water valve. • The water level sensor malfunction. Restart the cycle. 22 Straighten hose. Call for service. • Overload in motor. •...
... restart the spin cycle the machine will stop and the error code will be displayed. Rearrange load to help balance the load. Add 1 or 2 similar items to allow proper spinning. • Is the door opened or not completely closed? Unplug the power plug and call for service. • The water overfills due to the faulty water valve. • The water level sensor malfunction. Restart the cycle. 22 Straighten hose. Call for service. • Overload in motor. •...

Service Manual
Page 7
... water in the tub drains to a certain level. 2-4.DOOR CONTROL The door can be heard when the door is not in the tub. Clicking sounds can sense the water level in operation. When the cycle is determined by pulling the door handle whenever washer is locked / unlocked. 6 2-2.FUZZY LOGIC WASHING TIME OPTIMIZATION To get the best washing performance, optimal time is completed, the DOOR LOCKED light will lock for 5 minutes. water temperature selected washing temperature load size FUZZY LOGIC washing time rinsing time spin rhythm, time the best washing...
... water in the tub drains to a certain level. 2-4.DOOR CONTROL The door can be heard when the door is not in the tub. Clicking sounds can sense the water level in operation. When the cycle is determined by pulling the door handle whenever washer is locked / unlocked. 6 2-2.FUZZY LOGIC WASHING TIME OPTIMIZATION To get the best washing performance, optimal time is completed, the DOOR LOCKED light will lock for 5 minutes. water temperature selected washing temperature load size FUZZY LOGIC washing time rinsing time spin rhythm, time the best washing...

Service Manual
Page 12
...; Lights whenever the door is locked. • The door can be unlocked by pressing the Start / Pause button to stop the washer. • Choose High / Low • Rotate the Cycle selector knob to select the cycle designed for different types of fabric and soil levels. • Allows you to store a customized wash cycle for future use. • To create a Custom Program : 1) Select a cycle. 2) Select the other desired Wash / Rinse Temp., Spin Speed, Soil Level. 3) Select...
...; Lights whenever the door is locked. • The door can be unlocked by pressing the Start / Pause button to stop the washer. • Choose High / Low • Rotate the Cycle selector knob to select the cycle designed for different types of fabric and soil levels. • Allows you to store a customized wash cycle for future use. • To create a Custom Program : 1) Select a cycle. 2) Select the other desired Wash / Rinse Temp., Spin Speed, Soil Level. 3) Select...
Service Manual
Page 13
... option provides an additional rinse cycle. • Rinse+Spin : Use this option for better stain removal. Press and hold Quick Cycle and Delay Wash button for 3 seconds to the wash and rinse cycles for loads that need pretreatment. It adds 16 minutes prewash and drain. • Stain Cycle : Adds time to lock / unlock control. • When Child lock is operating. • Prewash : Use this option to rinse and then spin. • Delay Wash : Allows the start of any cycle to Start / Stop the washer.
... option provides an additional rinse cycle. • Rinse+Spin : Use this option for better stain removal. Press and hold Quick Cycle and Delay Wash button for 3 seconds to the wash and rinse cycles for loads that need pretreatment. It adds 16 minutes prewash and drain. • Stain Cycle : Adds time to lock / unlock control. • When Child lock is operating. • Prewash : Use this option to rinse and then spin. • Delay Wash : Allows the start of any cycle to Start / Stop the washer.
Service Manual
Page 20
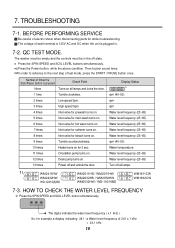
... the door. 1 time Tumble clockwise. 2 times Low speed Spin. 3 times High speed Spin. 4 times Inlet valve for prewash turns on. 5 times Inlet valve for main wash turns on. 6 times Inlet valve for hot water turns on. 7 times Inlet valve for softener turns on. 8 times Inlet valve for bleach turns on. 9 times Tumble counterclockwise. 10 times Heater turns on for 3 sec. 11 times Circulation pump turns on. 12 times Drain pump turns on all lamps. TROUBLESHOOTING 7-1. BEFORE PERFORMING SERVICE Be careful of test mode, press the START / PAUSE button once. Then buzzer sound...
... the door. 1 time Tumble clockwise. 2 times Low speed Spin. 3 times High speed Spin. 4 times Inlet valve for prewash turns on. 5 times Inlet valve for main wash turns on. 6 times Inlet valve for hot water turns on. 7 times Inlet valve for softener turns on. 8 times Inlet valve for bleach turns on. 9 times Tumble counterclockwise. 10 times Heater turns on for 3 sec. 11 times Circulation pump turns on. 12 times Drain pump turns on all lamps. TROUBLESHOOTING 7-1. BEFORE PERFORMING SERVICE Be careful of test mode, press the START / PAUSE button once. Then buzzer sound...

Service Manual
Page 27
... press both SPIN SPEED button and SOIL LEVEL button simultaneously, is 120V AC. (Refer to the terminals of the inlet valve connector is the water YES level frequency below 246? NO Is the inlet valve filter clogged? Clean the filter. YES Clean the dispenser. 26 NO WATER SUPPLY Is water supply shut-off? NO YES Open the tap. NO YES Has detergent been put in the correct place. Check the AIR...
... press both SPIN SPEED button and SOIL LEVEL button simultaneously, is 120V AC. (Refer to the terminals of the inlet valve connector is the water YES level frequency below 246? NO Is the inlet valve filter clogged? Clean the filter. YES Clean the dispenser. 26 NO WATER SUPPLY Is water supply shut-off? NO YES Open the tap. NO YES Has detergent been put in the correct place. Check the AIR...


