
Owner's Manual
Page 3
... and optimizes the washing time. Tilted Drum and Extra Large Door Opening Tilted drum and extra large opening make it possible to Use the Washer ...14 Maintenance ...17 Troubleshooting Guide...20 Warranty ...23 2 CONTENTS Important Safety Information ...3 Specifications...4 Installation Instructions ...5 Preparation Before Washing...10 Using.... The LED Display The LED display shows the settings, estimated time remaining, options, and status messages for your washer. Child Lock The Child lock prevents children from pressing any button to change the settings during operation. When the...
... and optimizes the washing time. Tilted Drum and Extra Large Door Opening Tilted drum and extra large opening make it possible to Use the Washer ...14 Maintenance ...17 Troubleshooting Guide...20 Warranty ...23 2 CONTENTS Important Safety Information ...3 Specifications...4 Installation Instructions ...5 Preparation Before Washing...10 Using.... The LED Display The LED display shows the settings, estimated time remaining, options, and status messages for your washer. Child Lock The Child lock prevents children from pressing any button to change the settings during operation. When the...
Owner's Manual
Page 4
...vapors that could ignite or explode. • Do not add gasoline, dry cleaning solvents, or other flammable or explosive substances to persons when using the washer, follow the fabric care instructions supplied by the manufacturer of life. As the gas is equipped with all hot water faucets and let the water... flow from hiding inside. • Do not install or store the washer where it does not fit the outlet, have the proper outlet, consult an electrician. ! This appliance is flammable, do not smoke or use an...
...vapors that could ignite or explode. • Do not add gasoline, dry cleaning solvents, or other flammable or explosive substances to persons when using the washer, follow the fabric care instructions supplied by the manufacturer of life. As the gas is equipped with all hot water faucets and let the water... flow from hiding inside. • Do not install or store the washer where it does not fit the outlet, have the proper outlet, consult an electrician. ! This appliance is flammable, do not smoke or use an...
Owner's Manual
Page 5
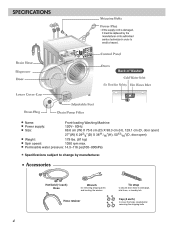
Accessories Hot/Cold (1 each) Hose Wrench for removing shipping bolts and leveling the washer Hose retainer Tie strap to secure drain hose to standpipe, inlet hose, or laundry tub Cap (4 each) to change by manufacturer. Permissible water pressure: 14.5~...
Accessories Hot/Cold (1 each) Hose Wrench for removing shipping bolts and leveling the washer Hose retainer Tie strap to secure drain hose to standpipe, inlet hose, or laundry tub Cap (4 each) to change by manufacturer. Permissible water pressure: 14.5~...
Owner's Manual
Page 6
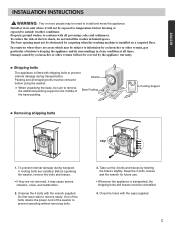
... where there are areas which may cause severe vibration, noise, and malfunction. 2. To prevent internal damage during transportation. Before operating the washer, remove the bolts and braces. • If they are installed. Do first lower side to install and move the appliance. Damage ... unpacking the base, be reinstalled. 4. Shipping bolts The appliance is fitted with all shipping bolts must not be removed before using the washer. Keep the 4 bolts, braces and the wrench for future use. • Whenever the appliance is installed on a carpeted floor. One...
... where there are areas which may cause severe vibration, noise, and malfunction. 2. To prevent internal damage during transportation. Before operating the washer, remove the bolts and braces. • If they are installed. Do first lower side to install and move the appliance. Damage ... unpacking the base, be reinstalled. 4. Shipping bolts The appliance is fitted with all shipping bolts must not be removed before using the washer. Keep the 4 bolts, braces and the wrench for future use. • Whenever the appliance is installed on a carpeted floor. One...
Owner's Manual
Page 7
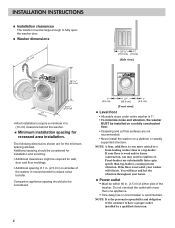
...on a platform or weakly supported structure. Power outlet • Must be within 60 in . (10 cm) clearance behind the washer. Front-loaders use substantially faster spin speeds than top-loaders, causing greater vibration. INSTALLATION INSTRUCTIONS Installation clearances The location must be large... enough to a top-loader. Washer dimensions (152091.13/1c6m" ) 29 3/4" 4" (75.6 cm) (10 cm) [Side view] 3811/16" (98.3 cm) (68.267c...
...on a platform or weakly supported structure. Power outlet • Must be within 60 in . (10 cm) clearance behind the washer. Front-loaders use substantially faster spin speeds than top-loaders, causing greater vibration. INSTALLATION INSTRUCTIONS Installation clearances The location must be large... enough to a top-loader. Washer dimensions (152091.13/1c6m" ) 29 3/4" 4" (75.6 cm) (10 cm) [Side view] 3811/16" (98.3 cm) (68.267c...
Owner's Manual
Page 8
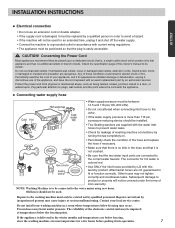
... accessible. ! Other hoses may cause injury or serious malfunctioning. Repairs to the washing machine must only be installed. • Two Sealing washers are supplied with the water inlet hoses to prevent water leaks. • Check for a few hours before putting it , discontinue use... at room temperature for leakage of washing machine connections by turning the tap completely on. • Periodically check the condition of LG's warranty. INSTALLATION INSTRUCTIONS ENGLISH Electrical connection • Do not use of these conditions could result in electric shock or fire. ...
... accessible. ! Other hoses may cause injury or serious malfunctioning. Repairs to the washing machine must only be installed. • Two Sealing washers are supplied with the water inlet hoses to prevent water leaks. • Check for a few hours before putting it , discontinue use... at room temperature for leakage of washing machine connections by turning the tap completely on. • Periodically check the condition of LG's warranty. INSTALLATION INSTRUCTIONS ENGLISH Electrical connection • Do not use of these conditions could result in electric shock or fire. ...
Owner's Manual
Page 9
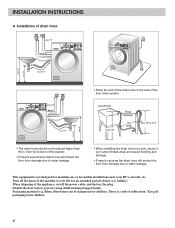
... extended period of time (e.g. This equipment is to water leakage. Turn off the power cable, and destroy the plug. holiday). from the bottom of the washer. • Properly securing the drain hose will protect the floor from children. 8 Disable the door lock to water leakage. • When installing the drain hose...
... extended period of time (e.g. This equipment is to water leakage. Turn off the power cable, and destroy the plug. holiday). from the bottom of the washer. • Properly securing the drain hose will protect the floor from children. 8 Disable the door lock to water leakage. • When installing the drain hose...
Owner's Manual
Page 10
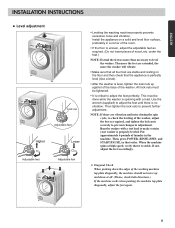
...not insert pieces of laundry in that it is uneven, adjust the adjustable feet as required, and tighten the lock nuts securely to level the washer. Install the appliance on the floor and then check that all . (Please, check both directions.) If the machine rocks when pushing the machine...the lock nuts to adjust the feet perfectly. The more the feet are extended, the more than necessary to prevent changes in a corner of the washer. If not, adjust the feet accordingly. All lock nuts must be tightened. • It is critical to prevent further adjustment. Put approximately 6 pounds...
...not insert pieces of laundry in that it is uneven, adjust the adjustable feet as required, and tighten the lock nuts securely to level the washer. Install the appliance on the floor and then check that all . (Please, check both directions.) If the machine rocks when pushing the machine...the lock nuts to adjust the feet perfectly. The more the feet are extended, the more than necessary to prevent changes in a corner of the washer. If not, adjust the feet accordingly. All lock nuts must be tightened. • It is critical to prevent further adjustment. Put approximately 6 pounds...
Owner's Manual
Page 11
... appliance. 1. Large items should be more than half the total wash load. Wash separately as clip, matches, pens, coins, and keys can damage both your washer and your clothes. Wash lint producers and lint collectors separately. 3. Load large items first. Add one or two similar items. • Check all the pockets...
... appliance. 1. Large items should be more than half the total wash load. Wash separately as clip, matches, pens, coins, and keys can damage both your washer and your clothes. Wash lint producers and lint collectors separately. 3. Load large items first. Add one or two similar items. • Check all the pockets...
Owner's Manual
Page 12
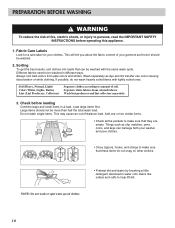
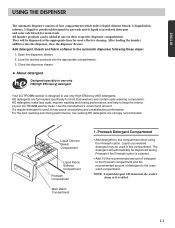
... be dispensed during Prewash if the Prewash option is used, it is designed to this compartment. They will drain into the washer drum as it may be used in their respective dispenser compartments. Add detergent, bleach and fabric softener to the main wash ...Prewash Detergent Compartment • Add detergent to use only HE(High Efficiency) detergent Your LG TROMM washer is added. 11 ENGLISH USING THE DISPENSER The automatic dispenser consists of your LG TROMM washer clean. About detergent Designed specially to use only High Efficiency (HE) detergents. HE...
... be dispensed during Prewash if the Prewash option is used, it is designed to this compartment. They will drain into the washer drum as it may be used in their respective dispenser compartments. Add detergent, bleach and fabric softener to the main wash ...Prewash Detergent Compartment • Add detergent to use only HE(High Efficiency) detergent Your LG TROMM washer is added. 11 ENGLISH USING THE DISPENSER The automatic dispenser consists of your LG TROMM washer clean. About detergent Designed specially to use only High Efficiency (HE) detergents. HE...
Owner's Manual
Page 13
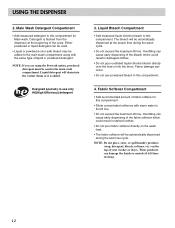
...to the fill line. • Do not exceed the maximum fill line. The bleach will be automatically dispensed at the beginning of your washer or dryer. These products can cause early dispensing of the fabric softener which could result in damaged clothes. • Do not pour undiluted ...liquid chlorine bleach directly onto the load or into the washer drum as it is flushed from the dispenser at the proper time during the last rinse cycle. USING THE DISPENSER 2. Overfilling can ...
...to the fill line. • Do not exceed the maximum fill line. The bleach will be automatically dispensed at the beginning of your washer or dryer. These products can cause early dispensing of the fabric softener which could result in damaged clothes. • Do not pour undiluted ...liquid chlorine bleach directly onto the load or into the washer drum as it is flushed from the dispenser at the proper time during the last rinse cycle. USING THE DISPENSER 2. Overfilling can ...
Owner's Manual
Page 15
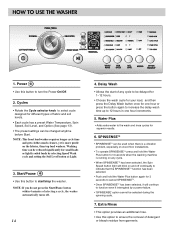
...Pause • Use this button to be changed anytime before Start. Delay Wash • Allows the start /stop the washer. HOW TO USE THE WASHER 1. NOTE: This front load washer requires longer cycle time and gets clothes much cleaner, yet is running on any cycle to turn the Power On/Off... cycle and setting the Soil Level button at Light. 3. Cycles • Rotate the Cycle selector knob to start of selecting a cycle, the washer automatically turns off continually to indicate that the SPINSENSETM function has been selected. • Push and hold the Water Plus button for 3 seconds when...
...Pause • Use this button to be changed anytime before Start. Delay Wash • Allows the start /stop the washer. HOW TO USE THE WASHER 1. NOTE: This front load washer requires longer cycle time and gets clothes much cleaner, yet is running on any cycle to turn the Power On/Off... cycle and setting the Soil Level button at Light. 3. Cycles • Rotate the Cycle selector knob to start of selecting a cycle, the washer automatically turns off continually to indicate that the SPINSENSETM function has been selected. • Push and hold the Water Plus button for 3 seconds when...
Owner's Manual
Page 16
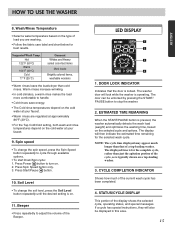
..., and special messages. LED DISPLAY 1 2 3 4 1. NOTE: The cycle time displayed may appear much of the cycle, as is pressed, the washer automatically detects the wash load (weight) and optimizes the washing time, based on the selected cycle and options. The displayed time is for the complete... Temp. Spin speed • To change the soil level, press the Soil Level button repeatedly until the desired setting is on a top-loading washer. 3. DOOR LOCK INDICATOR Indicates that of load you are regulated at approximately 86°F (30°C). • For the Tap Cold/Cold ...
..., and special messages. LED DISPLAY 1 2 3 4 1. NOTE: The cycle time displayed may appear much of the cycle, as is pressed, the washer automatically detects the wash load (weight) and optimizes the washing time, based on the selected cycle and options. The displayed time is for the complete... Temp. Spin speed • To change the soil level, press the Soil Level button repeatedly until the desired setting is on a top-loading washer. 3. DOOR LOCK INDICATOR Indicates that of load you are regulated at approximately 86°F (30°C). • For the Tap Cold/Cold ...
Owner's Manual
Page 17
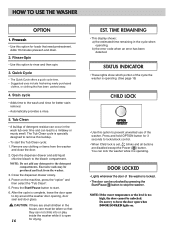
...Cycle • The Quick Cycle offers a quick cycle time. • Suggested uses include freshening newly purchased clothes, or clothing that they can lock the washer while it is operating. (See page 15) CHILD LOCK • Use this option for 3 seconds to lock/unlock control. • When Child lock...; This display shows: a) the estimated time remaining in the house, care must be unlocked by pressing the Start/Pause button to dry around the washer door opening, door seal and door glass. ! Stain cycle • Adds time to the detergent compartments. Rinse+Spin • Use this buildup....
...Cycle • The Quick Cycle offers a quick cycle time. • Suggested uses include freshening newly purchased clothes, or clothing that they can lock the washer while it is operating. (See page 15) CHILD LOCK • Use this option for 3 seconds to lock/unlock control. • When Child lock...; This display shows: a) the estimated time remaining in the house, care must be unlocked by pressing the Start/Pause button to dry around the washer door opening, door seal and door glass. ! Stain cycle • Adds time to the detergent compartments. Rinse+Spin • Use this buildup....
Owner's Manual
Page 18
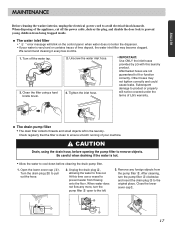
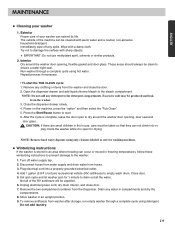
ENGLISH MAINTENANCE Before cleaning the washer interior, unplug the electrical power cord to pull out the hose. 2. We recommend cleaning it every few months. 1. Tighten the inlet hose. • IMPORTANT: Use ONLY the inlet hoses provided by LG with this time use a vessel to prevent water from flowing onto...filter open to ensure smooth running of lime deposit, the water inlet filter may not tighten correctly and could cause leaks. When disposing of LG's warranty. Unscrew the water inlet hose. 3. Other hoses may become clogged. Be careful when draining if the water is clean to the...
ENGLISH MAINTENANCE Before cleaning the washer interior, unplug the electrical power cord to pull out the hose. 2. We recommend cleaning it every few months. 1. Tighten the inlet hose. • IMPORTANT: Use ONLY the inlet hoses provided by LG with this time use a vessel to prevent water from flowing onto...filter open to ensure smooth running of lime deposit, the water inlet filter may not tighten correctly and could cause leaks. When disposing of LG's warranty. Unscrew the water inlet hose. 3. Other hoses may become clogged. Be careful when draining if the water is clean to the...
Owner's Manual
Page 19
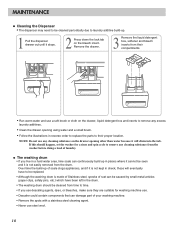
...to remove any cleaning substance from their proper location. Remove the drawer. 3 Remove the liquid detergent box, softener and bleach inserts from the washer before doing a load of laundry. MAINTENANCE Cleaning the Dispenser • The dispenser may need to be cleaned periodically due to laundry additive build...-up in the drum. • The washing drum should be cleaned from the drum. If this should happen, set the washer for washing machine use a soft brush or cloth on the drawer, liquid detergent box and inserts to remove any cleaning substance on the ...
...to remove any cleaning substance from their proper location. Remove the drawer. 3 Remove the liquid detergent box, softener and bleach inserts from the washer before doing a load of laundry. MAINTENANCE Cleaning the Dispenser • The dispenser may need to be cleaned periodically due to laundry additive build...-up in the drum. • The washing drum should be cleaned from the drum. If this should happen, set the washer for washing machine use a soft brush or cloth on the drawer, liquid detergent box and inserts to remove any cleaning substance on the ...
Owner's Manual
Page 20
... ) nontoxic recreational vehicle (RV) antifreeze to the bleach compartment. Unplug electrical power cord, dry drum interior, and close the door. 2. Store washer in compartments and dry the compartments. 8. NOTE: Do not add any spills. Do not add laundry. 19 Wipe with warm water and a ...an upright position. 9. Turn off any detergent to damage the surface with sharp objects. Drain any clothing or items from washer after storage, run empty washer through a complete cycle using only cleaners labeled as safe for drying. Repeat process if necessary. • To start ....
... ) nontoxic recreational vehicle (RV) antifreeze to the bleach compartment. Unplug electrical power cord, dry drum interior, and close the door. 2. Store washer in compartments and dry the compartments. 8. NOTE: Do not add any spills. Do not add laundry. 19 Wipe with warm water and a ...an upright position. 9. Turn off any detergent to damage the surface with sharp objects. Drain any clothing or items from washer after storage, run empty washer through a complete cycle using only cleaners labeled as safe for drying. Repeat process if necessary. • To start ....
Owner's Manual
Page 21
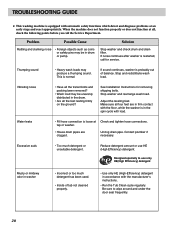
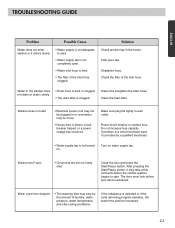
... be unevenly distributed in drum or pump. This is restarted, call the Service Department. Adjust the leveling feet. If noise continues after washer is normal. Vibrating noise • Have all the feet resting firmly on the ground? Excessive suds • Too much detergent has ...been used. • Inside of balance. Solution Stop washer and check drum and drain filter. Contact plumber if necessary. Designed specially to wipe around and under the door seal frequently. 20 ...
... be unevenly distributed in drum or pump. This is restarted, call the Service Department. Adjust the leveling feet. If noise continues after washer is normal. Vibrating noise • Have all the feet resting firmly on the ground? Excessive suds • Too much detergent has ...been used. • Inside of balance. Solution Stop washer and check drum and drain filter. Contact plumber if necessary. Designed specially to wipe around and under the door seal frequently. 20 ...
Owner's Manual
Page 22
... spin can be loose. • House fuse is blown, circuit breaker tripped, or a power outage has occurred. Straighten hose. Water in the washer does not drain or drains slowly • Drain hose is bent or clogged. • The drain filter is firmly shut. Make sure plug fits... fuse capacity. Wash cycle time delayed • The washing time may be achieved. TROUBLESHOOTING GUIDE ENGLISH Problem Possible Cause Water does not enter washer or it enters slowly • Water supply is not adequate in area. • Water supply tap is not completely open tap. Solution ...
... spin can be loose. • House fuse is blown, circuit breaker tripped, or a power outage has occurred. Straighten hose. Water in the washer does not drain or drains slowly • Drain hose is bent or clogged. • The drain filter is firmly shut. Make sure plug fits... fuse capacity. Wash cycle time delayed • The washing time may be achieved. TROUBLESHOOTING GUIDE ENGLISH Problem Possible Cause Water does not enter washer or it enters slowly • Water supply is not adequate in area. • Water supply tap is not completely open tap. Solution ...
Owner's Manual
Page 23
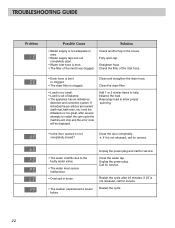
... completely closed? Restart the cycle after several attempts to the faulty water valve. • The water level sensor malfunction. • Overload in motor. • The washer experienced a power failure. If LE is not released, call for service. Unplug the power plug. Close the water tap.
... completely closed? Restart the cycle after several attempts to the faulty water valve. • The water level sensor malfunction. • Overload in motor. • The washer experienced a power failure. If LE is not released, call for service. Unplug the power plug. Close the water tap.


