
Owner's Manual (English)
Page 4
Otherwise, you may only be injured by the protruding sections of the stand. A3 Place the monitor with its front facing downward on the Stand Body with a standing base when the base is turned off. Connecting the stand base or Removing the ... Stand Base Slot Warning The tape and locking pin may be removed from those monitors equipped with the matching slots in the Stand Base. 3. Connecting the Display Before setting up the monitor, ensure that the power to the monitor, the computer system, and other attached devices is pulled up. Insert the hooks into...
Otherwise, you may only be injured by the protruding sections of the stand. A3 Place the monitor with its front facing downward on the Stand Body with a standing base when the base is turned off. Connecting the stand base or Removing the ... Stand Base Slot Warning The tape and locking pin may be removed from those monitors equipped with the matching slots in the Stand Base. 3. Connecting the Display Before setting up the monitor, ensure that the power to the monitor, the computer system, and other attached devices is pulled up. Insert the hooks into...

Owner's Manual (English)
Page 5
... only the stand base. Screw : Turn the screw by turning to the left to separate the monitor and Stand Base. Your monitor may fall and get damaged or injure your foot. Lift and turn the monitor to face towards the front after the connection is made to the right. A4 Connecting the Display...
... only the stand base. Screw : Turn the screw by turning to the left to separate the monitor and Stand Base. Your monitor may fall and get damaged or injure your foot. Lift and turn the monitor to face towards the front after the connection is made to the right. A4 Connecting the Display...

Owner's Manual (English)
Page 6
... be sure to remove the Locking pin to replace the Locking pin after it is turned off. It is recommended that the power to the monitor, the computer system, and other attached devices is removed, to adjust its height. A5 Connecting the Display Before setting up the... monitor, ensure that in order to maintain an ergonomic and comfortable viewing position, the forward tilt angle of the panel in various ways for maximum comfort. ...
... be sure to remove the Locking pin to replace the Locking pin after it is turned off. It is recommended that the power to the monitor, the computer system, and other attached devices is removed, to adjust its height. A5 Connecting the Display Before setting up the... monitor, ensure that in order to maintain an ergonomic and comfortable viewing position, the forward tilt angle of the panel in various ways for maximum comfort. ...

Owner's Manual (English)
Page 7
...adapter For Apple Macintosh use shielded signal interface cables (D-sub 15 pin cable, DVI cable) with optimal display settings.When the user connects the monitor for individual input signals. 'AUTO/SET Function'? Power Cord 2 Wall-outlet type 1 Signal Cable Varies according to turn the power on ...not available in order, then tighten the screw of the rear view. When you encounter problems such as shown. Make sure to model. When monitor power is turned on . Connecting the Display Using the Computer 1. User must use , a separate plug adapter is a simplified representation of ...
...adapter For Apple Macintosh use shielded signal interface cables (D-sub 15 pin cable, DVI cable) with optimal display settings.When the user connects the monitor for individual input signals. 'AUTO/SET Function'? Power Cord 2 Wall-outlet type 1 Signal Cable Varies according to turn the power on ...not available in order, then tighten the screw of the rear view. When you encounter problems such as shown. Make sure to model. When monitor power is turned on . Connecting the Display Using the Computer 1. User must use , a separate plug adapter is a simplified representation of ...

Owner's Manual (English)
Page 8
... connected to your computer. USB downstream Port x (4) Connect the cables from USB compliant peripherals-such as mouse, memory stick or USB hard disk, etc. The monitor's USB terminal supports USB 2.0 and High Speed cables. Data Rate Power Consumption High Speed 480Mbps 2.5W (Max,each Port) Full Speed 12Mbps 2.5W (Max,each...
... connected to your computer. USB downstream Port x (4) Connect the cables from USB compliant peripherals-such as mouse, memory stick or USB hard disk, etc. The monitor's USB terminal supports USB 2.0 and High Speed cables. Data Rate Power Consumption High Speed 480Mbps 2.5W (Max,each Port) Full Speed 12Mbps 2.5W (Max,each...

Owner's Manual (English)
Page 14
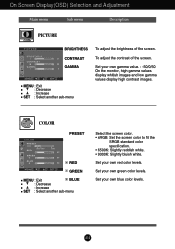
On Screen Display(OSD) Selection and Adjustment You were introduced to the procedure of the OSD appears. Touch the MENU Button, then the main menu of selecting and adjusting an item using the OSD system. A13 Listed below are the icons, icon names, and icon descriptions of the all items shown on the monitor may differ from the manual. Menu Name PICTURE Icons Sub-menus Button Tip MENU : Exit D E : Adjust (Decrease/Increase) SET : Enter : Select another sub-menu NOTE OSD (On Screen Display) menu languages on the Menu.
On Screen Display(OSD) Selection and Adjustment You were introduced to the procedure of the OSD appears. Touch the MENU Button, then the main menu of selecting and adjusting an item using the OSD system. A13 Listed below are the icons, icon names, and icon descriptions of the all items shown on the monitor may differ from the manual. Menu Name PICTURE Icons Sub-menus Button Tip MENU : Exit D E : Adjust (Decrease/Increase) SET : Enter : Select another sub-menu NOTE OSD (On Screen Display) menu languages on the Menu.
Owner's Manual (English)
Page 15
Set your own gamma value. : -50/0/50 On the monitor, high gamma values display whitish images and low gamma values display high contrast images. A14 COLOR COLOR PRESET RED GREEN MENU : Exit BLUE : Decrease : Increase ...
Set your own gamma value. : -50/0/50 On the monitor, high gamma values display whitish images and low gamma values display high contrast images. A14 COLOR COLOR PRESET RED GREEN MENU : Exit BLUE : Decrease : Increase ...

Owner's Manual (English)
Page 17
... ratio 4 : 3 5 : 4 4 : 3 4 : 3 4 : 3 4 : 3 3 : 2 WIDE 4:3 4:3 : Depending on the input video signal ratio, it will go off or on the front side of the monitor to 4:3.) The input signal which the control names are present in the screen. This function will automatically be enabled only when the input signal is...button is an analog signal. SOUND A function that a user can turn on1, on2 or off the sound when the monitor is powered off . The 26 inch monitor is adjusted to fit into the standard output level of the screen. Touch the button to video signal distortion. Using ...
... ratio 4 : 3 5 : 4 4 : 3 4 : 3 4 : 3 4 : 3 3 : 2 WIDE 4:3 4:3 : Depending on the input video signal ratio, it will go off or on the front side of the monitor to 4:3.) The input signal which the control names are present in the screen. This function will automatically be enabled only when the input signal is...button is an analog signal. SOUND A function that a user can turn on1, on2 or off the sound when the monitor is powered off . The 26 inch monitor is adjusted to fit into the standard output level of the screen. Touch the button to video signal distortion. Using ...

Owner's Manual (English)
Page 18
The applied screen will appear on the left side, whereas the non-applied screen will appear on the front of the monitor. Screen when applied Screen when not applied Main menu Sub menu Description MENU : Exit , : Move SET : Select To adjust the USER sub-menu function, touch ...
The applied screen will appear on the left side, whereas the non-applied screen will appear on the front of the monitor. Screen when applied Screen when not applied Main menu Sub menu Description MENU : Exit , : Move SET : Select To adjust the USER sub-menu function, touch ...

Owner's Manual (English)
Page 21
... can also download the driver from the display driver CD (or diskette) that comes with your display. Settings. Have you see an "Unrecognized monitor, Plug&Play (VESA DDC) monitor found" message? • Make sure to install the display driver from our web site: http://www.lge.com. G Do you installed the display...
... can also download the driver from the display driver CD (or diskette) that comes with your display. Settings. Have you see an "Unrecognized monitor, Plug&Play (VESA DDC) monitor found" message? • Make sure to install the display driver from our web site: http://www.lge.com. G Do you installed the display...
Owner's Manual (English)
Page 27
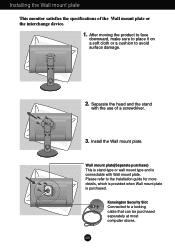
.... Kensington Security Slot Connected to avoid surface damage. 2. Separate the head and the stand with Wall mount plate. A26 Installing the Wall mount plate This monitor satisfies the specifications of a screwdriver. 3. Install the Wall mount plate. Wall mount plate(Separate purchase) This is stand-type or wall mount type and is...
.... Kensington Security Slot Connected to avoid surface damage. 2. Separate the head and the stand with Wall mount plate. A26 Installing the Wall mount plate This monitor satisfies the specifications of a screwdriver. 3. Install the Wall mount plate. Wall mount plate(Separate purchase) This is stand-type or wall mount type and is...

Specification (English)
Page 1
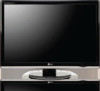
... FLATRON f-ENGINETM adjusts the contrast and brightness independently of the innovative operating system. widescreen forMat See the whole picture with LG's widescreen LCD monitors. fLatron f-enGineTM The LCD picture enhancing chip that require color accuracy such as photo and video editing. The 1920 ...16:10 aspect ratio deliver a better view. perfect for Windows Vista and complements the new look of each other to produce amazing images. W2600H Widescreen LCD Monitor 26" Class (25.5" diagonal) • 1920 x 1200 Resolution • Supports Full HD (1080p) • Wide Color Gamut &#...
... FLATRON f-ENGINETM adjusts the contrast and brightness independently of the innovative operating system. widescreen forMat See the whole picture with LG's widescreen LCD monitors. fLatron f-enGineTM The LCD picture enhancing chip that require color accuracy such as photo and video editing. The 1920 ...16:10 aspect ratio deliver a better view. perfect for Windows Vista and complements the new look of each other to produce amazing images. W2600H Widescreen LCD Monitor 26" Class (25.5" diagonal) • 1920 x 1200 Resolution • Supports Full HD (1080p) • Wide Color Gamut &#...

Specification (English)
Page 2
W2600H Technical specifications Widescreen LCD Monitor 26" Class (25.5" diagonal) L CD P A n e l Sp e c s Type 26" Widescreen LCD (25.5" diagonal) Screen Aspect Ratio 16:10 Resolution 1920 x 1200 Brightness 300 cd/m2 Contrast ...
W2600H Technical specifications Widescreen LCD Monitor 26" Class (25.5" diagonal) L CD P A n e l Sp e c s Type 26" Widescreen LCD (25.5" diagonal) Screen Aspect Ratio 16:10 Resolution 1920 x 1200 Brightness 300 cd/m2 Contrast ...


