
Owner's Manual
Page 3
... or over the power cord, and do not place the display where the power cord is provided. If used under any mode except the recommended resolution, some afterimages. Do not shock or scratch the front and sides of the screen with your LCD display. Do not use a screen saver on ... can cause failures which may appear on the screen. Some dot defects may cause damage to the screen. However, this is characteristic of the fixed-resolution LCD panel. Otherwise, it with anything to damage. Contact an authorized the service center for a long time as this display near water such as...
... or over the power cord, and do not place the display where the power cord is provided. If used under any mode except the recommended resolution, some afterimages. Do not shock or scratch the front and sides of the screen with your LCD display. Do not use a screen saver on ... can cause failures which may appear on the screen. Some dot defects may cause damage to the screen. However, this is characteristic of the fixed-resolution LCD panel. Otherwise, it with anything to damage. Contact an authorized the service center for a long time as this display near water such as...
Owner's Manual
Page 10
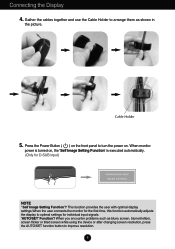
... provides the user with optimal display settings.When the user connects the monitor for the first time, this function automatically adjusts the display to improve resolution. 9 Connecting the Display 4. When monitor power is executed automatically. (Only for individual input signals. 'AUTO/SET' Function? Gather the cables together ...Holder to arrange them as blurry screen, blurred letters, screen flicker or tilted screen while using the device or after changing screen resolution, press the AUTO/SET function button to optimal settings for D-SUB input) NOTE ' Self Image Setting Function'?
... provides the user with optimal display settings.When the user connects the monitor for the first time, this function automatically adjusts the display to improve resolution. 9 Connecting the Display 4. When monitor power is executed automatically. (Only for individual input signals. 'AUTO/SET' Function? Gather the cables together ...Holder to arrange them as blurry screen, blurred letters, screen flicker or tilted screen while using the device or after changing screen resolution, press the AUTO/SET function button to optimal settings for D-SUB input) NOTE ' Self Image Setting Function'?
Owner's Manual
Page 12
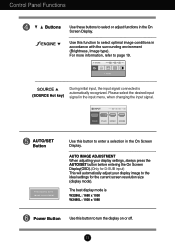
... the On Screen Display. For more information, refer to page 19. (SOURCE Hot key) During initial input, the input signal connected is W2286L : 1680 x 1050 W2486L : 1920 x 1080 Power Button Use this button to turn the display on or off. 11 Please select the desired input signal in the On Screen... to select or adjust functions in the input menu, when changing the input signal. Use this button to the ideal settings for the current screen resolution size (display mode).
... the On Screen Display. For more information, refer to page 19. (SOURCE Hot key) During initial input, the input signal connected is W2286L : 1680 x 1050 W2486L : 1920 x 1080 Power Button Use this button to turn the display on or off. 11 Please select the desired input signal in the On Screen... to select or adjust functions in the input menu, when changing the input signal. Use this button to the ideal settings for the current screen resolution size (display mode).
Owner's Manual
Page 15
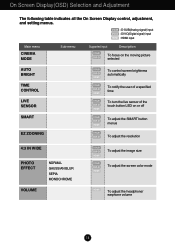
... of a specified time To turn the live sensor of the touch button LED on or off To adjust the SMART button menus To adjust the resolution 4:3 IN WIDE PHOTO EFFECT VOLUME NORMAL GAUSSIAN BLUR SEPIA MONOCHROME DSUB DVI-D HDMI DSUB DVI-D HDMI To adjust the image size To adjust the screen...
... of a specified time To turn the live sensor of the touch button LED on or off To adjust the SMART button menus To adjust the resolution 4:3 IN WIDE PHOTO EFFECT VOLUME NORMAL GAUSSIAN BLUR SEPIA MONOCHROME DSUB DVI-D HDMI DSUB DVI-D HDMI To adjust the image size To adjust the screen...
Owner's Manual
Page 18
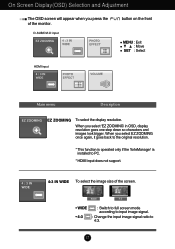
...is installed to 4:3. 17 On Screen Display(OSD) Selection and Adjustment The OSD screen will appear when you select 'EZ ZOOMING' in OSD, display resolution goes one step down so characters and images look bigger. D-SUB/DVI-D input button on the front MENU : Exit : Move SET : Select ...HDMI input Main menu Description EZ ZOOMING To select the display resolution. WIDE 4:3 • WIDE • 4:3 : Switch to full screen mode according to input image signal. : Change the input image signal ratio to PC...
...is installed to 4:3. 17 On Screen Display(OSD) Selection and Adjustment The OSD screen will appear when you select 'EZ ZOOMING' in OSD, display resolution goes one step down so characters and images look bigger. D-SUB/DVI-D input button on the front MENU : Exit : Move SET : Select ...HDMI input Main menu Description EZ ZOOMING To select the display resolution. WIDE 4:3 • WIDE • 4:3 : Switch to full screen mode according to input image signal. : Change the input image signal ratio to PC...
Owner's Manual
Page 27
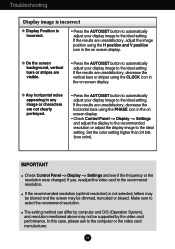
... the CLOCK icon in the on screen display. IMPORTANT Check Control Panel --> Display --> Settings and see if the frequency or the resolution were changed. If yes, readjust the video card to the computer or the video card manufacturer. 26 Troubleshooting Display image is incorrect... button to automatically adjust your display image to the ideal setting. The setting method can differ by computer and O/S (Operation System), and resolution mentioned above may be supported by the video card performance. G Any horizontal noise appearing in the on screen display. • Check Control...
... the CLOCK icon in the on screen display. IMPORTANT Check Control Panel --> Display --> Settings and see if the frequency or the resolution were changed. If yes, readjust the video card to the computer or the video card manufacturer. 26 Troubleshooting Display image is incorrect... button to automatically adjust your display image to the ideal setting. The setting method can differ by computer and O/S (Operation System), and resolution mentioned above may be supported by the video card performance. G Any horizontal noise appearing in the on screen display. • Check Control...

Owner's Manual
Page 28
... is properly inserted in the slot. • Set the color setting higher than 24 bits (true color) at Control Panel - Not supply to the recommend resolution. Do you see an "Unrecognized monitor, Plug&Play (VESA DDC) monitor found" message? Troubleshooting Display image is incorrect G The screen color is mono or abnormal...
... is properly inserted in the slot. • Set the color setting higher than 24 bits (true color) at Control Panel - Not supply to the recommend resolution. Do you see an "Unrecognized monitor, Plug&Play (VESA DDC) monitor found" message? Troubleshooting Display image is incorrect G The screen color is mono or abnormal...
Owner's Manual
Page 29
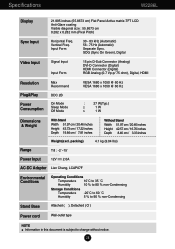
...), Digital Video Input Signal Input Input Form 15 pin D-Sub Connector (Analog) DVI-D Connector (Digital) HDMI Connector (Digital) RGB Analog (0.7 Vp-p/ 75 ohm), Digital, HDMI Resolution Plug&Play Power Consumption Max Recommend DDC 2B On Mode Sleep Mode Off Mode VESA 1680 x 1050 @ 60 Hz VESA 1680 x 1050 @ 60 Hz : 27...
...), Digital Video Input Signal Input Input Form 15 pin D-Sub Connector (Analog) DVI-D Connector (Digital) HDMI Connector (Digital) RGB Analog (0.7 Vp-p/ 75 ohm), Digital, HDMI Resolution Plug&Play Power Consumption Max Recommend DDC 2B On Mode Sleep Mode Off Mode VESA 1680 x 1050 @ 60 Hz VESA 1680 x 1050 @ 60 Hz : 27...
Owner's Manual
Page 30
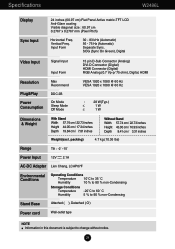
... cord Wall-outlet type NOTE Information in this document is subject to change without notice. 29 SOG (Sync On Green), Digital Video Input Signal Input Resolution Plug&Play Power Consumption Input Form Max Recommend DDC 2B On Mode Sleep Mode Off Mode 15 pin D-Sub Connector (Analog) DVI-D Connector (Digital)... Width 57.74 cm / 22.73 inches Height 43.00 cm / 16.93 inches Depth 8.41 cm / 3.31 inches Weight(excl. Vertical Freq. Specifications W2486L Display Sync Input 24 inches (60.97 cm) Flat Panel Active matrix-TFT LCD Anti-Glare coating Visible diagonal size : 60.97 cm 0.2767 x 0.2767...
... cord Wall-outlet type NOTE Information in this document is subject to change without notice. 29 SOG (Sync On Green), Digital Video Input Signal Input Resolution Plug&Play Power Consumption Input Form Max Recommend DDC 2B On Mode Sleep Mode Off Mode 15 pin D-Sub Connector (Analog) DVI-D Connector (Digital)... Width 57.74 cm / 22.73 inches Height 43.00 cm / 16.93 inches Depth 8.41 cm / 3.31 inches Weight(excl. Vertical Freq. Specifications W2486L Display Sync Input 24 inches (60.97 cm) Flat Panel Active matrix-TFT LCD Anti-Glare coating Visible diagonal size : 60.97 cm 0.2767 x 0.2767...
Owner's Manual
Page 32
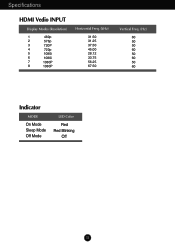
Specifications HDMI Vedio INPUT Display Modes (Resolution) 1 480p 2 576p 3 720P 4 720p 5 1080i 6 1080i 7 1080P 8 1080P Horizontal Freq. (kHz) 31.50 31.25 37.50 45.00 28.12 33.75 56.25 67.50 Vertical Freq. (Hz) 60 50 50 60 50 60 50 60 Indicator MODE On Mode Sleep Mode Off Mode LED Color Red Red Blinking Off 31
Specifications HDMI Vedio INPUT Display Modes (Resolution) 1 480p 2 576p 3 720P 4 720p 5 1080i 6 1080i 7 1080P 8 1080P Horizontal Freq. (kHz) 31.50 31.25 37.50 45.00 28.12 33.75 56.25 67.50 Vertical Freq. (Hz) 60 50 50 60 50 60 50 60 Indicator MODE On Mode Sleep Mode Off Mode LED Color Red Red Blinking Off 31


