

Owner's Manual
Page 4
... in which to clean the front frame; On Repacking Do not throw away the carton and packing materials. On Disposal (Only, Hg lamp used LCD Monitor) The fluorescent lamp used in this product must be carried out in accordance to 4 times, and use chemicals such as benzene, paint thinners or alcohol...
... in which to clean the front frame; On Repacking Do not throw away the carton and packing materials. On Disposal (Only, Hg lamp used LCD Monitor) The fluorescent lamp used in this product must be carried out in accordance to 4 times, and use chemicals such as benzene, paint thinners or alcohol...
Owner's Manual
Page 5
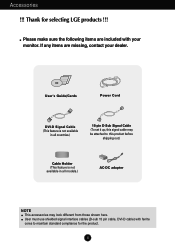
Please make sure the following items are missing, contact your monitor. Accessories !!! User's Guide/Cards Power Cord DVI-D Signal Cable (This feature is not available in all countries.) 15-pin D-Sub Signal Cable (To set it ...
Please make sure the following items are missing, contact your monitor. Accessories !!! User's Guide/Cards Power Cord DVI-D Signal Cable (This feature is not available in all countries.) 15-pin D-Sub Signal Cable (To set it ...

Owner's Manual
Page 6
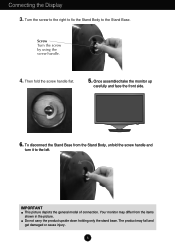
Assemble the Stand Base into the Stand Body in the correct direction. Stand Body Stand Base Good Connection The Stand Base may fall and get damaged or cause injury. Connecting the Display Before setting up the monitor, ensure that the power to the monitor, the computer system, and other attached devices is turned off. Make sure you push the Stand Base until the end. Bad Connection 5 Place the monitor face down on the soft cloth. 2. Connecting and Disassembling the stand 1.
Assemble the Stand Base into the Stand Body in the correct direction. Stand Body Stand Base Good Connection The Stand Base may fall and get damaged or cause injury. Connecting the Display Before setting up the monitor, ensure that the power to the monitor, the computer system, and other attached devices is turned off. Make sure you push the Stand Base until the end. Bad Connection 5 Place the monitor face down on the soft cloth. 2. Connecting and Disassembling the stand 1.
Owner's Manual
Page 7
Once assembled take the monitor up carefully and face the front side. 6. To disconnect the Stand Base from the items shown in the picture. Turn the screw to the right ... screw handle flat. 5. IMPORTANT This picture depicts the general model of connection. Do not carry the product upside down holding only the stand base. Your monitor may fall and get damaged or cause injury. 6 The product may differ from the Stand Body, unfold the screw handle and turn it to the...
Once assembled take the monitor up carefully and face the front side. 6. To disconnect the Stand Base from the items shown in the picture. Turn the screw to the right ... screw handle flat. 5. IMPORTANT This picture depicts the general model of connection. Do not carry the product upside down holding only the stand base. Your monitor may fall and get damaged or cause injury. 6 The product may differ from the Stand Body, unfold the screw handle and turn it to the...

Owner's Manual
Page 8
... the angle of the panel in various ways for maximum comfort. You can hurt your finger(s) in between the head of the monitor and the stand body. ERGONOMIC It is recommended that the power to maintain an ergonomic and comfortable viewing position, the forward tilt ... When adjusting the angle of the screen, do not put your finger(s). Adjust the position of the monitor. Connecting the Display Before setting up the monitor, ensure that in order to the monitor, the computer system, and other attached devices is turned off. Positioning your display After installation, adjust the...
... the angle of the panel in various ways for maximum comfort. You can hurt your finger(s) in between the head of the monitor and the stand body. ERGONOMIC It is recommended that the power to maintain an ergonomic and comfortable viewing position, the forward tilt ... When adjusting the angle of the screen, do not put your finger(s). Adjust the position of the monitor. Connecting the Display Before setting up the monitor, ensure that in order to the monitor, the computer system, and other attached devices is turned off. Positioning your display After installation, adjust the...
Owner's Manual
Page 9
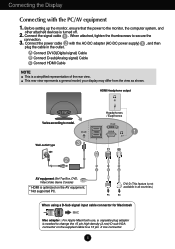
... type AV equipment (Set-Top Box, DVD, Video,Video Game Console) * HDMI is a simplified representation of the rear view. Before setting up the monitor, ensure that the power to secure the 3. your display may differ from the view as shown. When attached, tighten the thumbscrews to the... monitor, the computer system, and 2. C B A DVI-D (This feature is not available in the outlet. other attached devices is needed to change the 15 pin high ...
... type AV equipment (Set-Top Box, DVD, Video,Video Game Console) * HDMI is a simplified representation of the rear view. Before setting up the monitor, ensure that the power to secure the 3. your display may differ from the view as shown. When attached, tighten the thumbscrews to the... monitor, the computer system, and 2. C B A DVI-D (This feature is not available in the outlet. other attached devices is needed to change the 15 pin high ...
Owner's Manual
Page 10
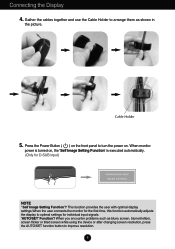
... adjusts the display to optimal settings for D-SUB input) NOTE ' Self Image Setting Function'? When you encounter problems such as shown in the picture. When monitor power is turned on, the 'Self Image Setting Function' is executed automatically. (Only for individual input signals. 'AUTO/SET' Function? Connecting the Display 4. Cable Holder...
... adjusts the display to optimal settings for D-SUB input) NOTE ' Self Image Setting Function'? When you encounter problems such as shown in the picture. When monitor power is turned on, the 'Self Image Setting Function' is executed automatically. (Only for individual input signals. 'AUTO/SET' Function? Connecting the Display 4. Cable Holder...
Owner's Manual
Page 17
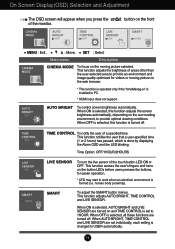
TIME CONTROL To notify the user of the monitor. When AUTO BRIGHT, TIME CONTROL and LIVE SENSOR are turned off . human body proximity). When OFF is selected, all these functions are set to provide ...
TIME CONTROL To notify the user of the monitor. When AUTO BRIGHT, TIME CONTROL and LIVE SENSOR are turned off . human body proximity). When OFF is selected, all these functions are set to provide ...
Owner's Manual
Page 18
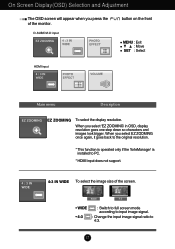
... input image signal. : Change the input image signal ratio to PC. * HDMI input does not support. 4:3 IN WIDE To select the image size of the monitor. D-SUB/DVI-D input button on the front MENU : Exit : Move SET : Select HDMI input Main menu Description EZ ZOOMING To select the display resolution.
... input image signal. : Change the input image signal ratio to PC. * HDMI input does not support. 4:3 IN WIDE To select the image size of the monitor. D-SUB/DVI-D input button on the front MENU : Exit : Move SET : Select HDMI input Main menu Description EZ ZOOMING To select the display resolution.

Owner's Manual
Page 20
... Adjustment The OSD screen will appear when you touch the button on the left and the inactive state is on the right side of the monitor. D-SUB/DVI-D input HDMI input INTERNET Select this when you are working on the document (Word etc.) GAME Select this when you are displayed as...
... Adjustment The OSD screen will appear when you touch the button on the left and the inactive state is on the right side of the monitor. D-SUB/DVI-D input HDMI input INTERNET Select this when you are working on the document (Word etc.) GAME Select this when you are displayed as...
Owner's Manual
Page 22
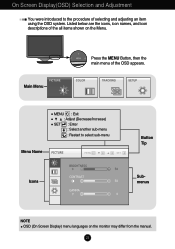
On Screen Display(OSD) Selection and Adjustment You were introduced to select sub-menu Menu Name Icons Button Tip Submenus NOTE OSD (On Screen Display) menu languages on the Menu. MENU : Exit : Adjust (Decrease/Increase) SET : Enter : Select another sub-menu : Restart to the procedure of the OSD appears. Main Menu Press the MENU Button, then the main menu of selecting and adjusting an item using the OSD system. Listed below are the icons, icon names, and icon descriptions of the all items shown on the monitor may differ from the manual. 21
On Screen Display(OSD) Selection and Adjustment You were introduced to select sub-menu Menu Name Icons Button Tip Submenus NOTE OSD (On Screen Display) menu languages on the Menu. MENU : Exit : Adjust (Decrease/Increase) SET : Enter : Select another sub-menu : Restart to the procedure of the OSD appears. Main Menu Press the MENU Button, then the main menu of selecting and adjusting an item using the OSD system. Listed below are the icons, icon names, and icon descriptions of the all items shown on the monitor may differ from the manual. 21

Owner's Manual
Page 23
...', the screen will be bright and if you select 'LOW', the screen will be dark. (only for video signal, it is the darkest screen the monitor can set the offset level. As the criteria for HDMI input) * Offset? Set your own gamma value. : -50 / 0 / 50 On the... monitor, high gamma values display whitish images and low gamma values display blackish images. MENU : Exit : Decrease : Increase SET : Select another sub-menu COLOR MENU : Exit : ...
...', the screen will be bright and if you select 'LOW', the screen will be dark. (only for video signal, it is the darkest screen the monitor can set the offset level. As the criteria for HDMI input) * Offset? Set your own gamma value. : -50 / 0 / 50 On the... monitor, high gamma values display whitish images and low gamma values display blackish images. MENU : Exit : Decrease : Increase SET : Select another sub-menu COLOR MENU : Exit : ...
Owner's Manual
Page 25
... different the required specifications, the color level may be generated around the edge of the OSD window on . WHITE BALANCE If the output of the monitor to fit into the standard output level of the screen. Using this does not improve the screen image, restore the factory default settings. When it...
... different the required specifications, the color level may be generated around the edge of the OSD window on . WHITE BALANCE If the output of the monitor to fit into the standard output level of the screen. Using this does not improve the screen image, restore the factory default settings. When it...

Owner's Manual
Page 28
... you installed the display driver? • Be sure to check if the video card supports Plug&Play function. Or, you see an "Unrecognized monitor, Plug&Play (VESA DDC) monitor found" message? The Audio function is not working G Picture OK & No sound. • Check whether volume is properly inserted in the slot. •...
... you installed the display driver? • Be sure to check if the video card supports Plug&Play function. Or, you see an "Unrecognized monitor, Plug&Play (VESA DDC) monitor found" message? The Audio function is not working G Picture OK & No sound. • Check whether volume is properly inserted in the slot. •...


