Owner's Manual (English)
Page 2
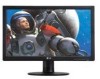
... components inside , even when the power is certified by the applicable national standards if not being provided by the manufacturer. They may result in the specifications of time, unplug it can cause electric shock. To Avoid Personal Injury : Do not place the display on a sloping shelf unless properly secured. Some internal...
... components inside , even when the power is certified by the applicable national standards if not being provided by the manufacturer. They may result in the specifications of time, unplug it can cause electric shock. To Avoid Personal Injury : Do not place the display on a sloping shelf unless properly secured. Some internal...
Owner's Manual (English)
Page 15
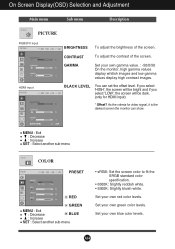
... MENU : Exit : Decrease BLUE : Increase SET : Select another sub-menu • sRGB: Set the screen color to fit the SRGB standard color specification. • 6500K: Slightly reddish white. • 9300K: Slightly bluish white. BLACK LEVEL You can show. CONTRAST To adjust the contrast of the screen.... GAMMA Set your own blue color levels. Set your own gamma value. : -50/0/50 On the monitor, high gamma values display whitish images and low gamma values display high contrast images. On Screen Display(OSD) Selection and Adjustment Main menu ...
... MENU : Exit : Decrease BLUE : Increase SET : Select another sub-menu • sRGB: Set the screen color to fit the SRGB standard color specification. • 6500K: Slightly reddish white. • 9300K: Slightly bluish white. BLACK LEVEL You can show. CONTRAST To adjust the contrast of the screen.... GAMMA Set your own blue color levels. Set your own gamma value. : -50/0/50 On the monitor, high gamma values display whitish images and low gamma values display high contrast images. On Screen Display(OSD) Selection and Adjustment Main menu ...
Owner's Manual (English)
Page 19
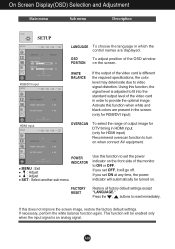
Using this function to set OFF, it will automatically be enabled only when the input signal is different the required specifications, the color level may deteriorate due to video signal distortion. If you set the power indicator on the front side of the OSD window POSITION ... input) OVERSCAN To select the range of output image for DTV timing in order to provide the optimal image. OSD To adjust position of the monitor to reset immediately. Press the , buttons to ON or OFF. A18
Using this function to set OFF, it will automatically be enabled only when the input signal is different the required specifications, the color level may deteriorate due to video signal distortion. If you set the power indicator on the front side of the OSD window POSITION ... input) OVERSCAN To select the range of output image for DTV timing in order to provide the optimal image. OSD To adjust position of the monitor to reset immediately. Press the , buttons to ON or OFF. A18
Owner's Manual (English)
Page 20
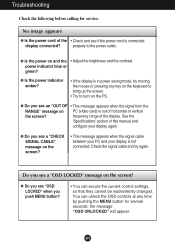
... (video card) is out of the • Check and see a "OSD LOCKED" message on and the • Adjust the brightness and the contrast. See the 'Specifications' section of the display. A19 frequency range of this manual and configure your display is connected display connected? Do you push MENU button? • You...
... (video card) is out of the • Check and see a "OSD LOCKED" message on and the • Adjust the brightness and the contrast. See the 'Specifications' section of the display. A19 frequency range of this manual and configure your display is connected display connected? Do you push MENU button? • You...
Owner's Manual (English)
Page 23
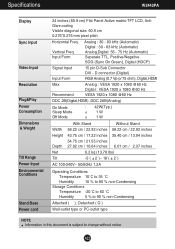
... - 75 Hz (Automatic) Separate TTL, Positive/Negative SOG (Sync On Green), Digital (HDCP) Signal Input Input Form 15 pin D-Sub Connector DVI - A22 Vertical Freq. Specifications W2442PA Display Sync Input Video Input Resolution Plug&Play Power Consumption Dimensions & Weight Tilt Range Power Input Environmental Conditions Stand Base Power cord...
... - 75 Hz (Automatic) Separate TTL, Positive/Negative SOG (Sync On Green), Digital (HDCP) Signal Input Input Form 15 pin D-Sub Connector DVI - A22 Vertical Freq. Specifications W2442PA Display Sync Input Video Input Resolution Plug&Play Power Consumption Dimensions & Weight Tilt Range Power Input Environmental Conditions Stand Base Power cord...
Owner's Manual (English)
Page 24
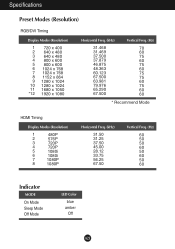
Specifications Preset Modes (Resolution) RGB/DVI Timing Display Modes (Resolution) 1 720 x 400 2 640 x 480 3 640 x 480 4 800 x 600 5 800 x 600 6 1024 x 768 7 1024 x 768 8 1152 x 864 9 ...
Specifications Preset Modes (Resolution) RGB/DVI Timing Display Modes (Resolution) 1 720 x 400 2 640 x 480 3 640 x 480 4 800 x 600 5 800 x 600 6 1024 x 768 7 1024 x 768 8 1152 x 864 9 ...
Owner's Manual (English)
Page 25
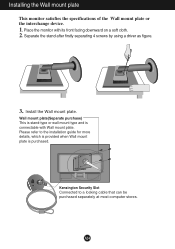
... the installation guide for more details, which is provided when Wall mount plate is connectable with its front facing downward on a soft cloth. 2. Place the monitor with Wall mount plate. Installing the Wall mount plate This monitor satisfies the specifications of the Wall mount plate or the interchange device. 1.
... the installation guide for more details, which is provided when Wall mount plate is connectable with its front facing downward on a soft cloth. 2. Place the monitor with Wall mount plate. Installing the Wall mount plate This monitor satisfies the specifications of the Wall mount plate or the interchange device. 1.
