Owner's Manual (English)
Page 2
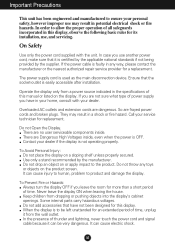
.... There are frayed power cords and broken plugs. Do not drop an object on a sloping shelf unless properly secured. To Prevent Fire or Hazards: Always turn the display OFF if you have not been designed for an extended period of time. Do not add accessories that the socket-outlet is used...
.... There are frayed power cords and broken plugs. Do not drop an object on a sloping shelf unless properly secured. To Prevent Fire or Hazards: Always turn the display OFF if you have not been designed for an extended period of time. Do not add accessories that the socket-outlet is used...
Owner's Manual (English)
Page 4
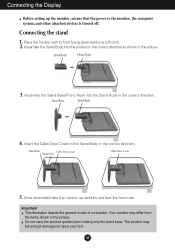
... cloth. 2. A3 Once assembled take the monitor up the monitor, ensure that the power to the monitor, the computer system, and other attached devices is turned off. Your monitor may fall and get damaged or injure your foot. Assemble the Stand Body into the Stand Body in the correct direction. Stand...
... cloth. 2. A3 Once assembled take the monitor up the monitor, ensure that the power to the monitor, the computer system, and other attached devices is turned off. Your monitor may fall and get damaged or injure your foot. Assemble the Stand Body into the Stand Body in the correct direction. Stand...
Owner's Manual (English)
Page 6
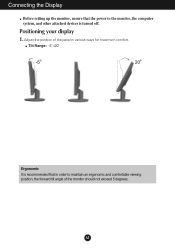
A5 Adjust the position of the panel in order to the monitor, the computer system, and other attached devices is recommended that the power to maintain an ergonomic and comfortable viewing position, the forward tilt angle of the monitor should not exceed 5 degrees. Tilt Range: -5˚~20˚ Ergonomic It is turned off. Connecting the Display Before setting up the monitor, ensure that in various ways for maximum comfort. Positioning your display 1.
A5 Adjust the position of the panel in order to the monitor, the computer system, and other attached devices is recommended that the power to maintain an ergonomic and comfortable viewing position, the forward tilt angle of the monitor should not exceed 5 degrees. Tilt Range: -5˚~20˚ Ergonomic It is turned off. Connecting the Display Before setting up the monitor, ensure that in various ways for maximum comfort. Positioning your display 1.
Owner's Manual (English)
Page 7
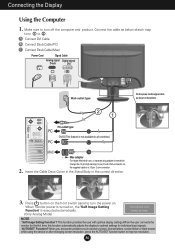
... connector on the supplied cable to 2 . When monitor power is executed automatically. (Only Analog Mode) NOTE ' Self Image Setting Function'? Make sure to turn off the computer and product. Connect the cable as below sketch map form 1 to a 15 pin 2 row connector. 2. A Connect DVI Cable B ...time, this function automatically adjusts the display to improve resolution. Press button on the front switch panel to turn the power on , the 'Self Image Setting Function' is turned on . When you encounter problems such as shown in the correct direction. 3. A6 This function provides ...
... connector on the supplied cable to 2 . When monitor power is executed automatically. (Only Analog Mode) NOTE ' Self Image Setting Function'? Make sure to turn off the computer and product. Connect the cable as below sketch map form 1 to a 15 pin 2 row connector. 2. A Connect DVI Cable B ...time, this function automatically adjusts the display to improve resolution. Press button on the front switch panel to turn the power on , the 'Self Image Setting Function' is turned on . When you encounter problems such as shown in the correct direction. 3. A6 This function provides ...

Owner's Manual (English)
Page 9
...or adjust functions in the On Screen Display. Power Indicator This Indicator lights up as blue when the display is : W1952TQ : 1440 x 900 W2252TQ : 1680 x 1050 Power Button Use this indicator color changes to the ideal settings for the current screen resolution size (display mode). For more information...The best display mode is operating normally(On Mode). This will automatically adjust your display settings, always press the AUTO/SET button prior to turn the display on or off. A8 AUTO IMAGE ADJUSTMENT When adjusting your display image to amber. If the display is in Sleep Mode ...
...or adjust functions in the On Screen Display. Power Indicator This Indicator lights up as blue when the display is : W1952TQ : 1440 x 900 W2252TQ : 1680 x 1050 Power Button Use this indicator color changes to the ideal settings for the current screen resolution size (display mode). For more information...The best display mode is operating normally(On Mode). This will automatically adjust your display settings, always press the AUTO/SET button prior to turn the display on or off. A8 AUTO IMAGE ADJUSTMENT When adjusting your display image to amber. If the display is in Sleep Mode ...
Owner's Manual (English)
Page 11
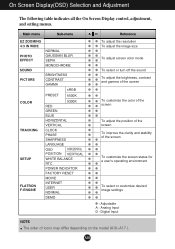
... INDICATOR FACTORY RESET MOVIE INTERNET USER NORMAL DEMO To adjust the resolution To adjust the image size To adjust screen color mode To select or turn off the sound To adjust the brightness, contrast and gamma of the screen To customize the color of the screen To adjust the position of...
... INDICATOR FACTORY RESET MOVIE INTERNET USER NORMAL DEMO To adjust the resolution To adjust the image size To adjust screen color mode To select or turn off the sound To adjust the brightness, contrast and gamma of the screen To customize the color of the screen To adjust the position of...
Owner's Manual (English)
Page 15
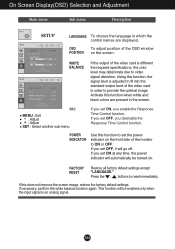
... Time Control function. If this function when white and black colors are displayed. If necessary, perform the white balance function again. This function will be turned on. POWER INDICATOR Use this function, the signal level is an analog signal. Press the , buttons to video signal distortion. A14 On Screen Display(OSD...
... Time Control function. If this function when white and black colors are displayed. If necessary, perform the white balance function again. This function will be turned on. POWER INDICATOR Use this function, the signal level is an analog signal. Press the , buttons to video signal distortion. A14 On Screen Display(OSD...

Owner's Manual (English)
Page 17
...; Main Button Menu On • Fun Button Menu On • Menu Off Use 'AUTO/SET' button to select sound (two kinds of Buzzer sound) or turn off the sound, and use 'MENU' button to the screen that the dark and sharp image becomes brighter and more blurred. - On Screen Display(OSD... EFFECT - A16 SEPIA: This option changes the screen to be Sepia tone. NORMAL: The PhotoEffect function is brown color tone. - SOUND SOUND To select or turn off the Buzzer sound. MONOCHROME: This option changed the screen to be Gray tone.
...; Main Button Menu On • Fun Button Menu On • Menu Off Use 'AUTO/SET' button to select sound (two kinds of Buzzer sound) or turn off the sound, and use 'MENU' button to the screen that the dark and sharp image becomes brighter and more blurred. - On Screen Display(OSD... EFFECT - A16 SEPIA: This option changes the screen to be Sepia tone. NORMAL: The PhotoEffect function is brown color tone. - SOUND SOUND To select or turn off the Buzzer sound. MONOCHROME: This option changed the screen to be Gray tone.

Owner's Manual (English)
Page 19
... LOCKED" when you see a "CHECK SIGNAL CABLE" message on the PC. ● Do you see if the power cord is connected display connected? properly to turn on the screen? • This message appears when the signal cable between your PC and your display is out of this manual and configure your...
... LOCKED" when you see a "CHECK SIGNAL CABLE" message on the PC. ● Do you see if the power cord is connected display connected? properly to turn on the screen? • This message appears when the signal cable between your PC and your display is out of this manual and configure your...


