Owner's Manual (English)
Page 4
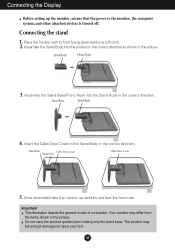
... shown in the correct direction. Stand Base Stand Body 4. Once assembled take the monitor up the monitor, ensure that the power to the monitor, the computer system, and other attached devices is turned off. Place the monitor with its front facing downward on a soft cloth. 2. Assemble the Stand Body ...into the Stand Body in the picture. Insert the Cable Deco Cover in the Stand Body in the picture. Your monitor may fall and get damaged ...
... shown in the correct direction. Stand Base Stand Body 4. Once assembled take the monitor up the monitor, ensure that the power to the monitor, the computer system, and other attached devices is turned off. Place the monitor with its front facing downward on a soft cloth. 2. Assemble the Stand Body ...into the Stand Body in the picture. Insert the Cable Deco Cover in the Stand Body in the picture. Your monitor may fall and get damaged ...
Owner's Manual (English)
Page 6
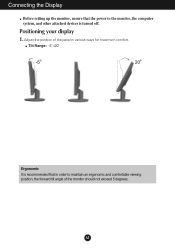
A5 Positioning your display 1. Tilt Range: -5˚~20˚ Ergonomic It is turned off. Connecting the Display Before setting up the monitor, ensure that the power to the monitor, the computer system, and other attached devices is recommended that in order to maintain an ergonomic and comfortable viewing position, the forward tilt angle of the panel in various ways for maximum comfort. Adjust the position of the monitor should not exceed 5 degrees.
A5 Positioning your display 1. Tilt Range: -5˚~20˚ Ergonomic It is turned off. Connecting the Display Before setting up the monitor, ensure that the power to the monitor, the computer system, and other attached devices is recommended that in order to maintain an ergonomic and comfortable viewing position, the forward tilt angle of the panel in various ways for maximum comfort. Adjust the position of the monitor should not exceed 5 degrees.
Owner's Manual (English)
Page 7
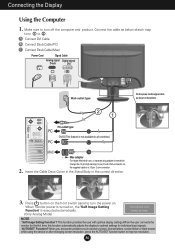
This function provides the user with optimal display settings.When the user connects the monitor for the first time, this function automatically adjusts the display to turn the power on. PC-outlet type DVI-D(This feature is not available in all countries.) Mac adapter For Apple Macintosh use, a...plug adapter is needed to change the 15 pin high density (3 row) D-sub VGA connector on , the 'Self Image Setting Function' is turned on the supplied cable to improve resolution. A6 Connect the cable as blurry screen, blurred letters, screen flicker or tilted screen while using the device...
This function provides the user with optimal display settings.When the user connects the monitor for the first time, this function automatically adjusts the display to turn the power on. PC-outlet type DVI-D(This feature is not available in all countries.) Mac adapter For Apple Macintosh use, a...plug adapter is needed to change the 15 pin high density (3 row) D-sub VGA connector on , the 'Self Image Setting Function' is turned on the supplied cable to improve resolution. A6 Connect the cable as blurry screen, blurred letters, screen flicker or tilted screen while using the device...
Owner's Manual (English)
Page 15
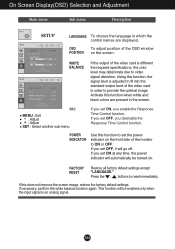
... white and black colors are present in which the control names are displayed. If you set ON at any time, the power indicator will be turned on. If you set OFF, it will go off. RTC MENU : Exit : Adjust : Adjust SET : Select another sub-menu If you enable the Response Time... position of the OSD window POSITION on the front side of the video card is an analog signal. WHITE BALANCE If the output of the monitor to set ON, you set the power indicator on the screen.
... white and black colors are present in which the control names are displayed. If you set ON at any time, the power indicator will be turned on. If you set OFF, it will go off. RTC MENU : Exit : Adjust : Adjust SET : Select another sub-menu If you enable the Response Time... position of the OSD window POSITION on the front side of the video card is an analog signal. WHITE BALANCE If the output of the monitor to set ON, you set the power indicator on the screen.


