

Owner's Manual
Page 2
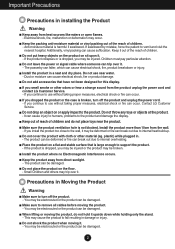
... the wall input terminal. - If you are not sure what type of thunder and lightning, never touch the power cord and signal cable because it cannot come loose. - Do not connect several extension cords, electrical appliances or electrical heaters to overheating. If you may result in the product specification. - Warning Failure to do not touch the power cable right after plugging into the product openings...
... the wall input terminal. - If you are not sure what type of thunder and lightning, never touch the power cord and signal cable because it cannot come loose. - Do not connect several extension cords, electrical appliances or electrical heaters to overheating. If you may result in the product specification. - Warning Failure to do not touch the power cable right after plugging into the product openings...
Owner's Manual
Page 3
...remove all cables before moving it . - Do not throw any toys or objects at the product. - plastic) while plugged in installing the Product Warning Keep away from the product unplug the power cord and contact LG Customer Service. - Do not place the product on a flat and stable surface that have not been designed for this display. Make... use near the product. If you install the product too close to the wall, it out of the reach of children. Do not drop an object on sit upon it . - It can break out due to turn off the product. - Keep out of reach of children. - Install the...
...remove all cables before moving it . - Do not throw any toys or objects at the product. - plastic) while plugged in installing the Product Warning Keep away from the product unplug the power cord and contact LG Customer Service. - Do not place the product on a flat and stable surface that have not been designed for this display. Make... use near the product. If you install the product too close to the wall, it out of the reach of children. Do not drop an object on sit upon it . - It can break out due to turn off the product. - Keep out of reach of children. - Install the...
Owner's Manual
Page 4
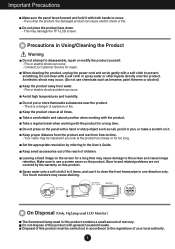
... near the product. - Spray water onto a soft cloth 2 to -time. - Too much moisture may damage the TFT-LCD screen. Disposal of mercury. Make sure to use it to disassemble, repair or modify the product yourself. - When cleaning the product, unplug the power cord and scrub gently with general household waste. Keep proper distance from the product and rest from water. - Leaving...
... near the product. - Spray water onto a soft cloth 2 to -time. - Too much moisture may damage the TFT-LCD screen. Disposal of mercury. Make sure to use it to disassemble, repair or modify the product yourself. - When cleaning the product, unplug the power cord and scrub gently with general household waste. Keep proper distance from the product and rest from water. - Leaving...

Owner's Manual
Page 7
Turn the Stand Base Lock through 90˚ to remove. Do not carry the product upside down and retry it. 6. Locking Knob IMPORTANT This picture depicts the general model of connection. The product may differ from the Stand Body. Pull out the Stand Base to separate the Stand Base from the items shown in the picture. Connecting the Display 5. If you can't release the Stand Base even the Locking Knob is at a release position, Please push the indicated knob down holding only the stand base. Your monitor may fall and get damaged or cause injury. 6
Turn the Stand Base Lock through 90˚ to remove. Do not carry the product upside down and retry it. 6. Locking Knob IMPORTANT This picture depicts the general model of connection. The product may differ from the Stand Body. Pull out the Stand Base to separate the Stand Base from the items shown in the picture. Connecting the Display 5. If you can't release the Stand Base even the Locking Knob is at a release position, Please push the indicated knob down holding only the stand base. Your monitor may fall and get damaged or cause injury. 6
Owner's Manual
Page 9
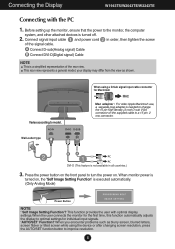
...sub(Analog signal) Cable B Connect DVI-D(Digital signal) Cable NOTE This is executed automatically. (Only Analog Mode) Power Button NOTE ' Self Image Setting Function'? Varies according to a 15 pin 2 row connector. When you encounter problems such as shown. your display may differ from the view as blurry screen, blurred letters, screen flicker or tilted screen while using a D-Sub signal input cable connector for individual input signals. 'AUTO/SET' Function? Connecting the Display W1943TS/W2043TE/W2243TE Connecting with optimal display settings.When the user connects the monitor...
...sub(Analog signal) Cable B Connect DVI-D(Digital signal) Cable NOTE This is executed automatically. (Only Analog Mode) Power Button NOTE ' Self Image Setting Function'? Varies according to a 15 pin 2 row connector. When you encounter problems such as shown. your display may differ from the view as blurry screen, blurred letters, screen flicker or tilted screen while using a D-Sub signal input cable connector for individual input signals. 'AUTO/SET' Function? Connecting the Display W1943TS/W2043TE/W2243TE Connecting with optimal display settings.When the user connects the monitor...
Owner's Manual
Page 10
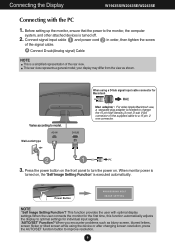
... signal input cable connector for individual input signals. 'AUTO/SET' Function? Connect signal input cable 1 and power cord 2 in order, then tighten the screw of the rear view. Power Button NOTE ' Self Image Setting Function'? Connecting the Display W1943SS/W2043SE/W2243SE Connecting with optimal display settings.When the user connects the monitor for the first time, this function automatically adjusts the display to optimal settings for Macintosh Mac adapter : For older Apple Macintosh use, a separate plug adapter is turned off. 2. Press the power button on the supplied cable...
... signal input cable connector for individual input signals. 'AUTO/SET' Function? Connect signal input cable 1 and power cord 2 in order, then tighten the screw of the rear view. Power Button NOTE ' Self Image Setting Function'? Connecting the Display W1943SS/W2043SE/W2243SE Connecting with optimal display settings.When the user connects the monitor for the first time, this function automatically adjusts the display to optimal settings for Macintosh Mac adapter : For older Apple Macintosh use, a separate plug adapter is turned off. 2. Press the power button on the supplied cable...
Owner's Manual
Page 12
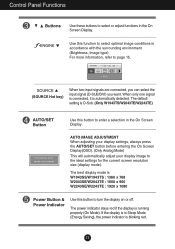
... screen resolution size (display mode). The power indicator stays red if the display is automatically detected. Use this function to select optimal image conditions in the On Screen Display. The default setting is D-Sub. (Only W1943TS/W2043TE/W2243TE) AUTO/SET Button Use this button to turn the display on or off. AUTO IMAGE ADJUSTMENT When adjusting your display settings, always press the AUTO/SET button before entering the On Screen Display(OSD). (Only Analog Mode) This will automatically adjust your display image to page 15. (SOURCE Hot key) When two input signals are connected...
... screen resolution size (display mode). The power indicator stays red if the display is automatically detected. Use this function to select optimal image conditions in the On Screen Display. The default setting is D-Sub. (Only W1943TS/W2043TE/W2243TE) AUTO/SET Button Use this button to turn the display on or off. AUTO IMAGE ADJUSTMENT When adjusting your display settings, always press the AUTO/SET button before entering the On Screen Display(OSD). (Only Analog Mode) This will automatically adjust your display image to page 15. (SOURCE Hot key) When two input signals are connected...
Owner's Manual
Page 13
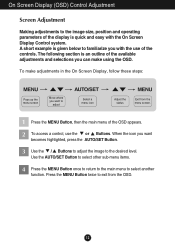
... becomes highlighted, press the AUTO/SET Button. 3 Use the / Buttons to adjust the image to the desired level. On Screen Display (OSD) Control Adjustment Screen Adjustment Making adjustments to the image size, position and operating parameters of the display is quick and easy with the use the or Buttons. The following section is given below to familiarize you can make adjustments in the On Screen Display, follow these steps: Pops up the menu screen Move where you want to...
... becomes highlighted, press the AUTO/SET Button. 3 Use the / Buttons to adjust the image to the desired level. On Screen Display (OSD) Control Adjustment Screen Adjustment Making adjustments to the image size, position and operating parameters of the display is quick and easy with the use the or Buttons. The following section is given below to familiarize you can make adjustments in the On Screen Display, follow these steps: Pops up the menu screen Move where you want to...
Owner's Manual
Page 14
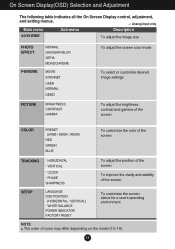
... menu Sub-menu Description 4:3 IN WIDE To adjust the image size PHOTO EFFECT F-ENGINE NORMAL GAUSSIAN BLUR SEPIA MONOCHROME MOVIE INTERNET USER NORMAL DEMO To adjust the screen color mode To select or customize desired image settings PICTURE BRIGHTNESS CONTRAST GAMMA To adjust the brightness, contrast and gamma of the screen COLOR PRESET (sRGB / 6500K / 9300K) RED GREEN BLUE To customize the color of the screen TRACKING * HORIZONTAL * VERTICAL * CLOCK * PHASE SHARPNESS SETUP LANGUAGE OSD POSITION (HORIZONTAL / VERTICAL) * WHITE BALANCE POWER INDICATOR FACTORY RESET To adjust...
... menu Sub-menu Description 4:3 IN WIDE To adjust the image size PHOTO EFFECT F-ENGINE NORMAL GAUSSIAN BLUR SEPIA MONOCHROME MOVIE INTERNET USER NORMAL DEMO To adjust the screen color mode To select or customize desired image settings PICTURE BRIGHTNESS CONTRAST GAMMA To adjust the brightness, contrast and gamma of the screen COLOR PRESET (sRGB / 6500K / 9300K) RED GREEN BLUE To customize the color of the screen TRACKING * HORIZONTAL * VERTICAL * CLOCK * PHASE SHARPNESS SETUP LANGUAGE OSD POSITION (HORIZONTAL / VERTICAL) * WHITE BALANCE POWER INDICATOR FACTORY RESET To adjust...
Owner's Manual
Page 16
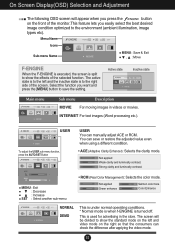
... etc.). MENU : Exit : Decrease : Increase SET : Select another sub-menu • RCM (Real Color Management): Selects the color mode. USER To adjust the USER sub-menu function, press the AUTO/SET Button USER You can check the difference after applying the video mode. 15 You can save the setting. Active state Inactive state Main menu Sub menu Description MOVIE For moving images in the store. Not applied Weak clarity and luminosity contrast. This...
... etc.). MENU : Exit : Decrease : Increase SET : Select another sub-menu • RCM (Real Color Management): Selects the color mode. USER To adjust the USER sub-menu function, press the AUTO/SET Button USER You can check the difference after applying the video mode. 15 You can save the setting. Active state Inactive state Main menu Sub menu Description MOVIE For moving images in the store. Not applied Weak clarity and luminosity contrast. This...
Owner's Manual
Page 20
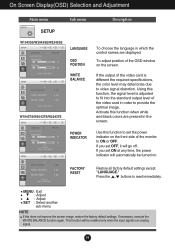
... screen. This function will go off. Activate this function, the signal level is different the required specifications, the color level may deteriorate due to video signal distortion. On Screen Display(OSD) Selection and Adjustment Main menu Sub menu Description SETUP W1943SS/W2043SE/W2243SE LANGUAGE OSD POSITION WHITE BALANCE W1943TS/W2043TE/W2243TE To choose the language in which the control names are present in order to provide the optimal image. To adjust position of the video card...
... screen. This function will go off. Activate this function, the signal level is different the required specifications, the color level may deteriorate due to video signal distortion. On Screen Display(OSD) Selection and Adjustment Main menu Sub menu Description SETUP W1943SS/W2043SE/W2243SE LANGUAGE OSD POSITION WHITE BALANCE W1943TS/W2043TE/W2243TE To choose the language in which the control names are present in order to provide the optimal image. To adjust position of the video card...
Owner's Manual
Page 21
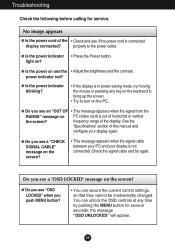
... display is connected display connected? Check the signal cable and try moving the mouse or pressing any time by pushing the MENU button for service. properly to turn on and the • Adjust the brightness and the contrast. Do you see a "OSD LOCKED" message on ? light on the screen? See the 'Specifications' section of horizontal or vertical the screen? G Do you see a "CHECK SIGNAL CABLE" message on PC (video card) is in power saving mode, try again. G Do you push MENU button...
... display is connected display connected? Check the signal cable and try moving the mouse or pressing any time by pushing the MENU button for service. properly to turn on and the • Adjust the brightness and the contrast. Do you see a "OSD LOCKED" message on ? light on the screen? See the 'Specifications' section of horizontal or vertical the screen? G Do you see a "CHECK SIGNAL CABLE" message on PC (video card) is in power saving mode, try again. G Do you push MENU button...
Owner's Manual
Page 22
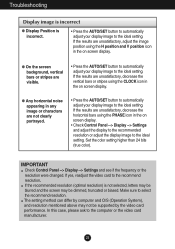
... recommended resolution (optimal resolution) is incorrect. • Press the AUTO/SET button to automatically adjust your display image to the ideal setting. G Any horizontal noise appearing in the on screen display. If yes, readjust the video card to select the recommend resolution. If the results are not clearly portrayed. • Press the AUTO/SET button to automatically adjust your display image to the ideal setting. Set the color setting higher than 24 bits (true color). Troubleshooting Display image is incorrect G Display Position...
... recommended resolution (optimal resolution) is incorrect. • Press the AUTO/SET button to automatically adjust your display image to the ideal setting. G Any horizontal noise appearing in the on screen display. If yes, readjust the video card to select the recommend resolution. If the results are not clearly portrayed. • Press the AUTO/SET button to automatically adjust your display image to the ideal setting. Set the color setting higher than 24 bits (true color). Troubleshooting Display image is incorrect G Display Position...
Owner's Manual
Page 23
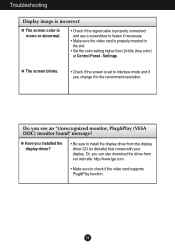
... monitor, Plug&Play (VESA DDC) monitor found" message? Troubleshooting Display image is incorrect G The screen color is mono or abnormal. • Check if the signal cable is properly connected and use a screwdriver to fasten if necessary. • Make sure the video card is set to interlace mode and if yes, change it to check if the video card supports Plug&Play function. 22 G The screen blinks. • Check if the screen is properly inserted in the slot. • Set the color setting...
... monitor, Plug&Play (VESA DDC) monitor found" message? Troubleshooting Display image is incorrect G The screen color is mono or abnormal. • Check if the signal cable is properly connected and use a screwdriver to fasten if necessary. • Make sure the video card is set to interlace mode and if yes, change it to check if the video card supports Plug&Play function. 22 G The screen blinks. • Check if the screen is properly inserted in the slot. • Set the color setting...

Owner's Manual
Page 24
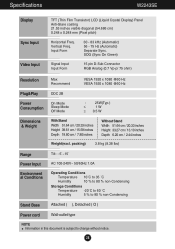
... document is subject to change without notice. 23 Vertical Freq. SOG (Sync On Green), Digital Video Input Signal Input Input Form 15 pin D-Sub Connector DVI-D Connector (Digital) RGB Analog (0.7 Vp-p/ 75 ohm), Digital Resolution Max Recommend VESA 1360 x 768 @60 Hz VESA 1360 x 768 @60 Hz Plug&Play DDC 2B Power Consumption On Mode Sleep Mode Off Mode : 21W(Typ.) ≤ 1 W ≤ 0.5 W Dimensions & Weight With Stand Width 44.90 cm / 17.68 inches Height 36.10 cm / 14...
... document is subject to change without notice. 23 Vertical Freq. SOG (Sync On Green), Digital Video Input Signal Input Input Form 15 pin D-Sub Connector DVI-D Connector (Digital) RGB Analog (0.7 Vp-p/ 75 ohm), Digital Resolution Max Recommend VESA 1360 x 768 @60 Hz VESA 1360 x 768 @60 Hz Plug&Play DDC 2B Power Consumption On Mode Sleep Mode Off Mode : 21W(Typ.) ≤ 1 W ≤ 0.5 W Dimensions & Weight With Stand Width 44.90 cm / 17.68 inches Height 36.10 cm / 14...

Owner's Manual
Page 25
... (Automatic) Separate Sync. Specifications W1943SS Display Sync Input Video Input TFT (Thin Film Transistor) LCD (Liquid Crystal Display) Panel Anti-Glare coating 18.51 inches visible diagonal (47.01 cm) 0.30 x 0.30 mm (Pixel pitch) Horizontal Freq. SOG (Sync On Green) Signal Input Input Form 15 pin D-Sub Connector RGB Analog (0.7 Vp-p/ 75 ohm) Resolution Max Recommend VESA 1360 x 768 @60 Hz VESA 1360 x 768 @60 Hz Plug&Play DDC 2B Power Consumption On Mode Sleep Mode Off Mode : 21W(Typ...
... (Automatic) Separate Sync. Specifications W1943SS Display Sync Input Video Input TFT (Thin Film Transistor) LCD (Liquid Crystal Display) Panel Anti-Glare coating 18.51 inches visible diagonal (47.01 cm) 0.30 x 0.30 mm (Pixel pitch) Horizontal Freq. SOG (Sync On Green) Signal Input Input Form 15 pin D-Sub Connector RGB Analog (0.7 Vp-p/ 75 ohm) Resolution Max Recommend VESA 1360 x 768 @60 Hz VESA 1360 x 768 @60 Hz Plug&Play DDC 2B Power Consumption On Mode Sleep Mode Off Mode : 21W(Typ...

Owner's Manual
Page 26
... this document is subject to change without notice. 25 SOG (Sync On Green), Digital Video Input Signal Input Input Form 15 pin D-Sub Connector DVI-D Connector (Digital) RGB Analog (0.7 Vp-p/ 75 ohm), Digital Resolution Max Recommend VESA 1600 x 900 @60 Hz VESA 1600 x 900 @60 Hz Plug&Play DDC 2B Power Consumption On Mode Sleep Mode Off Mode : 25 W(Typ.) ≤ 1 W ≤ 0.5 W Dimensions & Weight With Stand Width 48.36 cm / 19.04 inches Height 37.68 cm / 14...
... this document is subject to change without notice. 25 SOG (Sync On Green), Digital Video Input Signal Input Input Form 15 pin D-Sub Connector DVI-D Connector (Digital) RGB Analog (0.7 Vp-p/ 75 ohm), Digital Resolution Max Recommend VESA 1600 x 900 @60 Hz VESA 1600 x 900 @60 Hz Plug&Play DDC 2B Power Consumption On Mode Sleep Mode Off Mode : 25 W(Typ.) ≤ 1 W ≤ 0.5 W Dimensions & Weight With Stand Width 48.36 cm / 19.04 inches Height 37.68 cm / 14...

Owner's Manual
Page 27
SOG (Sync On Green) Video Input Signal Input Input Form 15 pin D-Sub Connector RGB Analog (0.7 Vp-p/ 75 ohm) Resolution Max Recommend VESA 1600 x 900 @60 Hz VESA 1600 x 900 @60 Hz Plug&Play DDC 2B Power Consumption On Mode Sleep Mode Off Mode : 25 W(Typ.) ≤ 1 W ≤ 0.5 W Dimensions & Weight With Stand Width 48.36 cm / 19.04 inches Height 37.68 cm / 14.83 inches Depth 18.30 cm / 7.20 inches Without Stand Width 48...
SOG (Sync On Green) Video Input Signal Input Input Form 15 pin D-Sub Connector RGB Analog (0.7 Vp-p/ 75 ohm) Resolution Max Recommend VESA 1600 x 900 @60 Hz VESA 1600 x 900 @60 Hz Plug&Play DDC 2B Power Consumption On Mode Sleep Mode Off Mode : 25 W(Typ.) ≤ 1 W ≤ 0.5 W Dimensions & Weight With Stand Width 48.36 cm / 19.04 inches Height 37.68 cm / 14.83 inches Depth 18.30 cm / 7.20 inches Without Stand Width 48...

Owner's Manual
Page 28
... (Automatic) Separate Sync. Specifications W2243TE Display TFT (Thin Film Transistor) LCD (Liquid Crystal Display) Panel Anti-Glare coating 21.53 inches visible diagonal (54.686 cm) 0.248 x 0.248 mm (Pixel pitch) Sync Input Horizontal Freq. SOG (Sync On Green), Digital Video Input Signal Input Input Form 15 pin D-Sub Connector DVI-D Connector (Digital) RGB Analog (0.7 Vp-p/ 75 ohm), Digital Resolution Max Recommend VESA 1920 x 1080 @60 Hz VESA 1920 x 1080 @60 Hz Plug&Play DDC 2B Power Consumption On Mode Sleep Mode Off Mode : 25W(Typ...
... (Automatic) Separate Sync. Specifications W2243TE Display TFT (Thin Film Transistor) LCD (Liquid Crystal Display) Panel Anti-Glare coating 21.53 inches visible diagonal (54.686 cm) 0.248 x 0.248 mm (Pixel pitch) Sync Input Horizontal Freq. SOG (Sync On Green), Digital Video Input Signal Input Input Form 15 pin D-Sub Connector DVI-D Connector (Digital) RGB Analog (0.7 Vp-p/ 75 ohm), Digital Resolution Max Recommend VESA 1920 x 1080 @60 Hz VESA 1920 x 1080 @60 Hz Plug&Play DDC 2B Power Consumption On Mode Sleep Mode Off Mode : 25W(Typ...
Owner's Manual
Page 29
... Stand Base Attached ( ), Detached ( O ) Power cord Wall-outlet type NOTE Information in this document is subject to change without notice. 28 Input Form 30 - 83 kHz (Automatic) 56 - 75 Hz (Automatic) Separate Sync. SOG (Sync On Green) Signal Input Input Form 15 pin D-Sub Connector RGB Analog (0.7 Vp-p/ 75 ohm) Resolution Max Recommend VESA 1920 x 1080 @60 Hz VESA 1920 x 1080 @60 Hz Plug&Play DDC 2B Power Consumption On Mode Sleep Mode Off Mode...
... Stand Base Attached ( ), Detached ( O ) Power cord Wall-outlet type NOTE Information in this document is subject to change without notice. 28 Input Form 30 - 83 kHz (Automatic) 56 - 75 Hz (Automatic) Separate Sync. SOG (Sync On Green) Signal Input Input Form 15 pin D-Sub Connector RGB Analog (0.7 Vp-p/ 75 ohm) Resolution Max Recommend VESA 1920 x 1080 @60 Hz VESA 1920 x 1080 @60 Hz Plug&Play DDC 2B Power Consumption On Mode Sleep Mode Off Mode...


