
User Guide
Page 3
... Leaving a fixed image on the screen for a long time as this may result in enclosure unless proper ventilation is characteristic of the fixed-resolution LCD panel. If you drop the product, the damaged product can cause failures which may scratch, mar, or damage the Active Matrix LCD.... However, this may cause some scaled or processed images may cause damage to the screen. If used under any mode except the recommended resolution, some afterimages. Do not shock or scratch the front and sides of the screen with cloth or other material. Important Precautions On Installation ...
... Leaving a fixed image on the screen for a long time as this may result in enclosure unless proper ventilation is characteristic of the fixed-resolution LCD panel. If you drop the product, the damaged product can cause failures which may scratch, mar, or damage the Active Matrix LCD.... However, this may cause some scaled or processed images may cause damage to the screen. If used under any mode except the recommended resolution, some afterimages. Do not shock or scratch the front and sides of the screen with cloth or other material. Important Precautions On Installation ...

User Guide
Page 9
... according to turn the power on the supplied cable to a 15 pin 2 row connector. Wall-outlet type When using the device or after changing screen resolution, press the AUTO/SET function button to the monitor, the computer system, and other attached devices is executed automatically. (Only Analog Mode) Power Button NOTE... feature is not available in order, then tighten the screw of the rear view. Before setting up the monitor, ensure that the power to improve resolution. 8
... according to turn the power on the supplied cable to a 15 pin 2 row connector. Wall-outlet type When using the device or after changing screen resolution, press the AUTO/SET function button to the monitor, the computer system, and other attached devices is executed automatically. (Only Analog Mode) Power Button NOTE... feature is not available in order, then tighten the screw of the rear view. Before setting up the monitor, ensure that the power to improve resolution. 8

User Guide
Page 10
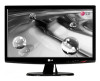
Connecting the Display W1943SB/W2243S Connecting with optimal display settings.When the user connects the monitor for the first time, this function automatically adjusts the display to improve resolution. 9 Connect signal input cable 1 and power cord 2 in order, then tighten the screw of the rear ...represents a general model; Before setting up the monitor, ensure that the power to model. When using the device or after changing screen resolution, press the AUTO/SET function button to optimal settings for Macintosh Mac adapter : For older Apple Macintosh use, a separate plug adapter ...
Connecting the Display W1943SB/W2243S Connecting with optimal display settings.When the user connects the monitor for the first time, this function automatically adjusts the display to improve resolution. 9 Connect signal input cable 1 and power cord 2 in order, then tighten the screw of the rear ...represents a general model; Before setting up the monitor, ensure that the power to model. When using the device or after changing screen resolution, press the AUTO/SET function button to optimal settings for Macintosh Mac adapter : For older Apple Macintosh use, a separate plug adapter ...

User Guide
Page 12
...default setting is D-Sub. (Only W1943TB/W2243T ) AUTO/SET Button Use this button to the ideal settings for the current screen resolution size (display mode). AUTO IMAGE ADJUSTMENT When adjusting your display settings, always press the AUTO/SET button before entering the On Screen...with the surrounding environment (Brightness, Image type). When only one signal is connected, it is running properly (On Mode). The best display mode is W1943SB/W1943TB : 1360 x 768 W2243S/W2243T : 1920 x 1080 Power Button & Power Indicator Use this function to select or adjust functions in Sleep ...
...default setting is D-Sub. (Only W1943TB/W2243T ) AUTO/SET Button Use this button to the ideal settings for the current screen resolution size (display mode). AUTO IMAGE ADJUSTMENT When adjusting your display settings, always press the AUTO/SET button before entering the On Screen...with the surrounding environment (Brightness, Image type). When only one signal is connected, it is running properly (On Mode). The best display mode is W1943SB/W1943TB : 1360 x 768 W2243S/W2243T : 1920 x 1080 Power Button & Power Indicator Use this function to select or adjust functions in Sleep ...
User Guide
Page 22
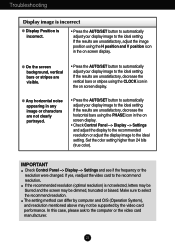
...the ideal setting. If the results are visible. • Press the AUTO/SET button to automatically adjust your display image to the recommend resolution. If yes, readjust the video card to the ideal setting. Troubleshooting Display image is incorrect G Display Position is not selected, letters ...the PHASE icon in the on screen display. • Check Control Panel --> Display --> Settings and adjust the display to the recommended resolution or adjust the display image to the computer or the video card manufacturer. 21 If the results are unsatisfactory, decrease the horizontal bars...
...the ideal setting. If the results are visible. • Press the AUTO/SET button to automatically adjust your display image to the recommend resolution. If yes, readjust the video card to the ideal setting. Troubleshooting Display image is incorrect G Display Position is not selected, letters ...the PHASE icon in the on screen display. • Check Control Panel --> Display --> Settings and adjust the display to the recommended resolution or adjust the display image to the computer or the video card manufacturer. 21 If the results are unsatisfactory, decrease the horizontal bars...

User Guide
Page 23
... the display driver? • Be sure to install the display driver from our web site: http://www.lge.com. • Make sure to the recommend resolution. Or, you see an "Unrecognized monitor, Plug&Play (VESA DDC) monitor found" message? Do you can also download the driver from the display driver CD...
... the display driver? • Be sure to install the display driver from our web site: http://www.lge.com. • Make sure to the recommend resolution. Or, you see an "Unrecognized monitor, Plug&Play (VESA DDC) monitor found" message? Do you can also download the driver from the display driver CD...

User Guide
Page 24
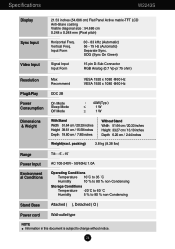
... Freq. SOG (Sync On Green), Digital Video Input Signal Input Input Form 15 pin D-Sub Connector DVI-D Connector (Digital) RGB Analog (0.7 Vp-p/ 75 ohm), Digital Resolution Max Recommend VESA 1360 x 768 @60 Hz VESA 1360 x 768 @60 Hz Plug&Play DDC 2B Power Consumption On Mode Sleep Mode Off Mode : 21W...
... Freq. SOG (Sync On Green), Digital Video Input Signal Input Input Form 15 pin D-Sub Connector DVI-D Connector (Digital) RGB Analog (0.7 Vp-p/ 75 ohm), Digital Resolution Max Recommend VESA 1360 x 768 @60 Hz VESA 1360 x 768 @60 Hz Plug&Play DDC 2B Power Consumption On Mode Sleep Mode Off Mode : 21W...

User Guide
Page 25
Specifications W1943SB Display Sync Input Video Input 18.51 inches (47.01 cm) Flat Panel Active matrix-TFT LCD Anti-Glare coating Visible diagonal size : 47.01 ... kHz (Automatic) 56 - 75 Hz (Automatic) Separate Sync. SOG (Sync On Green) Signal Input Input Form 15 pin D-Sub Connector RGB Analog (0.7 Vp-p/ 75 ohm) Resolution Max Recommend VESA 1360 x 768 @60 Hz VESA 1360 x 768 @60 Hz Plug&Play DDC 2B Power Consumption On Mode Sleep Mode Off Mode : 21W...
Specifications W1943SB Display Sync Input Video Input 18.51 inches (47.01 cm) Flat Panel Active matrix-TFT LCD Anti-Glare coating Visible diagonal size : 47.01 ... kHz (Automatic) 56 - 75 Hz (Automatic) Separate Sync. SOG (Sync On Green) Signal Input Input Form 15 pin D-Sub Connector RGB Analog (0.7 Vp-p/ 75 ohm) Resolution Max Recommend VESA 1360 x 768 @60 Hz VESA 1360 x 768 @60 Hz Plug&Play DDC 2B Power Consumption On Mode Sleep Mode Off Mode : 21W...

User Guide
Page 26
SOG (Sync On Green), Digital Video Input Signal Input Input Form 15 pin D-Sub Connector DVI-D Connector (Digital) RGB Analog (0.7 Vp-p/ 75 ohm), Digital Resolution Max Recommend VESA 1920 x 1080 @60 Hz VESA 1920 x 1080 @60 Hz Plug&Play DDC 2B Power Consumption On Mode Sleep Mode Off Mode : 40W(...
SOG (Sync On Green), Digital Video Input Signal Input Input Form 15 pin D-Sub Connector DVI-D Connector (Digital) RGB Analog (0.7 Vp-p/ 75 ohm), Digital Resolution Max Recommend VESA 1920 x 1080 @60 Hz VESA 1920 x 1080 @60 Hz Plug&Play DDC 2B Power Consumption On Mode Sleep Mode Off Mode : 40W(...
User Guide
Page 27
SOG (Sync On Green) Signal Input Input Form 15 pin D-Sub Connector RGB Analog (0.7 Vp-p/ 75 ohm) Resolution Max Recommend VESA 1920 x 1080 @60 Hz VESA 1920 x 1080 @60 Hz Plug&Play DDC 2B Power Consumption On Mode Sleep Mode Off Mode : 40W(...
SOG (Sync On Green) Signal Input Input Form 15 pin D-Sub Connector RGB Analog (0.7 Vp-p/ 75 ohm) Resolution Max Recommend VESA 1920 x 1080 @60 Hz VESA 1920 x 1080 @60 Hz Plug&Play DDC 2B Power Consumption On Mode Sleep Mode Off Mode : 40W(...

User Guide
Page 28
Specifications Preset Modes (Resolution) Display Modes (Resolution) 1 VGA 720 x 400 2 VGA 640 x 480 3 VESA 640 x 480 4 VESA 800 x 600 5 VESA 800 x 600 6 MAC 832 x 624 7 VESA 1024 x 768 8 VESA 1024 x 768 *9 VESA 1360 x 768 W1943SB/W1943TB Horizontal Freq. (kHz) 31.468 31.469 37.500 37.879 46.875 49.725 48.363 60....123 47.712 Vertical Freq. (Hz) 70 60 75 60 75 75 60 75 60 Display Modes (Resolution) 1 VGA 720 x 400 2 VGA 640 x 480 3 VGA...
Specifications Preset Modes (Resolution) Display Modes (Resolution) 1 VGA 720 x 400 2 VGA 640 x 480 3 VESA 640 x 480 4 VESA 800 x 600 5 VESA 800 x 600 6 MAC 832 x 624 7 VESA 1024 x 768 8 VESA 1024 x 768 *9 VESA 1360 x 768 W1943SB/W1943TB Horizontal Freq. (kHz) 31.468 31.469 37.500 37.879 46.875 49.725 48.363 60....123 47.712 Vertical Freq. (Hz) 70 60 75 60 75 75 60 75 60 Display Modes (Resolution) 1 VGA 720 x 400 2 VGA 640 x 480 3 VGA...


