
Owner's Manual (English)
Page 2
... rest upon or roll over the power cord, and do not place the display where the power cord is OFF. Ensure that have in the specifications of this display, observe the following basic rules for an extended period of time. Use only a stand recommended by the supplier. Do not add accessories...
... rest upon or roll over the power cord, and do not place the display where the power cord is OFF. Ensure that have in the specifications of this display, observe the following basic rules for an extended period of time. Use only a stand recommended by the supplier. Do not add accessories...

Owner's Manual (English)
Page 13
... the color temperature. • sRGB: Set the screen color to fit the sRGB standard color specification. • 6500K: Slightly reddish white. • 9300K: Slightly bluish white. GAMMA Set your own gamma value. : -50/0/50 On the monitor, high gamma values display whitish images and low gamma values display high contrast images. Adjusts...
... the color temperature. • sRGB: Set the screen color to fit the sRGB standard color specification. • 6500K: Slightly reddish white. • 9300K: Slightly bluish white. GAMMA Set your own gamma value. : -50/0/50 On the monitor, high gamma values display whitish images and low gamma values display high contrast images. Adjusts...

Owner's Manual (English)
Page 15
... Activate this does not improve the screen image, restore the factory default settings. Use this function, the signal level is different the required specifications, the color level may deteriorate due to video signal distortion. If you set ON at any time, the power indicator will automatically be ...enabled only when the input signal is an analog signal. Press the button to reset immediately. OSD To adjust position of the monitor to ON or OFF. SETUP WHITE BALANCE MENU : Exit : Adjust : Adjust SET : Select another sub-menu POWER INDICATOR If the output ...
... Activate this does not improve the screen image, restore the factory default settings. Use this function, the signal level is different the required specifications, the color level may deteriorate due to video signal distortion. If you set ON at any time, the power indicator will automatically be ...enabled only when the input signal is an analog signal. Press the button to reset immediately. OSD To adjust position of the monitor to ON or OFF. SETUP WHITE BALANCE MENU : Exit : Adjust : Adjust SET : Select another sub-menu POWER INDICATOR If the output ...

Owner's Manual (English)
Page 16
power indicator blue or green? See the 'Specifications' section of this manual and configure your display is out of horizontal or vertical the screen? Check the signal cable and try moving the mouse ...
power indicator blue or green? See the 'Specifications' section of this manual and configure your display is out of horizontal or vertical the screen? Check the signal cable and try moving the mouse ...

Owner's Manual (English)
Page 19
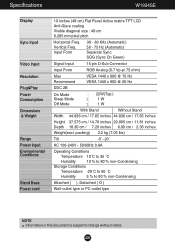
... Depth 18.30 cm / 7.20 inches 6.00 cm / 2.36 inches Weight(excl. A18 Input Form 30 - 83 kHz (Automatic) 56 - 75 Hz (Automatic) Separate Sync. Specifications W1934S Display Sync Input Video Input Resolution Plug&Play Power Consumption Dimensions & Weight Range Power Input Environmental Conditions Stand Base Power cord...
... Depth 18.30 cm / 7.20 inches 6.00 cm / 2.36 inches Weight(excl. A18 Input Form 30 - 83 kHz (Automatic) 56 - 75 Hz (Automatic) Separate Sync. Specifications W1934S Display Sync Input Video Input Resolution Plug&Play Power Consumption Dimensions & Weight Range Power Input Environmental Conditions Stand Base Power cord...

Owner's Manual (English)
Page 20
... 20.60 cm / 8.11 inches 6.05 cm / 2.38 inches Weight(excl. Input Form 30 - 83 kHz (Automatic) 56 - 75 Hz (Automatic) Separate Sync. Vertical Freq. Specifications W2234S Display Sync Input Video Input Resolution Plug&Play Power Consumption Dimensions & Weight Range Power Input Environmental Conditions Stand Base Power cord 22 inches (55...
... 20.60 cm / 8.11 inches 6.05 cm / 2.38 inches Weight(excl. Input Form 30 - 83 kHz (Automatic) 56 - 75 Hz (Automatic) Separate Sync. Vertical Freq. Specifications W2234S Display Sync Input Video Input Resolution Plug&Play Power Consumption Dimensions & Weight Range Power Input Environmental Conditions Stand Base Power cord 22 inches (55...
Owner's Manual (English)
Page 21
... ( ), Detached ( O ) Wall-outlet type or PC-outlet type NOTE Information in this document is subject to change without notice. Specifications W1934SE Display Sync Input Video Input Resolution Plug&Play Power Consumption Dimensions & Weight Range Power Input Environmental Conditions Stand Base Power cord... 19 inches (48 cm) Flat Panel Active matrix-TFT LCD Anti-Glare coating Visible diagonal size : 48 cm 0.285 mm pixel pitch Horizontal Freq. SOG (Sync...
... ( ), Detached ( O ) Wall-outlet type or PC-outlet type NOTE Information in this document is subject to change without notice. Specifications W1934SE Display Sync Input Video Input Resolution Plug&Play Power Consumption Dimensions & Weight Range Power Input Environmental Conditions Stand Base Power cord... 19 inches (48 cm) Flat Panel Active matrix-TFT LCD Anti-Glare coating Visible diagonal size : 48 cm 0.285 mm pixel pitch Horizontal Freq. SOG (Sync...

Owner's Manual (English)
Page 22
... Height 43.13 cm / 16.98 inches 33.86 cm / 13.33 inches Depth 20.60 cm / 8.11 inches 6.05 cm / 2.38 inches Weight(excl. Specifications W2234SE Display Sync Input Video Input Resolution Plug&Play Power Consumption Dimensions & Weight Range Power Input Environmental Conditions Stand Base Power cord 22 inches (55...
... Height 43.13 cm / 16.98 inches 33.86 cm / 13.33 inches Depth 20.60 cm / 8.11 inches 6.05 cm / 2.38 inches Weight(excl. Specifications W2234SE Display Sync Input Video Input Resolution Plug&Play Power Consumption Dimensions & Weight Range Power Input Environmental Conditions Stand Base Power cord 22 inches (55...

Owner's Manual (English)
Page 24
Specifications Preset Modes (Resolution) Display Modes (Resolution) 1 VGA 640 x 350 2 VGA 720 x 400 3 VGA 640 x 480 4 VESA 640 x 480 5 VESA 800 x 600 6 VESA 800 x 600 7 MAC ...
Specifications Preset Modes (Resolution) Display Modes (Resolution) 1 VGA 640 x 350 2 VGA 720 x 400 3 VGA 640 x 480 4 VESA 640 x 480 5 VESA 800 x 600 6 VESA 800 x 600 7 MAC ...

Owner's Manual (English)
Page 25
Hold the Head Part with one hand and hold the Stand Base Part with the other as shown in the picture and pull the Stand Base Part lightly upward 4. A24 Stand Base Part Head Part 3. Pushing Latch inside, Take the stand base from the hinge body. Place the monitor face Down on aflat surface. 2. Please pull the stand body lightly to separate it from stand body. 5. Installing the Wall mount plate This monitor satisfies the specifications of the Wall mount plate or the interchange device. 1. Put a cushion or soft cloth on the cushion or soft cloth.
Hold the Head Part with one hand and hold the Stand Base Part with the other as shown in the picture and pull the Stand Base Part lightly upward 4. A24 Stand Base Part Head Part 3. Pushing Latch inside, Take the stand base from the hinge body. Place the monitor face Down on aflat surface. 2. Please pull the stand body lightly to separate it from stand body. 5. Installing the Wall mount plate This monitor satisfies the specifications of the Wall mount plate or the interchange device. 1. Put a cushion or soft cloth on the cushion or soft cloth.
