
User Guide
Page 1
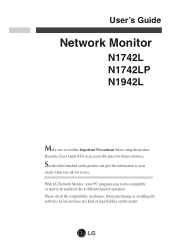
With LG Network Monitor, some PC programs may not be compatible or need to be modified due to read the Important Precautions before purchasing or installing the software. Keep the User's Guide(CD) in advance, before using the product. See the label attached on this matter. LG do not have any kind of operation. User's Guide Network Monitor N1742L N1742LP N1942L Make sure to different kind of legal liability on the product and give the information to your dealer when you ask for future reference. Please check the compatibility in an accessible place for service.
With LG Network Monitor, some PC programs may not be compatible or need to be modified due to read the Important Precautions before purchasing or installing the software. Keep the User's Guide(CD) in advance, before using the product. See the label attached on this matter. LG do not have any kind of operation. User's Guide Network Monitor N1742L N1742LP N1942L Make sure to different kind of legal liability on the product and give the information to your dealer when you ask for future reference. Please check the compatibility in an accessible place for service.
User Guide
Page 2
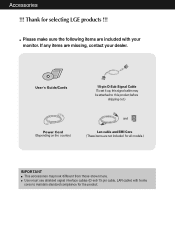
... must use shielded signal interface cables (D-sub 15 pin cable, LAN cable) with your dealer. Please make sure the following items are missing, contact your monitor. Thank for selecting LGE products !!!
... must use shielded signal interface cables (D-sub 15 pin cable, LAN cable) with your dealer. Please make sure the following items are missing, contact your monitor. Thank for selecting LGE products !!!
User Guide
Page 5
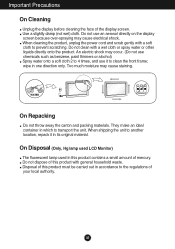
... cloth to clean the front frame; They make an ideal container in this product with general household waste. On Disposal (Only, Hg lamp used LCD Monitor) The fluorescent lamp used in which to the regulations of the display screen. An electric shock may occur. (Do not use chemicals such as benzene...
... cloth to clean the front frame; They make an ideal container in this product with general household waste. On Disposal (Only, Hg lamp used LCD Monitor) The fluorescent lamp used in which to the regulations of the display screen. An electric shock may occur. (Do not use chemicals such as benzene...
User Guide
Page 6
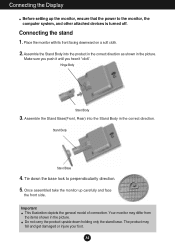
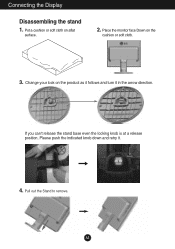
..., and other attached devices is turned off. The product may differ from the items shown in the picture. Stand Body Stand Base 4. Your monitor may fall and get damaged or injure your foot. A4 Assemble the Stand Base(Front, Rear) into the product in the correct direction as ...only the stand base. Connecting the Display Before setting up carefully and face the front side. Place the monitor with its front facing downward on a soft cloth. 2. Once assembled take the monitor up the monitor, ensure that the power to perpendicularity direction. 5. Make sure you push it until you hear it ...
..., and other attached devices is turned off. The product may differ from the items shown in the picture. Stand Body Stand Base 4. Your monitor may fall and get damaged or injure your foot. A4 Assemble the Stand Base(Front, Rear) into the product in the correct direction as ...only the stand base. Connecting the Display Before setting up carefully and face the front side. Place the monitor with its front facing downward on a soft cloth. 2. Once assembled take the monitor up the monitor, ensure that the power to perpendicularity direction. 5. Make sure you push it until you hear it ...
User Guide
Page 7
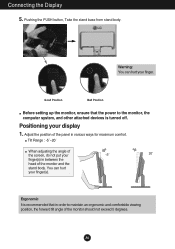
Change your lock on the product as it follows and turn it . 4. Connecting the Display Disassembling the stand 1. Place the monitor face Down on aflat surface. 2. If you can't release the stand base even the locking knob is at a release position, Please push the indicated knob down and retry it in the arrow direction. Pull out the Stand to remove. A5 Put a cushion or soft cloth on the cushion or soft cloth. 3.
Change your lock on the product as it follows and turn it . 4. Connecting the Display Disassembling the stand 1. Place the monitor face Down on aflat surface. 2. If you can't release the stand base even the locking knob is at a release position, Please push the indicated knob down and retry it in the arrow direction. Pull out the Stand to remove. A5 Put a cushion or soft cloth on the cushion or soft cloth. 3.
User Guide
Page 8
...It is turned off. Tilt Range : -5˚~20˚ When adjusting the angle of the monitor should not exceed 5 degrees. Connecting the Display 5. Good Position Bad Position Before setting up the monitor, ensure that the power to maintain an ergonomic and comfortable viewing position, the forward tilt angle ...of the screen, do not put your finger. You can hurt your finger(s) in order to the monitor, the computer system, and other attached devices is recommended that in between the head of the panel in various ways for maximum comfort. ...
...It is turned off. Tilt Range : -5˚~20˚ When adjusting the angle of the monitor should not exceed 5 degrees. Connecting the Display 5. Good Position Bad Position Before setting up the monitor, ensure that the power to maintain an ergonomic and comfortable viewing position, the forward tilt angle ...of the screen, do not put your finger. You can hurt your finger(s) in order to the monitor, the computer system, and other attached devices is recommended that in between the head of the panel in various ways for maximum comfort. ...
User Guide
Page 9
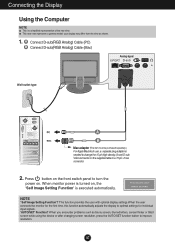
... the front switch panel to improve resolution. This function provides the user with optimal display settings.When the user connects the monitor for individual input signals. 'AUTO/SET' Function? When monitor power is executed automatically. NOTE ' Self Image Setting Function'? When you encounter problems such as shown. 1. A7 A Connect D-sub(RGB Analog...
... the front switch panel to improve resolution. This function provides the user with optimal display settings.When the user connects the monitor for individual input signals. 'AUTO/SET' Function? When monitor power is executed automatically. NOTE ' Self Image Setting Function'? When you encounter problems such as shown. 1. A7 A Connect D-sub(RGB Analog...
User Guide
Page 10
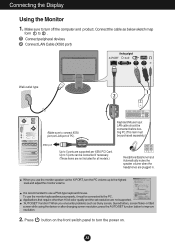
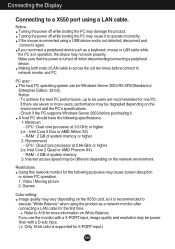
...Input LAN cable should be connected before booting PC.(This item must be connected to improve resolution. 2. Press button on . When you use the monitor keyboard/mouse properly, it must be connected if necessary. (These items are not included for all models.) Headphone/Earphone Input Automatically mutes the speaker ... titled screen while using the device or after changing screen resolution, press the AUTO/SET function button to the PC. To use the monitor speaker via the X-PORT, turn the PC volume up to 5 ports are supported per X550 PCI Card. Connecting the Display Using the...
...Input LAN cable should be connected before booting PC.(This item must be connected to improve resolution. 2. Press button on . When you use the monitor keyboard/mouse properly, it must be connected if necessary. (These items are not included for all models.) Headphone/Earphone Input Automatically mutes the speaker ... titled screen while using the device or after changing screen resolution, press the AUTO/SET function button to the PC. To use the monitor speaker via the X-PORT, turn the PC volume up to 5 ports are supported per X550 PCI Card. Connecting the Display Using the...
User Guide
Page 12
... Duo or AMD Athlon X2) - If the mouse is connected using a USB device and is in operation, the device may cause it to network monitor and PC. Making both ends of LAN cable to across the coil two times before purchasing it. Notice - Intel Core 2 Quad or AMD Phenom ... specifications. - Check if the PC supports Windows Server 2003 before connect to operate incorrectly. Restrictions : Using this network monitor for the first time. Video / Moving picture 2. If you use the monitor with a D-sub input. ( Only 16 bit color is turned off while booting the PC may be Windows Server 2003...
... Duo or AMD Athlon X2) - If the mouse is connected using a USB device and is in operation, the device may cause it to network monitor and PC. Making both ends of LAN cable to across the coil two times before purchasing it. Notice - Intel Core 2 Quad or AMD Phenom ... specifications. - Check if the PC supports Windows Server 2003 before connect to operate incorrectly. Restrictions : Using this network monitor for the first time. Video / Moving picture 2. If you use the monitor with a D-sub input. ( Only 16 bit color is turned off while booting the PC may be Windows Server 2003...
User Guide
Page 17
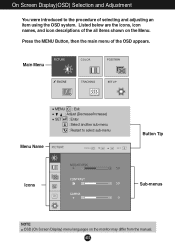
Press the MENU Button, then the main menu of selecting and adjusting an item using the OSD system. A15 Listed below are the icons, icon names, and icon descriptions of the all items shown on the monitor may differ from the manual. Main Menu MENU : Exit : Adjust (Decrease/Increase) SET Me: EnnuteNr ame : Select another sub-menu : Restart to the procedure of the OSD appears. On Screen Display(OSD) Selection and Adjustment You were introduced to select sub-menu Menu Name Button Tip Icons Sub-menus NOTE OSD (On Screen Display) menu languages on the Menu.
Press the MENU Button, then the main menu of selecting and adjusting an item using the OSD system. A15 Listed below are the icons, icon names, and icon descriptions of the all items shown on the monitor may differ from the manual. Main Menu MENU : Exit : Adjust (Decrease/Increase) SET Me: EnnuteNr ame : Select another sub-menu : Restart to the procedure of the OSD appears. On Screen Display(OSD) Selection and Adjustment You were introduced to select sub-menu Menu Name Button Tip Icons Sub-menus NOTE OSD (On Screen Display) menu languages on the Menu.
User Guide
Page 18
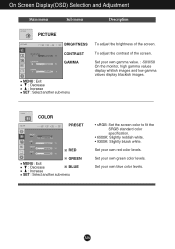
.... • 6500K: Slightly reddish white. • 9300K: Slightly bluish white. Set your own blue color levels. Set your own gamma value. : -50/0/50 On the monitor, high gamma values display whitish images and low gamma values display blackish images. Set your own green color levels. On Screen Display(OSD) Selection and...
.... • 6500K: Slightly reddish white. • 9300K: Slightly bluish white. Set your own blue color levels. Set your own gamma value. : -50/0/50 On the monitor, high gamma values display whitish images and low gamma values display blackish images. Set your own green color levels. On Screen Display(OSD) Selection and...
User Guide
Page 20
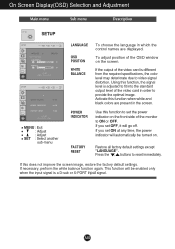
To adjust position of the OSD window on the front side of the monitor to ON or OFF. If you set OFF, it will be turned on. This function will go off. If the output of the video card ...
To adjust position of the OSD window on the front side of the monitor to ON or OFF. If you set OFF, it will be turned on. This function will go off. If the output of the video card ...
User Guide
Page 28
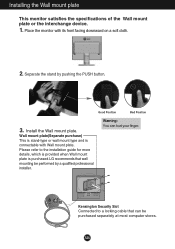
Installing the Wall mount plate This monitor satisfies the specifications of the Wall mount plate or the interchange device. 1. Wall mount plate(Separate purchase) This is stand-type or wall mount type and is purchased.LG recommends that can hurt your finger. A26 Warning: You can be performed by pushing the PUSH button... its front facing downward on a soft cloth. 2. Separate the stand by a qualified professional installer. Good Position Bad Position .3 Install the Wall mount plate. Place the monitor with Wall mount plate.
Installing the Wall mount plate This monitor satisfies the specifications of the Wall mount plate or the interchange device. 1. Wall mount plate(Separate purchase) This is stand-type or wall mount type and is purchased.LG recommends that can hurt your finger. A26 Warning: You can be performed by pushing the PUSH button... its front facing downward on a soft cloth. 2. Separate the stand by a qualified professional installer. Good Position Bad Position .3 Install the Wall mount plate. Place the monitor with Wall mount plate.


