
Owners Manual
Page 5
...8 Remote Control Key Functions 9 Installation Installation Instructions 10~11 External Equipment Connections 12~16 VCR Setup 12 Cable TV Setup 12 External A/V Source Setup 13 DVD Setup 13 DTV Setup 14 PC Setup 15~16 Operation Turning on the Monitor 17 Menu Language Selection 17 Picture Menu Options APC (... Options Auto Adjustment 25 Setting Picture Format 25 Screen Position 25 Manual Configure 26 Selecting VGA Mode 26 Screen Adjustments 26 Cinema Mode Setup 26 Luminance Noise Reduction 27 Initializing (Reset to original factory value) . . . . .27 Split Zoom 27 PIP (Picture-...
...8 Remote Control Key Functions 9 Installation Installation Instructions 10~11 External Equipment Connections 12~16 VCR Setup 12 Cable TV Setup 12 External A/V Source Setup 13 DVD Setup 13 DTV Setup 14 PC Setup 15~16 Operation Turning on the Monitor 17 Menu Language Selection 17 Picture Menu Options APC (... Options Auto Adjustment 25 Setting Picture Format 25 Screen Position 25 Manual Configure 26 Selecting VGA Mode 26 Screen Adjustments 26 Cinema Mode Setup 26 Luminance Noise Reduction 27 Initializing (Reset to original factory value) . . . . .27 Split Zoom 27 PIP (Picture-...

Owners Manual
Page 11
... 4 inches 4 inches 2.36 inches Owner's Manual 11 Detailed installation instructions are included in the optional Desktop Stand Installation and Setup Guide available from your dealer, see the optional Wall Mounting Bracket Installation and Setup Guide. 4 inches 4 inches 4 inches 2 inches 4 inches Desktop Pedestal Installation For proper ventilation, allow a clearance of 4" on each side...
... 4 inches 4 inches 2.36 inches Owner's Manual 11 Detailed installation instructions are included in the optional Desktop Stand Installation and Setup Guide available from your dealer, see the optional Wall Mounting Bracket Installation and Setup Guide. 4 inches 4 inches 4 inches 2 inches 4 inches Desktop Pedestal Installation For proper ventilation, allow a clearance of 4" on each side...

Owners Manual
Page 12
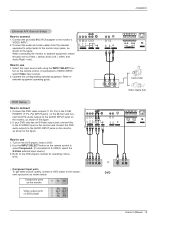
... INPUT R L AUDIO INPUT S-VIDEO S-VIDEO OUT (R) AUDIO (L) IN VIDEO R L (MONO) AUDIO INPUT VIDEO INPUT VCR ( )R( ) ( )L( ) EXTERNAL SPEAKER AC INPUT Cable TV Setup - Use the ISM Method (on the Option menu) feature to VIDEO INPUT, select Video input source) 4. compared to connecting a regular VCR to the monitor's VIDEO... input jacks, as shown in the figure. If you can watch cable TV programming. Select the input source with the Monitor VCR Setup - Select your local cable TV service provider(s). the fixed images on the sides of the screen may remain visible on the screen ...
... INPUT R L AUDIO INPUT S-VIDEO S-VIDEO OUT (R) AUDIO (L) IN VIDEO R L (MONO) AUDIO INPUT VIDEO INPUT VCR ( )R( ) ( )L( ) EXTERNAL SPEAKER AC INPUT Cable TV Setup - Use the ISM Method (on the Option menu) feature to VIDEO INPUT, select Video input source) 4. compared to connecting a regular VCR to the monitor's VIDEO... input jacks, as shown in the figure. If you can watch cable TV programming. Select the input source with the Monitor VCR Setup - Select your local cable TV service provider(s). the fixed images on the sides of the screen may remain visible on the screen ...
Owners Manual
Page 13
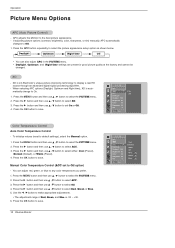
...Video output jack, connect this RGBOUTPUT to the S-VIDEO input on the monitor, as shown in the figure. Installation External A/V Source Setup How to S-VIDEO, select the S-Video external input source.) 3. Connect the audio and video cables from the external equipment's output ... L AUDIO INPUT S-VIDEO R L (MONO) AUDIO INPUT VIDEO INPUT R AUDIO L VIDEO ( )R( ) ( )L( ) EXTERNAL SPEAKER AC INPUT Camcorder Video Game Set DVD Setup How to external equipment, match the jack colors (Video = yellow, Audio Left = white, and Audio Right = red). PONENT (Y, PB, PR) INPUT jacks on the ...
...Video output jack, connect this RGBOUTPUT to the S-VIDEO input on the monitor, as shown in the figure. Installation External A/V Source Setup How to S-VIDEO, select the S-Video external input source.) 3. Connect the audio and video cables from the external equipment's output ... L AUDIO INPUT S-VIDEO R L (MONO) AUDIO INPUT VIDEO INPUT R AUDIO L VIDEO ( )R( ) ( )L( ) EXTERNAL SPEAKER AC INPUT Camcorder Video Game Set DVD Setup How to external equipment, match the jack colors (Video = yellow, Audio Left = white, and Audio Right = red). PONENT (Y, PB, PR) INPUT jacks on the ...

Owners Manual
Page 14
... Yes RGB,DVI No Yes Yes Yes 14 Plasma Monitor Turn on the digital set -top box. Then, make the corresponding audio connections. Installation DTV Setup -
... Yes RGB,DVI No Yes Yes Yes 14 Plasma Monitor Turn on the digital set -top box. Then, make the corresponding audio connections. Installation DTV Setup -

Owners Manual
Page 15
... image on the monitor's screen for video connections, depending on your monitor. Owner's Manual 15 Use INPUT SELECT on the remote control to use 1. PC Setup How to Plug and Play automatically by pressing the POWER button on the monitor's remote control. 3. Use the Monitor's RGB INPUT or DVI (Digital Visual...
... image on the monitor's screen for video connections, depending on your monitor. Owner's Manual 15 Use INPUT SELECT on the remote control to use 1. PC Setup How to Plug and Play automatically by pressing the POWER button on the monitor's remote control. 3. Use the Monitor's RGB INPUT or DVI (Digital Visual...
Owners Manual
Page 18
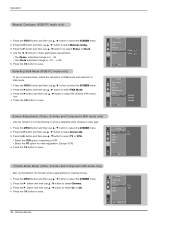
...button to select the PICTURE menu. 2. Cool Normal Warm Off Red 0 Green 0 Blue 0 APC adjusts the Monitor to select the picture appearance setup option as shown below. Press the APC button repeatedly to the best picture appearance. - When selecting APC options (Daylight, Optimum and Night time),... XD is LG Electronic's unique picture improving technology to select the PICTURE menu. 2. Press the G button and then use D / E button to display a...
...button to select the PICTURE menu. 2. Cool Normal Warm Off Red 0 Green 0 Blue 0 APC adjusts the Monitor to select the picture appearance setup option as shown below. Press the APC button repeatedly to the best picture appearance. - When selecting APC options (Daylight, Optimum and Night time),... XD is LG Electronic's unique picture improving technology to select the PICTURE menu. 2. Press the G button and then use D / E button to display a...

Owners Manual
Page 20
... Off. 4. Press the OK button to select AVL. 3. If you adjust sound options (Treble and Bass) manually, DASP automatically changes to select the appropriate sound setup as shown below. SRS TSXT Flat Music Movie Sports Off • You can also adjust DASP in the SOUND menu. • SRS TSXT, Flat, Music...
... Off. 4. Press the OK button to select AVL. 3. If you adjust sound options (Treble and Bass) manually, DASP automatically changes to select the appropriate sound setup as shown below. SRS TSXT Flat Music Movie Sports Off • You can also adjust DASP in the SOUND menu. • SRS TSXT, Flat, Music...
Owners Manual
Page 22
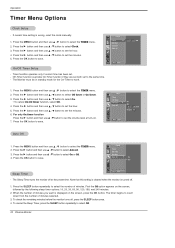
... use D / E button to select On. • To cancel On/Off timer function, select Off. 4. Press the OK button to the same time. - On/Off Timer Setup - Timer function operates only if current time has been set to save . Press the G button and then use D / E button to select Off timer or On... minutes. 2. Press the G button and then use D / E button to save. If current time setting is wrong, reset the clock manually. 1. Operation Timer Menu Options Clock Setup -
... use D / E button to select On. • To cancel On/Off timer function, select Off. 4. Press the OK button to the same time. - On/Off Timer Setup - Timer function operates only if current time has been set to save . Press the G button and then use D / E button to select Off timer or On... minutes. 2. Press the G button and then use D / E button to save. If current time setting is wrong, reset the clock manually. 1. Operation Timer Menu Options Clock Setup -
Owners Manual
Page 26
..., match the resolution of RGB mode and selection of VGA mode. 1. tion. 4. SCREEN Auto config. G ARC Cinema YNR Reset TV VCR Menu Prev. Cinema Mode Setup (Video, S-Video and Component 480i mode only) - Sets up the Monitor for the best picture appearance for other equipment. (Except VCR) 4. Press the OK button...
..., match the resolution of RGB mode and selection of VGA mode. 1. tion. 4. SCREEN Auto config. G ARC Cinema YNR Reset TV VCR Menu Prev. Cinema Mode Setup (Video, S-Video and Component 480i mode only) - Sets up the Monitor for the best picture appearance for other equipment. (Except VCR) 4. Press the OK button...
Owners Manual
Page 29
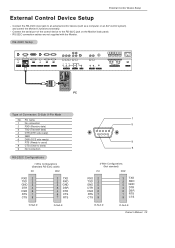
RS-232C connection cables are not supplied with the Monitor. RS-232C Setup REMOTE RS-232C INPUT CONTROL (CONTROL/SERVICE) DVI INPUT AUDIO INPUT RGB INPUT RGB OUTPUT Y PB PR COMPONENT INPUT R L AUDIO INPUT S-VIDEO R L (MONO) AUDIO INPUT ... (Ready to send) 8 CTS (Clear to the RS-232C jack on the Monitor back panel. - Connect the serial port of Connector; External Control Device Setup External Control Device Setup - Connect the RS-232C input jack to an external control device (such as a computer or an A/V control system) and control the Monitor's functions...
RS-232C connection cables are not supplied with the Monitor. RS-232C Setup REMOTE RS-232C INPUT CONTROL (CONTROL/SERVICE) DVI INPUT AUDIO INPUT RGB INPUT RGB OUTPUT Y PB PR COMPONENT INPUT R L AUDIO INPUT S-VIDEO R L (MONO) AUDIO INPUT ... (Ready to send) 8 CTS (Clear to the RS-232C jack on the Monitor back panel. - Connect the serial port of Connector; External Control Device Setup External Control Device Setup - Connect the RS-232C input jack to an external control device (such as a computer or an A/V control system) and control the Monitor's functions...
Owners Manual
Page 30
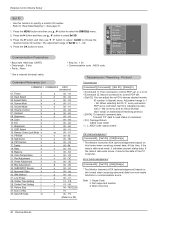
External Control Device Setup Set ID - Refer to select Set ID. 3. Press the G button and then use D / E button to 'Real Data Mapping 1'. SPECIAL Language Key lock ISM Method Low ...
External Control Device Setup Set ID - Refer to select Set ID. 3. Press the G button and then use D / E button to 'Real Data Mapping 1'. SPECIAL Language Key lock ISM Method Low ...
Owners Manual
Page 31
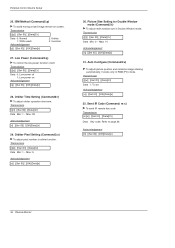
...][Data][x] * In a like manner, if other functions transmit 'FF' data based on (Volume off) 1 : Volume mute off ) Acknowledgement [d][ ][Set ID][ ][OK][Data][x] External Control Device Setup 05. Transmission [k][d][ ][Set ID][ ][Data][Cr] Data 0 : Screen mute off (Picture on) 1 : Screen mute on (Picture off (Volume on /off . Transmission [k][e][ ][Set ID][ ][Data][Cr...
...][Data][x] * In a like manner, if other functions transmit 'FF' data based on (Volume off) 1 : Volume mute off ) Acknowledgement [d][ ][Set ID][ ][OK][Data][x] External Control Device Setup 05. Transmission [k][d][ ][Set ID][ ][Data][Cr] Data 0 : Screen mute off (Picture on) 1 : Screen mute on (Picture off (Volume on /off . Transmission [k][e][ ][Set ID][ ][Data][Cr...

Owners Manual
Page 32
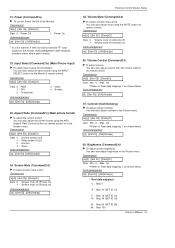
...][x] • If you're not using the remote control and front panel controls on the remote control or in the Picture menu. External Control Device Setup 09. Color (Command2:i) G To adjust the screen color. Transmission [k][j][ ][Set ID][ ][Data][Cr] Data Red : 0 ~ Green : 64 • Refer to 'Real data mapping...
...][x] • If you're not using the remote control and front panel controls on the remote control or in the Picture menu. External Control Device Setup 09. Color (Command2:i) G To adjust the screen color. Transmission [k][j][ ][Set ID][ ][Data][Cr] Data Red : 0 ~ Green : 64 • Refer to 'Real data mapping...

Owners Manual
Page 33
...:s) G To adjust bass. Acknowledgement [s][ ][Set ID][ ][OK][Data][x] 19. You can also adjust ACC in color temperature. Acknowledgement [w][ ][Set ID][ ][OK][Data][x] External Control Device Setup 23. Transmission [k][$][ ][Set ID][ ][Data][Cr] Data Min: 0 ~ Max: 3C • Refer to 'Real data mapping 3' as shown right. Transmission [k][s][ ][Set ID][ ][Data][Cr] Data...
...:s) G To adjust bass. Acknowledgement [s][ ][Set ID][ ][OK][Data][x] 19. You can also adjust ACC in color temperature. Acknowledgement [w][ ][Set ID][ ][OK][Data][x] External Control Device Setup 23. Transmission [k][$][ ][Set ID][ ][Data][Cr] Data Min: 0 ~ Max: 3C • Refer to 'Real data mapping 3' as shown right. Transmission [k][s][ ][Set ID][ ][Data][Cr] Data...
Owners Manual
Page 34
... picture position and minimize image shaking automatically. Transmission [j][t][ ][Set ID][ ][Data][Cr] Data Min: 0 ~ Max: 14 Acknowledgement [t][ ][Set ID][ ][OK][Data][x] 31. External Control Device Setup 26. Acknowledgement [c][ ][Set ID][ ][OK][Data][x] 34 Plasma Monitor Orbiter Pixel Setting (Command2:s) G To adjust pixel number in orbiter function.
... picture position and minimize image shaking automatically. Transmission [j][t][ ][Set ID][ ][Data][Cr] Data Min: 0 ~ Max: 14 Acknowledgement [t][ ][Set ID][ ][OK][Data][x] 31. External Control Device Setup 26. Acknowledgement [c][ ][Set ID][ ][OK][Data][x] 34 Plasma Monitor Orbiter Pixel Setting (Command2:s) G To adjust pixel number in orbiter function.
Service Manual
Page 8
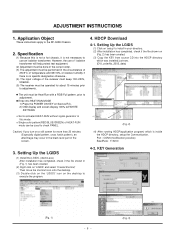
...WHITE PATTERN. [ Set is activated HEAT-RUN without signal generator in this is not a hot chassis, it is inside the HDCP directory, setup the Communication. Application Object These instructions apply to execute the program. 4-2. Caution) If you turn on the desktop to the RF-043E Chassis...) (Fig. 2) (4) After running HDCP(application program) which is not necessary to use of the screen. 4. Setting Up the LGIDS (1) Click on 'setup' to install in (Fig. 1) has been created. (2) Right click on 'LGIDS' and select 'Create Shortcut' Then move the shortcut icon onto the desktop...
...WHITE PATTERN. [ Set is activated HEAT-RUN without signal generator in this is not a hot chassis, it is inside the HDCP directory, setup the Communication. Application Object These instructions apply to execute the program. 4-2. Caution) If you turn on the desktop to the RF-043E Chassis...) (Fig. 2) (4) After running HDCP(application program) which is not necessary to use of the screen. 4. Setting Up the LGIDS (1) Click on 'setup' to install in (Fig. 1) has been created. (2) Right click on 'LGIDS' and select 'Create Shortcut' Then move the shortcut icon onto the desktop...


