
User Guide
Page 6
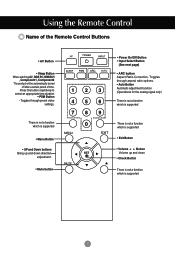
Using the Remote Control Name of the Remote Control Buttons • AV Button • Sleep Button When watching AV, RGB PC,HDMI/DVI ,Component1, Component2 The product will be automatically turned off after a ...
Using the Remote Control Name of the Remote Control Buttons • AV Button • Sleep Button When watching AV, RGB PC,HDMI/DVI ,Component1, Component2 The product will be automatically turned off after a ...
User Guide
Page 7
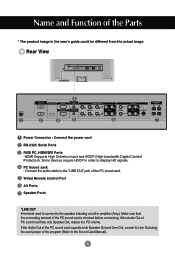
Wired Remote Control Port AV Ports Speaker Ports *LINE OUT A terminal used to connect to display HD signals. Name and Function of the PC sound card is checked before connecting. Make sure that the connecting terminal of the Parts * The product ...
Wired Remote Control Port AV Ports Speaker Ports *LINE OUT A terminal used to connect to display HD signals. Name and Function of the PC sound card is checked before connecting. Make sure that the connecting terminal of the Parts * The product ...
User Guide
Page 9
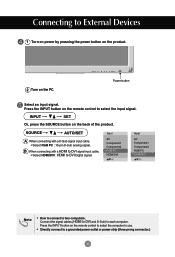
...input cable. • Select HDMI/DVI : HDMI to External Devices 1 Turn on power by pressing the power button on the product. 2 Turn on the remote control to select the computer to use. • Directly connect to each computer. Connecting to DVI Digital signal. B When connecting with a D-Sub signal ...8226; Select RGB PC : 15-pin D-Sub analog signal. Press the INPUT button on the PC. INPUT SET Or, press the SOURCE button on the remote control to two computers. Connect the signal cables (HDMI to DVI and D-Sub) to a grounded power outlet or power strip (three prong connector.) 8 ...
...input cable. • Select HDMI/DVI : HDMI to External Devices 1 Turn on power by pressing the power button on the product. 2 Turn on the remote control to select the computer to use. • Directly connect to each computer. Connecting to DVI Digital signal. B When connecting with a D-Sub signal ...8226; Select RGB PC : 15-pin D-Sub analog signal. Press the INPUT button on the PC. INPUT SET Or, press the SOURCE button on the remote control to two computers. Connect the signal cables (HDMI to DVI and D-Sub) to a grounded power outlet or power strip (three prong connector.) 8 ...
User Guide
Page 12
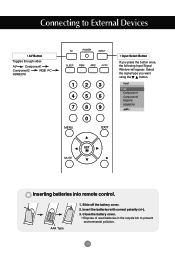
Input AV Component1 Component2 RGB PC HDMI/DVI * Inserting batteries into remote control. Insert the batteries with correct polarity (+/-). 3. Select the signal type you press the button once, the following Input Signal Window will appear. Slide off ...
Input AV Component1 Component2 RGB PC HDMI/DVI * Inserting batteries into remote control. Insert the batteries with correct polarity (+/-). 3. Select the signal type you press the button once, the following Input Signal Window will appear. Slide off ...
User Guide
Page 13
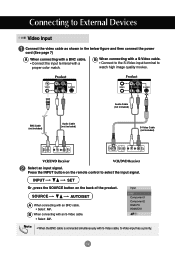
... is connected simultaneously with an S-Video cable. • Select AV. Connecting to select the input signal. INPUT SET Or, press the SOURCE button on the remote control to External Devices Video Input Connect the video cable as shown in the below figure and then connect the power cord (See page 7) A When...
... is connected simultaneously with an S-Video cable. • Select AV. Connecting to select the input signal. INPUT SET Or, press the SOURCE button on the remote control to External Devices Video Input Connect the video cable as shown in the below figure and then connect the power cord (See page 7) A When...
User Guide
Page 14
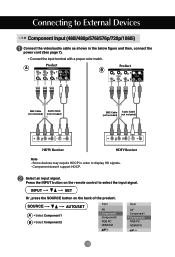
... cord (See page 7). • Connect the input terminal with a proper color match. INPUT SET Or, press the SOURCE button on the remote control to select the input signal. Select an input signal. SOURCE AUTO/SET A • Select Component 1 B • Select Component 2... Input AV Component1 Component2 RGB PC HDMI/DVI Input AV Component1 Component2 RGB PC HDMI/DVI 13 Connecting to display HD signals. - Product A M Product B M BNC Cable Audio Cable (not included) (not included) BNC Cable Audio Cable (not included) (not...
... cord (See page 7). • Connect the input terminal with a proper color match. INPUT SET Or, press the SOURCE button on the remote control to select the input signal. Select an input signal. SOURCE AUTO/SET A • Select Component 1 B • Select Component 2... Input AV Component1 Component2 RGB PC HDMI/DVI Input AV Component1 Component2 RGB PC HDMI/DVI 13 Connecting to display HD signals. - Product A M Product B M BNC Cable Audio Cable (not included) (not included) BNC Cable Audio Cable (not included) (not...
User Guide
Page 15
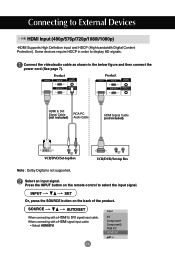
.../DVI Input AV Component1 Component2 RGB PC HDMI/DVI 14 Connect the video/audio cable as shown in order to display HD signals. INPUT SET Or, press the SOURCE button on the remote control to External Devices HDMI Input (480p/576p/720p/1080i/1080p) -HDMI Supports High Definition input and HDCP (High...
.../DVI Input AV Component1 Component2 RGB PC HDMI/DVI 14 Connect the video/audio cable as shown in order to display HD signals. INPUT SET Or, press the SOURCE button on the remote control to External Devices HDMI Input (480p/576p/720p/1080i/1080p) -HDMI Supports High Definition input and HDCP (High...
User Guide
Page 19
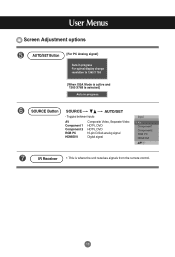
Toggles between inputs AV Component 1 Component 2 RGB PC HDMI/DVI Composite Video, Separate Video HDTV, DVD HDTV, DVD 15-pin D-Sub analog signal Digital signal Input AV Component1 Component2 RGB PC HDMI/DVI IR Receiver • This is selected] SOURCE Button SOURCE AUTO/SET - User Menus Screen Adjustment options AUTO/SET Button [For PC Analog signal] [When XGA Mode is active and 1360 X768 is where the unit receives signals from the remote control. 18
Toggles between inputs AV Component 1 Component 2 RGB PC HDMI/DVI Composite Video, Separate Video HDTV, DVD HDTV, DVD 15-pin D-Sub analog signal Digital signal Input AV Component1 Component2 RGB PC HDMI/DVI IR Receiver • This is selected] SOURCE Button SOURCE AUTO/SET - User Menus Screen Adjustment options AUTO/SET Button [For PC Analog signal] [When XGA Mode is active and 1360 X768 is where the unit receives signals from the remote control. 18
User Guide
Page 21
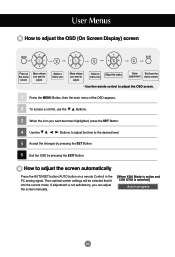
...On Screen Display) screen Pops up the menu screen Move where you want to adjust Select a menu icon Move where you want becomes highlighted, press the SET Button. 4 Use the Buttons to adjust the item to adjust the screen automatically Press the AUTO/SET button (AUTO button on a remote Control)... If adjustment is not satisfactory, you want to adjust Select a Adjust the status menu icon Save Exit from the adjustment menu screen. • Use the remote control to adjust the OSD screen. 1 Press the MENU Button, then the main menu of the OSD appears. 2 To access a control, use the ...
...On Screen Display) screen Pops up the menu screen Move where you want to adjust Select a menu icon Move where you want becomes highlighted, press the SET Button. 4 Use the Buttons to adjust the item to adjust the screen automatically Press the AUTO/SET button (AUTO button on a remote Control)... If adjustment is not satisfactory, you want to adjust Select a Adjust the status menu icon Save Exit from the adjustment menu screen. • Use the remote control to adjust the OSD screen. 1 Press the MENU Button, then the main menu of the OSD appears. 2 To access a control, use the ...
User Guide
Page 29
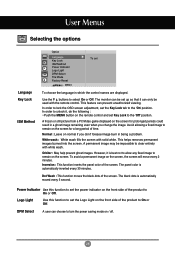
... or still picture from a PC/Video game displayed on the front side of the product to set up so that it can prevent unauthorized viewing. This helps removes permanent images burned into the screen. The panel color is automatically moved every 5 second. Logo Light Use this function to On ...mode on the screen, the screen will move every 2 minutes. A permanent image may be used with the remote control. This feature can only be impossible to remain on the remote control and set the Logo Light on normal if you don't foresee image burn in a ghost image remaining even...
... or still picture from a PC/Video game displayed on the front side of the product to set up so that it can prevent unauthorized viewing. This helps removes permanent images burned into the screen. The panel color is automatically moved every 5 second. Logo Light Use this function to On ...mode on the screen, the screen will move every 2 minutes. A permanent image may be used with the remote control. This feature can only be impossible to remain on the remote control and set the Logo Light on normal if you don't foresee image burn in a ghost image remaining even...
User Guide
Page 34
... function is supported by the horizontal interval, the number of image display per second. The vertical frequency or refresh rate is the times of horizontal lines displayed every second can set this function in the remote Control to the outlet. When 1 is divided by referring to... watch the product display, screen image should be tabulated as the horizontal frequency. G the power ...
... function is supported by the horizontal interval, the number of image display per second. The vertical frequency or refresh rate is the times of horizontal lines displayed every second can set this function in the remote Control to the outlet. When 1 is divided by referring to... watch the product display, screen image should be tabulated as the horizontal frequency. G the power ...
User Guide
Page 35
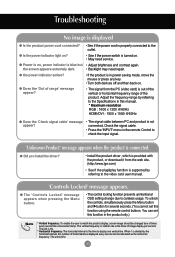
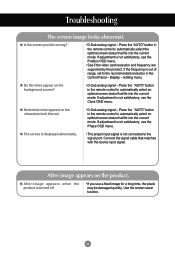
...OSD menu. • See if the video card resolution and frequency are supported by the product. Display - Press the "AUTO" button in the remote control to the recommended resolution in the remote control to the signal port. If adjustment is not satisfactory, use the Clock OSD menu. If ... signal - G The screen is displayed abnormally. • The proper input signal is out of range, set to automatically select the optimal screen status that fits into the current mode. Use the screen-saver function. 34 Press the "AUTO" button in the Control Panel - Connect the signal cable that...
...OSD menu. • See if the video card resolution and frequency are supported by the product. Display - Press the "AUTO" button in the remote control to the recommended resolution in the remote control to the signal port. If adjustment is not satisfactory, use the Clock OSD menu. If ... signal - G The screen is displayed abnormally. • The proper input signal is out of range, set to automatically select the optimal screen status that fits into the current mode. Use the screen-saver function. 34 Press the "AUTO" button in the Control Panel - Connect the signal cable that...
User Guide
Page 42
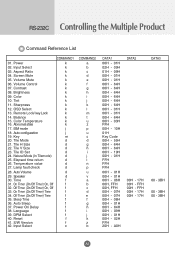
RS-232C Controlling the Multiple Product Command Reference List 01. Tint 11. Remote Lock/ key Lock 14. Key 20. Elapsed time return 26. Lamp fault check 28. Time 31. Auto Sleep 37. Power On Delay 38. DPM Select 40. S/W Version 42. Volume Control 07. Color 10. ISM mode 18. On Timer (On/Off...
RS-232C Controlling the Multiple Product Command Reference List 01. Tint 11. Remote Lock/ key Lock 14. Key 20. Elapsed time return 26. Lamp fault check 28. Time 31. Auto Sleep 37. Power On Delay 38. DPM Select 40. S/W Version 42. Volume Control 07. Color 10. ISM mode 18. On Timer (On/Off...

User Guide
Page 44
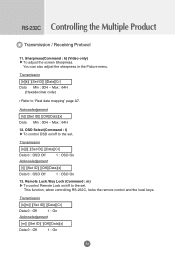
...][Cr] Acknowledgement [a][ ][Set ID][ ][OK][Data][x] Data 0 : Power Off 1 : Power On L 02. You can also select an input source using the INPUT button on the remote control. Power(Command : a) To control Power On/Off of Power On/Off. Input Select (Command : b) (Main Picture Input) To select input source for the Set...
...][Cr] Acknowledgement [a][ ][Set ID][ ][OK][Data][x] Data 0 : Power Off 1 : Power On L 02. You can also select an input source using the INPUT button on the remote control. Power(Command : a) To control Power On/Off of Power On/Off. Input Select (Command : b) (Main Picture Input) To select input source for the Set...

User Guide
Page 45
...][x] 04. L RS-232C Controlling the Multiple Product Transmission / Receiving Protocol 03. Transmission [k][d][ ][Set ID][ ][Data][Cr] Data 0 : Screen mute off (Picture on) 1 : Screen mute on remote control or in the Screen menu. Aspect Ratio(Command : c) (Main picture format) To adjust the screen format. You can also adjust the screen format using...
...][x] 04. L RS-232C Controlling the Multiple Product Transmission / Receiving Protocol 03. Transmission [k][d][ ][Set ID][ ][Data][Cr] Data 0 : Screen mute off (Picture on) 1 : Screen mute on remote control or in the Screen menu. Aspect Ratio(Command : c) (Main picture format) To adjust the screen format. You can also adjust the screen format using...
User Guide
Page 49
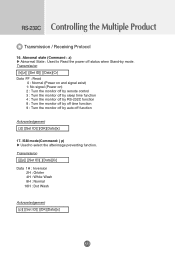
...8226; Refer to the set . Transmission [k][m][ ][Set ID][ ][Data][Cr] Data 0 : Off 1 : On Acknowledgement [m][ ][Set ID][ ][OK][Data][x] Data 0 : Off 1 : On A9 Remote Lock /Key Lock (Command : m) To control Remote Lock on /off to 'Real data mapping' page A7. This function, when controlling RS-232C, locks the... remote control and the local keys. Sharpness(Command : k) (Video only) To adjust the screen Sharpness. L Transmission [k][l][ ][Set ID][ ][Data][Cr] Data 0 : OSD Off 1...
...8226; Refer to the set . Transmission [k][m][ ][Set ID][ ][Data][Cr] Data 0 : Off 1 : On Acknowledgement [m][ ][Set ID][ ][OK][Data][x] Data 0 : Off 1 : On A9 Remote Lock /Key Lock (Command : m) To control Remote Lock on /off to 'Real data mapping' page A7. This function, when controlling RS-232C, locks the... remote control and the local keys. Sharpness(Command : k) (Video only) To adjust the screen Sharpness. L Transmission [k][l][ ][Set ID][ ][Data][Cr] Data 0 : OSD Off 1...
User Guide
Page 51
... preventing function. Transmission [k][z][ ][Set ID][ ][Data][Cr] Data FF : Read 0 : Normal (Power on and signal exist) 1: No signal (Power on) 2 : Turn the monitor off by remote control 3 : Turn the monitor off by sleep time function 4 : Turn the monitor off by RS-232C function 8 : Turn the monitor off by off time function...
... preventing function. Transmission [k][z][ ][Set ID][ ][Data][Cr] Data FF : Read 0 : Normal (Power on and signal exist) 1: No signal (Power on) 2 : Turn the monitor off by remote control 3 : Turn the monitor off by sleep time function 4 : Turn the monitor off by RS-232C function 8 : Turn the monitor off by off time function...
User Guide
Page 52
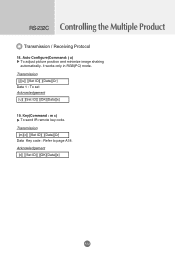
Acknowledgement [c][ ][Set ID][ ][OK][Data][x] A12 Key(Command : m c) To send IR remote key code. Transmission [j][u][ ][Set ID][ ][Data][Cr] Data 1 : To set Acknowledgement [u][ ][Set ID][ ][OK][Data][x] 19. L L RS-232C Controlling the Multiple Product Transmission / Receiving Protocol 18. Transmission [m][c][ ][Set ID][ ][Data][Cr] Data Key code : Refer to page A18. Auto Configure(Command: j u) To adjust picture position and minimize image shaking automatically. it works only in RGB(PC) mode.
Acknowledgement [c][ ][Set ID][ ][OK][Data][x] A12 Key(Command : m c) To send IR remote key code. Transmission [j][u][ ][Set ID][ ][Data][Cr] Data 1 : To set Acknowledgement [u][ ][Set ID][ ][OK][Data][x] 19. L L RS-232C Controlling the Multiple Product Transmission / Receiving Protocol 18. Transmission [m][c][ ][Set ID][ ][Data][Cr] Data Key code : Refer to page A18. Auto Configure(Command: j u) To adjust picture position and minimize image shaking automatically. it works only in RGB(PC) mode.
User Guide
Page 66
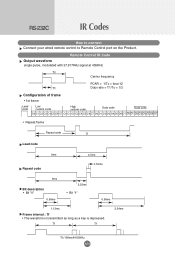
Remote Control IR Code Output waveform single pulse, modulated with 37.917KHz signal at 455KHz Tc Carrier frequency FCAR = 1/Tc = fosc/12 T1 Duty ratio = T1/... is transmitted as long as a key is depressed. Tf Tf 2.24ms L L L L Tf=108ms@455KHz A26 RS-232C IR Codes L L L How to connect Connect your wired remote control to Remote Control port on the Product.
Remote Control IR Code Output waveform single pulse, modulated with 37.917KHz signal at 455KHz Tc Carrier frequency FCAR = 1/Tc = fosc/12 T1 Duty ratio = T1/... is transmitted as long as a key is depressed. Tf Tf 2.24ms L L L L Tf=108ms@455KHz A26 RS-232C IR Codes L L L How to connect Connect your wired remote control to Remote Control port on the Product.


