
Owners Manual
Page 2
.../M2780D....... 8 M2380DF/M2780DF 9 DETACHING THE STAND BODY (Only M2080D/ M2280D/M2380D/M2780D 10 WALL MOUNT: HORIZONTAL INSTALLATION.11 SWIVEL STAND(Only M2780D / M2780DF)....12 DESKTOP PEDESTAL INSTALLATION 12 POSITIONING YOUR DISPLAY 13 LOCATION 13 KENSINGTON SECURITY SYSTEM 14 REMOTE CONTROL KEY FUNCTIONS 33 TURNING ON THE TV 35 CHANNEL SELECTION 35 VOLUME ADJUSTMENT...
.../M2780D....... 8 M2380DF/M2780DF 9 DETACHING THE STAND BODY (Only M2080D/ M2280D/M2380D/M2780D 10 WALL MOUNT: HORIZONTAL INSTALLATION.11 SWIVEL STAND(Only M2780D / M2780DF)....12 DESKTOP PEDESTAL INSTALLATION 12 POSITIONING YOUR DISPLAY 13 LOCATION 13 KENSINGTON SECURITY SYSTEM 14 REMOTE CONTROL KEY FUNCTIONS 33 TURNING ON THE TV 35 CHANNEL SELECTION 35 VOLUME ADJUSTMENT...

Owners Manual
Page 4
M2080D / M2280D M2380D / M2780D M2380DF / M2780DF PREPARATION 1 1 2 3 45 6 7 89 1 IR RECEIVER (remote control signal receiver) 2 SPEAKER (WOOFER) 3 INPUT BUTTON 4 MENU BUTTON 5 ENTER BUTTON 6 VOLUME BUTTON 7 CHANNEL BUTTON 8 POWER BUTTON 9 POWER INDICATOR Illuminates blue when the set . Note: You can adjust the power indicator in the OPTION menu. 4 PREPARATION FRONT PANEL INFORMATION ■■ This is switched on. The image shown may be somewhat different from your Monitor set is a simplified representation of the front panel.
M2080D / M2280D M2380D / M2780D M2380DF / M2780DF PREPARATION 1 1 2 3 45 6 7 89 1 IR RECEIVER (remote control signal receiver) 2 SPEAKER (WOOFER) 3 INPUT BUTTON 4 MENU BUTTON 5 ENTER BUTTON 6 VOLUME BUTTON 7 CHANNEL BUTTON 8 POWER BUTTON 9 POWER INDICATOR Illuminates blue when the set . Note: You can adjust the power indicator in the OPTION menu. 4 PREPARATION FRONT PANEL INFORMATION ■■ This is switched on. The image shown may be somewhat different from your Monitor set is a simplified representation of the front panel.

Owners Manual
Page 16
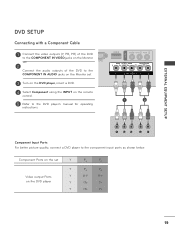
... Monitor set. 2 Connect the audio output of the digital set-top box to the COMPONENT IN AUDIO jacks on the Monitor set. 3 Turn on the remote control. 1 2 ►►HDMI Audio Supported formats: Dolby Digital, PCM DTS Audio format is not supported. Signal 480i / 576i 480p / 576p 720p / 1080i 1080p Component HDMI...
... Monitor set. 2 Connect the audio output of the digital set-top box to the COMPONENT IN AUDIO jacks on the Monitor set. 3 Turn on the remote control. 1 2 ►►HDMI Audio Supported formats: Dolby Digital, PCM DTS Audio format is not supported. Signal 480i / 576i 480p / 576p 720p / 1080i 1080p Component HDMI...

Owners Manual
Page 17
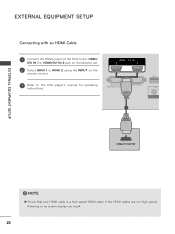
EXTERNAL EQUIPMENT SETUP Connecting a Set-top Box with an HDMI Cable 1 Connect the digital set-top box to the HDMI/DVI IN 1 or HDMI/DVI IN 2 jack on the Monitor set. 2 Turn on the digital set-top box. (Refer to the owner's manual for the digital set-top box.) 3 Select HDMI 1 or HDMI 2 input source using the INPUT button on the remote control. 1 ! If the HDMI cables are not high speed, flickering or no screen display can result. 17 NOTE ►►Check that your HDMI cable is a high speed HDMI cable.
EXTERNAL EQUIPMENT SETUP Connecting a Set-top Box with an HDMI Cable 1 Connect the digital set-top box to the HDMI/DVI IN 1 or HDMI/DVI IN 2 jack on the Monitor set. 2 Turn on the digital set-top box. (Refer to the owner's manual for the digital set-top box.) 3 Select HDMI 1 or HDMI 2 input source using the INPUT button on the remote control. 1 ! If the HDMI cables are not high speed, flickering or no screen display can result. 17 NOTE ►►Check that your HDMI cable is a high speed HDMI cable.

Owners Manual
Page 18
EXTERNAL EQUIPMENT SETUP EXTERNAL EQUIPMENT SETUP Connecting with an HDMI to DVI Cable 1 Connect the digital set-top box to the HDMI/DVI IN 1 or HDMI/DVI IN 2 jack on the Monitor set. 2 Connect the audio output of the digital set-top box to the AUDIO IN (RGB/DVI) jack on the Monitor set. 3 Turn on the digital set-top box. (Refer to the owner's manual for the digital set-top box.) 4 Select HDMI 1 or HDMI 2 using the INPUT on the remote control. 1 2 18
EXTERNAL EQUIPMENT SETUP EXTERNAL EQUIPMENT SETUP Connecting with an HDMI to DVI Cable 1 Connect the digital set-top box to the HDMI/DVI IN 1 or HDMI/DVI IN 2 jack on the Monitor set. 2 Connect the audio output of the digital set-top box to the AUDIO IN (RGB/DVI) jack on the Monitor set. 3 Turn on the digital set-top box. (Refer to the owner's manual for the digital set-top box.) 4 Select HDMI 1 or HDMI 2 using the INPUT on the remote control. 1 2 18
Owners Manual
Page 19
... set. 2 Connect the audio outputs of the DVD to the COMPONENT IN AUDIO jacks on the Monitor set Y PB PR Video output Ports on the remote control. 5 Refer to the DVD player's manual for operating instructions. 1 2 Component Input Ports For better picture quality, connect a DVD player to the component input ports as...
... set. 2 Connect the audio outputs of the DVD to the COMPONENT IN AUDIO jacks on the Monitor set Y PB PR Video output Ports on the remote control. 5 Refer to the DVD player's manual for operating instructions. 1 2 Component Input Ports For better picture quality, connect a DVD player to the component input ports as...
Owners Manual
Page 20
EXTERNAL EQUIPMENT SETUP EXTERNAL EQUIPMENT SETUP Connecting with an HDMI Cable 1 Connect the HDMI output of the DVD to the HDMI/ DVI IN 1 or HDMI/DVI IN 2 jack on the Monitor set. 2 Select HDMI 1 or HDMI 2 using the INPUT on the remote control. 3 Refer to the DVD player's manual for operating instructions. 1 ! If the HDMI cables are not high speed, flickering or no screen display can result. 20 NOTE ►►Check that your HDMI cable is a high speed HDMI cable.
EXTERNAL EQUIPMENT SETUP EXTERNAL EQUIPMENT SETUP Connecting with an HDMI Cable 1 Connect the HDMI output of the DVD to the HDMI/ DVI IN 1 or HDMI/DVI IN 2 jack on the Monitor set. 2 Select HDMI 1 or HDMI 2 using the INPUT on the remote control. 3 Refer to the DVD player's manual for operating instructions. 1 ! If the HDMI cables are not high speed, flickering or no screen display can result. 20 NOTE ►►Check that your HDMI cable is a high speed HDMI cable.

Owners Manual
Page 22
NOTE ►►If you have a mono VCR, connect the audio cable from the VCR to the VCR owner's manual.) 3 Select AV input source using INPUT on the remote control. ! EXTERNAL EQUIPMENT SETUP EXTERNAL EQUIPMENT SETUP Connecting with an RCA Cable 1 Connect the AUDIO/VIDEO jacks between set . 22 Match the jack colors (Video = yellow, Audio Left = white, and Audio Right = red) 2 Insert a video tape into the VCR and press PLAY. (Refer to the AUDIO L/MONO jack of the set and VCR.
NOTE ►►If you have a mono VCR, connect the audio cable from the VCR to the VCR owner's manual.) 3 Select AV input source using INPUT on the remote control. ! EXTERNAL EQUIPMENT SETUP EXTERNAL EQUIPMENT SETUP Connecting with an RCA Cable 1 Connect the AUDIO/VIDEO jacks between set . 22 Match the jack colors (Video = yellow, Audio Left = white, and Audio Right = red) 2 Insert a video tape into the VCR and press PLAY. (Refer to the AUDIO L/MONO jack of the set and VCR.

Owners Manual
Page 26
Camcorder Video game set and external equipment. Refer to external equipment operating guide. Match the jack colors. (Video = yellow, Audio Left = white, and Audio Right = red) 2 Select AV input source with using INPUT on the remote control. 3 Operate the corresponding external equipment. EXTERNAL EQUIPMENT SETUP EXTERNAL EQUIPMENT SETUP OTHER A/V SOURCE SETUP 1 Connect the AUDIO/VIDEO jacks between set 1 26
Camcorder Video game set and external equipment. Refer to external equipment operating guide. Match the jack colors. (Video = yellow, Audio Left = white, and Audio Right = red) 2 Select AV input source with using INPUT on the remote control. 3 Operate the corresponding external equipment. EXTERNAL EQUIPMENT SETUP EXTERNAL EQUIPMENT SETUP OTHER A/V SOURCE SETUP 1 Connect the AUDIO/VIDEO jacks between set 1 26

Owners Manual
Page 27
... it by turning the screws clockwise. 27 The set . NOTE ►►Connect the signal input cable and tighten it at the remote control sensor on the set. Connecting with a D-sub 15-pin Cable 1 Connect the signal cable from the monitor output socket of the PERSONAL COMPUTER to the ...
... it by turning the screws clockwise. 27 The set . NOTE ►►Connect the signal input cable and tighten it at the remote control sensor on the set. Connecting with a D-sub 15-pin Cable 1 Connect the signal cable from the monitor output socket of the PERSONAL COMPUTER to the ...

Owners Manual
Page 28
EXTERNAL EQUIPMENT SETUP ! EXTERNAL EQUIPMENT SETUP Connecting with an HDMI to DVI Cable 1 Connect the DVI output of the PC to the HDMI/DVI IN1 or HDMI/DVI IN2 jack on the Monitor set. 2 Connect the PC audio output to the AUDIO IN (RGB/DVI) jack on the Monitor set. 3 Turn on the PC and the set the input label to use HDMI-PC mode, you must set . 1 2 4 Select HDMI 1 or HDMI 2 input source using the INPUT on the remote control. NOTE ►►If you want to PC mode. ►►Connect the signal input cable and tighten it by turning the screws clockwise. 28
EXTERNAL EQUIPMENT SETUP ! EXTERNAL EQUIPMENT SETUP Connecting with an HDMI to DVI Cable 1 Connect the DVI output of the PC to the HDMI/DVI IN1 or HDMI/DVI IN2 jack on the Monitor set. 2 Connect the PC audio output to the AUDIO IN (RGB/DVI) jack on the Monitor set. 3 Turn on the PC and the set the input label to use HDMI-PC mode, you must set . 1 2 4 Select HDMI 1 or HDMI 2 input source using the INPUT on the remote control. NOTE ►►If you want to PC mode. ►►Connect the signal input cable and tighten it by turning the screws clockwise. 28

Owners Manual
Page 29
NOTE ►►Check that your HDMI cable is a high speed HDMI cable. If the HDMI cables are not high speed, flickering or no screen display can result. ►►If you want to use HDMI-PC mode, you must set . 3 Select HDMI 1 or HDMI 2 input source using INPUT on the PC and the Monitor set the input label to the HDMI/ DVI IN1 or HDMI/DVI IN2 jack on the Monitor set. 2 Turn on the remote control. 1 ! EXTERNAL EQUIPMENT SETUP Connecting with an HDMI to HDMI Cable 1 Connect the HDMI output of the PC to the PC mode. 29
NOTE ►►Check that your HDMI cable is a high speed HDMI cable. If the HDMI cables are not high speed, flickering or no screen display can result. ►►If you want to use HDMI-PC mode, you must set . 3 Select HDMI 1 or HDMI 2 input source using INPUT on the PC and the Monitor set the input label to the HDMI/ DVI IN1 or HDMI/DVI IN2 jack on the Monitor set. 2 Turn on the remote control. 1 ! EXTERNAL EQUIPMENT SETUP Connecting with an HDMI to HDMI Cable 1 Connect the HDMI output of the PC to the PC mode. 29

Owners Manual
Page 33
WATCHING TV/CHANNEL CONTROL WATCHING TV/CHANNEL CONTROL REMOTE CONTROL KEY FUNCTIONS When using the remote control, aim it at the remote control sensor on the set. ꔰ(POWER) Switches the set on from standby or off to TV viewing from any menu. (► P. 38) INFO Shows the ...
WATCHING TV/CHANNEL CONTROL WATCHING TV/CHANNEL CONTROL REMOTE CONTROL KEY FUNCTIONS When using the remote control, aim it at the remote control sensor on the set. ꔰ(POWER) Switches the set on from standby or off to TV viewing from any menu. (► P. 38) INFO Shows the ...

Owners Manual
Page 35
... to be able to use its features. 1 Connect the power cord and switch the AC power control switch on the remote control. You can cancel this function by using the INPUT button on the remote control. ■■ This TV is programmed to remember which power state it will appear whenever the ...or -) to adjust the volume. 2 If you wish to , even if the power cord is unplugged once or turns off with the AC power control switch on the remote control. 2 Select the viewing source by pressing MUTE or VOL(+ or -). 35 CHANNEL SELECTION 1 Press CH ꕭ ꕮ or the NUMBER buttons to...
... to be able to use its features. 1 Connect the power cord and switch the AC power control switch on the remote control. You can cancel this function by using the INPUT button on the remote control. ■■ This TV is programmed to remember which power state it will appear whenever the ...or -) to adjust the volume. 2 If you wish to , even if the power cord is unplugged once or turns off with the AC power control switch on the remote control. 2 Select the viewing source by pressing MUTE or VOL(+ or -). 35 CHANNEL SELECTION 1 Press CH ꕭ ꕮ or the NUMBER buttons to...

Owners Manual
Page 76
... SETTINGS KEY LOCK This feature can be used to even if you turn the set to prevent unauthorized viewing by locking out the front panel controls. This TV is pressed while viewing the TV. 76 OPTIONAL SETTINGS • Press MENU or EXIT to close the menu window. • Press BACK to... is turned off, press ꔰ / l , INPUT, CH (ꕭorꕮ) on the TV or POWER, INPUT, CH (ꕭorꕮ) or NUMBER buttons on the remote control. • With the Key Lock On, the display ' Key Lock On ' appears on the screen if any button on the front panel is programmed to...
... SETTINGS KEY LOCK This feature can be used to even if you turn the set to prevent unauthorized viewing by locking out the front panel controls. This TV is pressed while viewing the TV. 76 OPTIONAL SETTINGS • Press MENU or EXIT to close the menu window. • Press BACK to... is turned off, press ꔰ / l , INPUT, CH (ꕭorꕮ) on the TV or POWER, INPUT, CH (ꕭorꕮ) or NUMBER buttons on the remote control. • With the Key Lock On, the display ' Key Lock On ' appears on the screen if any button on the front panel is programmed to...

Owners Manual
Page 95
... be slightly different. Supported photo file type: *.JPG • You can only view .JPG files from USB storage devices. The on-Screen display on the remote control. 1 34 Photo List Drive1 SGKIM001 1366x768, 125KB Up Folder Page 2/3 No Marked Up Folder SG101 04/01/2010 SG102 04/01/2010 SGKIM001 04/01...
... be slightly different. Supported photo file type: *.JPG • You can only view .JPG files from USB storage devices. The on-Screen display on the remote control. 1 34 Photo List Drive1 SGKIM001 1366x768, 125KB Up Folder Page 2/3 No Marked Up Folder SG101 04/01/2010 SG102 04/01/2010 SGKIM001 04/01...

Owners Manual
Page 99
... USB DEVICES Screen Components 1 MENU Select USB. 2 Enter Enter Select Music List. 1 Moves to play back copy-protected files. The on-screen display on the 1 remote control 34 Music List Music SGKIM003 00:00/01:34 Up Folder Page 2/3 No Marked Title Up Folder SGKIM001 SGKIM002 SGKIM003 SGKIM004 SGKIM005 Navigation Popup Menu...
... USB DEVICES Screen Components 1 MENU Select USB. 2 Enter Enter Select Music List. 1 Moves to play back copy-protected files. The on-screen display on the 1 remote control 34 Music List Music SGKIM003 00:00/01:34 Up Folder Page 2/3 No Marked Title Up Folder SGKIM001 SGKIM002 SGKIM003 SGKIM004 SGKIM005 Navigation Popup Menu...

Owners Manual
Page 103
... on the frame rate. ►►Videos with resolutions higher than 1920x1080 @ 25/30P or 1280x720 @ 50/60P may not work properly depending on the remote control 1 23 Movie List Drive1 SGKIM003 640x480, 720KB Up Folder Page 2/3 No Marked Title Up Folder GKIM001 SGKM002 SGKIM001 SGKIM001 SGKIM001 Navigation Popup Menu Page Change...
... on the frame rate. ►►Videos with resolutions higher than 1920x1080 @ 25/30P or 1280x720 @ 50/60P may not work properly depending on the remote control 1 23 Movie List Drive1 SGKIM003 640x480, 720KB Up Folder Page 2/3 No Marked Title Up Folder GKIM001 SGKM002 SGKIM001 SGKIM001 SGKIM001 Navigation Popup Menu Page Change...

Owners Manual
Page 105
... 01:30:20 MARK Mark Exit ➩ USB 640 x 480 SJS001 H.264 / AAC_HAAC 00:00:15 08:03 PM 00:02:08 Option Using the Remote Control There are various ways to normal playback. ll ■■ During playback, press Pause(II) and a still screen will be displayed. < > ■■ When using...
... 01:30:20 MARK Mark Exit ➩ USB 640 x 480 SJS001 H.264 / AAC_HAAC 00:00:15 08:03 PM 00:02:08 Option Using the Remote Control There are various ways to normal playback. ll ■■ During playback, press Pause(II) and a still screen will be displayed. < > ■■ When using...

Owners Manual
Page 109
The remote control doesn't trol directly at the set ? ■■ Check the power control settings. The problem may have been interrupted. ■■...lines or streaks in the menu. ■■ Keep a sufficient distance between the product and the remote control causing obstruction. Please check the file in your antenna direction and/or location. ■■ Test the...can cause flickers or no signal, the set turns off . work. ■■ Ensure that the correct remote operating mode is set may turn off automatically in 15 minutes. ■■ When a corrupted file is ...
The remote control doesn't trol directly at the set ? ■■ Check the power control settings. The problem may have been interrupted. ■■...lines or streaks in the menu. ■■ Keep a sufficient distance between the product and the remote control causing obstruction. Please check the file in your antenna direction and/or location. ■■ Test the...can cause flickers or no signal, the set turns off . work. ■■ Ensure that the correct remote operating mode is set may turn off automatically in 15 minutes. ■■ When a corrupted file is ...

