

Owner's Manual
Page 4
... 35 Sound Settings 36 Display Settings 40 Location Settings 46 Messaging Settings 47 Airplane Mode 50 TTY Use With your wireless Service 51 Phone Setup Options 53 Your Phone: The Basics 9 Front View of Your Phone 10 Viewing the Display Screen 13 Features of Contents Introduction i Section 1: Getting Started 1 1A. Table of Your...
... 35 Sound Settings 36 Display Settings 40 Location Settings 46 Messaging Settings 47 Airplane Mode 50 TTY Use With your wireless Service 51 Phone Setup Options 53 Your Phone: The Basics 9 Front View of Your Phone 10 Viewing the Display Screen 13 Features of Contents Introduction i Section 1: Getting Started 1 1A. Table of Your...

Owner's Manual
Page 5
... Managing Call History 79 Viewing History 80 Call History Options 81 Making a Call From Call History 82 Saving a Phone Number From Call History 82 Prepending a Phone Number From Call History 83 Deleting Call History 84 2G. 2C. Navigating Through Menus 73 Menu Navigation 74 Menu ...Structure 74 Viewing the Menus 75 2F. Setting Your Phone's Security 57 Accessing the Security Menu 58 Using Your Phone's Lock Feature 58 Restricting Your Phone 60 Using Special Numbers 61 Erasing the Contacts 62 Resetting Your...
... Managing Call History 79 Viewing History 80 Call History Options 81 Making a Call From Call History 82 Saving a Phone Number From Call History 82 Prepending a Phone Number From Call History 83 Deleting Call History 84 2G. 2C. Navigating Through Menus 73 Menu Navigation 74 Menu ...Structure 74 Viewing the Menus 75 2F. Setting Your Phone's Security 57 Accessing the Security Menu 58 Using Your Phone's Lock Feature 58 Restricting Your Phone 60 Using Special Numbers 61 Erasing the Contacts 62 Resetting Your...

Owner's Manual
Page 6
...Basics 115 Using Voicemail 116 Using SMS Text Messaging 126 Using Caller ID 129 Responding to a Contacts Entry 90 Editing a Contacts Entry's Phone Number 91 Assigning Speed Dial Numbers 92 Creating Voice Dial Tags 93 Editing a Contacts Entry 94 Selecting a Ringer Type for an Entry ... Services Applications 134 Getting Started With Data Services 135 Accessing Messaging 141 Adding a Phone Number to Call Waiting 130 Making a Three-Way Call 131 Using Call Forwarding 132 3B. Using Your Phone's Voice Services 107 Using Voice-Activated Dialing 108 Managing Voice Memos 110 Section 3:...
...Basics 115 Using Voicemail 116 Using SMS Text Messaging 126 Using Caller ID 129 Responding to a Contacts Entry 90 Editing a Contacts Entry's Phone Number 91 Assigning Speed Dial Numbers 92 Creating Voice Dial Tags 93 Editing a Contacts Entry 94 Selecting a Ringer Type for an Entry ... Services Applications 134 Getting Started With Data Services 135 Accessing Messaging 141 Adding a Phone Number to Call Waiting 130 Making a Three-Way Call 131 Using Call Forwarding 132 3B. Using Your Phone's Voice Services 107 Using Voice-Activated Dialing 108 Managing Voice Memos 110 Section 3:...

Owner's Manual
Page 7
Safety 159 Getting the Most Out of Your Reception 160 Maintaining Safe Use of and Access to Your Phone 161 Caring for the Battery 163 Using Your Phone With a Hearing Aid Device 164 Acknowledging Special Precautions and the FCC Notice . . . . .166 Owner's Record 168 Phone Guide Proprietary Notice 168 4B. Manufacturer's Warranty 169 Manufacturer's Warranty 170 Index 173 Downloading Premium Services Content 145 Exploring the Web 148 Data Services FAQs 154 Section 4: Safety and Warranty Information 157 4A.
Safety 159 Getting the Most Out of Your Reception 160 Maintaining Safe Use of and Access to Your Phone 161 Caring for the Battery 163 Using Your Phone With a Hearing Aid Device 164 Acknowledging Special Precautions and the FCC Notice . . . . .166 Owner's Record 168 Phone Guide Proprietary Notice 168 4B. Manufacturer's Warranty 169 Manufacturer's Warranty 170 Index 173 Downloading Premium Services Content 145 Exploring the Web 148 Data Services FAQs 154 Section 4: Safety and Warranty Information 157 4A.

Owner's Manual
Page 8
... in that section, and you to your wireless service and all the features of your new phone. i Introduction This Phone Guide introduces you 'll be ready to use your phone in no time. The Table of your new phone and service. It's divided into four sections: ࡗ Section 1: Getting Started ࡗ ...Service Features ࡗ Section 4: Safety and Warranty Information Throughout this guide, you'll find tips that page. You'll get the most of your phone if you 'd like to get right to a specific feature, simply locate that section in the Table of Contents and go directly to that highlight ...
... in that section, and you to your wireless service and all the features of your new phone. i Introduction This Phone Guide introduces you 'll be ready to use your phone in no time. The Table of your new phone and service. It's divided into four sections: ࡗ Section 1: Getting Started ࡗ ...Service Features ࡗ Section 4: Safety and Warranty Information Throughout this guide, you'll find tips that page. You'll get the most of your phone if you 'd like to get right to a specific feature, simply locate that section in the Table of Contents and go directly to that highlight ...

Owner's Manual
Page 12
Setting Up Service Setting Up Service In This Section ࡗ Getting Started ࡗ Setting UpYourVoicemail ࡗ Getting Help Section 1A Setting up service on your new Phone is quick and easy.This section walks you through the necessary steps to unlock your phone, set up your voicemail, establish passwords, and contact Sprint for assistance with your wireless service. Section 1A: Setting Up Service 3
Setting Up Service Setting Up Service In This Section ࡗ Getting Started ࡗ Setting UpYourVoicemail ࡗ Getting Help Section 1A Setting up service on your new Phone is quick and easy.This section walks you through the necessary steps to unlock your phone, set up your voicemail, establish passwords, and contact Sprint for assistance with your wireless service. Section 1A: Setting Up Service 3

Owner's Manual
Page 13
... or try 0000 or NATL (6285). If none of your service provider. 4 Section 1A: Setting Up Service Enter your phone, follow these work, call call your phone's display screen. Note: To select a softkey, press the softkey button directly below the softkey text that appears at the bottom left and ...bottom right of these easy steps: 1. Getting Started Unlocking Your Phone To unlock your four-digit lock code. (For security purposes, the code is not visible as you type.) Tip: If you 're viewing ...
... or try 0000 or NATL (6285). If none of your service provider. 4 Section 1A: Setting Up Service Enter your phone, follow these work, call call your phone's display screen. Note: To select a softkey, press the softkey button directly below the softkey text that appears at the bottom left and ...bottom right of these easy steps: 1. Getting Started Unlocking Your Phone To unlock your four-digit lock code. (For security purposes, the code is not visible as you type.) Tip: If you 're viewing ...
Owner's Manual
Page 14
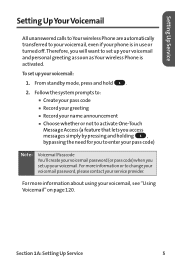
... Message Access (a feature that lets you access messages simply by pressing and holding 1 , bypassing the need for you to your voicemail, even if your phone is activated. From standby mode, press and hold 1 . 2. Setting Up Service Setting Up Your Voicemail All unanswered calls to Your wireless... Phone are automatically transferred to enter your pass code) Note: Voicemail Passcode You'll create your voicemail password (or pass code) when you set up ...
... Message Access (a feature that lets you access messages simply by pressing and holding 1 , bypassing the need for you to your voicemail, even if your phone is activated. From standby mode, press and hold 1 . 2. Setting Up Service Setting Up Your Voicemail All unanswered calls to Your wireless... Phone are automatically transferred to enter your pass code) Note: Voicemail Passcode You'll create your voicemail password (or pass code) when you set up ...

Owner's Manual
Page 18
... Basics Section 2A In This Section ࡗ FrontView ofYour Phone ࡗ Viewing the Display Screen ࡗ Features ofYour Phone ࡗ TurningYour Phone On and Off ࡗ UsingYour Phone's Battery and Charger ࡗ DisplayingYour Phone Number ࡗ Making and Answering Calls ࡗ EnteringText Your Phone is packed with features that simplify your life and expand your ability...
... Basics Section 2A In This Section ࡗ FrontView ofYour Phone ࡗ Viewing the Display Screen ࡗ Features ofYour Phone ࡗ TurningYour Phone On and Off ࡗ UsingYour Phone's Battery and Charger ࡗ DisplayingYour Phone Number ࡗ Making and Answering Calls ࡗ EnteringText Your Phone is packed with features that simplify your life and expand your ability...

Owner's Manual
Page 19
Softkey Buttons 14. Talk 13. Back (Clear) 10 10. Earpiece 15. Battery Strength Indicator 2. Headset Jack 4. Voice Services Key 11. The Basics Navigation Key 7. Accessory Jack 9. Charger Jack Section 2A: Your wireless Phone - Signal Strength Indicator 16. Microphone 8. Volume Control 5. Display Screen 3. Front View ofYour Phone 1. OK 12. End (Power) 6.
Softkey Buttons 14. Talk 13. Back (Clear) 10 10. Earpiece 15. Battery Strength Indicator 2. Headset Jack 4. Voice Services Key 11. The Basics Navigation Key 7. Accessory Jack 9. Charger Jack Section 2A: Your wireless Phone - Signal Strength Indicator 16. Microphone 8. Volume Control 5. Display Screen 3. Front View ofYour Phone 1. OK 12. End (Power) 6.
Owner's Manual
Page 20
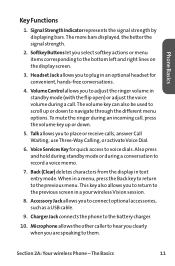
...Clear) deletes characters from the display in a menu, press the Back key to return to record a voice memo. 7. Charger Jack connects the phone to plug in an optional headset for convenient, hands-free conversations. 4. Microphone allows the other caller to hear you clearly when you to them. ...Voice Dial. 6. Accessory Jack allows you to return to the bottom left and right lines on the display screen. 3. Section 2A: Your wireless Phone - Voice Services Keyfor quick access to connect optional accessories, such as a USB cable. 9. This key also allows you to voice dials. Also ...
...Clear) deletes characters from the display in a menu, press the Back key to return to record a voice memo. 7. Charger Jack connects the phone to plug in an optional headset for convenient, hands-free conversations. 4. Microphone allows the other caller to hear you clearly when you to them. ...Voice Dial. 6. Accessory Jack allows you to return to the bottom left and right lines on the display screen. 3. Section 2A: Your wireless Phone - Voice Services Keyfor quick access to connect optional accessories, such as a USB cable. 9. This key also allows you to voice dials. Also ...

Owner's Manual
Page 21
.... When all the information needed to enter silent mode and mute the ringer. 13. Press and hold this key for two seconds to turn your phone, such as a shortcut key from standby mode. Ⅲ Press Up to access Messaging. Ⅲ Press Down to access Downloads. Ⅲ Press ... completely discharged or empty. 16. Battery Strength Indicator represents the amount of remaining battery charge currently available in the main menu, it returns the phone to view your Scheduler or your input. Navigation Key scrolls through a menu. 14. When you hear the caller and automated prompts. 12 Section...
.... When all the information needed to enter silent mode and mute the ringer. 13. Press and hold this key for two seconds to turn your phone, such as a shortcut key from standby mode. Ⅲ Press Up to access Messaging. Ⅲ Press Down to access Downloads. Ⅲ Press ... completely discharged or empty. 16. Battery Strength Indicator represents the amount of remaining battery charge currently available in the main menu, it returns the phone to view your Scheduler or your input. Navigation Key scrolls through a menu. 14. When you hear the caller and automated prompts. 12 Section...

Owner's Manual
Page 22
... is dormant (no data is using SSL (Secure Sockets Layer) protocol for client/server communication. indicates your phone's location feature is being sent or received). Section 2A: Your wireless Phone - tells you a call your voicemail box.) indicates you have new text and voice messages. indicates you ... feature is in progress. indicates Your wireless Vision connection is active (data is on your phone's display screen: Tip: To view a list of information about your phone's status and options.This list identifies the symbols you'll see on . The Basics 13 indicates you have new ...
... is dormant (no data is using SSL (Secure Sockets Layer) protocol for client/server communication. indicates your phone's location feature is being sent or received). Section 2A: Your wireless Phone - tells you a call your voicemail box.) indicates you have new text and voice messages. indicates you ... feature is in progress. indicates Your wireless Vision connection is active (data is on your phone's display screen: Tip: To view a list of information about your phone's status and options.This list identifies the symbols you'll see on . The Basics 13 indicates you have new ...

Owner's Manual
Page 23
... and service options. indicates missed calls number. indicates speaker is activated. Downloads indicates an item has been downloaded to access your phone. The VI-125 by letting you know when you're off the Nationwide your wireless Network and whether you manage your roaming charges ...by LG is set . The Basics indicates your phone is full). indicates battery charge level (icon shown is not currently able to your wireless Vision service features. indicates ...
... and service options. indicates missed calls number. indicates speaker is activated. Downloads indicates an item has been downloaded to access your phone. The VI-125 by letting you know when you're off the Nationwide your wireless Network and whether you manage your roaming charges ...by LG is set . The Basics indicates your phone is full). indicates battery charge level (icon shown is not currently able to your wireless Vision service features. indicates ...

Owner's Manual
Page 24
...equipped with a Location feature for use in the future (page 50). ⅷ Your phone's external LCD display allows you to monitor the phone's status and to make Your wireless Phone as unique as you dial phone numbers with up to five phone numbers per letter (see page 29). Additional charges may be downloaded to see... who's calling without opening the phone. ⅷ T9 Text Input lets you quickly type messages with one key press per entry (page 85). ⅷ The built-in Calendar offers several ...
...equipped with a Location feature for use in the future (page 50). ⅷ Your phone's external LCD display allows you to monitor the phone's status and to make Your wireless Phone as unique as you dial phone numbers with up to five phone numbers per letter (see page 29). Additional charges may be downloaded to see... who's calling without opening the phone. ⅷ T9 Text Input lets you quickly type messages with one key press per entry (page 85). ⅷ The built-in Calendar offers several ...

Owner's Manual
Page 25
... for your wireless Service by pressing any key (when your phone is automatically activated. When a signal is found, your phone is unable to begin making and receiving calls. In Power Save mode, your phone searches for a signal periodically without your phone is off : ᮣ Press and hold END for approximately... two seconds. At this point, you are in an area where there is charging). 16 Section 2A: Your wireless Phone - Tip: The Power Save feature helps to conserve your battery power when you see the powering down animation on : ᮣ Press and ...
... for your wireless Service by pressing any key (when your phone is automatically activated. When a signal is found, your phone is unable to begin making and receiving calls. In Power Save mode, your phone searches for a signal periodically without your phone is off : ᮣ Press and hold END for approximately... two seconds. At this point, you are in an area where there is charging). 16 Section 2A: Your wireless Phone - Tip: The Power Save feature helps to conserve your battery power when you see the powering down animation on : ᮣ Press and ...
Owner's Manual
Page 26
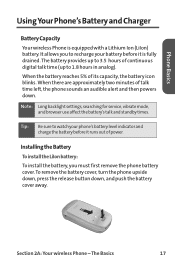
Installing the Battery To install the LiIon battery: To install the battery, you to recharge your phone's battery level indicator and charge the battery before it runs out of continuous digital talk time (up to watch your battery before it is equipped .... When there are approximately two minutes of its capacity, the battery icon blinks. The Basics 17 When the battery reaches 5% of talk time left, the phone sounds an audible alert and then powers down , and push the battery cover away. To remove the battery cover, turn the...
Installing the Battery To install the LiIon battery: To install the battery, you to recharge your phone's battery level indicator and charge the battery before it runs out of continuous digital talk time (up to watch your battery before it is equipped .... When there are approximately two minutes of its capacity, the battery icon blinks. The Basics 17 When the battery reaches 5% of talk time left, the phone sounds an audible alert and then powers down , and push the battery cover away. To remove the battery cover, turn the...

Owner's Manual
Page 27
...metal contacts must be charged as soon as possible so you don't lose any stored numbers or messages. 2. The Basics Charging the Battery Your wireless Phone's LiIon battery is off so that you can begin using your battery: 1. Press down , and push the battery cover away. 3. 1. Insert the... battery (label side facing up) into place. To remove the battery cover, turn the phone upside down, press the release button down on the upper end of the battery with and touching the metal prongs.) 2. Removing the Battery To remove...
...metal contacts must be charged as soon as possible so you don't lose any stored numbers or messages. 2. The Basics Charging the Battery Your wireless Phone's LiIon battery is off so that you can begin using your battery: 1. Press down , and push the battery cover away. 3. 1. Insert the... battery (label side facing up) into place. To remove the battery cover, turn the phone upside down, press the release button down on the upper end of the battery with and touching the metal prongs.) 2. Removing the Battery To remove...

Owner's Manual
Page 28
... outlet. Ⅲ A red indicator light on . Section 2A: Your wireless Phone - The Basics 19 Warning! Phone Basics Keeping track of your phone's display screen. With the approved LiIon battery, you were just working on the phone lets you know the battery is charging. Ⅲ A green indicator light lets... travel charger, or vehicle power adapter to fully recharge a completely rundown battery. If your battery level becomes too low, your phone and void the warranty. It takes approximately 3 hours to charge your battery's charge is getting too low, the battery icon blinks and ...
... outlet. Ⅲ A red indicator light on . Section 2A: Your wireless Phone - The Basics 19 Warning! Phone Basics Keeping track of your phone's display screen. With the approved LiIon battery, you were just working on the phone lets you know the battery is charging. Ⅲ A green indicator light lets... travel charger, or vehicle power adapter to fully recharge a completely rundown battery. If your battery level becomes too low, your phone and void the warranty. It takes approximately 3 hours to charge your battery's charge is getting too low, the battery icon blinks and ...
Owner's Manual
Page 29
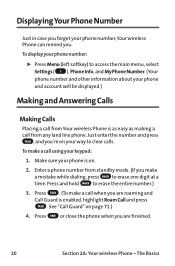
...mode. (If you make a mistake while dialing, press BACK to access the main menu, select Settings ( 7 ), Phone Info, and My Phone Number. (Your phone number and other information about your phone is enabled, highlight Roam Call and press TALK . Press TALK . (To make a call when you are finished.... 20 Section 2A: Your wireless Phone - Displaying Your Phone Number Just in case you forget your keypad: 1. Press and hold BACK to clear calls. To make a call using your phone number, Your wireless Phone can remind you 're on page 71.) 4. Just enter the...
...mode. (If you make a mistake while dialing, press BACK to access the main menu, select Settings ( 7 ), Phone Info, and My Phone Number. (Your phone number and other information about your phone is enabled, highlight Roam Call and press TALK . Press TALK . (To make a call when you are finished.... 20 Section 2A: Your wireless Phone - Displaying Your Phone Number Just in case you forget your keypad: 1. Press and hold BACK to clear calls. To make a call using your phone number, Your wireless Phone can remind you 're on page 71.) 4. Just enter the...


